Criar, usar e gerenciar um classificador de documentos personalizado
Use o classificador personalizado para classificar documentos. Crie do zero com seus próprios documentos e classes personalizadas. O aspecto de IA generativa permite o aprendizado few-shot e o ajuste detalhado. Isso melhora a acurácia com menos amostras e correções com a identificação automática iterativa.
O classificador personalizado abrange esses três casos de uso gerais.
- Modelo pré-treinado:use o modelo de fundação de IA generativa pré-treinado para classificar rapidamente documentos com os rótulos fornecidos.
- Ajuste refinado: melhore a acurácia treinando o modelo de fundação de IA generativa com seus próprios dados e rótulos.
- Treinar um modelo personalizado: treine um extrator personalizado de IA não generativa usando seus próprios dados e rótulos.
Versões do modelo de classificador personalizado
| Versão do modelo | Descrição | Canal de lançamento | Processamento de ML nos EUA/UE | Ajuste de detalhes nos EUA/UE | Data de lançamento |
|---|---|---|---|---|---|
pretrained-foundation-model-v1.4-2025-05-16 |
Candidato a lançamento com tecnologia do LLM Gemini 2.0 Flash. Também inclui recursos avançados de OCR. | Versão candidata a lançamento | Sim | EUA, UE (pré-lançamento) | 16 de maio de 2025 |
pretrained-classifier-v1.5-2025-08-05 |
Candidato a lançamento com tecnologia do LLM Gemini 2.5 Flash. Também inclui recursos avançados de OCR. | Versão candidata a lançamento | Sim | EUA, UE (pré-lançamento) | 5 de agosto de 2025 |
As pontuações de confiança não são compatíveis com modelos de classificação personalizados.
Criar um classificador personalizado no console Google Cloud
Você pode criar classificadores personalizados que são especificamente adequados para seus documentos, além de serem treinados e avaliados com seus dados. Este processador identifica classes de documentos de um conjunto de classes definido pelo usuário. Você pode usar o processador treinado em outros documentos. Normalmente, você usa um classificador personalizado em documentos de diferentes tipos e usa a identificação para enviar os documentos a um processador de extração para extrair as entidades.
Para saber o processo geral de criação e uso de um processador, consulte a seção Como fazer.
É possível fazer suas próprias escolhas de configuração que sejam adequadas ao seu fluxo de trabalho.
Para seguir as instruções detalhadas desta tarefa diretamente no console do Google Cloud , clique em Orientação:
Antes de começar
- Sign in to your Google Cloud account. If you're new to Google Cloud, create an account to evaluate how our products perform in real-world scenarios. New customers also get $300 in free credits to run, test, and deploy workloads.
-
In the Google Cloud console, on the project selector page, select or create a Google Cloud project.
-
Verify that billing is enabled for your Google Cloud project.
-
Enable the Document AI, Cloud Storage APIs.
-
In the Google Cloud console, on the project selector page, select or create a Google Cloud project.
-
Verify that billing is enabled for your Google Cloud project.
-
Enable the Document AI, Cloud Storage APIs.
Acesse o Workbench
No classificador de documentos personalizado, selecione
Criar processador .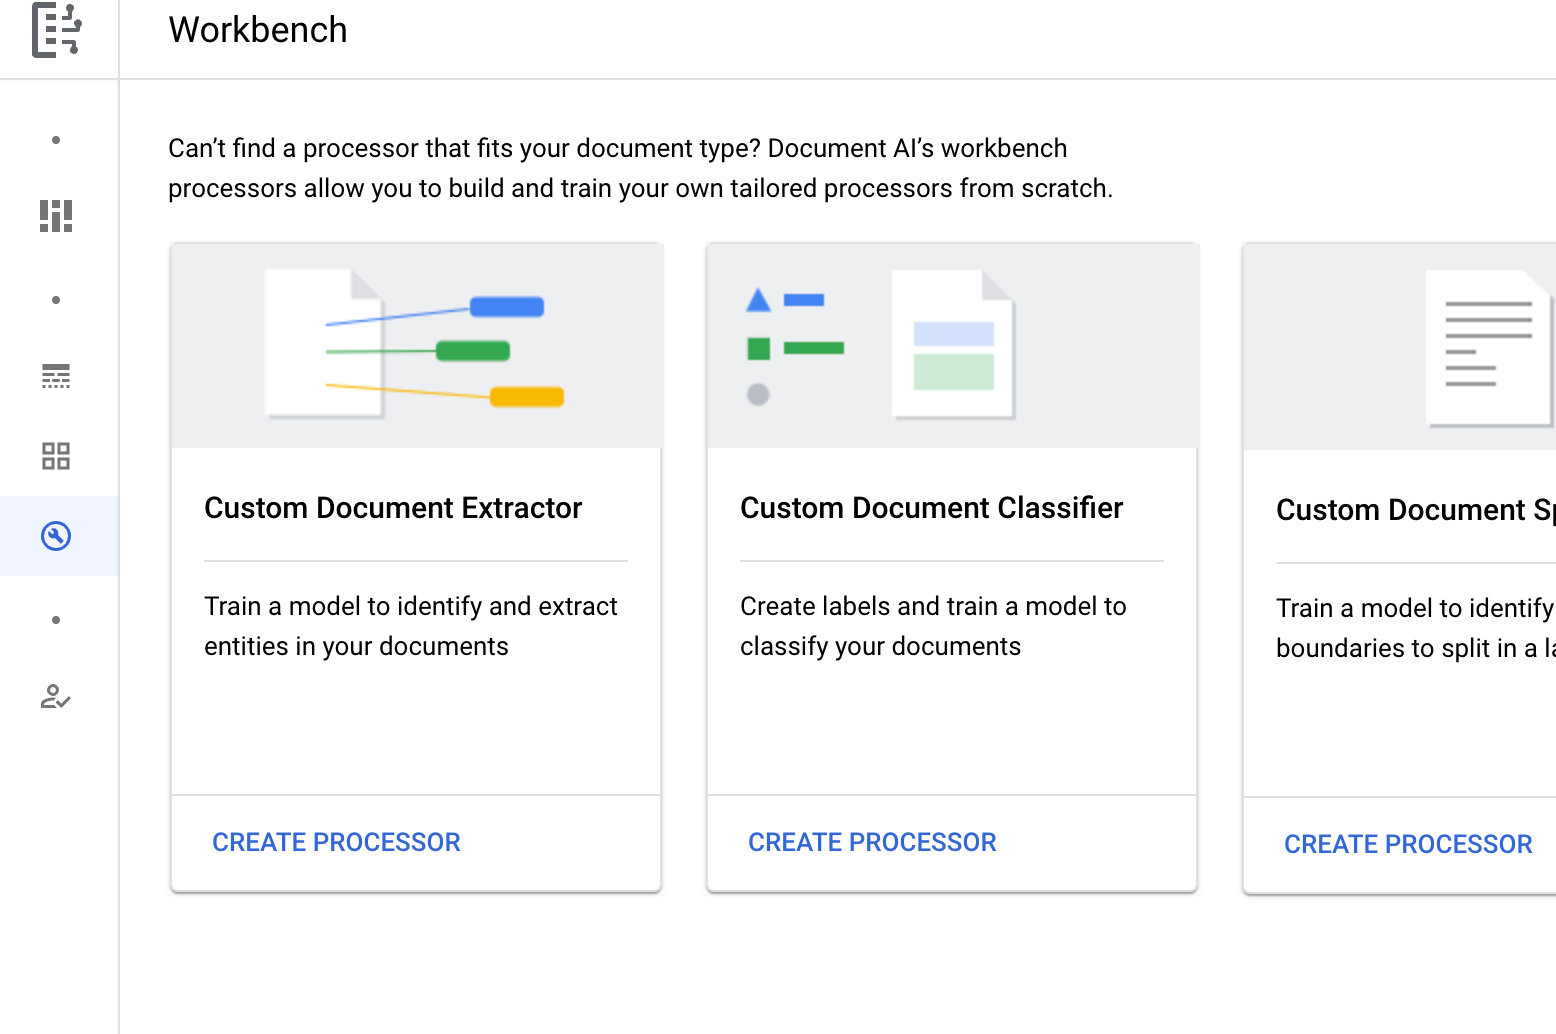
No menu Criar processador, insira um nome para o processador, como
my-custom-document-classifier.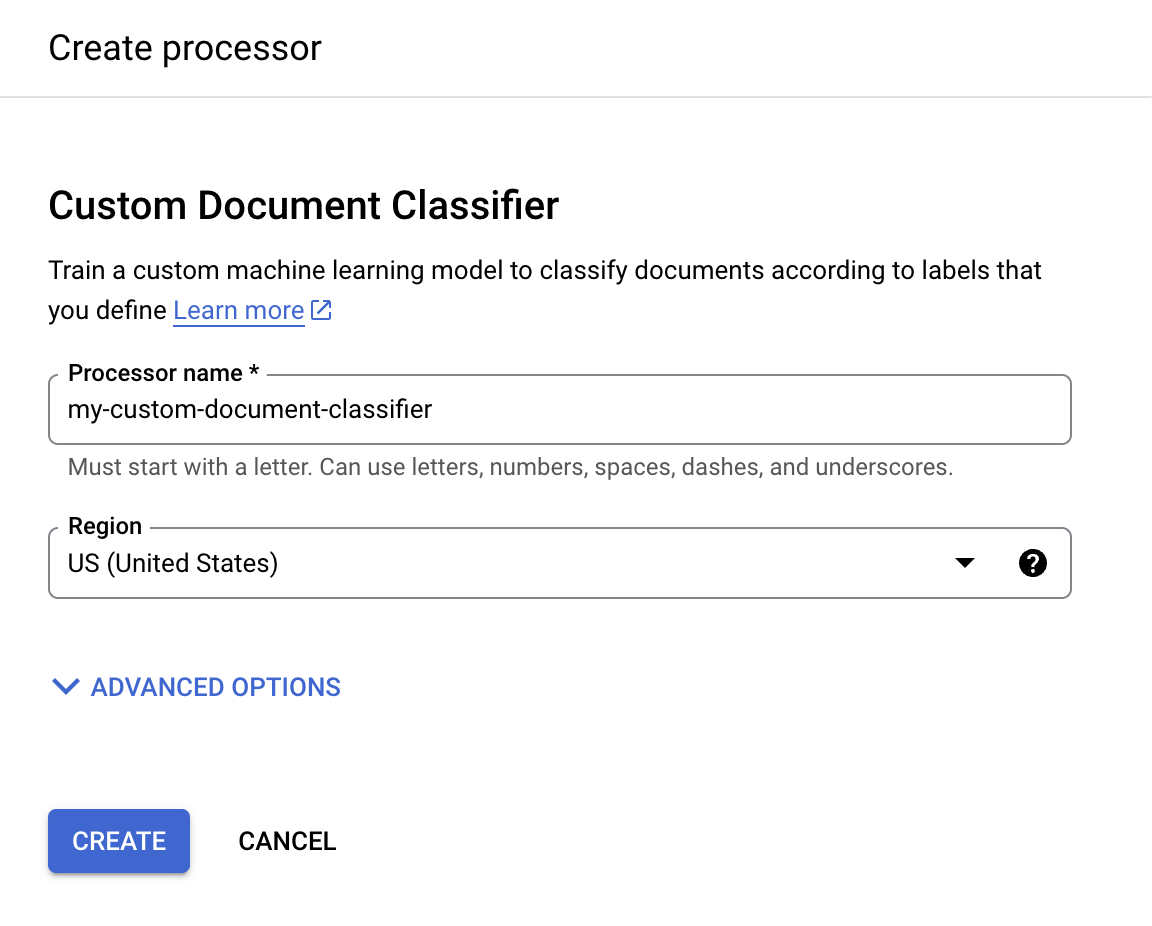
Selecione a região mais próxima de você.
Selecione Criar. A guia Detalhes do processador é exibida.
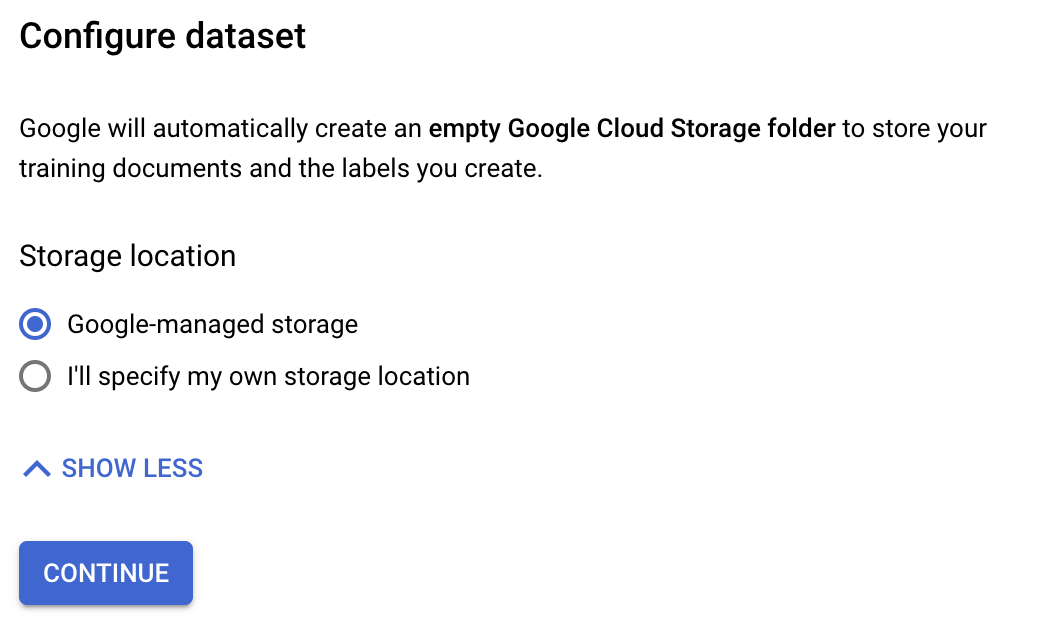
- Selecionar Armazenamento gerenciado pelo Google caso queira usar o Cloud Storage.
- Selecione Vou especificar meu próprio local de armazenamento se você quiser usar seu próprio armazenamento para utilizar chaves de criptografia gerenciadas pelo cliente (CMEK) e siga o procedimento em Criar um conjunto de dados.
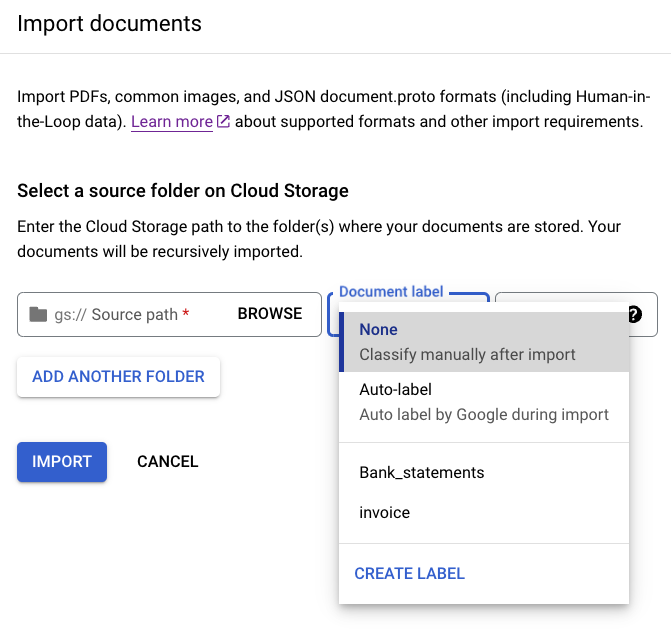
Na guia Build, selecione
Importar documentos .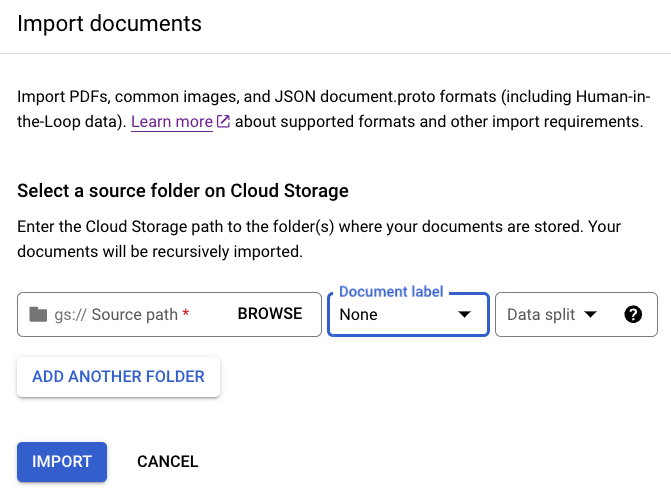
Ao escolher usar um bucket de armazenamento, insira o Caminho de origem do bucket. Para este exemplo de treinamento, digite o nome do bucket em
Caminho de origem Este link direciona para um documento.cloud-samples-data/documentai/Custom/Patents/PDF/computer_vision_20.pdfEm Divisão de dados, selecione Não atribuído. O documento nesta pasta não está atribuído ao conjunto de teste ou treinamento. Deixe a opção Importar com rotulagem automática desmarcada.
Selecione Importar. A Document AI lê os documentos do bucket no conjunto de dados. Ele não modifica o bucket de importação ou faz uma leitura a partir do bucket após a conclusão da importação.
Opcional: para excluir documentos importados, na guia Build, acesse Gerenciar conjunto de dados > selecione os documentos > clique em Excluir.
Na guia Build, selecione Gerenciar conjunto de dados > Editar esquema. A página Editar esquema é aberta.
Selecione
Criar rótulo .Digite o nome do marcador.
Selecione Criar. Consulte Definir esquema de processador para instruções detalhadas sobre como criar e editar um esquema.
Crie cada um dos rótulos a seguir para o esquema do processador.
computer_visioncryptomed_techother
Selecione
Salvar quando os rótulos estiverem completos.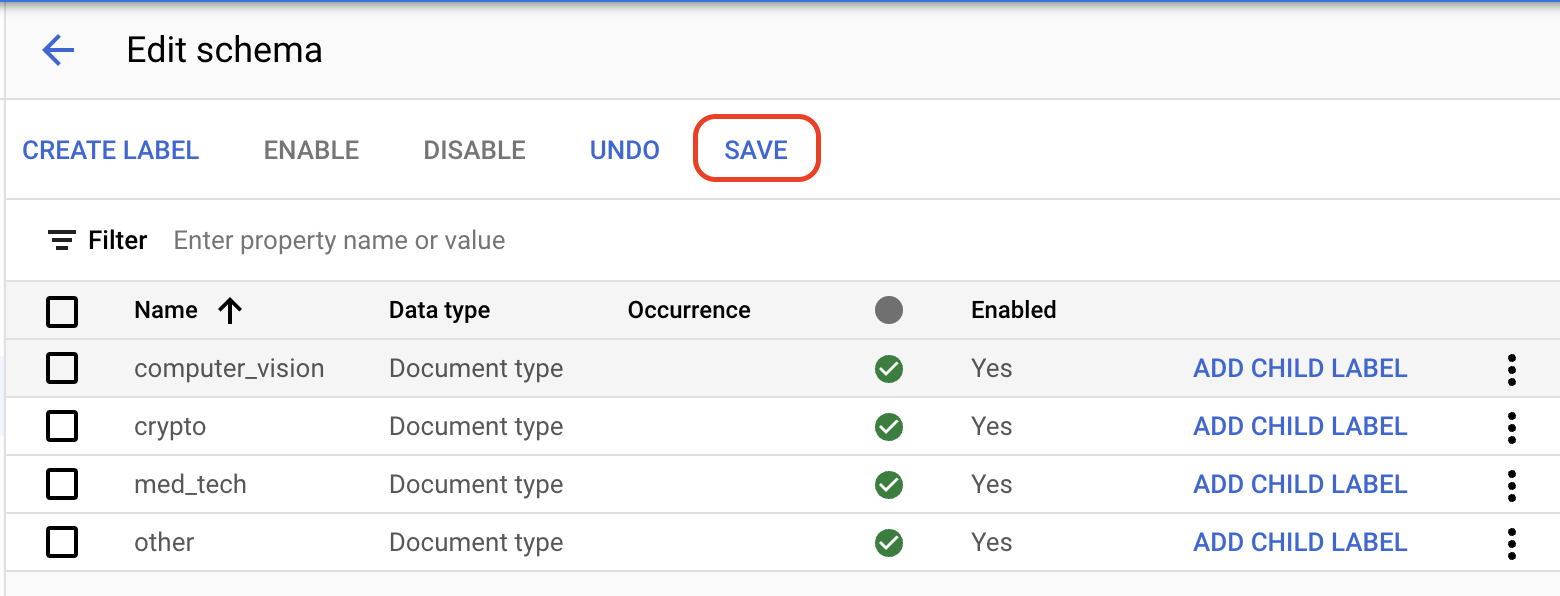
Volte para a guia Build e selecione
um documento para abrir o console Gerenciar conjunto de dados.Entre as
opções , selecione o marcador apropriado para o documento. Se você estiver usando o documento de amostra fornecido, selecionecomputer_vision.Quando rotulado, o documento deve ficar assim:

Selecione
Marcar como rotulado quando terminar de anotar o documento.Na guia Gerenciar conjunto de dados, o painel Documento mostra que um documento foi rotulado.
Na guia Gerenciar conjunto de dados, marque a caixa de seleção
Selecionar tudo .Na lista suspensa
Atribuir ao conjunto , selecione Treinamento.Clique em
Importar documentos .Insira o caminho a seguir em
Caminho de origem . Esse bucket contém documentos pré-marcados no formato Document JSON.cloud-samples-data/documentai/Custom/Patents/JSON/Classification-InventionTypeNa lista Divisão de dados, selecione Dividir automaticamente. Isso divide automaticamente os documentos para que tenham 80% no conjunto de treinamento e 20% no conjunto de teste. Ignore a seção Aplicar rótulos.
Selecione Importar. A implantação pode levar alguns minutos para ser concluída.
Clique em
Importar documentos .Insira o caminho a seguir em
Caminho de origem . Este bucket contém documentos sem rótulo em formato PDF.cloud-samples-data/documentai/Custom/Patents/PDF-CDC-BatchLabelNa lista Divisão de dados, selecione Dividir automaticamente. Isso divide automaticamente os documentos para que tenham 80% no conjunto de treinamento e 20% no conjunto de teste.
Na seção Aplicar marcadores, selecione Escolher marcador.
Para esses documentos de amostra, selecione
other.Selecione Importar e aguarde a conclusão do processo. Você pode sair desta página e continuar mais tarde. Quando eles forem concluídos, você vai encontrar os documentos na guia Gerenciar conjunto de dados com o rótulo aplicado.
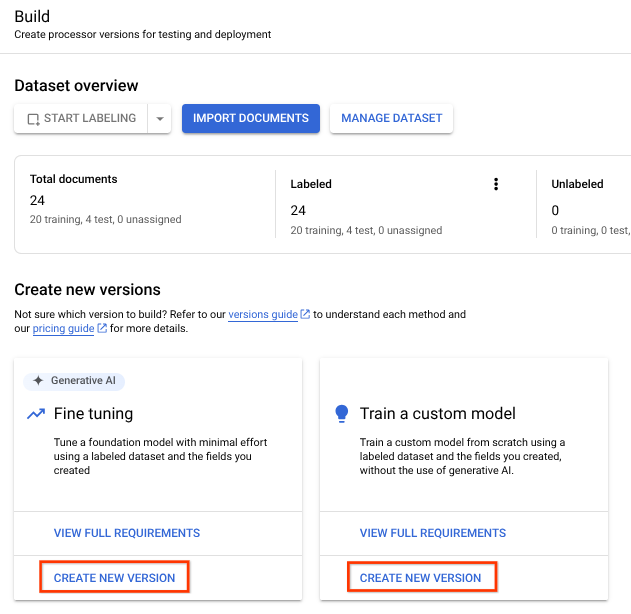
- Selecione
Treinar nova versão . No campo
Nome da versão , insira um nome para essa versão do processador, comomy-cdc-version-1.Opcional: selecione Ver estatísticas dos rótulos para encontrar informações sobre os rótulos dos documentos que podem ajudar a determinar sua cobertura. Selecione Fechar para retornar à configuração de treinamento.
Selecione
Iniciar treinamento. Confira o status no painel lateral.Após a conclusão do treinamento, navegue até a guia
Gerenciar versões . É possível ver detalhes sobre a versão que você acabou de treinar.Selecione o
ao lado da versão que você quer implantar e selecione Implantar versão. Selecione
Implantar na caixa de diálogo.A implantação leva alguns minutos para ser concluída.
Após a conclusão da implantação, navegue até a guia
Avaliar e testar .Nessa página, é possível encontrar as métricas de avaliação, incluindo a pontuação F1, precisão e recall para o documento completo e os rótulos individuais. Para mais informações sobre avaliação e estatísticas, consulte Avaliar processador.
Faça o download de um documento que não esteja envolvido em treinamentos ou testes anteriores para usá-lo na avaliação da versão do processador. Se você estiver usando seus próprios dados, use um documento reservado para essa finalidade.
Clique em
Fazer upload do documento de teste e escolha documento que você acabou de fazer download.A página Análise de classificador de documentos personalizada é aberta. A saída demonstra como o documento foi classificado.
Também é possível executar novamente a avaliação em um conjunto de teste ou versão de processador diferente.
Na página Gerenciar conjunto de dados,
Importar documentos .Copie e cole o caminho do Cloud Storage a seguir. Esse diretório contém cinco PDFs de faturas sem rótulo. Na lista suspensa Divisão de dados, clique em Treinamento.
cloud-samples-data/documentai/Custom/Patents/PDF-CDC-AutoLabelNa seção Aplicar rótulos, selecione rotulação automática.
Selecione uma versão do processador existente para rotular os documentos.
- Por exemplo:
2af620b2fd4d1fcf
- Por exemplo:
Selecione Importar e aguarde a conclusão do processo. Você pode sair desta página e continuar mais tarde. Quando terminar, os documentos vão aparecer na seção Rotulados automaticamente da página Gerenciar conjunto de dados.
Não é possível usar documentos com rótulos automáticos para treinamento ou teste sem marcá-los como rotulados. Acesse a seção
Rotulados automaticamente para conferir os documentos rotulados automaticamente.Selecione o primeiro documento para acessar o console de rotulagem.
Verifique se o rótulo está correto. Ajuste se ele estiver incorreto.
Selecione
Marcar como rotulado quando terminar.Repita a verificação de cada documento com rótulo automático e volte à página Gerenciar conjunto de dados para atribuir os dados ao treinamento.
No menu de navegação do console Google Cloud , selecione Document AI e Meus processadores.
Selecione
Mais ações na mesma linha do processador que você quer excluir.Clique em Excluir processador, insira o nome do processador e selecione Excluir novamente para confirmar.
- Para mais detalhes, consulte os Guias.
- Consulte a lista de processadores.
- Separe documentos em partes legíveis com o Layout Parser.
- Use o Enterprise Document OCR para detectar e extrair texto.
Criar um processador
Siga as etapas a seguir.
Configurar conjunto de dados
Para treinar esse novo processador, você precisa criar um conjunto de dados com informações de treinamento e teste para ajudar o processador a identificar os documentos que você quer dividir e classificar. Este conjunto de dados requer um novo local. Pode ser um bucket do Cloud Storage ou uma pasta vazia, ou você pode permitir um local gerenciado internamente.
Depois que a guia Detalhes do processador aparecer, você poderá fazer o seguinte:
Importar documentos para um conjunto de dados
Em seguida, você vai importar seus documentos para seu conjunto de dados.
Quando você importa documentos, é possível atribuir os documentos ao conjunto de Treinamento ou Teste na importação ou esperar mais tarde.
Para mais informações sobre como preparar os dados para importação, consulte o guia de preparação de dados.
Definir esquema do processado
É possível criar o esquema do processador antes ou depois de importar documentos para o conjunto de dados. O esquema fornece rótulos que serão usados para anotar documentos.
Rotular um documento
O processo para selecionar texto em um documento e aplicar rótulos é conhecido como anotação.
Atribuir documentos anotados ao conjunto de treinamento
Agora que você rotulou este documento de exemplo, é possível atribuí-lo ao conjunto de treinamento.
No painel Documentos, é possível conferir que um documento foi atribuído ao conjunto de treinamento.
Importar dados pré-rotulados para os conjuntos de treinamento e teste
Neste guia, fornecemos dados pré-rotulados. Se estiver trabalhando no seu próprio projeto, é necessário determinar como rotular os dados. Consulte Opções de rotulagem.
Os processadores personalizados da Document AI exigem no mínimo um documento nos conjuntos de treinamento e teste para cada tipo de documento a ser rotulado. Recomendamos que você tenha pelo menos 10 documentos para cada rótulo para melhor desempenho. Para cinco rótulos, você precisaria de 50 documentos para treinamento e 50 para teste. Mais dados de treinamento geralmente produzem maior acurácia.
Quando a importação for concluída, você vai encontrar os documentos na guia Gerenciar conjunto de dados.
Identificar documentos em lote na importação
Depois de configurar o esquema, é possível rotular todos os documentos que estão em um diretório específico na importação para poupar tempo com a rotulagem.
Treinar o processador
Agora que você importou os dados de treinamento e teste, é possível treinar o processador. Como o treinamento pode levar várias horas, confirme se você configurou o processador com os dados e rótulos apropriados antes de começar o treinamento.
É possível treinar modelos personalizados e ajustados com seus dados rotulados. Os modelos ajustados usam IA generativa. Os modelos personalizados treinam um modelo de linguagem grande exclusivo usando seus dados rotulados. É necessário ter pelo menos dois rótulos no esquema, com 10 documentos de treinamento e 10 de teste (mínimo de 1) recomendados.
Implantar a versão do processador
Avaliar e testar o processador
Rotular automaticamente documentos recém-importados
Depois de implantar uma versão do processador treinado, use a Rotulagem automática para poupar tempo ao importar novos documentos.
Usar o processador
É possível gerenciar versões do processador treinadas e personalizadas como qualquer outra versão do processador. Para mais informações, consulte Como gerenciar versões do processador.
É possível enviar uma solicitação de processamento ao processador personalizado, e a resposta pode ser processada da mesma forma que outros processadores classificadores.
Limpar
Para evitar cobranças na conta do Google Cloud pelos recursos usados nesta página, siga as etapas abaixo.