Document AI의 일부로 Enterprise Document OCR을 사용하여 다양한 문서에서 텍스트와 레이아웃 정보를 감지하고 추출할 수 있습니다. 구성 가능한 기능을 사용하면 특정 문서 처리 요구사항을 충족하도록 시스템을 맞춤설정할 수 있습니다.
개요
엔터프라이즈 문서 OCR을 사용하여 알고리즘 또는 머신러닝을 기반으로 한 데이터 입력, 데이터 정확도 개선 및 검증과 같은 작업을 할 수 있습니다. Enterprise Document OCR을 사용하여 다음과 같은 작업을 처리할 수도 있습니다.
- 텍스트 디지털화: 검색, 규칙 기반 문서 처리 파이프라인 또는 맞춤 모델 생성을 위해 문서에서 텍스트 및 레이아웃 데이터를 추출합니다.
- 대규모 언어 모델 애플리케이션 사용: LLM의 컨텍스트 이해 및 OCR의 텍스트 및 레이아웃 추출 기능을 사용하여 질문과 답변을 자동화합니다. 데이터에서 유용한 정보를 도출하고 워크플로를 간소화하세요.
- 보관: 종이 문서를 기계가 읽을 수 있는 텍스트로 디지털화하여 문서 접근성을 개선합니다.
사용 사례에 가장 적합한 OCR 선택
| 해결책 | 제품 | 설명 | 사용 사례 |
|---|---|---|---|
| Document AI | Enterprise Document OCR | 문서 사용 사례를 위한 전문 모델입니다. 고급 기능에는 이미지 품질 점수, 언어 힌트, 회전 보정이 포함됩니다. | 문서에서 텍스트를 추출할 때 권장됩니다. 사용 사례에는 PDF, 이미지 형태의 스캔한 문서 또는 Microsoft DocX 파일이 포함됩니다. |
| Document AI | OCR 부가기능 | 특정 요구사항을 위한 프리미엄 기능 Enterprise Document OCR 버전 2.0 이상과만 호환됩니다. | 수학 공식을 감지하고 인식하거나, 글꼴 스타일 정보를 수신하거나, 체크박스 추출을 사용 설정해야 합니다. |
| Cloud Vision API | 텍스트 감지 | Google Cloud 표준 OCR 모델을 기반으로 전 세계에서 사용할 수 있는 REST API 기본 할당량은 분당 1,800개 요청입니다. | 지연 시간이 짧고 용량이 큰 일반적인 텍스트 추출 사용 사례 |
| Cloud Vision | OCR Google Distributed Cloud (지원 중단됨) | GKE Enterprise를 사용하여 GKE 클러스터에 컨테이너로 배포할 수 있는 Google Cloud Marketplace 애플리케이션입니다. | 데이터 상주 또는 규정 준수 요구사항을 충족하기 위해 |
감지 및 추출
Enterprise Document OCR은 PDF 및 이미지에서 블록, 단락, 행, 단어, 기호를 감지할 수 있으며 정확도를 높이기 위해 문서의 기울기를 보정할 수 있습니다.
지원되는 레이아웃 감지 및 추출 속성:
| 인쇄된 텍스트 | 손글씨 | 단락 | 차단 | 선 | Word | 기호 수준 | 페이지 번호 |
|---|---|---|---|---|---|---|---|
| 기본값 | 기본값 | 기본값 | 기본값 | 기본값 | 기본값 | 구성 가능 | 기본값 |
구성 가능한 Enterprise Document OCR 기능은 다음과 같습니다.
디지털 PDF에서 삽입된 텍스트 또는 기본 텍스트 추출: 이 기능은 회전된 텍스트, 극단적인 글꼴 크기 또는 스타일, 부분적으로 숨겨진 텍스트의 경우에도 소스 문서에 표시된 대로 텍스트와 기호를 정확하게 추출합니다.
회전 수정: Enterprise Document OCR을 사용하여 문서 이미지를 사전 처리하여 추출 품질이나 처리에 영향을 줄 수 있는 회전 문제를 수정합니다.
이미지 품질 점수: 문서 라우팅에 도움이 되는 품질 측정항목을 수신합니다. 이미지 품질 점수는 흐림, 일반적인 글꼴보다 작은 글꼴의 존재, 눈부심 등 8가지 측면에서 페이지 수준 품질 측정항목을 제공합니다.
페이지 범위 지정: OCR을 위해 입력 문서의 페이지 범위를 지정합니다. 이렇게 하면 불필요한 페이지에 대한 지출과 처리 시간을 절약할 수 있습니다.
언어 감지: 추출된 텍스트에 사용된 언어를 감지합니다.
언어 및 필기 힌트: 데이터 세트의 알려진 특성을 기반으로 OCR 모델에 언어 또는 필기 힌트를 제공하여 정확도를 개선합니다.
OCR 구성을 사용 설정하는 방법을 알아보려면 OCR 구성 사용 설정을 참고하세요.
OCR 부가기능
Enterprise Document OCR은 필요에 따라 개별 처리 요청에서 사용 설정할 수 있는 선택적 분석 기능을 제공합니다.
안정화 pretrained-ocr-v2.0-2023-06-02 및 pretrained-ocr-v2.1-2024-08-07 버전과 출시 후보 pretrained-ocr-v2.1.1-2025-01-31 버전에서는 다음 부가기능을 사용할 수 있습니다.
- 수학 OCR: 문서에서 LaTeX 형식의 공식을 식별하고 추출합니다.
- 체크박스 추출: Enterprise Document OCR 응답에서 체크박스를 감지하고 상태(선택됨/선택 안 됨)를 추출합니다.
- 글꼴 스타일 감지: 글꼴 유형, 글꼴 스타일, 필기, 두께, 색상 등 단어 수준 글꼴 속성을 식별합니다.
나열된 부가기능을 사용 설정하는 방법을 알아보려면 OCR 부가기능 사용 설정을 참고하세요.
지원되는 파일 형식
Enterprise Document OCR은 PDF, GIF, TIFF, JPEG, PNG, BMP, WebP 파일 형식을 지원합니다. 자세한 내용은 지원되는 파일을 참고하세요.
Enterprise Document OCR은 동기식으로 최대 15페이지, 비동기식으로 최대 30페이지의 DocX 파일도 지원합니다. DocX 지원은 비공개 프리뷰 버전입니다. 액세스를 요청하려면 DocX 지원 요청 양식을 제출하세요 .
고급 버전 관리
고급 버전 관리는 미리보기 상태입니다. 기본 AI/ML OCR 모델을 업그레이드하면 OCR 동작이 변경될 수 있습니다. 엄격한 일관성이 필요한 경우 고정된 모델 버전을 사용하여 최대 18개월 동안 동작을 기존 OCR 모델에 고정하세요. 이렇게 하면 OCR 기능 결과가 동일한 이미지가 됩니다. 프로세서 버전에 관한 표를 참고하세요.
프로세서 버전
다음 프로세서 버전은 이 기능과 호환됩니다. 자세한 내용은 프로세서 버전 관리를 참고하세요.
| 버전 ID | 출시 채널 | 설명 |
|---|---|---|
pretrained-ocr-v1.2-2022-11-10 |
정식 | 고정된 모델 버전 1.0: 최대 18개월 동안 컨테이너 이미지에 고정된 버전 스냅샷의 모델 파일, 구성, 바이너리입니다. |
pretrained-ocr-v2.0-2023-06-02 |
정식 | 문서 사용 사례에 특화된 프로덕션 지원 모델입니다. 모든 OCR 부가기능에 대한 액세스가 포함됩니다. |
pretrained-ocr-v2.1-2024-08-07 |
정식 | v2.1의 주요 개선사항은 인쇄된 텍스트 인식 개선, 체크박스 감지 정밀도 향상, 읽기 순서 정확도 향상입니다. |
pretrained-ocr-v2.1.1-2025-01-31 |
출시 후보 | v2.1.1은 v2.1과 유사하며 US, EU, asia-southeast1를 제외한 모든 리전에서 사용할 수 있습니다. |
Enterprise Document OCR을 사용하여 문서 처리
이 빠른 시작에서는 Enterprise Document OCR을 소개합니다. 사용 가능한 OCR 구성을 사용 설정 또는 사용 중지하여 워크플로의 문서 OCR 결과를 최적화하는 방법을 보여줍니다.
- Sign in to your Google Cloud account. If you're new to Google Cloud, create an account to evaluate how our products perform in real-world scenarios. New customers also get $300 in free credits to run, test, and deploy workloads.
-
In the Google Cloud console, on the project selector page, select or create a Google Cloud project.
-
Verify that billing is enabled for your Google Cloud project.
-
Enable the Document AI API.
-
In the Google Cloud console, on the project selector page, select or create a Google Cloud project.
-
Verify that billing is enabled for your Google Cloud project.
-
Enable the Document AI API.
quality/defect_blurryquality/defect_noisyquality/defect_darkquality/defect_faintquality/defect_text_too_smallquality/defect_document_cutoffquality/defect_text_cutoffquality/defect_glare- 결함이 없는 디지털 문서에서 거짓양성 감지를 반환할 수 있습니다. 이 기능은 스캔하거나 촬영한 문서에 사용하는 것이 가장 좋습니다.
글레어 결함은 로컬입니다. 이러한 요소가 전체 문서 가독성을 저해하지 않을 수도 있습니다.
- 두 번째 페이지와 다섯 번째 페이지만 처리하려면 다음을 실행합니다.
- 처음 세 페이지를 처리하려면 다음을 실행합니다.
- 마지막 4페이지만 처리하려면 다음을 실행합니다.
이미지 감지됨
LaTeX로 변환

- Vision AI API 응답은 이미지 요청의 경우
vertices만 채우고 PDF 요청의 경우normalized_vertices만 채웁니다. Document AI 응답과 변환기는vertices와normalized_vertices를 모두 채웁니다. - Vision AI API 응답은 단어의 마지막 기호에
detected_break를 채웁니다. Document AI API 응답과 변환기는 단어와 단어의 마지막 기호에detected_break를 채웁니다. - Vision AI API 응답은 항상 기호 필드를 채웁니다. 기본적으로 Document AI 응답은 기호 필드를 채우지 않습니다. Document AI 응답과 변환기에 기호 필드가 채워지도록 하려면
enable_symbol기능을 자세히 설정하세요. - LOCATION: 프로세서의 위치입니다(예:
- ).
us- 미국eu- 유럽 연합
- PROJECT_ID: Google Cloud 프로젝트 ID입니다.
- PROCESSOR_ID: 커스텀 프로세서의 ID입니다.
- PROCESSOR_VERSION: 프로세서 버전 식별자입니다. 자세한 내용은 프로세서 버전 선택을 참고하세요. 예를 들면 다음과 같습니다.
pretrained-TYPE-vX.X-YYYY-MM-DDstablerc
- skipHumanReview: 수동 검토를 사용 중지하는 불리언입니다 (인간 참여형 프로세서에서만 지원됨).
true- 사람의 검토를 건너뜁니다.false- 수동 검토를 사용 설정합니다 (기본값).
- MIME_TYPE†: 유효한 MIME 유형 옵션 중 하나입니다.
- IMAGE_CONTENT†: 유효한 인라인 문서 콘텐츠 중 하나로, 바이트 스트림으로 표시됩니다. JSON 표현의 경우 바이너리 이미지 데이터의 base64 인코딩 (ASCII 문자열)입니다. 이 문자열은 다음 문자열과 유사하게 표시됩니다.
/9j/4QAYRXhpZgAA...9tAVx/zDQDlGxn//2Q==
- FIELD_MASK:
Document출력에 포함할 필드를 지정합니다.FieldMask형식의 정규화된 필드 이름의 쉼표로 구분된 목록입니다.- 예:
text,entities,pages.pageNumber
- 예:
- OCR 구성
- ENABLE_NATIVE_PDF_PARSING: (불리언) PDF에서 삽입된 텍스트를 추출합니다(있는 경우).
- ENABLE_IMAGE_QUALITY_SCORES: (불리언) 지능형 문서 품질 점수를 사용 설정합니다.
- ENABLE_SYMBOL: (불리언) 기호 (문자) OCR 정보를 포함합니다.
- DISABLE_CHARACTER_BOXES_DETECTION: (불리언) OCR 엔진에서 문자 상자 감지기를 사용 중지합니다.
- LANGUAGE_HINTS: OCR에 사용할 BCP-47 언어 코드 목록입니다.
- ADVANCED_OCR_OPTIONS: OCR 동작을 추가로 미세 조정하기 위한 고급 OCR 옵션 목록입니다. 현재 유효한 값은 다음과 같습니다.
legacy_layout: 현재 ML 기반 레이아웃 감지 알고리즘의 대안으로 사용되는 휴리스틱 레이아웃 감지 알고리즘
- Premium OCR 부가기능
- ENABLE_SELECTION_MARK_DETECTION: (불리언) OCR 엔진에서 선택 표시 인식기를 사용 설정합니다.
- COMPUTE_STYLE_INFO (불리언) 글꼴 식별 모델을 사용 설정하고 글꼴 스타일 정보를 반환합니다.
- ENABLE_MATH_OCR: (불리언) LaTeX 수학 공식을 추출할 수 있는 모델을 사용 설정합니다.
- INDIVIDUAL_PAGES: 처리할 개별 페이지 목록입니다.
- 프로세서 목록을 검토합니다.
- Layout Parser를 사용하여 문서를 읽을 수 있는 청크로 분리합니다.
- 맞춤 분류기를 만듭니다.
Enterprise Document OCR 프로세서 만들기
먼저 Enterprise Document OCR 프로세서를 만듭니다. 자세한 내용은 프로세서 만들기 및 관리를 참고하세요.
OCR 구성
모든 OCR 구성은 ProcessDocumentRequest 또는 BatchProcessDocumentsRequest의 ProcessOptions.ocrConfig에서 해당 필드를 설정하여 사용 설정할 수 있습니다.
자세한 내용은 처리 요청 보내기를 참고하세요.
이미지 품질 분석
지능형 문서 품질 분석은 머신러닝을 사용하여 콘텐츠의 가독성을 기반으로 문서의 품질을 평가합니다.
이 품질 평가는 품질평가점수 [0, 1]로 반환되며 1는 완벽한 품질을 의미합니다.
인식된 품질평가점수가 0.5 미만인 경우 부정적인 품질 사유 목록 (가능성 기준으로 정렬)이 함께 반환됩니다.
가능성이 0.5보다 크면 양성 감지로 간주됩니다.
문서에 결함이 있는 것으로 간주되면 API는 다음 8가지 문서 결함 유형을 반환합니다.
현재 문서 품질 분석에는 몇 가지 제한사항이 있습니다.
입력
처리 요청에서 ProcessOptions.ocrConfig.enableImageQualityScores을 true로 설정하여 사용 설정합니다.
이 추가 기능은 프로세스 호출에 OCR 처리와 비슷한 지연 시간을 추가합니다.
  {
    "rawDocument": {
      "mimeType": "MIME_TYPE",
      "content": "IMAGE_CONTENT"
    },
    "processOptions": {
      "ocrConfig": {
        "enableImageQualityScores": true
      }
    }
  }
출력
결함 감지 결과는 Document.pages[].imageQualityScores[]에 표시됩니다.
  {
    "pages": [
      {
        "imageQualityScores": {
          "qualityScore": 0.7811847,
          "detectedDefects": [
            {
              "type": "quality/defect_document_cutoff",
              "confidence": 1.0
            },
            {
              "type": "quality/defect_glare",
              "confidence": 0.97849524
            },
            {
              "type": "quality/defect_text_cutoff",
              "confidence": 0.5
            }
          ]
        }
      }
    ]
  }
전체 출력 예시는 샘플 프로세서 출력을 참고하세요.
언어 힌트
OCR 프로세서는 OCR 엔진 성능을 개선하기 위해 정의한 언어 힌트를 지원합니다. 언어 힌트를 적용하면 OCR이 추론된 언어가 아닌 선택된 언어에 맞게 최적화될 수 있습니다.
입력
BCP-47 언어 코드 목록으로 ProcessOptions.ocrConfig.hints[].languageHints[]을 설정하여 사용 설정합니다.
  {
    "rawDocument": {
      "mimeType": "MIME_TYPE",
      "content": "IMAGE_CONTENT"
    },
    "processOptions": {
      "ocrConfig": {
        "hints": {
          "languageHints": ["en", "es"]
        }
      }
    }
  }
전체 출력 예시는 샘플 프로세서 출력을 참고하세요.
기호 감지
문서 응답에서 기호 (또는 개별 글자) 수준으로 데이터를 채웁니다.
입력
처리 요청에서 ProcessOptions.ocrConfig.enableSymbol을 true로 설정하여 사용 설정합니다.
  {
    "rawDocument": {
      "mimeType": "MIME_TYPE",
      "content": "IMAGE_CONTENT"
    },
    "processOptions": {
      "ocrConfig": {
        "enableSymbol": true
      }
    }
  }
출력
이 기능이 사용 설정되면 Document.pages[].symbols[] 필드가 채워집니다.
전체 출력 예시는 샘플 프로세서 출력을 참고하세요.
기본 제공 PDF 파싱
디지털 PDF 파일에서 삽입된 텍스트를 추출합니다. 사용 설정하면 디지털 텍스트가 있는 경우 내장 디지털 PDF 모델이 자동으로 사용됩니다. 디지털이 아닌 텍스트가 있으면 광학 OCR 모델이 자동으로 사용됩니다. 사용자는 병합된 텍스트 결과를 모두 수신합니다.
입력
처리 요청에서 ProcessOptions.ocrConfig.enableNativePdfParsing을 true로 설정하여 사용 설정합니다.
  {
    "rawDocument": {
      "mimeType": "MIME_TYPE",
      "content": "IMAGE_CONTENT"
    },
    "processOptions": {
      "ocrConfig": {
        "enableNativePdfParsing": true
      }
    }
  }
상자 속 캐릭터 감지
기본적으로 Enterprise Document OCR에는 상자 안에 있는 문자의 텍스트 추출 품질을 개선하기 위해 감지기가 사용 설정되어 있습니다. 예를 들면 다음과 같습니다.
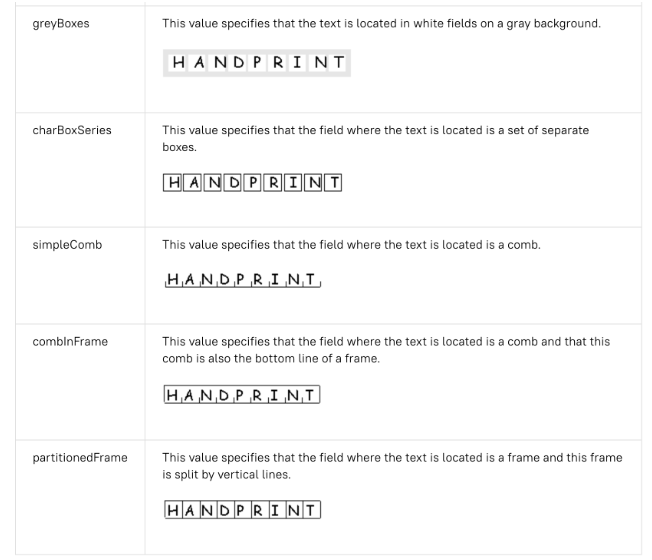
상자 안의 문자에 OCR 품질 문제가 있는 경우 사용 중지할 수 있습니다.
입력
처리 요청에서 ProcessOptions.ocrConfig.disableCharacterBoxesDetection을 true로 설정하여 사용 중지합니다.
  {
    "rawDocument": {
      "mimeType": "MIME_TYPE",
      "content": "IMAGE_CONTENT"
    },
    "processOptions": {
      "ocrConfig": {
        "disableCharacterBoxesDetection": true
      }
    }
  }
기존 레이아웃
휴리스틱 레이아웃 감지 알고리즘이 필요한 경우 현재 ML 기반 레이아웃 감지 알고리즘의 대안으로 사용할 수 있는 기존 레이아웃을 사용 설정하면 됩니다. 권장되는 구성이 아닙니다. 고객은 문서 워크플로에 따라 가장 적합한 레이아웃 알고리즘을 선택할 수 있습니다.
입력
처리 요청에서 ProcessOptions.ocrConfig.advancedOcrOptions을 ["legacy_layout"]로 설정하여 사용 설정합니다.
  {
    "rawDocument": {
      "mimeType": "MIME_TYPE",
      "content": "IMAGE_CONTENT"
    },
    "processOptions": {
      "ocrConfig": {
          "advancedOcrOptions": ["legacy_layout"]
      }
    }
  }
페이지 범위 지정
기본적으로 OCR은 문서의 모든 페이지에서 텍스트와 레이아웃 정보를 추출합니다. 특정 페이지 번호 또는 페이지 범위를 선택하여 해당 페이지의 텍스트만 추출할 수 있습니다.
ProcessOptions에서 이를 구성하는 방법은 세 가지입니다.
  {
    "individualPageSelector": {"pages": [2, 5]}
  }
  {
    "fromStart": 3
  }
  {
    "fromEnd": 4
  }
대답에서 각 Document.pages[].pageNumber은 요청에 지정된 동일한 페이지에 해당합니다.
OCR 부가기능 사용
이러한 Enterprise Document OCR 선택적 분석 기능은 필요에 따라 개별 처리 요청에서 사용 설정할 수 있습니다.
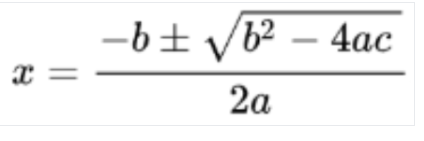
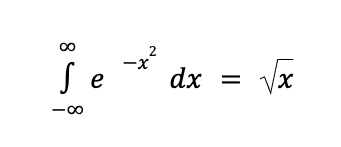
수학 OCR
수학 OCR은 경계 상자 좌표와 함께 LaTeX로 표현된 수학 방정식과 같은 공식을 감지, 인식, 추출합니다.
다음은 LaTeX 표현의 예입니다.
입력
처리 요청에서 ProcessOptions.ocrConfig.premiumFeatures.enableMathOcr을 true로 설정하여 사용 설정합니다.
  {
    "rawDocument": {
      "mimeType": "MIME_TYPE",
      "content": "IMAGE_CONTENT"
    },
    "processOptions": {
      "ocrConfig": {
          "premiumFeatures": {
            "enableMathOcr": true
          }
      }
    }
  }
출력
수학 OCR 출력은 "type": "math_formula"와 함께 Document.pages[].visualElements[]에 표시됩니다.
"visualElements": [
  {
    "layout": {
      "textAnchor": {
        "textSegments": [
          {
            "endIndex": "46"
          }
        ]
      },
      "confidence": 1,
      "boundingPoly": {
        "normalizedVertices": [
          {
            "x": 0.14662756,
            "y": 0.27891156
          },
          {
            "x": 0.9032258,
            "y": 0.27891156
          },
          {
            "x": 0.9032258,
            "y": 0.8027211
          },
          {
            "x": 0.14662756,
            "y": 0.8027211
          }
        ]
      },
      "orientation": "PAGE_UP"
    },
    "type": "math_formula"
  }
]
선택 표시 추출
사용 설정된 경우 모델은 경계 상자 좌표와 함께 문서의 모든 체크박스와 라디오 버튼을 추출하려고 시도합니다.
입력
처리 요청에서 ProcessOptions.ocrConfig.premiumFeatures.enableSelectionMarkDetection을 true로 설정하여 사용 설정합니다.
  {
    "rawDocument": {
      "mimeType": "MIME_TYPE",
      "content": "IMAGE_CONTENT"
    },
    "processOptions": {
      "ocrConfig": {
          "premiumFeatures": {
            "enableSelectionMarkDetection": true
          }
      }
    }
  }
출력
체크박스 출력은 "type": "unfilled_checkbox" 또는 "type": "filled_checkbox"와 함께 Document.pages[].visualElements[]에 표시됩니다.

"visualElements": [
  {
    "layout": {
      "confidence": 0.89363575,
      "boundingPoly": {
        "vertices": [
          {
            "x": 11,
            "y": 24
          },
          {
            "x": 37,
            "y": 24
          },
          {
            "x": 37,
            "y": 56
          },
          {
            "x": 11,
            "y": 56
          }
        ],
        "normalizedVertices": [
          {
            "x": 0.017488075,
            "y": 0.38709676
          },
          {
            "x": 0.05882353,
            "y": 0.38709676
          },
          {
            "x": 0.05882353,
            "y": 0.9032258
          },
          {
            "x": 0.017488075,
            "y": 0.9032258
          }
        ]
      }
    },
    "type": "unfilled_checkbox"
  },
  {
    "layout": {
      "confidence": 0.9148201,
      "boundingPoly": ...
    },
    "type": "filled_checkbox"
  }
],
글꼴 스타일 감지
글꼴 스타일 감지가 사용 설정된 경우 Enterprise Document OCR은 글꼴 속성을 추출하며, 이는 더 나은 후처리에 사용할 수 있습니다.
토큰 (단어) 수준에서는 다음 속성이 감지됩니다.
입력
처리 요청에서 ProcessOptions.ocrConfig.premiumFeatures.computeStyleInfo을 true로 설정하여 사용 설정합니다.
  {
    "rawDocument": {
      "mimeType": "MIME_TYPE",
      "content": "IMAGE_CONTENT"
    },
    "processOptions": {
      "ocrConfig": {
          "premiumFeatures": {
            "computeStyleInfo": true
          }
      }
    }
  }
출력
글꼴 스타일 출력은 StyleInfo 유형의 Document.pages[].tokens[].styleInfo에 표시됩니다.

"tokens": [
  {
    "styleInfo": {
      "fontSize": 3,
      "pixelFontSize": 13,
      "fontType": "SANS_SERIF",
      "bold": true,
      "fontWeight": 564,
      "textColor": {
        "red": 0.16862746,
        "green": 0.16862746,
        "blue": 0.16862746
      },
      "backgroundColor": {
        "red": 0.98039216,
        "green": 0.9882353,
        "blue": 0.99215686
      }
    }
  },
  ...
]
문서 객체를 Vision AI API 형식으로 변환
Document AI 도구 상자에는 Document AI API Document 형식을 Vision AI AnnotateFileResponse 형식으로 변환하는 도구가 포함되어 있어 사용자가 문서 OCR 프로세서와 Vision AI API 간의 응답을 비교할 수 있습니다. 다음은 샘플 코드입니다.
Vision AI API 응답과 Document AI API 응답 및 변환기 간에 알려진 불일치:
코드 샘플
다음 코드 샘플은 OCR 구성 및 부가기능을 사용 설정하는 처리 요청을 전송한 다음 필드를 읽고 터미널에 출력하는 방법을 보여줍니다.
REST
요청 데이터를 사용하기 전에 다음을 바꿉니다.
† 이 콘텐츠는 inlineDocument 객체에서 base64로 인코딩된 콘텐츠를 사용하여 지정할 수도 있습니다.
HTTP 메서드 및 URL:
POST https://LOCATION-documentai.googleapis.com/v1/projects/PROJECT_ID/locations/LOCATION/processors/PROCESSOR_ID/processorVersions/PROCESSOR_VERSION:process
JSON 요청 본문:
{
  "skipHumanReview": skipHumanReview,
  "rawDocument": {
    "mimeType": "MIME_TYPE",
    "content": "IMAGE_CONTENT"
  },
  "fieldMask": "FIELD_MASK",
  "processOptions": {
    "ocrConfig": {
      "enableNativePdfParsing": ENABLE_NATIVE_PDF_PARSING,
      "enableImageQualityScores": ENABLE_IMAGE_QUALITY_SCORES,
      "enableSymbol": ENABLE_SYMBOL,
      "disableCharacterBoxesDetection": DISABLE_CHARACTER_BOXES_DETECTION,
      "hints": {
        "languageHints": [
          "LANGUAGE_HINTS"
        ]
      },
      "advancedOcrOptions": ["ADVANCED_OCR_OPTIONS"],
      "premiumFeatures": {
        "enableSelectionMarkDetection": ENABLE_SELECTION_MARK_DETECTION,
        "computeStyleInfo": COMPUTE_STYLE_INFO,
        "enableMathOcr": ENABLE_MATH_OCR,
      }
    },
    "individualPageSelector" {
      "pages": [INDIVIDUAL_PAGES]
    }
  }
}
요청을 보내려면 다음 옵션 중 하나를 선택합니다.
curl
요청 본문을 request.json 파일에 저장하고 다음 명령어를 실행합니다.
curl -X POST \
     -H "Authorization: Bearer $(gcloud auth print-access-token)" \
     -H "Content-Type: application/json; charset=utf-8" \
     -d @request.json \
     "https://LOCATION-documentai.googleapis.com/v1/projects/PROJECT_ID/locations/LOCATION/processors/PROCESSOR_ID/processorVersions/PROCESSOR_VERSION:process"
PowerShell
요청 본문을 request.json 파일에 저장하고 다음 명령어를 실행합니다.
$cred = gcloud auth print-access-token
$headers = @{ "Authorization" = "Bearer $cred" }

Invoke-WebRequest `
    -Method POST `
    -Headers $headers `
    -ContentType: "application/json; charset=utf-8" `
    -InFile request.json `
    -Uri "https://LOCATION-documentai.googleapis.com/v1/projects/PROJECT_ID/locations/LOCATION/processors/PROCESSOR_ID/processorVersions/PROCESSOR_VERSION:process" | Select-Object -Expand Content
요청이 성공하면 서버가 200 OK HTTP 상태 코드와 응답을 JSON 형식으로 반환합니다. 응답 본문에는 Document 인스턴스가 포함됩니다.
Python
자세한 내용은 Document AI Python API 참고 문서를 참고하세요.
Document AI에 인증하려면 애플리케이션 기본 사용자 인증 정보를 설정합니다. 자세한 내용은 로컬 개발 환경의 인증 설정을 참조하세요.