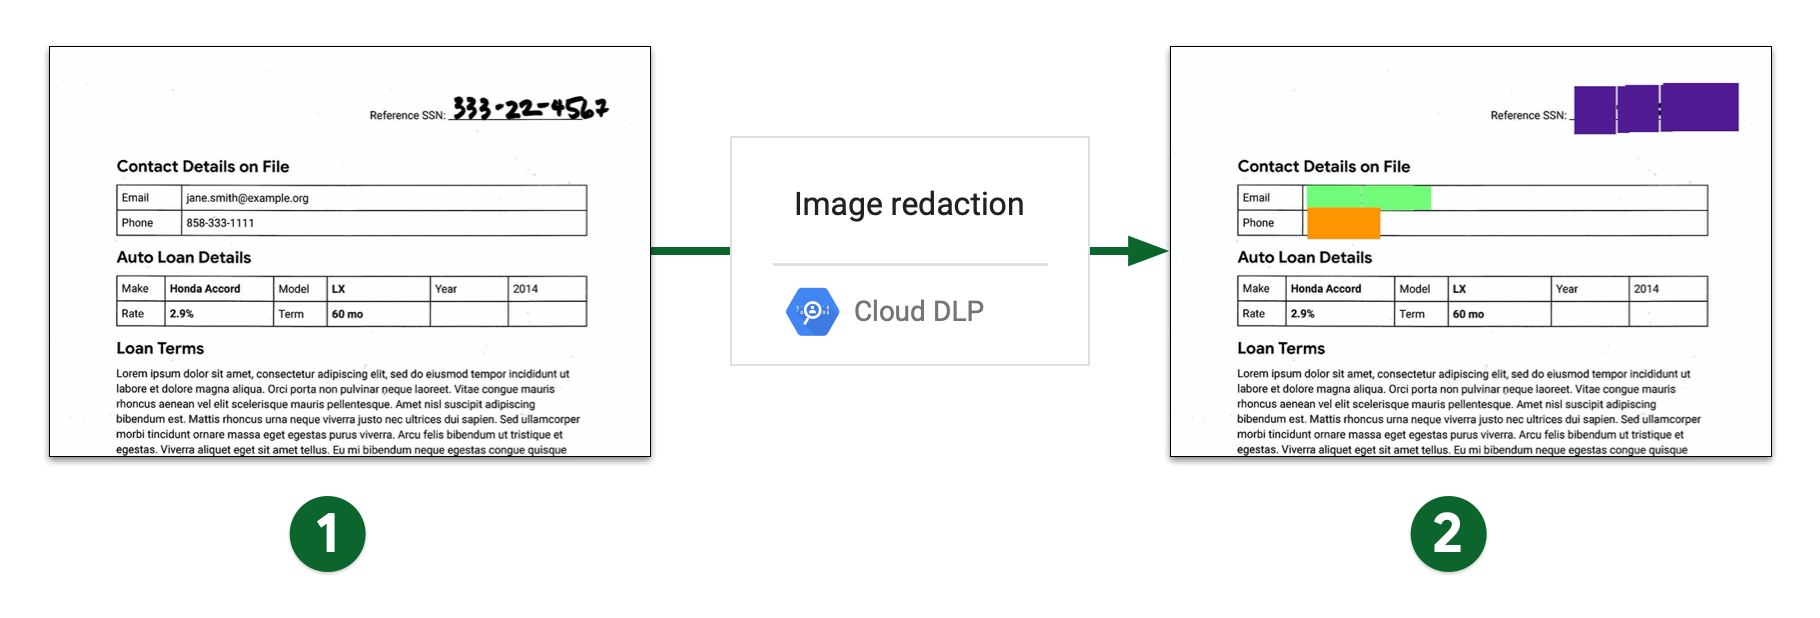
La protection des données sensibles peut masquer le texte sensible d'une image. À l'aide des détecteurs d'infoTypes et de Cloud Vision, la protection des données sensibles inspecte une image pour détecter du texte, détecte les données sensibles dans le texte, puis renvoie une image avec toutes les données sensibles correspondantes masquées par un rectangle opaque.
Prenons l'exemple des images "avant" et "après" suivantes. L'image d'origine est un exemple de fichier image type généré à partir de la numérisation d'un document papier. Dans cet exemple, la protection des données sensibles a été configurée pour masquer les numéros de sécurité sociale américains, les adresses e-mail et les numéros de téléphone à l'aide de rectangles de différentes couleurs, en fonction du contenu.
- Image numérisée avant masquage
- Image numérisée après masquage
Limites et points à noter
Tenez compte des points suivants lorsque vous masquez du contenu dans des images.
Types de fichiers compatibles
La protection des données sensibles peut masquer les données sensibles de nombreux types d'images, y compris JPEG, BMP et PNG. Pour en savoir plus, consultez la section Types de fichiers compatibles.
Le masquage du contenu n'est pas compatible avec les fichiers SVG, PDF, XLSX, PPTX ou DOCX.
Limites des résultats
Lorsque vous masquez des données dans des images, les limites de résultat ne s'appliquent pas. Elles peuvent entraîner des résultats inattendus ou potentiellement incohérents, où seules certaines données sont masquées. Si vous incluez FindingLimits dans votre requête, la protection des données sensibles génère une erreur.
Avant de commencer
-
In the Google Cloud console, on the project selector page, select or create a Google Cloud project.
-
Make sure that billing is enabled for your Google Cloud project.
-
Enable the DLP API.
-
Create a service account:
-
In the Google Cloud console, go to the Create service account page.
Go to Create service account - Select your project.
-
In the Service account name field, enter a name. The Google Cloud console fills in the Service account ID field based on this name.
In the Service account description field, enter a description. For example,
Service account for quickstart. - Click Create and continue.
-
Grant the Project > Owner role to the service account.
To grant the role, find the Select a role list, then select Project > Owner.
- Click Continue.
-
Click Done to finish creating the service account.
Do not close your browser window. You will use it in the next step.
-
-
Create a service account key:
- In the Google Cloud console, click the email address for the service account that you created.
- Click Keys.
- Click Add key, and then click Create new key.
- Click Create. A JSON key file is downloaded to your computer.
- Click Close.
-
Set the environment variable
GOOGLE_APPLICATION_CREDENTIALSto the path of the JSON file that contains your credentials. This variable applies only to your current shell session, so if you open a new session, set the variable again. - Install the Google Cloud CLI.
-
Configure the gcloud CLI to use your federated identity.
For more information, see Browser-based sign-in with the gcloud CLI.
-
To initialize the gcloud CLI, run the following command:
gcloud init
Masquer tous les infoTypes par défaut d'une image
Pour masquer les données sensibles d'une image, envoyez l'image à la méthode image.redact de l'API DLP.
La protection des données sensibles recherche les infoTypes les plus courants, sauf si vous spécifiez des types d'informations spécifiques (infoTypes) à rechercher.
Pour masquer les infoTypes par défaut d'une image, procédez comme suit:
Encodez l'image en tant que chaîne base64.
Si vous prévoyez d'utiliser l'une des bibliothèques clientes de protection des données sensibles pour effectuer cette tâche, ignorez cette étape.
Envoyez une requête à la méthode
image.redact.Si vous souhaitez masquer les infoTypes par défaut, la requête ne nécessite que l'image encodée en base64.
Par exemple, considérons l'image suivante. Voici un exemple de fichier image type généré à partir de la numérisation d'un document papier.
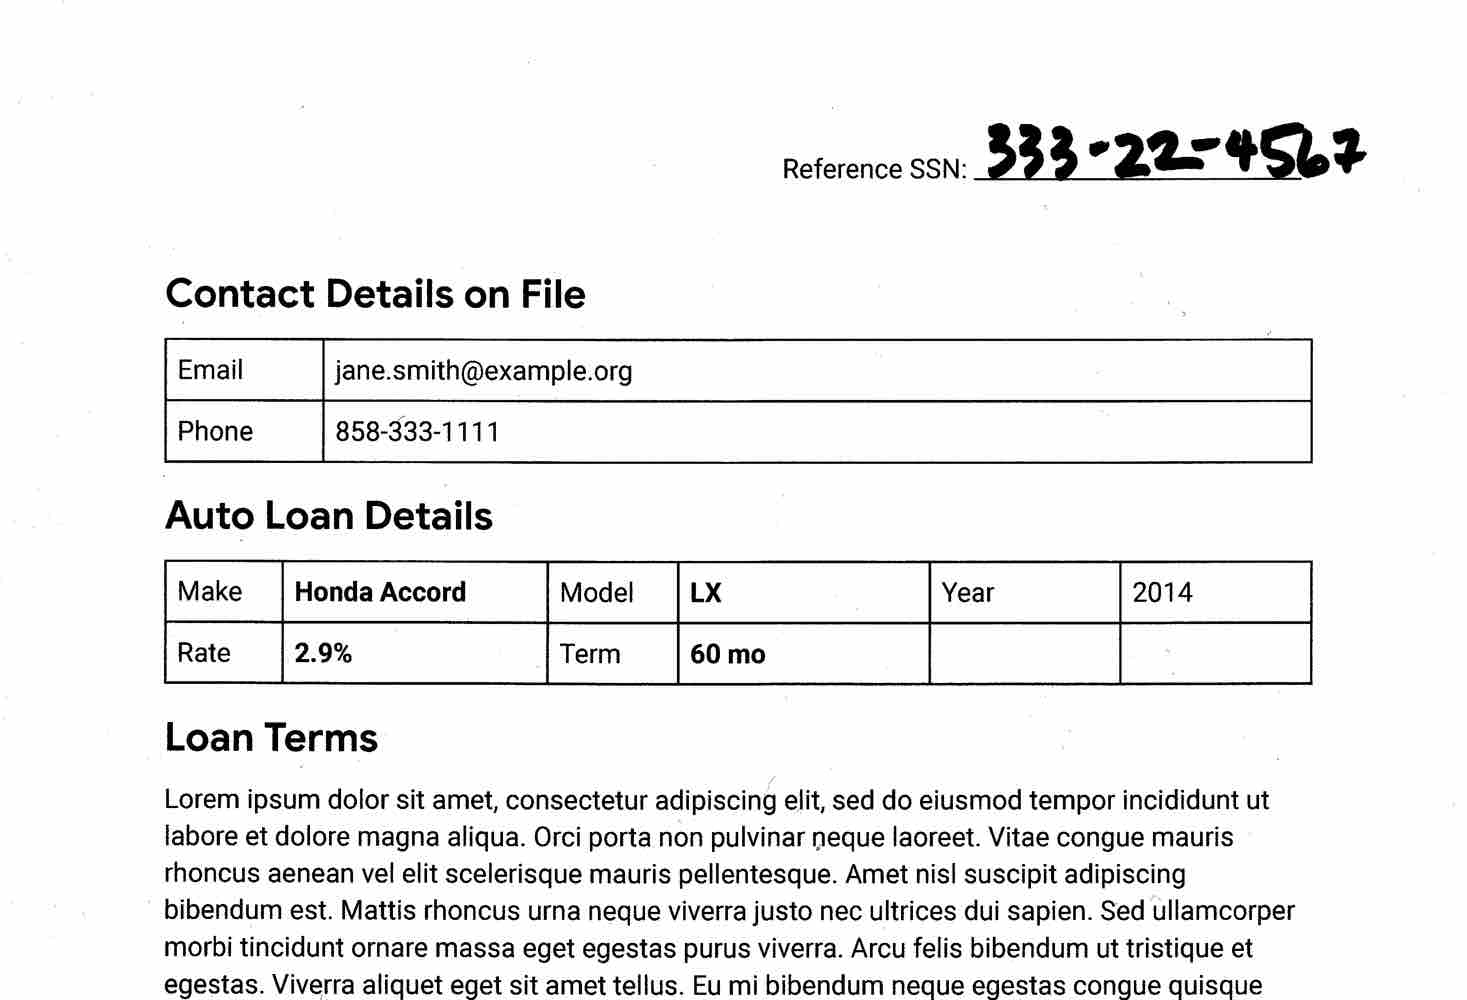
Pour masquer les infoTypes par défaut de cette image, envoyez la requête suivante à la méthode image.redact de l'API DLP :
C#
Pour savoir comment installer et utiliser la bibliothèque cliente pour la protection des données sensibles, consultez Bibliothèques clientes pour la protection des données sensibles.
Pour vous authentifier auprès de la protection des données sensibles, configurez les Identifiants par défaut de l'application. Pour en savoir plus, consultez Configurer l'authentification pour un environnement de développement local.
Go
Pour savoir comment installer et utiliser la bibliothèque cliente pour la protection des données sensibles, consultez Bibliothèques clientes pour la protection des données sensibles.
Pour vous authentifier auprès de la protection des données sensibles, configurez les Identifiants par défaut de l'application. Pour en savoir plus, consultez Configurer l'authentification pour un environnement de développement local.
Java
Pour savoir comment installer et utiliser la bibliothèque cliente pour la protection des données sensibles, consultez Bibliothèques clientes pour la protection des données sensibles.
Pour vous authentifier auprès de la protection des données sensibles, configurez les Identifiants par défaut de l'application. Pour en savoir plus, consultez Configurer l'authentification pour un environnement de développement local.
Node.js
Pour savoir comment installer et utiliser la bibliothèque cliente pour la protection des données sensibles, consultez Bibliothèques clientes pour la protection des données sensibles.
Pour vous authentifier auprès de la protection des données sensibles, configurez les Identifiants par défaut de l'application. Pour en savoir plus, consultez Configurer l'authentification pour un environnement de développement local.
PHP
Pour savoir comment installer et utiliser la bibliothèque cliente pour la protection des données sensibles, consultez Bibliothèques clientes pour la protection des données sensibles.
Pour vous authentifier auprès de la protection des données sensibles, configurez les Identifiants par défaut de l'application. Pour en savoir plus, consultez Configurer l'authentification pour un environnement de développement local.
Python
Pour savoir comment installer et utiliser la bibliothèque cliente pour la protection des données sensibles, consultez Bibliothèques clientes pour la protection des données sensibles.
Pour vous authentifier auprès de la protection des données sensibles, configurez les Identifiants par défaut de l'application. Pour en savoir plus, consultez Configurer l'authentification pour un environnement de développement local.
REST
{
  "byteItem": {
    "data": "[BASE64-ENCODED-IMAGE]",
    "type": "IMAGE_JPEG"
  }
}
La protection des données sensibles renvoie les éléments suivants:
    {
      "redactedImage": "[BASE64-ENCODED-IMAGE]"
    }
Décodez l'image encodée en base64.
L'image obtenue est la suivante :
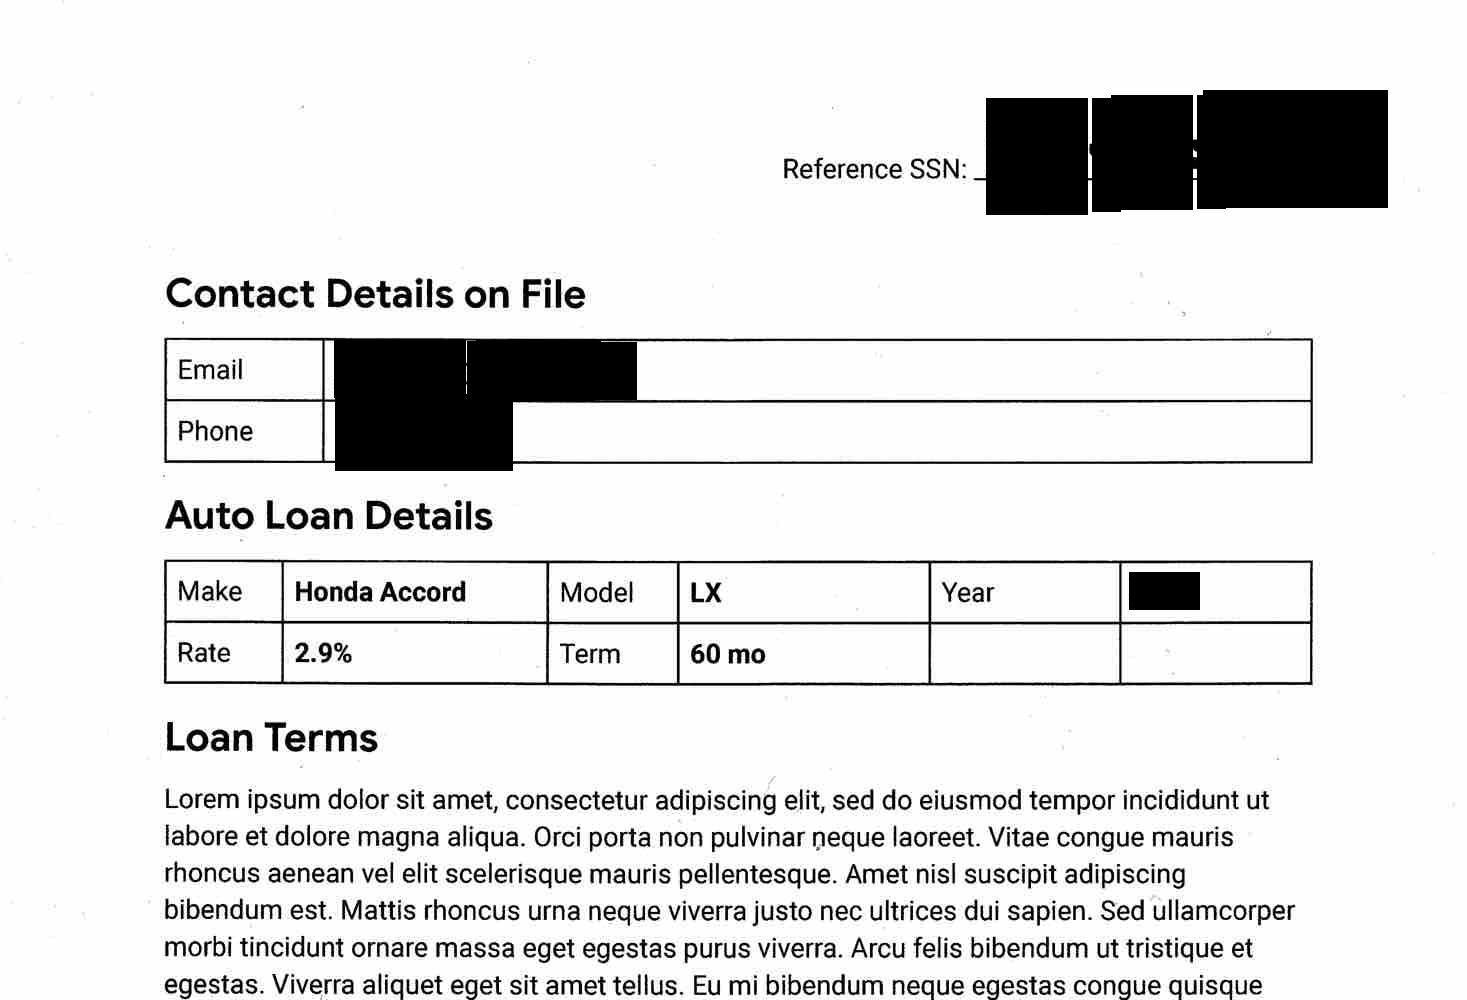
Notez qu'en plus de masquer le numéro de sécurité sociale manuscrit, l'adresse e-mail et le numéro de téléphone, la protection des données sensibles a également masqué l'année. La section suivante explique comment masquer uniquement certains infoTypes.
Masquer des infoTypes spécifiques dans une image
Si vous ne souhaitez masquer que certaines données sensibles dans une image, spécifiez les infoTypes intégrés correspondants.
Pour masquer des infoTypes spécifiques d'une image, envoyez une requête à la méthode image.redact de l'API DLP. La requête doit inclure les éléments suivants:
- Image.
- Un ou plusieurs détecteurs d'infoTypes
Prenons l'exemple de l'image d'origine de la section précédente. Pour ne masquer que les numéros de sécurité sociale américains, les adresses e-mail et les numéros de téléphone, envoyez le code JSON suivant à la méthode image.redact de l'API DLP :
C#
Pour savoir comment installer et utiliser la bibliothèque cliente pour la protection des données sensibles, consultez Bibliothèques clientes pour la protection des données sensibles.
Pour vous authentifier auprès de la protection des données sensibles, configurez les Identifiants par défaut de l'application. Pour en savoir plus, consultez Configurer l'authentification pour un environnement de développement local.
Go
Pour savoir comment installer et utiliser la bibliothèque cliente pour la protection des données sensibles, consultez Bibliothèques clientes pour la protection des données sensibles.
Pour vous authentifier auprès de la protection des données sensibles, configurez les Identifiants par défaut de l'application. Pour en savoir plus, consultez Configurer l'authentification pour un environnement de développement local.
Java
Pour savoir comment installer et utiliser la bibliothèque cliente pour la protection des données sensibles, consultez Bibliothèques clientes pour la protection des données sensibles.
Pour vous authentifier auprès de la protection des données sensibles, configurez les Identifiants par défaut de l'application. Pour en savoir plus, consultez Configurer l'authentification pour un environnement de développement local.
Node.js
Pour savoir comment installer et utiliser la bibliothèque cliente pour la protection des données sensibles, consultez Bibliothèques clientes pour la protection des données sensibles.
Pour vous authentifier auprès de la protection des données sensibles, configurez les Identifiants par défaut de l'application. Pour en savoir plus, consultez Configurer l'authentification pour un environnement de développement local.
PHP
Pour savoir comment installer et utiliser la bibliothèque cliente pour la protection des données sensibles, consultez Bibliothèques clientes pour la protection des données sensibles.
Pour vous authentifier auprès de la protection des données sensibles, configurez les Identifiants par défaut de l'application. Pour en savoir plus, consultez Configurer l'authentification pour un environnement de développement local.
Python
Pour savoir comment installer et utiliser la bibliothèque cliente pour la protection des données sensibles, consultez Bibliothèques clientes pour la protection des données sensibles.
Pour vous authentifier auprès de la protection des données sensibles, configurez les Identifiants par défaut de l'application. Pour en savoir plus, consultez Configurer l'authentification pour un environnement de développement local.
REST
    {
      "byteItem": {
        "data": "[BASE64-ENCODED-IMAGE]",
        "type": "IMAGE_JPEG"
      },
      "imageRedactionConfigs": [
        {
          "infoType": {
            "name": "US_SOCIAL_SECURITY_NUMBER"
          }
        },
        {
          "infoType": {
            "name": "EMAIL_ADDRESS"
          }
        },
        {
          "infoType": {
            "name": "PHONE_NUMBER"
          }
        }
      ]
    }
La protection des données sensibles renvoie les éléments suivants:
    {
      "redactedImage": "[BASE64-ENCODED-IMAGE]"
    }
Décodez l'image encodée en base64.
L'image obtenue est la suivante :

Vous pouvez appliquer un code couleur aux informations masquées par infoType lorsque vous souhaitez identifier les éléments masqués en un coup d'œil. Pour en savoir plus, consultez la section suivante.
Masquer les infoTypes d'une image avec des codes couleur
Pour attribuer des codes couleur aux informations masquées par infoType, associez des détecteurs d'infoTypes à des valeurs d'espace colorimétrique RVB.
Pour appliquer un code couleur aux infoTypes masqués d'une image, envoyez une requête à la méthode image.redact de l'API DLP. La requête doit inclure les éléments suivants:
- Image.
- Un ou plusieurs détecteurs d'infoTypes, chacun étant associé à une couleur utilisant des valeurs d'espace colorimétrique RVB.
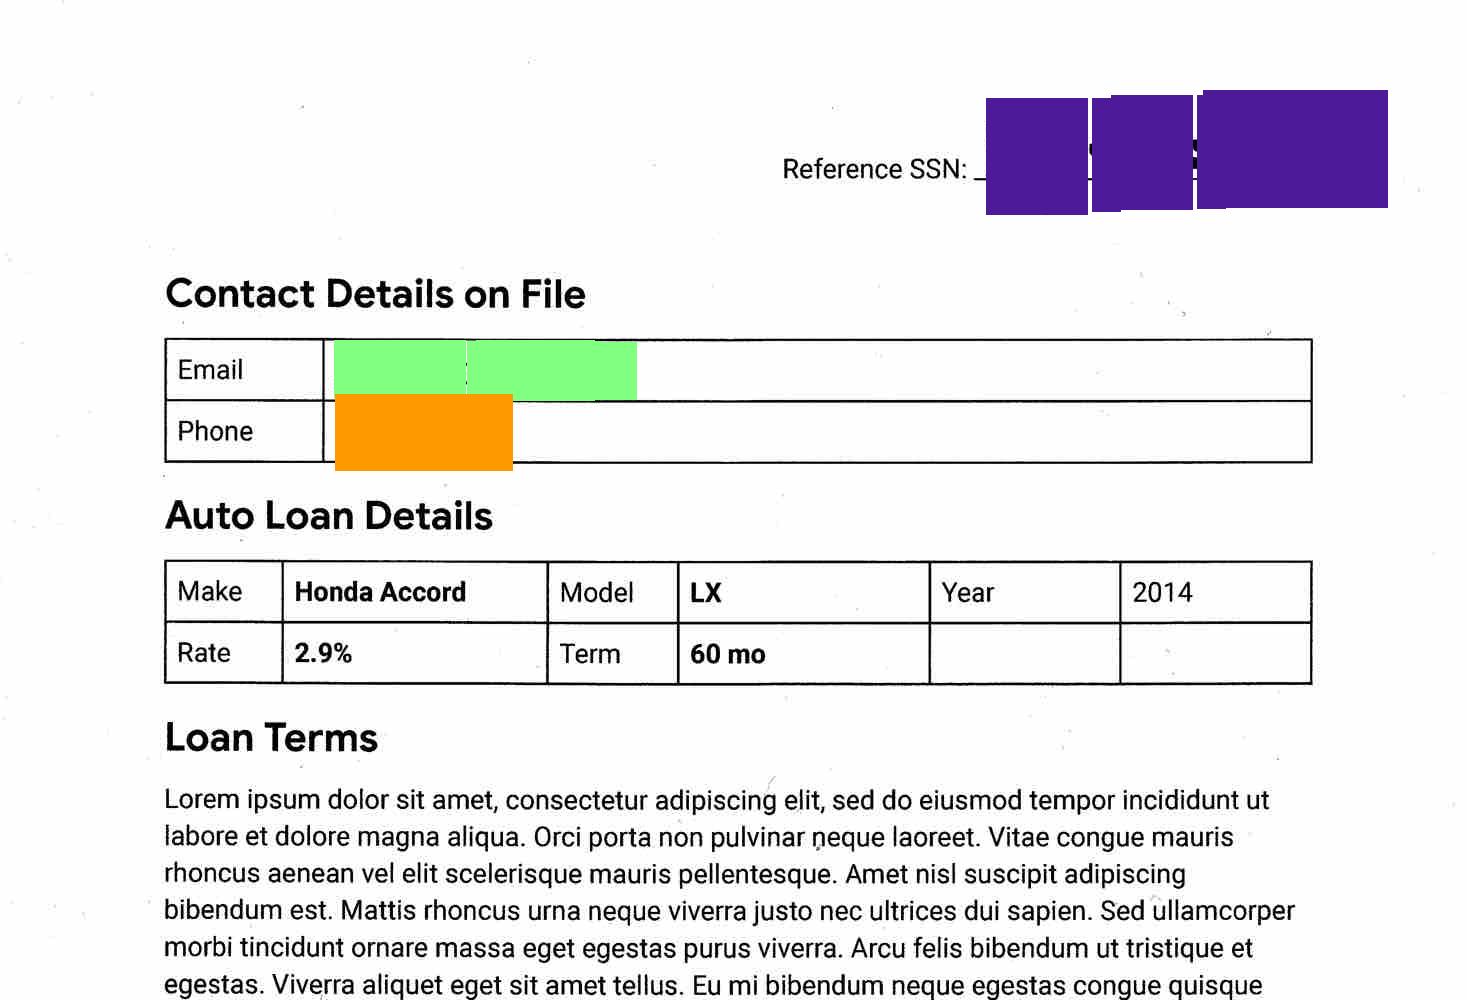
Prenons l'exemple de l'image d'origine de la première section. Pour masquer les numéros de sécurité sociale américains avec un cadre violet, les adresses e-mail avec un cadre vert et les numéros de téléphone avec un cadre orange, envoyez le code JSON suivant à la méthode image.redact de l'API DLP :
C#
Pour savoir comment installer et utiliser la bibliothèque cliente pour la protection des données sensibles, consultez Bibliothèques clientes pour la protection des données sensibles.
Pour vous authentifier auprès de la protection des données sensibles, configurez les Identifiants par défaut de l'application. Pour en savoir plus, consultez Configurer l'authentification pour un environnement de développement local.
Go
Pour savoir comment installer et utiliser la bibliothèque cliente pour la protection des données sensibles, consultez Bibliothèques clientes pour la protection des données sensibles.
Pour vous authentifier auprès de la protection des données sensibles, configurez les Identifiants par défaut de l'application. Pour en savoir plus, consultez Configurer l'authentification pour un environnement de développement local.
Java
Pour savoir comment installer et utiliser la bibliothèque cliente pour la protection des données sensibles, consultez Bibliothèques clientes pour la protection des données sensibles.
Pour vous authentifier auprès de la protection des données sensibles, configurez les Identifiants par défaut de l'application. Pour en savoir plus, consultez Configurer l'authentification pour un environnement de développement local.
Node.js
Pour savoir comment installer et utiliser la bibliothèque cliente pour la protection des données sensibles, consultez Bibliothèques clientes pour la protection des données sensibles.
Pour vous authentifier auprès de la protection des données sensibles, configurez les Identifiants par défaut de l'application. Pour en savoir plus, consultez Configurer l'authentification pour un environnement de développement local.
PHP
Pour savoir comment installer et utiliser la bibliothèque cliente pour la protection des données sensibles, consultez Bibliothèques clientes pour la protection des données sensibles.
Pour vous authentifier auprès de la protection des données sensibles, configurez les Identifiants par défaut de l'application. Pour en savoir plus, consultez Configurer l'authentification pour un environnement de développement local.
Python
Pour savoir comment installer et utiliser la bibliothèque cliente pour la protection des données sensibles, consultez Bibliothèques clientes pour la protection des données sensibles.
Pour vous authentifier auprès de la protection des données sensibles, configurez les Identifiants par défaut de l'application. Pour en savoir plus, consultez Configurer l'authentification pour un environnement de développement local.
REST
    {
      "byteItem": {
        "data": "[BASE64-ENCODED-IMAGE]",
        "type": "IMAGE_JPEG"
      },
      "imageRedactionConfigs": [
        {
          "infoType": {
            "name": "US_SOCIAL_SECURITY_NUMBER"
          },
          "redactionColor": {
            "red": 0.3,
            "green": 0.1,
            "blue": 0.6
          }
        },
        {
          "infoType": {
            "name": "EMAIL_ADDRESS"
          },
          "redactionColor": {
            "red": 0.5,
            "blue": 0.5,
            "green": 1
          }
        },
        {
          "infoType": {
            "name": "PHONE_NUMBER"
          },
          "redactionColor": {
            "red": 1,
            "blue": 0,
            "green": 0.6
          }
        }
      ]
    }
La protection des données sensibles renvoie les éléments suivants:
    {
      "redactedImage": "[BASE64-ENCODED-IMAGE]"
    }
Décodez l'image encodée en base64.
L'image obtenue est la suivante :
Masquer tout le texte d'une image
La protection des données sensibles contient également une option permettant de masquer tout le texte détecté dans une image.
Pour masquer tout le texte d'une image, envoyez une requête à la méthode image.redact de l'API DLP. La requête doit inclure les éléments suivants:
- Image.
- L'option
redactAllTextdéfinie surtrue
Prenons l'exemple de l'image d'origine de la première section. Pour masquer tout le texte, envoyez le code JSON suivant à la méthode image.redact de l'API DLP :
C#
Pour savoir comment installer et utiliser la bibliothèque cliente pour la protection des données sensibles, consultez Bibliothèques clientes pour la protection des données sensibles.
Pour vous authentifier auprès de la protection des données sensibles, configurez les Identifiants par défaut de l'application. Pour en savoir plus, consultez Configurer l'authentification pour un environnement de développement local.
Go
Pour savoir comment installer et utiliser la bibliothèque cliente pour la protection des données sensibles, consultez Bibliothèques clientes pour la protection des données sensibles.
Pour vous authentifier auprès de la protection des données sensibles, configurez les Identifiants par défaut de l'application. Pour en savoir plus, consultez Configurer l'authentification pour un environnement de développement local.
Java
Pour savoir comment installer et utiliser la bibliothèque cliente pour la protection des données sensibles, consultez Bibliothèques clientes pour la protection des données sensibles.
Pour vous authentifier auprès de la protection des données sensibles, configurez les Identifiants par défaut de l'application. Pour en savoir plus, consultez Configurer l'authentification pour un environnement de développement local.
Node.js
Pour savoir comment installer et utiliser la bibliothèque cliente pour la protection des données sensibles, consultez Bibliothèques clientes pour la protection des données sensibles.
Pour vous authentifier auprès de la protection des données sensibles, configurez les Identifiants par défaut de l'application. Pour en savoir plus, consultez Configurer l'authentification pour un environnement de développement local.
PHP
Pour savoir comment installer et utiliser la bibliothèque cliente pour la protection des données sensibles, consultez Bibliothèques clientes pour la protection des données sensibles.
Pour vous authentifier auprès de la protection des données sensibles, configurez les Identifiants par défaut de l'application. Pour en savoir plus, consultez Configurer l'authentification pour un environnement de développement local.
Python
Pour savoir comment installer et utiliser la bibliothèque cliente pour la protection des données sensibles, consultez Bibliothèques clientes pour la protection des données sensibles.
Pour vous authentifier auprès de la protection des données sensibles, configurez les Identifiants par défaut de l'application. Pour en savoir plus, consultez Configurer l'authentification pour un environnement de développement local.
REST
    {
      "byteItem": {
        "data": "[BASE64-ENCODED-IMAGE]",
        "type": "IMAGE_JPEG"
      },
      "imageRedactionConfigs": [
        {
          "redactAllText": true
        }
      ]
    }
La protection des données sensibles renvoie les éléments suivants:
    {
      "redactedImage": "[BASE64-ENCODED-IMAGE]"
    }
Décodez l'image encodée en base64.
L'API renvoie les images que vous lui avez fournies, mais tout texte identifié par vos critères comme contenant des informations sensibles est masqué.
L'image obtenue est la suivante :
Exemple de code avec paramètre de probabilité
Cet exemple est semblable à la section Masquer des infoTypes spécifiques d'une image. Elle montre également comment spécifier une probabilité minimale.
C#
Pour savoir comment installer et utiliser la bibliothèque cliente pour la protection des données sensibles, consultez Bibliothèques clientes pour la protection des données sensibles.
Pour vous authentifier auprès de la protection des données sensibles, configurez les Identifiants par défaut de l'application. Pour en savoir plus, consultez Configurer l'authentification pour un environnement de développement local.
Go
Pour savoir comment installer et utiliser la bibliothèque cliente pour la protection des données sensibles, consultez Bibliothèques clientes pour la protection des données sensibles.
Pour vous authentifier auprès de la protection des données sensibles, configurez les Identifiants par défaut de l'application. Pour en savoir plus, consultez Configurer l'authentification pour un environnement de développement local.
Java
Pour savoir comment installer et utiliser la bibliothèque cliente pour la protection des données sensibles, consultez Bibliothèques clientes pour la protection des données sensibles.
Pour vous authentifier auprès de la protection des données sensibles, configurez les Identifiants par défaut de l'application. Pour en savoir plus, consultez Configurer l'authentification pour un environnement de développement local.
Node.js
Pour savoir comment installer et utiliser la bibliothèque cliente pour la protection des données sensibles, consultez Bibliothèques clientes pour la protection des données sensibles.
Pour vous authentifier auprès de la protection des données sensibles, configurez les Identifiants par défaut de l'application. Pour en savoir plus, consultez Configurer l'authentification pour un environnement de développement local.
PHP
Pour savoir comment installer et utiliser la bibliothèque cliente pour la protection des données sensibles, consultez Bibliothèques clientes pour la protection des données sensibles.
Pour vous authentifier auprès de la protection des données sensibles, configurez les Identifiants par défaut de l'application. Pour en savoir plus, consultez Configurer l'authentification pour un environnement de développement local.
Python
Pour savoir comment installer et utiliser la bibliothèque cliente pour la protection des données sensibles, consultez Bibliothèques clientes pour la protection des données sensibles.
Pour vous authentifier auprès de la protection des données sensibles, configurez les Identifiants par défaut de l'application. Pour en savoir plus, consultez Configurer l'authentification pour un environnement de développement local.
Essayer
Vous pouvez tester chacun des exemples de cette page par vous-même ou tester vos propres images dans APIs Explorer sur la page de référence de la méthode image.redact :
Étapes suivantes
- Apprenez-en plus sur l'inspection et le masquage d'images.
- Suivez l'atelier de programmation Masquer les données sensibles avec la protection des données sensibles.
- Découvrez comment inspecter des images pour identifier les données sensibles.
- Découvrez comment créer une copie anonymisée des données dans l'espace de stockage.