프로덕션 시스템에서 fulfillment를 사용하려면 웹훅 서비스를 구현하고 배포해야 합니다. fulfillment를 처리하려면 웹훅 서비스가 이 가이드에 지정된 대로 JSON 요청을 수락하고 JSON 응답을 반환해야 합니다. fulfillment 및 웹훅의 세부 처리 과정은 fulfillment 개요 문서에 설명되어 있습니다.
웹훅 서비스 요구사항
웹훅 서비스에서 다음 요구사항을 충족해야 합니다.
- HTTPS 요청을 처리해야 합니다. HTTP는 지원되지 않습니다. Compute 또는 서버리스 컴퓨팅 솔루션을 사용하여 Google Cloud Platform에서 웹훅 서비스를 호스팅하는 경우 HTTPS와 함께 제공되는 제품 문서를 참조하세요. 다른 호스팅 옵션은 도메인의 SSL 인증서 받기를 참조하세요.
- 요청 URL은 공개적으로 액세스할 수 있어야 합니다.
- JSON
WebhookRequest본문으로 POST 요청을 처리해야 합니다. - JSON
WebhookResponse본문으로WebhookRequest요청에 응답해야 합니다.
인증
본인 또는 Dialogflow 에이전트만 요청을 실행할 수 있도록 웹훅 서비스를 보호하는 것이 중요합니다. Dialogflow는 인증을 위해 다음과 같은 메커니즘을 지원합니다.
| 용어 | 정의 |
|---|---|
| 로그인 사용자 이름 및 비밀번호 | 웹훅 설정의 경우 선택사항인 로그인 사용자 이름과 비밀번호 값을 지정할 수 있습니다. 제공되는 경우 Dialogflow가 웹훅 요청에 승인 HTTP 헤더를 추가합니다. 이 헤더는 "authorization: Basic <base 64 encoding of the string username:password>" 형식입니다. |
| 인증 헤더 | 웹훅 설정의 경우 선택사항인 HTTP 헤더 키-값 쌍을 지정할 수 있습니다. 제공되는 경우 Dialogflow가 이러한 HTTP 헤더를 웹훅 요청에 추가합니다. authorization 키와 함께 단일 쌍을 제공하는 것이 일반적입니다. |
| Cloud Functions 기본 제공 인증 | Cloud Functions를 사용할 때 기본 제공 인증을 사용할 수 있습니다. 이러한 인증 유형을 사용하려면 로그인 사용자 이름, 로그인 비밀번호, 승인 헤더를 제공하지 마세요. 이러한 필드를 입력하면 기본 제공되는 인증 대신 이 필드가 인증에 사용됩니다. |
| 서비스 ID 토큰 | 인증에 서비스 ID 토큰을 사용할 수 있습니다. 로그인 사용자 이름, 로그인 비밀번호, authorization 키가 있는 헤더를 제공하지 않을 경우 Dialogflow는 서비스 ID 토큰을 사용하도록 자동으로 가정하고, 승인 HTTP 헤더를 웹훅 요청에 추가합니다. 이 헤더는 "authorization: Bearer <identity token>" 형식입니다. |
| 상호 TLS 인증 | 상호 TLS 인증 문서를 참조하세요. |
웹훅 요청
fulfillment를 위해 구성된 인텐트가 일치하면 Dialogflow는 웹훅 서비스에 HTTPS POST 웹훅 요청을 보냅니다. 이 요청의 본문은 일치된 인텐트에 대한 정보가 있는 JSON 객체입니다.
최종 사용자 쿼리 외에도 여러 통합에서 최종 사용자에 대한 일부 정보도 전송합니다. 사용자를 고유하게 식별하는 ID를 예로 들 수 있습니다. 이 정보는 통합 플랫폼에서 전송된 정보를 포함하는 웹훅 요청의 originalDetectIntentRequest 필드를 통해 액세스할 수 있습니다.
자세한 내용은 WebhookRequest 참고 문서를 확인하세요.
샘플 요청은 다음과 같습니다.
{
  "responseId": "response-id",
  "session": "projects/project-id/agent/sessions/session-id",
  "queryResult": {
    "queryText": "End-user expression",
    "parameters": {
      "param-name": "param-value"
    },
    "allRequiredParamsPresent": true,
    "fulfillmentText": "Response configured for matched intent",
    "fulfillmentMessages": [
      {
        "text": {
          "text": [
            "Response configured for matched intent"
          ]
        }
      }
    ],
    "outputContexts": [
      {
        "name": "projects/project-id/agent/sessions/session-id/contexts/context-name",
        "lifespanCount": 5,
        "parameters": {
          "param-name": "param-value"
        }
      }
    ],
    "intent": {
      "name": "projects/project-id/agent/intents/intent-id",
      "displayName": "matched-intent-name"
    },
    "intentDetectionConfidence": 1,
    "diagnosticInfo": {},
    "languageCode": "en"
  },
  "originalDetectIntentRequest": {}
}
웹훅 응답
웹훅이 웹훅 요청을 받으면 웹훅 응답을 보내야 합니다. 이 응답의 본문은 다음 정보가 포함된 JSON 객체입니다.
- Dialogflow가 최종 사용자에게 반환하는 응답
- 대화에 활성화된 컨텍스트 업데이트
- 인텐트 일치를 트리거 할 후속 이벤트
- 통합 또는 인텐트 클라이언트 감지로 전송할 커스텀 페이로드
응답에 대해 다음 제한사항이 적용됩니다.
- 응답은 Google 어시스턴트 애플리케이션의 경우 10초, 다른 모든 애플리케이션의 경우 5초 이내에 실행되어야 하며 그렇지 않으면 요청이 타임아웃됩니다.
- 응답 크기는 64KiB 이하여야 합니다.
자세한 내용은 WebhookResponse 참고 문서를 확인하세요.
텍스트 응답
텍스트 응답의 예는 다음과 같습니다.
{
  "fulfillmentMessages": [
    {
      "text": {
        "text": [
          "Text response from webhook"
        ]
      }
    }
  ]
}
카드 응답
카드 응답의 예는 다음과 같습니다.
{
  "fulfillmentMessages": [
    {
      "card": {
        "title": "card title",
        "subtitle": "card text",
        "imageUri": "https://example.com/images/example.png",
        "buttons": [
          {
            "text": "button text",
            "postback": "https://example.com/path/for/end-user/to/follow"
          }
        ]
      }
    }
  ]
}
Google 어시스턴트 응답
Google 어시스턴트 응답의 예는 다음과 같습니다.
{
  "payload": {
    "google": {
      "expectUserResponse": true,
      "richResponse": {
        "items": [
          {
            "simpleResponse": {
              "textToSpeech": "this is a Google Assistant response"
            }
          }
        ]
      }
    }
  }
}
컨텍스트
출력 컨텍스트를 설정하는 예:
{
  "fulfillmentMessages": [
    {
      "text": {
        "text": [
          "Text response from webhook"
        ]
      }
    }
  ],
  "outputContexts": [
    {
      "name": "projects/project-id/agent/sessions/session-id/contexts/context-name",
      "lifespanCount": 5,
      "parameters": {
        "param-name": "param-value"
      }
    }
  ]
}
이벤트
커스텀 이벤트를 호출하는 예는 다음과 같습니다.
{
  "followupEventInput": {
    "name": "event-name",
    "languageCode": "en-US",
    "parameters": {
      "param-name": "param-value"
    }
  }
}
세션 항목
세션 항목을 설정하는 예는 다음과 같습니다.
{
  "fulfillmentMessages": [
    {
      "text": {
        "text": [
          "Choose apple or orange"
        ]
      }
    }
  ],
  "sessionEntityTypes":[
    {
      "name":"projects/project-id/agent/sessions/session-id/entityTypes/fruit",
      "entities":[
        {
          "value":"APPLE_KEY",
          "synonyms":[
            "apple",
            "green apple",
            "crabapple"
          ]
        },
        {
          "value":"ORANGE_KEY",
          "synonyms":[
            "orange"
          ]
        }
      ],
      "entityOverrideMode":"ENTITY_OVERRIDE_MODE_OVERRIDE"
    }
  ]
}
커스텀 페이로드
커스텀 페이로드를 제공하는 예시:
{
  "fulfillmentMessages": [
    {
      "payload": {
        "facebook": { // for Facebook Messenger integration
          "attachment": {
            "type": "",
            "payload": {}
          }
        },
        "slack": { // for Slack integration
          "text": "",
          "attachments": []
        },
        "richContent": [ // for Dialogflow Messenger integration
          [
            {
              "type": "image",
              "rawUrl": "https://example.com/images/logo.png",
              "accessibilityText": "Example logo"
            }
          ]
        ],
        // custom integration payload here
      }
    }
  ]
}
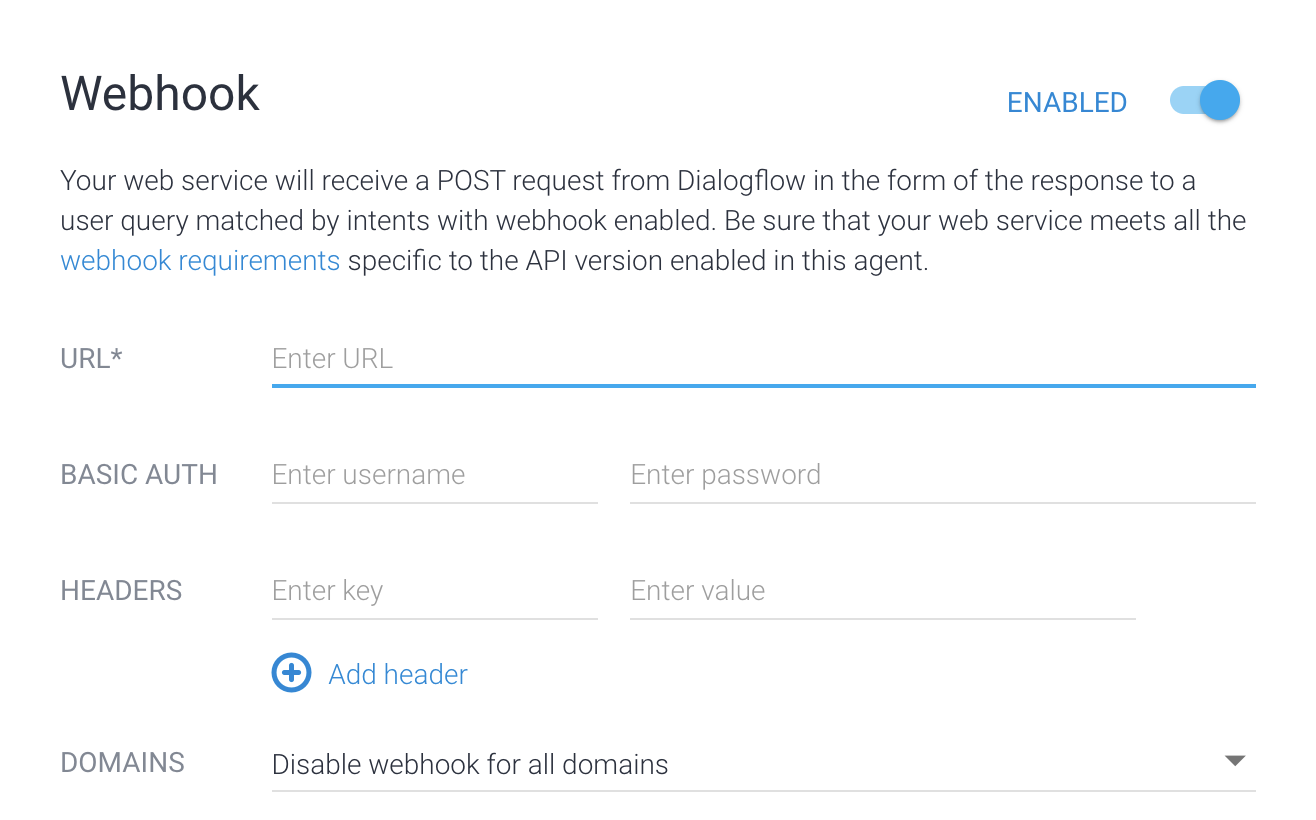
fulfillment 사용 설정 및 관리
콘솔을 사용하여 에이전트의 fulfillment를 사용 설정하고 관리하려면 다음 안내를 따르세요.
- Dialogflow ES 콘솔로 이동합니다.
- 에이전트를 선택합니다.
- 왼쪽 사이드바 메뉴에서 Fulfillment를 선택합니다.
- 웹훅 필드를 사용 설정됨으로 전환합니다.
- 양식에 웹훅 서비스의 세부정보를 제공합니다. 웹훅에 인증이 필요하지 않은 경우 인증 필드는 비워둡니다.
- 페이지 하단의 저장을 클릭합니다.
API를 사용하여 에이전트의 fulfillment를 사용 설정하고 관리하려면 에이전트 참조를 확인하세요.
getFulfillment 및 updateFulfillment 메서드를 사용하여 fulfillment 설정을 관리할 수 있습니다.
콘솔에서 인텐트에 fulfillment를 사용 설정하려면 다음 안내를 따르세요.
- 왼쪽 사이드바 메뉴에서 인텐트를 선택합니다.
- 인텐트를 선택합니다.
- Fulfillment 섹션까지 아래로 스크롤합니다.
- 이 인텐트에 웹훅 호출 사용 설정을 활성화로 전환합니다
- 저장을 클릭합니다.
API를 사용하여 인텐트에 fulfillment를 사용 설정하려면 인텐트 참조를 확인하세요.
webhookState 필드를 WEBHOOK_STATE_ENABLED로 설정합니다.
웹훅 오류
웹훅 서비스에 오류가 발생하면 다음 HTTP 상태 코드 중 하나가 반환되어야 합니다.
400잘못된 요청401승인되지 않음403금지됨404찾을 수 없음500서버 오류503서비스를 사용할 수 없음
다음과 같은 오류 상황에서 Dialogflow는 현재 일치된 인텐트에 구성된 기본 제공 응답으로 최종 사용자에게 응답합니다.
- 응답 제한 시간을 초과했습니다.
- 오류 상태 코드가 수신되었습니다.
- 응답이 잘못되었습니다.
- 웹훅 서비스를 사용할 수 없습니다.
또한 인텐트 일치가 인텐트 API 호출 감지로 트리거된 경우 인텐트 응답 감지의 status 필드에 웹훅 오류 정보가 포함됩니다. 예를 들면 다음과 같습니다.
"status": {
    "code": 206,
    "message": "Webhook call failed. <details of the error...>"
}
자동 재시도
Dialogflow ES에는 안정성을 높이기 위해 특정 웹훅 오류가 발생하면 자동으로 재시도하는 내부 메커니즘이 포함되어 있습니다. 시간 초과 또는 연결 오류와 같은 비종단적 오류만 재시도됩니다.
중복 호출 가능성을 줄이려면 다음 안내를 따르세요.
- 웹훅 제한 시간 기준점을 더 길게 설정합니다.
- 웹훅 로직 또는 중복 제거에서 멱등성을 지원합니다.
Cloud Functions 사용
fulfillment에 Cloud Functions를 사용하는 몇 가지 방법이 있습니다. Dialogflow 인라인 편집기는 Cloud Functions와 통합됩니다. 인라인 편집기를 사용하여 웹훅 코드를 만들고 수정하면 Dialogflow가 Cloud 함수에 대한 보안 연결을 설정합니다.
인라인 편집기로 만들지 않은 Cloud 함수를 사용할 수도 있습니다(Node.js가 아닌 언어를 사용하려는 경우). Cloud 함수가 에이전트와 동일한 프로젝트에 있으면 에이전트는 특별한 구성 없이 웹훅을 호출할 수 있습니다.
그러나 다음 두 상황에서는 이 통합을 수동으로 설정해야 합니다.
- 에이전트 프로젝트에 다음 주소를 사용하는 Dialogflow Service Agent 서비스 계정이 있어야 합니다.
service-agent-project-number@gcp-sa-dialogflow.iam.gserviceaccount.com
- 프로젝트의 새 에이전트를 만듭니다.
- 다음 명령어를 실행합니다.
gcloud beta services identity create --service=dialogflow.googleapis.com --project=agent-project-id
- 웹훅 함수가 에이전트가 아닌 다른 프로젝트에 있는 경우Cloud Functions 호출자 IAM 역할을 함수의 프로젝트의 Dialogflow 서비스 에이전트 서비스 계정에 제공해야 합니다.
서비스 ID 토큰
Dialogflow가 웹훅을 호출할 때 요청과 함께 Google ID 토큰을 제공합니다.
모든 웹훅은 Google 클라이언트 라이브러리 또는 github.com/googleapis/google-auth-library-nodejs와 같은 오픈소스 라이브러리를 사용하여 토큰을 선택적으로 검증할 수 있습니다.
예를 들어 다음과 같이 ID 토큰의 email을 확인할 수 있습니다.
service-agent-project-number@gcp-sa-dialogflow.iam.gserviceaccount.com
샘플
다음 샘플은 WebhookRequest를 수신하고 WebhookResponse를 전송하는 방법을 보여줍니다.
이 샘플은 빠른 시작에서 만든 인텐트를 참조합니다.
Go
CTS에 인증하려면 애플리케이션 기본 사용자 인증 정보를 설정합니다. 자세한 내용은 로컬 개발 환경의 인증 설정을 참조하세요.
import (
	"encoding/json"
	"fmt"
	"log"
	"net/http"
)

type intent struct {
	DisplayName string `json:"displayName"`
}

type queryResult struct {
	Intent intent `json:"intent"`
}

type text struct {
	Text []string `json:"text"`
}

type message struct {
	Text text `json:"text"`
}

// webhookRequest is used to unmarshal a WebhookRequest JSON object. Note that
// not all members need to be defined--just those that you need to process.
// As an alternative, you could use the types provided by
// the Dialogflow protocol buffers:
// https://godoc.org/google.golang.org/genproto/googleapis/cloud/dialogflow/v2#WebhookRequest
type webhookRequest struct {
	Session     string      `json:"session"`
	ResponseID  string      `json:"responseId"`
	QueryResult queryResult `json:"queryResult"`
}

// webhookResponse is used to marshal a WebhookResponse JSON object. Note that
// not all members need to be defined--just those that you need to process.
// As an alternative, you could use the types provided by
// the Dialogflow protocol buffers:
// https://godoc.org/google.golang.org/genproto/googleapis/cloud/dialogflow/v2#WebhookResponse
type webhookResponse struct {
	FulfillmentMessages []message `json:"fulfillmentMessages"`
}

// welcome creates a response for the welcome intent.
func welcome(request webhookRequest) (webhookResponse, error) {
	response := webhookResponse{
		FulfillmentMessages: []message{
			{
				Text: text{
					Text: []string{"Welcome from Dialogflow Go Webhook"},
				},
			},
		},
	}
	return response, nil
}

// getAgentName creates a response for the get-agent-name intent.
func getAgentName(request webhookRequest) (webhookResponse, error) {
	response := webhookResponse{
		FulfillmentMessages: []message{
			{
				Text: text{
					Text: []string{"My name is Dialogflow Go Webhook"},
				},
			},
		},
	}
	return response, nil
}

// handleError handles internal errors.
func handleError(w http.ResponseWriter, err error) {
	w.WriteHeader(http.StatusInternalServerError)
	fmt.Fprintf(w, "ERROR: %v", err)
}

// HandleWebhookRequest handles WebhookRequest and sends the WebhookResponse.
func HandleWebhookRequest(w http.ResponseWriter, r *http.Request) {
	var request webhookRequest
	var response webhookResponse
	var err error

	// Read input JSON
	if err = json.NewDecoder(r.Body).Decode(&request); err != nil {
		handleError(w, err)
		return
	}
	log.Printf("Request: %+v", request)

	// Call intent handler
	switch intent := request.QueryResult.Intent.DisplayName; intent {
	case "Default Welcome Intent":
		response, err = welcome(request)
	case "get-agent-name":
		response, err = getAgentName(request)
	default:
		err = fmt.Errorf("Unknown intent: %s", intent)
	}
	if err != nil {
		handleError(w, err)
		return
	}
	log.Printf("Response: %+v", response)

	// Send response
	if err = json.NewEncoder(w).Encode(&response); err != nil {
		handleError(w, err)
		return
	}
}
Java
CTS에 인증하려면 애플리케이션 기본 사용자 인증 정보를 설정합니다. 자세한 내용은 로컬 개발 환경의 인증 설정을 참조하세요.
Node.js
CTS에 인증하려면 애플리케이션 기본 사용자 인증 정보를 설정합니다. 자세한 내용은 로컬 개발 환경의 인증 설정을 참조하세요.
Python
CTS에 인증하려면 애플리케이션 기본 사용자 인증 정보를 설정합니다. 자세한 내용은 로컬 개발 환경의 인증 설정을 참조하세요.