Datastream 支援將 Oracle、MySQL 和 PostgreSQL 資料庫的資料直接串流至 BigQuery 資料集。不過,如果您需要進一步控管串流處理邏輯 (例如資料轉換或手動設定邏輯主鍵),可以將 Datastream 與 Dataflow 工作範本整合。
本教學課程說明 Datastream 如何與 Dataflow 整合,方法是使用 Dataflow 工作範本,將 BigQuery 中最新的具體化檢視區塊串流至 Dataflow 進行分析。
如果機構有許多獨立的資料來源,存取機構內企業資料的權限可能會受到限制,速度也會較慢,尤其是即時存取。這會限制機構的內省能力。
Datastream 可近乎即時地存取各種內部部署和雲端資料來源的異動資料。Datastream 提供設定體驗,您不必為串流資料進行太多設定,Datastream 會為您完成這項作業。Datastream 也提供統一的取用 API,讓貴機構能輕鬆存取最新的企業資料,建構整合式情境。
其中一個例子是將資料從來源資料庫移轉至雲端儲存空間服務或訊息佇列。Datastream 串流資料後,資料會轉換為其他應用程式和服務可讀取的格式。在本教學課程中,Dataflow 是與儲存服務或訊息佇列通訊的網路服務,可擷取及處理 Google Cloud上的資料。
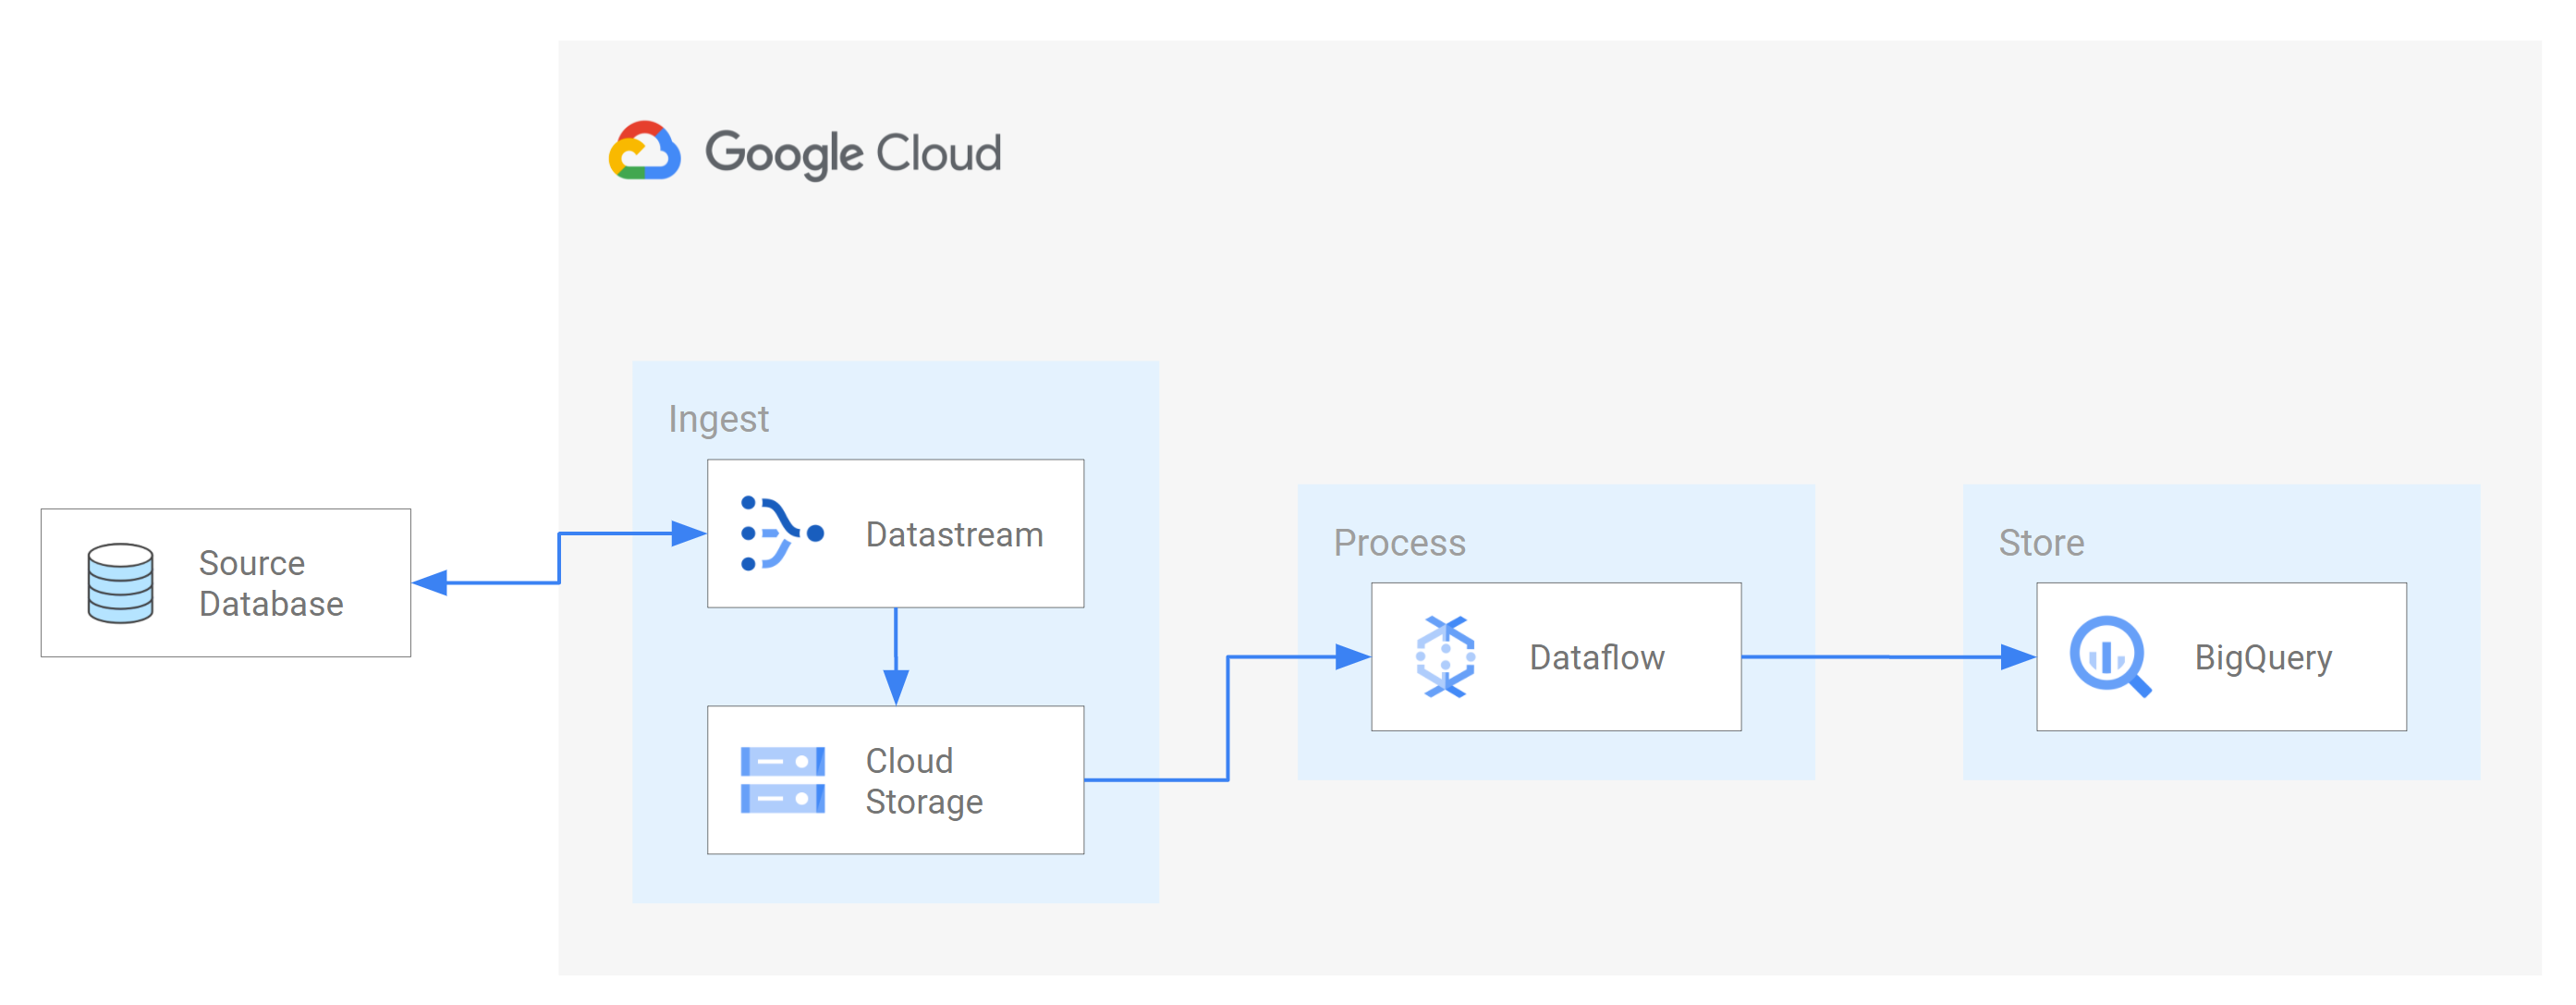
瞭解如何使用 Datastream,將來源 MySQL 資料庫的變更 (插入、更新或刪除的資料) 串流至 Cloud Storage 值區中的資料夾。接著,您會設定 Cloud Storage bucket 傳送通知,Dataflow 會使用這些通知瞭解任何包含資料變更的新檔案,而 Datastream 會從來源資料庫串流這些變更。接著,Dataflow 工作會處理檔案,並將變更內容移轉至 BigQuery。
目標
在本教學課程中,您將執行下列作業:- 在 Cloud Storage 中建立值區。這是目的地值區,Datastream 會將來源 MySQL 資料庫的結構定義、資料表和資料串流至這個值區。
- 為 Cloud Storage 值區啟用 Pub/Sub 通知。這樣做是為了設定值區傳送通知,讓 Dataflow 瞭解是否有新檔案可供處理。這些檔案包含 Datastream 從來源資料庫串流至 Bucket 的資料變更。
- 在 BigQuery 中建立資料集。BigQuery 會使用資料集來存放從 Dataflow 接收的資料。這項資料代表 Datastream 串流至 Cloud Storage bucket 的來源資料庫異動。
- 為來源資料庫和 Cloud Storage 中的目的地 bucket 建立及管理連線設定檔。Datastream 中的串流會使用連線設定檔中的資訊,將資料從來源資料庫轉移至值區。
- 建立並啟動串流。這個串流會將來源資料庫中的資料、結構定義和資料表移轉至值區。
- 確認 Datastream 會將與來源資料庫結構定義相關聯的資料和資料表移轉至該值區。
- 在 Dataflow 中建立工作。Datastream 將來源資料庫的資料變更串流至 Cloud Storage bucket 後,系統會將含有變更的新檔案通知傳送至 Dataflow。Dataflow 工作會處理檔案,並將變更轉移至 BigQuery。
- 確認 Dataflow 會處理含有與這項資料相關聯變更內容的檔案,並將變更內容轉移至 BigQuery。這樣一來,Datastream 和 BigQuery 之間就會完成端對端整合。
- 清除在 Datastream、Cloud Storage、Pub/Sub、Dataflow 和 BigQuery 上建立的資源,以免資源占用配額,也避免系統日後向您收取資源費用。
費用
在本文件中,您會使用下列 Google Cloud的計費元件:
- Datastream
- Cloud Storage
- Pub/Sub
- Dataflow
- BigQuery
如要根據預測用量估算費用,請使用 Pricing Calculator。
事前準備
- Sign in to your Google Cloud account. If you're new to Google Cloud, create an account to evaluate how our products perform in real-world scenarios. New customers also get $300 in free credits to run, test, and deploy workloads.
-
In the Google Cloud console, on the project selector page, select or create a Google Cloud project.
Roles required to select or create a project
- Select a project: Selecting a project doesn't require a specific IAM role—you can select any project that you've been granted a role on.
-
Create a project: To create a project, you need the Project Creator
(
roles/resourcemanager.projectCreator), which contains theresourcemanager.projects.createpermission. Learn how to grant roles.
-
Verify that billing is enabled for your Google Cloud project.
-
In the Google Cloud console, on the project selector page, select or create a Google Cloud project.
Roles required to select or create a project
- Select a project: Selecting a project doesn't require a specific IAM role—you can select any project that you've been granted a role on.
-
Create a project: To create a project, you need the Project Creator
(
roles/resourcemanager.projectCreator), which contains theresourcemanager.projects.createpermission. Learn how to grant roles.
-
Verify that billing is enabled for your Google Cloud project.
- 啟用 Datastream API。
- 確認您的使用者帳戶已獲授 Datastream 管理員角色。
- 請確認您有 Datastream 可存取的來源 MySQL 資料庫。此外,請確認資料庫中是否有資料、資料表和結構定義。
- 將 MySQL 資料庫設為允許來自 Datastream 公開 IP 位址的連入連線。如需所有 Datastream 區域及其相關聯公開 IP 位址的清單,請參閱「IP 許可清單和區域」。
- 為來源資料庫設定變更資料擷取 (CDC)。詳情請參閱「設定來源 MySQL 資料庫」。
請確認您已符合所有必要條件,才能為 Cloud Storage 啟用 Pub/Sub 通知。
在本教學課程中,您會在 Cloud Storage 中建立目的地 bucket,並為該 bucket 啟用 Pub/Sub 通知。這樣一來,Dataflow 就能接收 Datastream 寫入值區的新檔案通知。這些檔案包含 Datastream 從來源資料庫串流至 Cloud Storage 值區的資料變更。
需求條件
Datastream 提供多種來源選項、目的地選項和網路連線方法。
在本教學課程中,我們假設您使用獨立的 MySQL 資料庫和目的地 Cloud Storage 服務。對於來源資料庫,您應該可以設定網路來新增輸入防火牆規則。來源資料庫可位於地端部署系統中,或其他雲端服務供應商的系統中。如果是 Cloud Storage 目的地,則不需要設定連線。
由於我們無法瞭解您的環境詳情,因此無法提供網路設定的詳細步驟。
在本教學課程中,您會選取「IP 許可清單」做為網路連線方法。IP 位址許可清單是一項安全功能,通常用於限制及控管可存取來源資料庫中資料的信任使用者。您可以透過 IP 允許清單建立信任的 IP 位址或 IP 範圍清單,讓使用者和其他服務 (例如 Datastream) 存取這些資料。 Google Cloud 如要使用 IP 許可清單,您必須開放來源資料庫或防火牆,允許來自 Datastream 的連入連線。
在 Cloud Storage 中建立 bucket
在 Cloud Storage 中建立目的地 bucket,Datastream 會將來源 MySQL 資料庫的結構定義、資料表和資料串流至該 bucket。
前往 Google Cloud 控制台的 Cloud Storage「瀏覽器」頁面。
按一下「建立 bucket」。「建立 bucket」頁面隨即顯示。
在「為值區命名」區域的文字欄位中,輸入值區的專屬名稱,然後按一下「繼續」。
接受網頁其餘區域的預設設定。在每個區域的結尾,按一下「繼續」。
點選「建立」。
為 Cloud Storage 值區啟用 Pub/Sub 通知
在本節中,您將為建立的 Cloud Storage bucket 啟用 Pub/Sub 通知。這樣做是為了設定值區,在 Datastream 將任何新檔案寫入值區時通知 Dataflow。這些檔案包含 Datastream 從來源 MySQL 資料庫串流至 Bucket 的資料變更。
存取您建立的 Cloud Storage bucket。「Bucket details」(值區詳細資料) 頁面隨即顯示。
按一下 「Activate Cloud Shell」(啟用 Cloud Shell)。
在提示中輸入下列指令:
gcloud storage buckets notifications create gs://bucket-name --topic=my_integration_notifs --payload-format=json --object-prefix=integration/tutorial/選用:如果出現「Authorize Cloud Shell」(授權 Cloud Shell) 視窗,請按一下「Authorize」(授權)。
確認您看到下列幾行程式碼:
Created Cloud Pub/Sub topic projects/project-name/topics/my_integration_notifs
Created notification config projects/_/buckets/bucket-name/notificationConfigs/1
前往 Google Cloud 控制台的 Pub/Sub「主題」頁面。
按一下您建立的 my_integration_notifs 主題。
在「my_integration_notifs」my_integration_notifs頁面中,前往頁面底部。確認「訂閱項目」分頁已啟用,且顯示「沒有可顯示的訂閱項目」訊息。
按一下「Create Subscription」 (建立訂閱項目)。
在隨即顯示的選單中,選取「建立訂閱項目」。
在「將訂閱項目新增至主題」頁面中:
- 在「Subscription ID」(訂閱 ID) 欄位中輸入
my_integration_notifs_sub。 - 將「Acknowledgement deadline」(確認期限) 值設為
120秒。這樣 Dataflow 就能有充足的時間確認已處理的檔案,並提升 Dataflow 作業的整體效能。如要進一步瞭解 Pub/Sub 訂閱項目屬性,請參閱「訂閱項目屬性」。 - 保留頁面上的所有其他預設值。
- 點選「建立」。
- 在「Subscription ID」(訂閱 ID) 欄位中輸入
在本教學課程中,您稍後會建立 Dataflow 工作。建立這項工作時,您會將 Dataflow 指派為 my_integration_notifs_sub 訂閱項目的訂閱者。這樣一來,Dataflow 就能接收 Datastream 寫入 Cloud Storage 的新檔案通知、處理檔案,並將資料變更內容轉移至 BigQuery。
在 BigQuery 中建立資料集
在本節中,您將在 BigQuery 建立資料集。BigQuery 會使用資料集來存放從 Dataflow 接收的資料。這項資料代表來源 MySQL 資料庫中的變更,Datastream 會將這些變更串流至 Cloud Storage 值區。
前往 Google Cloud 控制台的 BigQuery「SQL workspace」(SQL 工作區) 頁面。
在「Explorer」窗格中,點選 Google Cloud 專案名稱旁的「查看動作」圖示 。
在隨即顯示的選單中,選取「建立資料集」。
在「建立資料集」視窗中:
- 在「Dataset ID」(資料集 ID) 欄位中,輸入資料集 ID。在本教學課程中,請在欄位中輸入
My_integration_dataset_log。 - 視窗中的其他預設值則維持不變。
- 點選「建立資料集」。
- 在「Dataset ID」(資料集 ID) 欄位中,輸入資料集 ID。在本教學課程中,請在欄位中輸入
在「Explorer」窗格中,找到 Google Cloud 專案名稱,然後點選「Expand node」(展開節點) ,確認您看到建立的資料集。
請按照這個程序的步驟建立第二個資料集:My_integration_dataset_final。
展開每個資料集旁的 「展開節點」。
確認每個資料集都是空白。
Datastream 將來源資料庫的資料變更串流至 Cloud Storage 值區後,Dataflow 作業會處理含有變更內容的檔案,並將變更內容轉移至 BigQuery 資料集。
在 Datastream 中建立連線設定檔
在本節中,您將在 Datastream 中為來源資料庫和目的地建立連線設定檔。建立連線設定檔時,請選取「MySQL」做為來源連線設定檔的設定檔類型,並選取「Cloud Storage」做為目的地連線設定檔的設定檔類型。
Datastream 會使用連線設定檔中定義的資訊,連線至來源和目的地,以便將來源資料庫中的資料串流至 Cloud Storage 中的目的地值區。
為 MySQL 資料庫建立來源連線設定檔
在 Google Cloud 控制台中,前往 Datastream 的「連線設定檔」頁面。
按一下 Create profile。
如要為 MySQL 資料庫建立來源連線設定檔,請在「建立連線設定檔」頁面中,點選「MySQL」設定檔類型。
在「Create MySQL profile」(建立 MySQL 設定檔) 頁面的「Define connection settings」(定義連線設定) 部分,提供下列資訊:
- 在「連線設定檔名稱」欄位中,輸入
My Source Connection Profile。 - 保留系統自動產生的「連線設定檔 ID」。
選取要儲存連線設定檔的「Region」(區域)。
輸入連線詳細資料:
- 在「Hostname or IP」(主機名稱或 IP) 欄位中,輸入 Datastream 可用來連線至來源資料庫的主機名稱或公開 IP 位址。您提供公開 IP 位址,是因為在本教學課程中,您使用 IP 許可清單做為網路連線方法。
- 在「Port」(通訊埠) 欄位中,輸入為來源資料庫保留的通訊埠號碼。如果是 MySQL 資料庫,預設通訊埠通常為
3306。 - 輸入「使用者名稱」和「密碼」,向來源資料庫驗證身分。
- 在「連線設定檔名稱」欄位中,輸入
在「定義連線設定」部分中,按一下「繼續」。「建立 MySQL 設定檔」頁面的「保護與來源的連線」部分處於啟用狀態。
在「加密類型」選單中選取「無」。如要進一步瞭解這個選單,請參閱「建立 MySQL 資料庫的連線設定檔」。
在「確保與來源的連線安全無虞」部分,按一下「繼續」。「建立 MySQL 設定檔」頁面的「定義連線方式」部分會處於啟用狀態。
在「連線方式」下拉式選單中,選擇要用來建立 Datastream 與來源資料庫之間連線的網路方法。在本教學課程中,請選取「IP 許可清單」做為連線方式。
設定來源資料庫,允許來自顯示的 Datastream 公開 IP 位址的連入連線。
在「定義連線方式」部分中,按一下「繼續」。「Create MySQL profile」(建立 MySQL 設定檔) 頁面的「Test connection profile」(測試連線設定檔) 部分會處於啟用狀態。
點選「執行測試」,確認來源資料庫和 Datastream 可以相互通訊。
確認狀態為「測試通過」。
點選「建立」。
為 Cloud Storage 建立目的地連線設定檔
在 Google Cloud 控制台中,前往 Datastream 的「連線設定檔」頁面。
按一下 Create profile。
如要為 Cloud Storage 建立目的地連線設定檔,請在「建立連線設定檔」頁面中,點選「Cloud Storage」設定檔類型。
在「建立 Cloud Storage 設定檔」頁面中,提供下列資訊:
- 在「連線設定檔名稱」欄位中,輸入
My Destination Connection Profile。 - 保留系統自動產生的「連線設定檔 ID」。
- 選取要儲存連線設定檔的「Region」(區域)。
在「連線詳細資料」窗格中,按一下「瀏覽」,選取您在本教學課程稍早建立的 Cloud Storage bucket。這是 Datastream 將來源資料庫中的資料轉移至其中的 bucket。選取完畢後,按一下「選取」。
值區會顯示在「連線詳細資料」窗格的「值區名稱」欄位中。
在「連線設定檔路徑前置字串」欄位中,提供要附加至值區名稱的路徑前置字串,Datastream 將資料串流至目的地時會使用這個路徑。請確認 Datastream 是將資料寫入 bucket 內的路徑,而非 bucket 根資料夾。在本教學課程中,請使用您設定 Pub/Sub 通知時定義的路徑。在欄位中輸入
/integration/tutorial。
- 在「連線設定檔名稱」欄位中,輸入
點選「建立」。
為 MySQL 資料庫建立來源連線設定檔,並為 Cloud Storage 建立目的地連線設定檔後,即可使用這些設定檔建立串流。
在 Datastream 中建立串流
在本節中,您將建立串流。這項串流會使用連線設定檔中的資訊,將來源 MySQL 資料庫中的資料移轉至 Cloud Storage 中的目的地 bucket。
定義串流的設定
在 Google Cloud 控制台中,前往 Datastream 的「Streams」頁面。
按一下 [建立訊息串]。
在「建立串流」頁面的「定義串流詳細資料」面板中,提供下列資訊:
- 在「Stream name」(串流名稱) 欄位中,輸入
My Stream。 - 保留系統自動產生的串流 ID。
- 在「Region」(區域) 選單中,選取您建立來源和目的地連線設定檔的區域。
- 在「來源類型」選單中,選取「MySQL」設定檔類型。
- 在「目的地類型」選單中,選取「Cloud Storage」設定檔類型。
- 在「Stream name」(串流名稱) 欄位中,輸入
查看自動生成的需求條件,瞭解如何準備串流環境。這些必要條件可能包括如何設定來源資料庫,以及如何將 Datastream 連線至 Cloud Storage 中的目的地 bucket。
按一下「繼續」。「Create stream」(建立串流) 頁面會顯示「Define MySQL connection profile」(定義 MySQL 連線設定檔) 面板。
指定來源連線設定檔的相關資訊
在本節中,請選取您為來源資料庫建立的連線設定檔 (來源連線設定檔)。在本教學課程中,這是「My Source Connection Profile」(我的來源連線設定檔)。
在「Source connection profile」(來源連線設定檔) 選單中,選取 MySQL 資料庫的來源連線設定檔。
點選「執行測試」,確認來源資料庫和 Datastream 可以相互通訊。
如果測試失敗,系統會顯示與連線設定檔相關的問題。如需疑難排解步驟,請參閱「診斷問題」頁面。進行必要變更來修正問題,然後重新測試。
按一下「繼續」。「Create stream」(建立串流) 頁面會顯示「Configure stream source」(設定串流來源) 面板。
設定串流的來源資料庫相關資訊
在本節中,您將指定來源資料庫中的資料表和結構定義,設定串流的來源資料庫相關資訊,讓 Datastream 執行下列操作:
- 可轉移至目的地。
- 無法轉移至目的地。
您也可以決定 Datastream 是否要補充歷來資料,以及是否要將持續變更的資料串流至目的地,或只串流資料變更。
使用「Objects to include」(要包含的物件)選單,指定 Datastream 可轉移至 Cloud Storage 目的地 bucket 中資料夾的來源資料庫資料表和結構定義。只有在資料庫最多有 5,000 個物件時,系統才會載入選單。
在本教學課程中,您希望 Datastream 轉移所有資料表和結構定義。因此,請從選單中選取「採用任何結構定義的所有資料表」。
確認「Select objects to exclude」(選取要排除的物件) 面板已設為「None」(無)。您不希望限制 Datastream 將來源資料庫中的任何資料表和結構定義移轉至 Cloud Storage。
確認「Choose backfill mode for historical data」(選擇歷來資料的補充作業模式) 面板已設為「Automatic」(自動)。除了資料變動外,Datastream 也會將來源中的所有現有資料串流至目的地。
按一下「繼續」。「Create stream」(建立串流) 頁面的「Define Cloud Storage connection profile」(定義 Cloud Storage 連線設定檔) 面板隨即顯示。
選取目的地連線設定檔
在本節中,請選取您為 Cloud Storage 建立的連線設定檔 (目的地連線設定檔)。在本教學課程中,這是「My Destination Connection Profile」。
從「Destination connection profile」(目的地連線設定檔) 選單中,選取 Cloud Storage 的目的地連線設定檔。
按一下「繼續」。「建立串流」頁面會顯示「設定串流目的地」面板。
設定串流目的地的相關資訊
在本節中,您將設定串流的目的地 bucket 相關資訊。這類資訊包括:
- 寫入 Cloud Storage 的檔案輸出格式。
- Datastream 會將來源資料庫的結構定義、資料表和資料移轉至這個目的地 bucket 的資料夾。
在「輸出格式」欄位中,選取寫入 Cloud Storage 的檔案格式。Datastream 支援兩種輸出格式:Avro 和 JSON。在本教學課程中,檔案格式為 Avro。
按一下「繼續」。「建立串流」頁面隨即顯示「查看串流詳細資料並建立」面板。
建立串流
驗證串流的詳細資料,以及串流用來將資料從來源 MySQL 資料庫移轉至 Cloud Storage 目的地值區的來源和目的地連線設定檔。
如要驗證串流,請按一下「執行驗證」。驗證串流時,Datastream 會檢查來源設定是否正確、驗證串流是否能連線至來源和目的地,並驗證串流的端對端設定。
通過所有驗證檢查後,按一下「建立」。
在「建立串流?」對話方塊中,按一下「建立」。
開始直播
在本教學課程中,您會分別建立及啟動串流,以免串流建立程序對來源資料庫造成負擔。如要延後載入,請先建立串流,但不要啟動,等到資料庫可以處理負載時再啟動串流。
啟動串流後,Datastream 就能將來源資料庫中的資料、結構定義和資料表轉移至目的地。
在 Google Cloud 控制台中,前往 Datastream 的「Streams」頁面。
勾選要啟動的串流旁邊的核取方塊。在本教學課程中,這個串流是「My Stream」。
按一下「啟動」。
在對話方塊中,按一下「開始」。串流的狀態會從「
Not started」變更為「Starting」,再變更為「Running」。
啟動串流後,您可以確認 Datastream 是否已將資料從來源資料庫轉移至目的地。
驗證串流
在本節中,您會確認 Datastream 將來源 MySQL 資料庫的所有資料表,轉移至 Cloud Storage 目的地 bucket 的 /integration/tutorial 資料夾。
在 Google Cloud 控制台中,前往 Datastream 的「Streams」頁面。
按一下你建立的串流。在本教學課程中,這個串流是「My Stream」。
在「Stream details」(串流詳細資料) 頁面中,按一下 bucket-name/integration/tutorial 連結,其中 bucket-name 是您為 Cloud Storage bucket 命名的名稱。這個連結會顯示在「目的地寫入路徑」欄位後方。Cloud Storage 的「Bucket details」(值區詳細資料) 頁面會在另一個分頁中開啟。
確認您看見代表來源資料庫資料表的資料夾。
按一下其中一個資料表資料夾,然後逐一按一下每個子資料夾,直到看到與資料表相關聯的資料為止。
建立 Dataflow 工作
在本節中,您將在 Dataflow 中建立工作。Datastream 將來源 MySQL 資料庫的資料異動串流至 Cloud Storage 值區後,Pub/Sub 會將含有異動內容的新檔案通知傳送至 Dataflow。Dataflow 工作會處理檔案,並將變更轉移至 BigQuery。
前往 Google Cloud 控制台的 Dataflow「Jobs」(工作) 頁面。
按一下 [Create job from template] (利用範本建立工作)。
在「Create job from template」(從範本建立工作) 頁面的「Job name」(工作名稱) 欄位中,輸入要建立的 Dataflow 工作名稱。在本教學課程中,請在欄位中輸入
my-dataflow-integration-job。在「Dataflow template」(Dataflow 範本) 選單中,選取用於建立工作的範本。在本教學課程中,請選取「Datastream to BigQuery」(Datastream 到 BigQuery)。
選取後,畫面上會顯示與範本相關的其他欄位。
在「File location for Datastream file output in Cloud Storage」(Cloud Storage 中 Datastream 檔案輸出位置) 欄位中,使用
gs://bucket-name格式輸入 Cloud Storage bucket 名稱。在「Pub/Sub subscription being used in a Cloud Storage notification policy」(Cloud Storage 通知政策中使用的 Pub/Sub 訂閱項目) 欄位中,輸入包含 Pub/Sub 訂閱項目名稱的路徑。在本教學課程中,請輸入
projects/project-name/subscriptions/my_integration_notifs_sub。在「Datastream output file format (avro/json).」(Datastream 輸出檔案格式 (avro/json)) 欄位中,輸入
avro,因為在本教學課程中,Avro 是 Datastream 寫入 Cloud Storage 的檔案格式。在「Name or template for the dataset to contain staging tables」(要包含暫存資料表的資料集名稱或範本) 欄位中,輸入
My_integration_dataset_log,因為 Dataflow 會使用這個資料集,暫存從 Datastream 收到的資料變更。在「Template for the dataset to contain replica tables」(要包含副本資料表的資料集範本) 欄位中,輸入
My_integration_dataset_final,因為這是資料集,在 My_integration_dataset_log 資料集中暫存的變更會合併至這個資料集,以建立來源資料庫中資料表的一對一副本。在「Dead letter queue directory」(無法傳送的訊息佇列目錄) 欄位中,輸入包含 Cloud Storage 值區名稱和無法傳送的訊息佇列資料夾的路徑。請勿使用根資料夾中的路徑,且路徑不得與 Datastream 寫入資料的路徑相同。如果 Dataflow 無法將資料變更項目移轉至 BigQuery,這些項目會儲存在佇列中。您可以修正佇列中的內容,讓 Dataflow 重新處理。
在本教學課程中,請在「Dead letter queue directory」(無法傳送的訊息佇列目錄) 欄位中輸入
gs://bucket-name/dlq(其中 bucket-name 是 bucket 的名稱,而 dlq 是無法傳送的訊息佇列的資料夾)。按一下「Run Job」(執行工作)。
驗證整合
在本教學課程的「驗證串流」一節中,您已確認 Datastream 將來源 MySQL 資料庫中所有資料表內的資料,轉移至 Cloud Storage 目的地值區的 /integration/tutorial 資料夾。
在本節中,您會驗證 Dataflow 是否處理包含與這項資料相關聯變更內容的檔案,並將變更內容轉移至 BigQuery。這樣一來,Datastream 和 BigQuery 之間就會完成端對端整合。
前往 Google Cloud 控制台的 BigQuery「SQL 工作區」頁面。
在「Explorer」窗格中,展開 Google Cloud 專案名稱旁邊的節點。
展開「My_integration_dataset_log」和「My_integration_dataset_final」資料集旁的節點。
確認每個資料集現在都包含資料。這表示 Dataflow 已處理包含與資料相關聯變更的檔案,而 Datastream 已將這些變更串流至 Cloud Storage,並轉移至 BigQuery。
清除所用資源
如要避免系統向您的 Google Cloud 帳戶收取本教學課程所用資源的費用,請使用 Google Cloud 控制台執行下列操作:
- 刪除專案、Datastream 串流和 Datastream 連線設定檔。
- 停止 Dataflow 工作。
- 刪除 BigQuery 資料集、Pub/Sub 主題和訂閱項目,以及 Cloud Storage bucket。
清除在 Datastream、Dataflow、BigQuery、Pub/Sub 和 Cloud Storage 中建立的資源,可避免資源占用配額,且日後不需再為這些資源付費。
刪除專案
如要避免付費,最簡單的方法就是刪除您為了本教學課程所建立的專案。
前往 Google Cloud 控制台的「Manage resources」(管理資源) 頁面。
在專案清單中選取要刪除的專案,然後點按「刪除」。
如要刪除專案,請在對話方塊中輸入專案 ID,然後按一下「Shut down」(關閉)。
刪除串流
在 Google Cloud 控制台中,前往 Datastream 的「Streams」頁面。
按一下要刪除的串流。在本教學課程中,這個串流是「My Stream」。
按一下「暫停」。
在對話方塊中,按一下「暫停」。
在「串流詳細資料」頁面的「串流狀態」窗格中,確認串流的狀態為
Paused。點選「刪除」。
在對話方塊的文字欄位中輸入
Delete,然後按一下「Delete」(刪除)。
刪除連線設定檔
在 Google Cloud 控制台中,前往 Datastream 的「連線設定檔」頁面。
勾選要刪除的連線設定檔核取方塊:「我的來源連線設定檔」和「我的目的地連線設定檔」。
點選「刪除」。
在對話方塊中按一下「刪除」。
停止 Dataflow 工作
前往 Google Cloud 控制台的 Dataflow「Jobs」(工作) 頁面。
按一下要停止的工作。在本教學課程中,這個值是 my-dataflow-integration-job。
按一下「停止」。
在「停止工作」對話方塊中,選取「排除」選項,然後按一下「停止工作」。
刪除 BigQuery 資料集
前往 Google Cloud 控制台的 BigQuery「SQL 工作區」頁面。
在「Explorer」窗格中,展開 Google Cloud 專案名稱旁邊的節點。
按一下在「在 BigQuery 中建立資料集」中建立的其中一個資料集右側的「查看動作」按鈕。這個按鈕看起來像是直向省略號。
在本教學課程中,請點選「My_integration_dataset_log」右側的「查看動作」按鈕。
在顯示的下拉式選單中選取「刪除」。
在「Delete dataset?」(要刪除資料集嗎?) 對話方塊中,在文字欄位輸入
delete,然後按一下「Delete」(刪除)。重複執行本程序中的步驟,刪除您建立的第二個資料集:My_integration_dataset_final。
刪除 Pub/Sub 訂閱項目和主題
前往 Google Cloud 控制台的 Pub/Sub「Subscriptions」(訂閱項目) 頁面。
按一下要刪除的訂閱項目旁邊的核取方塊。在本教學課程中,請按一下「my_integration_notifs_sub」my_integration_notifs_sub訂閱項目旁邊的核取方塊。
點選「刪除」。
在「刪除訂閱」對話方塊中,按一下「刪除」。
前往 Google Cloud 控制台的 Pub/Sub「主題」頁面。
按一下「my_integration_notifs」my_integration_notifs主題旁邊的核取方塊。
點選「刪除」。
在「Delete topic」(刪除主題) 對話方塊中,在文字欄位輸入
delete,然後按一下「Delete」(刪除)。
刪除 Cloud Storage 值區
前往 Google Cloud 控制台的 Cloud Storage「瀏覽器」頁面。
選取 bucket 旁的核取方塊。
點選「刪除」。
在對話方塊的文字欄位中輸入
Delete,然後按一下「Delete」(刪除)。
後續步驟
- 進一步瞭解 Datastream。
- 使用舊版串流 API,對串流至 BigQuery 的資料執行進階功能。
- 歡迎自行試用其他 Google Cloud 功能,請參考我們的教學課程。