本教學課程建議採用雙區域災難復原和業務持續性策略,並使用 Dataproc Metastore。本教學課程使用雙區域值區,同時儲存 Hive 資料集和 Hive 中繼資料匯出項目。
Dataproc Metastore 是全代管、高可用性、自動擴縮、自動修復的 OSS 原生中繼存放區服務,可大幅簡化技術中繼資料管理作業。我們的代管服務以 Apache Hive Metastore 為基礎,是企業資料湖泊的重要元件。
本教學課程適用於 Google Cloud 需要高可用性 Hive 資料和中繼資料的客戶。這項服務使用 Cloud Storage 做為儲存空間、Dataproc 做為運算資源,以及 Dataproc Metastore (DPMS),這是 Google Cloud上的全代管 Hive Metastore 服務。本教學課程也提供兩種不同的容錯移轉協調方式:一種是使用 Cloud Run 和 Cloud Scheduler,另一種是使用 Cloud Composer。
本教學課程使用的雙地區方法有以下優缺點:
優點
- 雙地區 bucket 提供異地備援機制。
- 雙區域值區的服務水準協議保證可用性達 99.95%,單一區域值區則為 99.9%。
- 雙區域 bucket 在兩個區域中都有最佳化效能,而單一區域 bucket 在處理其他區域的資源時,效能則不如雙區域 bucket。
缺點
- 雙區域值區寫入作業不會立即複製到兩個區域。
- 雙區域 bucket 的儲存費用高於單一區域 bucket。
參考架構
下方架構圖顯示您將在本教學課程使用的元件。在兩張圖中,大型紅色 X 表示主要區域發生故障:
 圖 1:使用 Cloud Run 和 Cloud Scheduler
 圖 2:使用 Cloud Composer
解決方案的元件及其關係如下:
- 兩個 Cloud Storage 雙區域值區:您需要建立一個值區來存放 Hive 資料,另一個值區則用於定期備份 Hive 中繼資料。建立雙區域值區時,請確保這些值區與存取資料的 Hadoop 叢集使用相同區域。
- 使用 DPMS 的 Hive Metastore:您會在主要區域 (區域 A) 建立這個 Hive Metastore。Metastore 設定會指向 Hive 資料 bucket。使用 Dataproc 的 Hadoop 叢集必須與所連結的 DPMS 執行個體位於同一區域。
- 第二個 DPMS 執行個體:您會在待命區域 (區域 B) 中建立第二個 DPMS 執行個體,以防發生區域範圍的故障。然後將匯出 bucket 中最新的
hive.sql匯出檔案匯入備用 DPMS。您也會在待命區域中建立 Dataproc 叢集,並將其附加至待命 DPMS 執行個體。最後,在災害復原情境中,您會將用戶端應用程式從 A 區域的 Dataproc 叢集重新導向至 B 區域的 Dataproc 叢集。 Cloud Run 部署作業:您可以在 A 區域建立 Cloud Run 部署作業,使用 Cloud Scheduler 定期將 DPMS 中繼資料匯出至中繼資料備份值區 (如圖 1 所示)。匯出內容為 SQL 檔案,其中包含 DPMS 中繼資料的完整傾印。
如果您已有 Cloud Composer 環境,可以在該環境中執行 Airflow DAG,自動調度 DPMS 中繼資料的匯出和匯入作業 (如圖 2 所示)。使用 Airflow DAG 時,會取代先前提及的 Cloud Run 方法。
目標
- 為 Hive 資料和 Hive Metastore 備份設定雙區域儲存空間。
- 在 A 和 B 區域中部署 Dataproc Metastore 和 Dataproc 叢集。
- 將部署作業容錯移轉至區域 B。
- 將部署作業還原至 A 區域。
- 建立自動 Hive 中繼存放區備份。
- 透過 Cloud Run 自動化調度管理中繼資料匯出和匯入作業。
- 透過 Cloud Composer 自動調度管理中繼資料匯出和匯入作業。
費用
在本文件中,您會使用 Google Cloud的下列計費元件:
如要根據預測用量估算費用,請使用 Pricing Calculator。
事前準備
- Sign in to your Google Cloud account. If you're new to Google Cloud, create an account to evaluate how our products perform in real-world scenarios. New customers also get $300 in free credits to run, test, and deploy workloads.
-
In the Google Cloud console, on the project selector page, select or create a Google Cloud project.
Roles required to select or create a project
- Select a project: Selecting a project doesn't require a specific IAM role—you can select any project that you've been granted a role on.
-
Create a project: To create a project, you need the Project Creator
(
roles/resourcemanager.projectCreator), which contains theresourcemanager.projects.createpermission. Learn how to grant roles.
-
Verify that billing is enabled for your Google Cloud project.
-
Enable the Dataproc, and Dataproc Metastore APIs.
Roles required to enable APIs
To enable APIs, you need the Service Usage Admin IAM role (
roles/serviceusage.serviceUsageAdmin), which contains theserviceusage.services.enablepermission. Learn how to grant roles. -
Create a service account:
-
Ensure that you have the Create Service Accounts IAM role
(
roles/iam.serviceAccountCreator). Learn how to grant roles. -
In the Google Cloud console, go to the Create service account page.
Go to Create service account - Select your project.
-
In the Service account name field, enter a name. The Google Cloud console fills in the Service account ID field based on this name.
In the Service account description field, enter a description. For example,
Service account for quickstart. - Click Create and continue.
-
Grant the Project > Owner role to the service account.
To grant the role, find the Select a role list, then select Project > Owner.
- Click Continue.
-
Click Done to finish creating the service account.
Do not close your browser window. You will use it in the next step.
-
Ensure that you have the Create Service Accounts IAM role
(
-
Create a service account key:
- In the Google Cloud console, click the email address for the service account that you created.
- Click Keys.
- Click Add key, and then click Create new key.
- Click Create. A JSON key file is downloaded to your computer.
- Click Close.
-
In the Google Cloud console, on the project selector page, select or create a Google Cloud project.
Roles required to select or create a project
- Select a project: Selecting a project doesn't require a specific IAM role—you can select any project that you've been granted a role on.
-
Create a project: To create a project, you need the Project Creator
(
roles/resourcemanager.projectCreator), which contains theresourcemanager.projects.createpermission. Learn how to grant roles.
-
Verify that billing is enabled for your Google Cloud project.
-
Enable the Dataproc, and Dataproc Metastore APIs.
Roles required to enable APIs
To enable APIs, you need the Service Usage Admin IAM role (
roles/serviceusage.serviceUsageAdmin), which contains theserviceusage.services.enablepermission. Learn how to grant roles. -
Create a service account:
-
Ensure that you have the Create Service Accounts IAM role
(
roles/iam.serviceAccountCreator). Learn how to grant roles. -
In the Google Cloud console, go to the Create service account page.
Go to Create service account - Select your project.
-
In the Service account name field, enter a name. The Google Cloud console fills in the Service account ID field based on this name.
In the Service account description field, enter a description. For example,
Service account for quickstart. - Click Create and continue.
-
Grant the Project > Owner role to the service account.
To grant the role, find the Select a role list, then select Project > Owner.
- Click Continue.
-
Click Done to finish creating the service account.
Do not close your browser window. You will use it in the next step.
-
Ensure that you have the Create Service Accounts IAM role
(
-
Create a service account key:
- In the Google Cloud console, click the email address for the service account that you created.
- Click Keys.
- Click Add key, and then click Create new key.
- Click Create. A JSON key file is downloaded to your computer.
- Click Close.
- 在 Cloud Shell 中,啟動 Cloud Shell 執行個體。
複製本教學課程的 GitHub 存放區:
git clone https://github.com/GoogleCloudPlatform/metastore-disaster-recovery.git啟用下列 Google Cloud API:
gcloud services enable dataproc.googleapis.com metastore.googleapis.com設定幾項環境變數:
export PROJECT=$(gcloud info --format='value(config.project)')
export WAREHOUSE_BUCKET=${PROJECT}-warehouse
export BACKUP_BUCKET=${PROJECT}-dpms-backups
export DPMS_PRIMARY_REGION=us-central1
export DPMS_STANDBY_REGION=us-east1
export DPMS_PRIMARY_INSTANCE=dpms1
export DPMS_STANDBY_INSTANCE=dpms2
export HADOOP_PRIMARY=dataproc-cluster1
export HADOOP_STANDBY=dataproc-cluster2
初始化環境
為 Hive 資料和 Hive Metastore 備份建立儲存空間
在本節中,您將建立 Cloud Storage 值區,用於代管 Hive 資料和 Hive Metastore 備份。
建立 Hive 資料儲存空間
在 Cloud Shell 中,建立雙區域值區來代管 Hive 資料:
gcloud storage buckets create gs://${WAREHOUSE_BUCKET} --location=NAM4將一些範例資料複製到 Hive 資料 bucket:
gcloud storage cp gs://retail_csv gs://${WAREHOUSE_BUCKET}/retail --recursive
建立中繼資料備份的儲存空間
在 Cloud Shell 中,建立雙區域值區來存放 DPMS 中繼資料備份:
gcloud storage buckets create gs://${BACKUP_BUCKET} --location=NAM4
在主要區域部署運算資源
在本節中,您將在主要區域中部署所有運算資源,包括 DPMS 執行個體和 Dataproc 叢集。您也可以使用範例中繼資料填入 Dataproc Metastore。
建立 DPMS 執行個體
在 Cloud Shell 中,建立 DPMS 執行個體:
gcloud metastore services create ${DPMS_PRIMARY_INSTANCE} \
    --location=${DPMS_PRIMARY_REGION} \
    --hive-metastore-version=3.1.2
這個指令可能需要幾分鐘才能完成。
將 Hive 資料 bucket 設為預設倉庫目錄:
gcloud metastore services update ${DPMS_PRIMARY_INSTANCE} \
    --location=${DPMS_PRIMARY_REGION} \
    --update-hive-metastore-configs="hive.metastore.warehouse.dir=gs://${PROJECT}-  warehouse"
這個指令可能需要幾分鐘才能完成。
建立 Dataproc 叢集
在 Cloud Shell 中建立 Dataproc 叢集,並附加至 DPMS 執行個體:
gcloud dataproc clusters create ${HADOOP_PRIMARY} \
    --dataproc-metastore=projects/${PROJECT}/locations/${DPMS_PRIMARY_REGION}/services/${DPMS_PRIMARY_INSTANCE} \
    --region=${DPMS_PRIMARY_REGION} \
    --image-version=2.0
請將叢集映像檔指定為 2.0 版,這是 2021 年 6 月的最新版本。這也是第一個支援 DPMS 的版本。
填入 Metastore
在 Cloud Shell 中,使用 Hive 資料值區的名稱,更新本教學課程存放區中提供的範例
retail.hql:sed -i -- 's/${WAREHOUSE_BUCKET}/'"$WAREHOUSE_BUCKET"'/g' retail.hql執行
retail.hql檔案中包含的查詢,在 Metastore 中建立資料表定義:gcloud dataproc jobs submit hive \ --cluster=${HADOOP_PRIMARY} \ --region=${DPMS_PRIMARY_REGION} \ --file=retail.hql確認資料表定義是否已正確建立:
gcloud dataproc jobs submit hive \
    --cluster=${HADOOP_PRIMARY} \
    --region=${DPMS_PRIMARY_REGION} \
    --execute="
    desc departments;
    desc categories;
    desc products;
    desc order_items;
    desc orders;
    desc customers;

    select count(*) as num_departments from departments;
    select count(*) as num_categories from categories;
    select count(*) as num_products from products;
    select count(*) as num_order_items from order_items;
    select count(*) as num_orders from orders;
    select count(*) as num_customers from customers;
  "
輸出結果會與下列內容相似:
+------------------+------------+----------+
|     col_name     | data_type  | comment  |
+------------------+------------+----------+
| department_id    | int        |          |
| department_name  | string     |          |
+------------------+------------+----------+
輸出內容也會包含每個表格中的元素數量,例如:
+----------------+
| num_customers  |
+----------------+
| 12435          |
+----------------+
容錯移轉至備援區域
本節說明如何從主要區域 (區域 A) 容錯移轉至待命區域 (區域 B)。
在 Cloud Shell 中,將主要 DPMS 執行個體的中繼資料匯出至備份 bucket:
gcloud metastore services export gcs ${DPMS_PRIMARY_INSTANCE}  \
    --location=${DPMS_PRIMARY_REGION} \
    --destination-folder=gs://${BACKUP_BUCKET}
輸出結果會與下列內容相似:
metadataManagementActivity:
metadataExports:
‐ databaseDumpType: MYSQL
    destinationGcsUri: gs://qa01-300915-dpms-backups/hive-export-2021-05-04T22:21:53.288Z
    endTime: '2021-05-04T22:23:35.982214Z'
    startTime: '2021-05-04T22:21:53.308534Z'
    state: SUCCEEDED
請記下
destinationGcsUri屬性的值。這個屬性會儲存您建立的備份。在備用區域中建立新的 DPMS 執行個體:
gcloud metastore services create ${DPMS_STANDBY_INSTANCE} \
    --location=${DPMS_STANDBY_REGION} \
    --hive-metastore-version=3.1.2
將 Hive 資料 bucket 設為預設倉庫目錄:
gcloud metastore services update ${DPMS_STANDBY_INSTANCE} \
    --location=${DPMS_STANDBY_REGION} \
    --update-hive-metastore-configs="hive.metastore.warehouse.dir=gs://${PROJECT}-warehouse"
擷取最新中繼資料備份的路徑:
IMPORT_DIR=`gcloud storage ls gs://${BACKUP_BUCKET} | sort -k 1 | tail -1`
IMPORT_SQL="${IMPORT_DIR}hive.sql"
echo ${IMPORT_SQL}
將備份的中繼資料匯入新的 Dataproc Metastore 執行個體:
gcloud metastore services import gcs ${DPMS_STANDBY_INSTANCE} \
    --location=${DPMS_STANDBY_REGION} \
    --dump-type=mysql \
    --database-dump=${IMPORT_SQL} \
    --import-id=import-$(date +"%Y-%m-%d-%H-%M-%S")
在備用區域 (區域 B) 中建立 Dataproc 叢集:
gcloud dataproc clusters create ${HADOOP_STANDBY} \
    --dataproc-metastore=projects/${PROJECT}/locations/${DPMS_STANDBY_REGION}/services/${DPMS_STANDBY_INSTANCE} \
    --region=${DPMS_STANDBY_REGION} \
    --image-version=2.0
確認中繼資料是否已正確匯入:
gcloud dataproc jobs submit hive \
    --cluster ${HADOOP_STANDBY} \
    --region ${DPMS_STANDBY_REGION} \
    --execute "select count(*) as num_orders from orders;"
本教學課程最重要的是
num_orders輸出內容。類似以下範例:+-------------+ | num_orders | +-------------+ | 68883 | +-------------+主要 Dataproc Metastore 已成為新的待命 Metastore,而待命 Dataproc Metastore 已成為新的主要 Metastore。
根據這些新角色更新環境變數:
export DPMS_PRIMARY_REGION=us-east1
export DPMS_STANDBY_REGION=us-central1]
export DPMS_PRIMARY_INSTANCE=dpms2
export DPMS_STANDBY_INSTANCE=dpms1
export HADOOP_PRIMARY=dataproc-cluster2
export HADOOP_STANDBY=dataproc-cluster1
確認您可以在區域 B 中寫入新的主要 Dataproc Metastore:
gcloud dataproc jobs submit hive \
    --cluster ${DPMS_PRIMARY_INSTANCE} \
    --region ${DPMS_PRIMARY_REGION} \
    --execute "create view completed_orders as select * from orders where order_status = 'COMPLETE';"

gcloud dataproc jobs submit hive \
    --cluster ${HADOOP_PRIMARY} \
    --region ${DPMS_PRIMARY_REGION} \
    --execute "select * from completed_orders limit 5;"
輸出內容包含下列項目:
+----------------------------+------------------------------+-------------------------------------+--------------------------------+
| completed_orders.order_id  | completed_orders.order_date  | completed_orders.order_customer_id  | completed_orders.order_status  |
+----------------------------+------------------------------+-------------------------------------+--------------------------------+
| 3                          | 2013-07-25 00:00:00.0        | 12111                               | COMPLETE                       |
| 5                          | 2013-07-25 00:00:00.0        | 11318                               | COMPLETE                       |
| 6                          | 2013-07-25 00:00:00.0        | 7130                                | COMPLETE                       |
| 7                          | 2013-07-25 00:00:00.0        | 4530                                | COMPLETE                       |
| 15                         | 2013-07-25 00:00:00.0        | 2568                                | COMPLETE                       |
+----------------------------+------------------------------+-------------------------------------+--------------------------------+
容錯移轉作業已完成。現在,請更新 Hadoop 用戶端設定檔,將用戶端應用程式重新導向至 B 區域的新主 Dataproc 叢集。
還原為原始區域
本節提供步驟,說明如何回復至原始區域 (區域 A)。
在 Cloud Shell 中,從 DPMS 執行個體匯出中繼資料:
gcloud metastore services export gcs ${DPMS_PRIMARY_INSTANCE} \
    --location=${DPMS_PRIMARY_REGION} \
    --destination-folder=gs://${BACKUP_BUCKET}
擷取最新中繼資料備份的路徑:
IMPORT_DIR=`gcloud storage ls gs://${BACKUP_BUCKET} | sort -k 1 | tail -1`
IMPORT_SQL="${IMPORT_DIR}hive.sql"
echo ${IMPORT_SQL}
將中繼資料匯入原始區域 (區域 A) 的待命 DPMS 執行個體:
gcloud metastore services import gcs ${DPMS_STANDBY_INSTANCE} \
    --location=${DPMS_STANDBY_REGION} \
    --dump-type=mysql \
    --database-dump=${IMPORT_SQL} \
    --import-id=import-$(date +"%Y-%m-%d-%H-%M-%S")
確認中繼資料是否已正確匯入:
gcloud dataproc jobs submit hive \
    --cluster ${HADOOP_STANDBY} \
    --region ${DPMS_STANDBY_REGION} \
    --execute "select * from completed_orders limit 5;"
輸出內容包含下列項目:
+----------------------------+------------------------------+-------------------------------------+--------------------------------+
| completed_orders.order_id  | completed_orders.order_date  | completed_orders.order_customer_id  | completed_orders.order_status  |
+----------------------------+------------------------------+-------------------------------------+--------------------------------+
| 3                          | 2013-07-25 00:00:00.0        | 12111                               | COMPLETE                       |
| 5                          | 2013-07-25 00:00:00.0        | 11318                               | COMPLETE                       |
| 6                          | 2013-07-25 00:00:00.0        | 7130                                | COMPLETE                       |
| 7                          | 2013-07-25 00:00:00.0        | 4530                                | COMPLETE                       |
| 15                         | 2013-07-25 00:00:00.0        | 2568                                | COMPLETE                       |
+----------------------------+------------------------------+-------------------------------------+--------------------------------+
主要 Dataproc Metastore 和備用 Dataproc Metastore 再次交換角色。
將環境變數更新為這些新角色:
export DPMS_PRIMARY_REGION=us-central1
export DPMS_STANDBY_REGION=us-east1
export DPMS_PRIMARY_INSTANCE=dpms1
export DPMS_STANDBY_INSTANCE=dpms12
export HADOOP_PRIMARY=dataproc-cluster1
export HADOOP_STANDBY=dataproc-cluster2
容錯回復作業已完成。現在,您應該更新 Hadoop 用戶端設定檔,將用戶端應用程式重新導向至 A 地區的新主要 Dataproc 叢集。
建立自動中繼資料備份
本節將說明兩種自動匯出及匯入中繼資料備份的方法。第一種方法是「選項 1:Cloud Run 和 Cloud Scheduler」,使用 Cloud Run 和 Cloud Scheduler。第二種方法「選項 2:Cloud Composer」使用 Cloud Composer。在這兩個範例中,匯出工作都會在 A 地區的主要 DPMS 中建立中繼資料備份。匯入工作會從備份資料填入 B 區域的待命 DPMS。
如果您已有 Cloud Composer 叢集,建議採用選項 2:Cloud Composer (前提是叢集有足夠的運算容量)。否則,請選擇選項 1:Cloud Run 和 Cloud Scheduler。這個選項採用隨用隨付計費模式,且比 Cloud Composer 更經濟實惠,因為 Cloud Composer 需要使用持續性運算資源。
選項 1:Cloud Run 和 Cloud Scheduler
本節說明如何使用 Cloud Run 和 Cloud Scheduler,自動匯出及匯入 DPMS 中繼資料。
Cloud Run 服務
本節說明如何建構兩個 Cloud Run 服務,以執行中繼資料匯出和匯入工作。
在 Cloud Shell 中啟用 Cloud Run、Cloud Scheduler、Cloud Build 和 App Engine API:
gcloud services enable run.googleapis.com cloudscheduler.googleapis.com cloudbuild.googleapis.com appengine.googleapis.com您啟用 App Engine API,是因為 Cloud Scheduler 服務需要 App Engine。
使用提供的 Dockerfile 建構 Docker 映像檔:
cd metastore-disaster-recovery
gcloud builds submit --tag gcr.io/$PROJECT/dpms_dr
將容器映像檔部署到主要區域 (區域 A) 的 Cloud Run 服務。這個部署作業負責從主要中繼資料存放區建立中繼資料備份:
gcloud run deploy dpms-export \
    --image gcr.io/${PROJECT}/dpms_dr \
    --region ${DPMS_PRIMARY_REGION} \
    --platform managed \
    --update-env-vars DPMS_STANDBY_REGION=${DPMS_STANDBY_REGION},BACKUP_BUCKET=${BACKUP_BUCKET},DPMS_STANDBY_INSTANCE=${DPMS_STANDBY_INSTANCE},DPMS_PRIMARY_INSTANCE=${DPMS_PRIMARY_INSTANCE},DPMS_PRIMARY_REGION=${DPMS_PRIMARY_REGION} \
    --allow-unauthenticated \
    --timeout=10m
根據預設,Cloud Run 服務要求會在 5 分鐘後逾時。為確保所有要求都有足夠時間順利完成,先前的程式碼範例將逾時值延長至至少 10 分鐘。
擷取 Cloud Run 服務的部署網址:
EXPORT_RUN_URL=$(gcloud run services describe dpms-export --platform
managed --region ${DPMS_PRIMARY_REGION} --format `
"value(status.address.url)")
echo ${EXPORT_RUN_URL}
在備援區域 (區域 B) 中建立第二個 Cloud Run 服務。這項服務負責從
BACKUP_BUCKET將中繼資料備份匯入待命 Metastore:gcloud run deploy dpms-import \ --image gcr.io/${PROJECT}/dpms_dr \ --region ${DPMS_STANDBY_REGION} \ --platform managed \ --update-env-vars DPMS_STANDBY_REGION=${DPMS_STANDBY_REGION},BACKUP_BUCKET=${BACKUP_BUCKET},DPMS_STANDBY_INSTANCE=${DPMS_STANDBY_INSTANCE} \ --allow-unauthenticated \ --timeout=10m擷取第二個 Cloud Run 服務的部署網址:
  IMPORT_RUN_URL=$(gcloud run services describe dpms-import --platform
  managed --region ${REGION_B} --format "value(status.address.url)")
  echo ${IMPORT_RUN_URL}
工作排程
本節說明如何使用 Cloud Scheduler 觸發這兩項 Cloud Run 服務。
在 Cloud Shell 中,建立 Cloud Scheduler 必須使用的 App Engine 應用程式:
gcloud app create --region=${REGION_A}建立 Cloud Scheduler 工作,排定從主要中繼資料存放區匯出中繼資料的時間:
gcloud scheduler jobs create http dpms-export \
    --schedule "*/15 * * * *" \
    --http-method=post \
    --uri=${EXPORT_RUN_URL}/export\
Cloud Scheduler 工作每 15 分鐘會向 Cloud Run 服務發出 http 要求。Cloud Run 服務會執行容器化的 Flask 應用程式,其中包含匯出和匯入函式。匯出函式觸發後,會使用 gcloud metastore services export 指令將中繼資料匯出至 Cloud Storage。
一般而言,如果 Hadoop 工作經常寫入 Hive Metastore,建議您經常備份中繼存放區。建議備份頻率為每 15 分鐘到 60 分鐘。
觸發 Cloud Run 服務的測試執行:
gcloud scheduler jobs run dpms-export確認 Cloud Scheduler 是否正確觸發 DPMS 匯出作業:
gcloud metastore operations list --location ${REGION_A}輸出結果會與下列內容相似:
OPERATION_NAME                                           LOCATION     TYPE             TARGET                             DONE  CREATE_TIME          DURATION
 ...
operation-a520936204508-5v23bx4y23f60-920f0a0f-9c2b56b5  us-central1  update  dpms1                       True  2021-05-13T20:05:04  2M23S
如果
DONE的值為False,表示匯出作業仍在進行中。如要確認作業是否完成,請重新執行gcloud metastore operations list --location ${REGION_A}指令,直到值變成True為止。如要進一步瞭解
gcloud metastore operations指令,請參閱參考說明文件。(選用) 建立 Cloud Scheduler 工作,排定將資料匯入待命中繼資料存放區的時間:
gcloud scheduler jobs create http dpms-import \
    --schedule "*/15 * * * *" \
    --http-method=post \
    --uri=${IMPORT_RUN_URL}/import
這個步驟取決於您的復原時間目標 (RTO) 需求。
如要使用熱待機來縮短容錯移轉時間,請排定這項匯入工作。每 15 分鐘重新整理一次待機 DPMS。
如果冷待命足以滿足 RTO 需求,您可以略過這個步驟,並刪除待命 DPMS 和 Dataproc 叢集,進一步降低每月帳單總金額。容錯移轉至待命區域 (區域 B) 時,請佈建待命 DPMS 和 Dataproc 叢集,並執行匯入工作。由於備份檔案儲存在雙區域 bucket 中,即使主要區域 (區域 A) 發生故障,您仍可存取這些檔案。
處理容錯移轉
容錯移轉至 B 區域後,您必須按照下列步驟操作,才能滿足災難復原需求,並保護基礎架構免於 B 區域發生潛在故障:
- 暫停現有的 Cloud Scheduler 工作。
- 將主要 DPMS 區域更新為區域 B (
us-east1)。 - 將待命 DPMS 區域更新為區域 A (
us-central1)。 - 將 DPMS 主要執行個體更新為
dpms2。 - 將 DPMS 待命執行個體更新為
dpms1。 - 根據更新後的變數重新部署 Cloud Run 服務。
- 建立新的 Cloud Scheduler 工作,指向新的 Cloud Run 服務。
前述清單中的必要步驟與先前章節的許多步驟重複,只有小幅調整 (例如替換區域名稱)。請使用「選項 1:Cloud Run 和 Cloud Scheduler」中的資訊完成這項必要工作。
選項 2:Cloud Composer
本節說明如何使用 Cloud Composer,在單一 Airflow 有向非循環圖 (DAG) 中執行匯出和匯入工作。
在 Cloud Shell 中啟用 Cloud Composer API:
gcloud services enable composer.googleapis.com建立 Cloud Composer 環境:
export COMPOSER_ENV=comp-env gcloud beta composer environments create ${COMPOSER_ENV} \ --location ${DPMS_PRIMARY_REGION} \ --image-version composer-1.17.0-preview.1-airflow-2.0.1 \ --python-version 3使用下列環境變數設定 Cloud Composer 環境:
gcloud composer environments update ${COMPOSER_ENV} \
    --location ${DPMS_PRIMARY_REGION} \
    --update-env-variables=DPMS_PRIMARY_REGION=${DPMS_PRIMARY_REGION},DPMS_STANDBY_REGION=${DPMS_STANDBY_REGION},BACKUP_BUCKET=${BACKUP_BUCKET},DPMS_PRIMARY_INSTANCE=${DPMS_PRIMARY_INSTANCE},DPMS_STANDBY_INSTANCE=${DPMS_STANDBY_INSTANCE}
將 DAG 檔案上傳至 Composer 環境:
gcloud composer environments storage dags import \
    --environment ${COMPOSER_ENV} \
    --location ${DPMS_PRIMARY_REGION} \
    --source dpms_dag.py
擷取 Airflow 網址:
gcloud composer environments describe ${COMPOSER_ENV} \
    --location ${DPMS_PRIMARY_REGION} \
    --format "value(config.airflowUri)"
在瀏覽器中開啟上一個指令傳回的網址。
您應該會看到名為
dpms_dag的新 DAG 項目。在單次執行中,DAG 會先執行匯出作業,再執行匯入作業。DAG 假設待機 DPMS 一律處於運作狀態。如果不需要熱待機,只想執行匯出工作,請在程式碼中註解掉所有與匯入相關的工作 (find_backup, wait_for_ready_status, current_ts、dpms_import))。按一下「箭頭」圖示,觸發 DAG 執行測試:

按一下執行中 DAG 的「圖表檢視」,即可檢查各項工作的狀態:
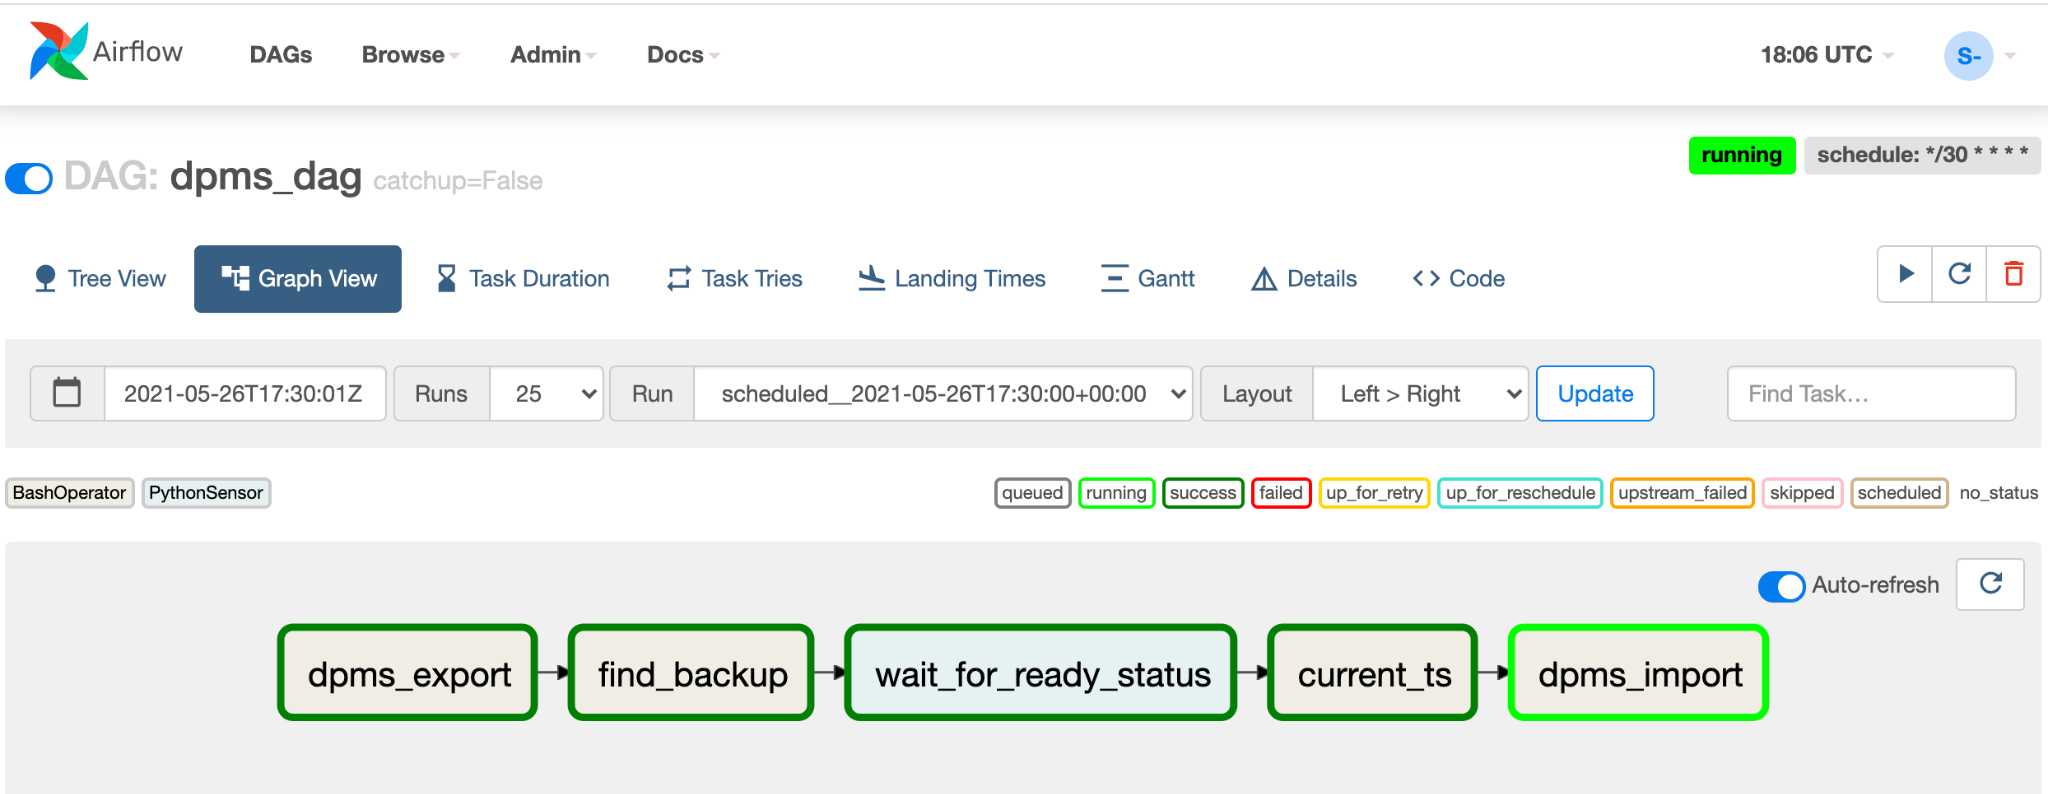
驗證 DAG 後,即可讓 Airflow 按照固定時間表執行 DAG。排程設定為每 30 分鐘間隔一次,但您可以變更程式碼中的
schedule_interval參數,以符合時間要求。
處理容錯移轉
容錯移轉至 B 區域後,您必須按照下列步驟操作,才能滿足災難復原需求,並保護基礎架構免於 B 區域發生潛在故障:
- 將主要 DPMS 區域更新為區域 B (
us-east1)。 - 將待命 DPMS 區域更新為區域 A (
us-central1)。 - 將 DPMS 主要執行個體更新為
dpms2。 - 將 DPMS 待命執行個體更新為
dpms1。 - 在 B 區域 (
us-east1) 中建立新的 Cloud Composer 環境。 - 使用更新後的環境變數設定 Cloud Composer 環境。
- 將與先前相同的
dpms_dagAirflow DAG 匯入新的 Cloud Composer 環境。
前述清單中的必要步驟與先前章節的許多步驟重複,只有小幅調整 (例如替換區域名稱)。請使用「選項 2:Cloud Composer」中的資訊完成這項必要工作。
清除所用資源
如要避免系統向您的 Google Cloud 帳戶收取本教學課程中所用資源的相關費用,請刪除含有該項資源的專案,或者保留專案但刪除個別資源。
- In the Google Cloud console, go to the Manage resources page.
- In the project list, select the project that you want to delete, and then click Delete.
- In the dialog, type the project ID, and then click Shut down to delete the project.
後續步驟
- 瞭解如何監控 Dataproc Metastore 執行個體
- 瞭解如何將 Hive Metastore 同步至 Data Catalog
- 進一步瞭解如何開發 Cloud Run 服務
- 如需更多參考架構、圖表和最佳做法,請瀏覽 Cloud 架構中心。