이 가이드에서는 Cloud Build 및 Terraform을 사용하여 Compute Engine 관리형 인스턴스 그룹(MIG)에서 제로 다운타임 블루/그린 배포를 수행하는 방법을 설명합니다.
Cloud Build를 사용하면 애플리케이션을 빌드하고 Compute Engine, Google Kubernetes Engine, GKE Enterprise, Cloud Run 함수와 같은 다양한 런타임에 배포하는 등 다양한 개발자 프로세스를 자동화할 수 있습니다. Google Cloud
Compute Engine MIG를 사용하면 동일한 여러 가상 머신(VM)에서 애플리케이션을 운영할 수 있습니다. 자동 확장, 자동 복구, 리전(멀티 영역) 배포, 자동 업데이트 등의 자동화된 MIG 서비스를 활용하여 워크로드의 확장성 및 가용성을 높일 수 있습니다. 블루/그린 지속적 배포 모델을 사용하여 프로덕션에서 실행 중인 한 MIG(블루)에서 다른 MIG(그린)로 사용자 트래픽을 점진적으로 전송하는 방법을 알아봅니다.
디자인 개요
다음 다이어그램은 이 문서에 설명된 코드 샘플에서 사용하는 블루/그린 배포 모델을 보여줍니다.
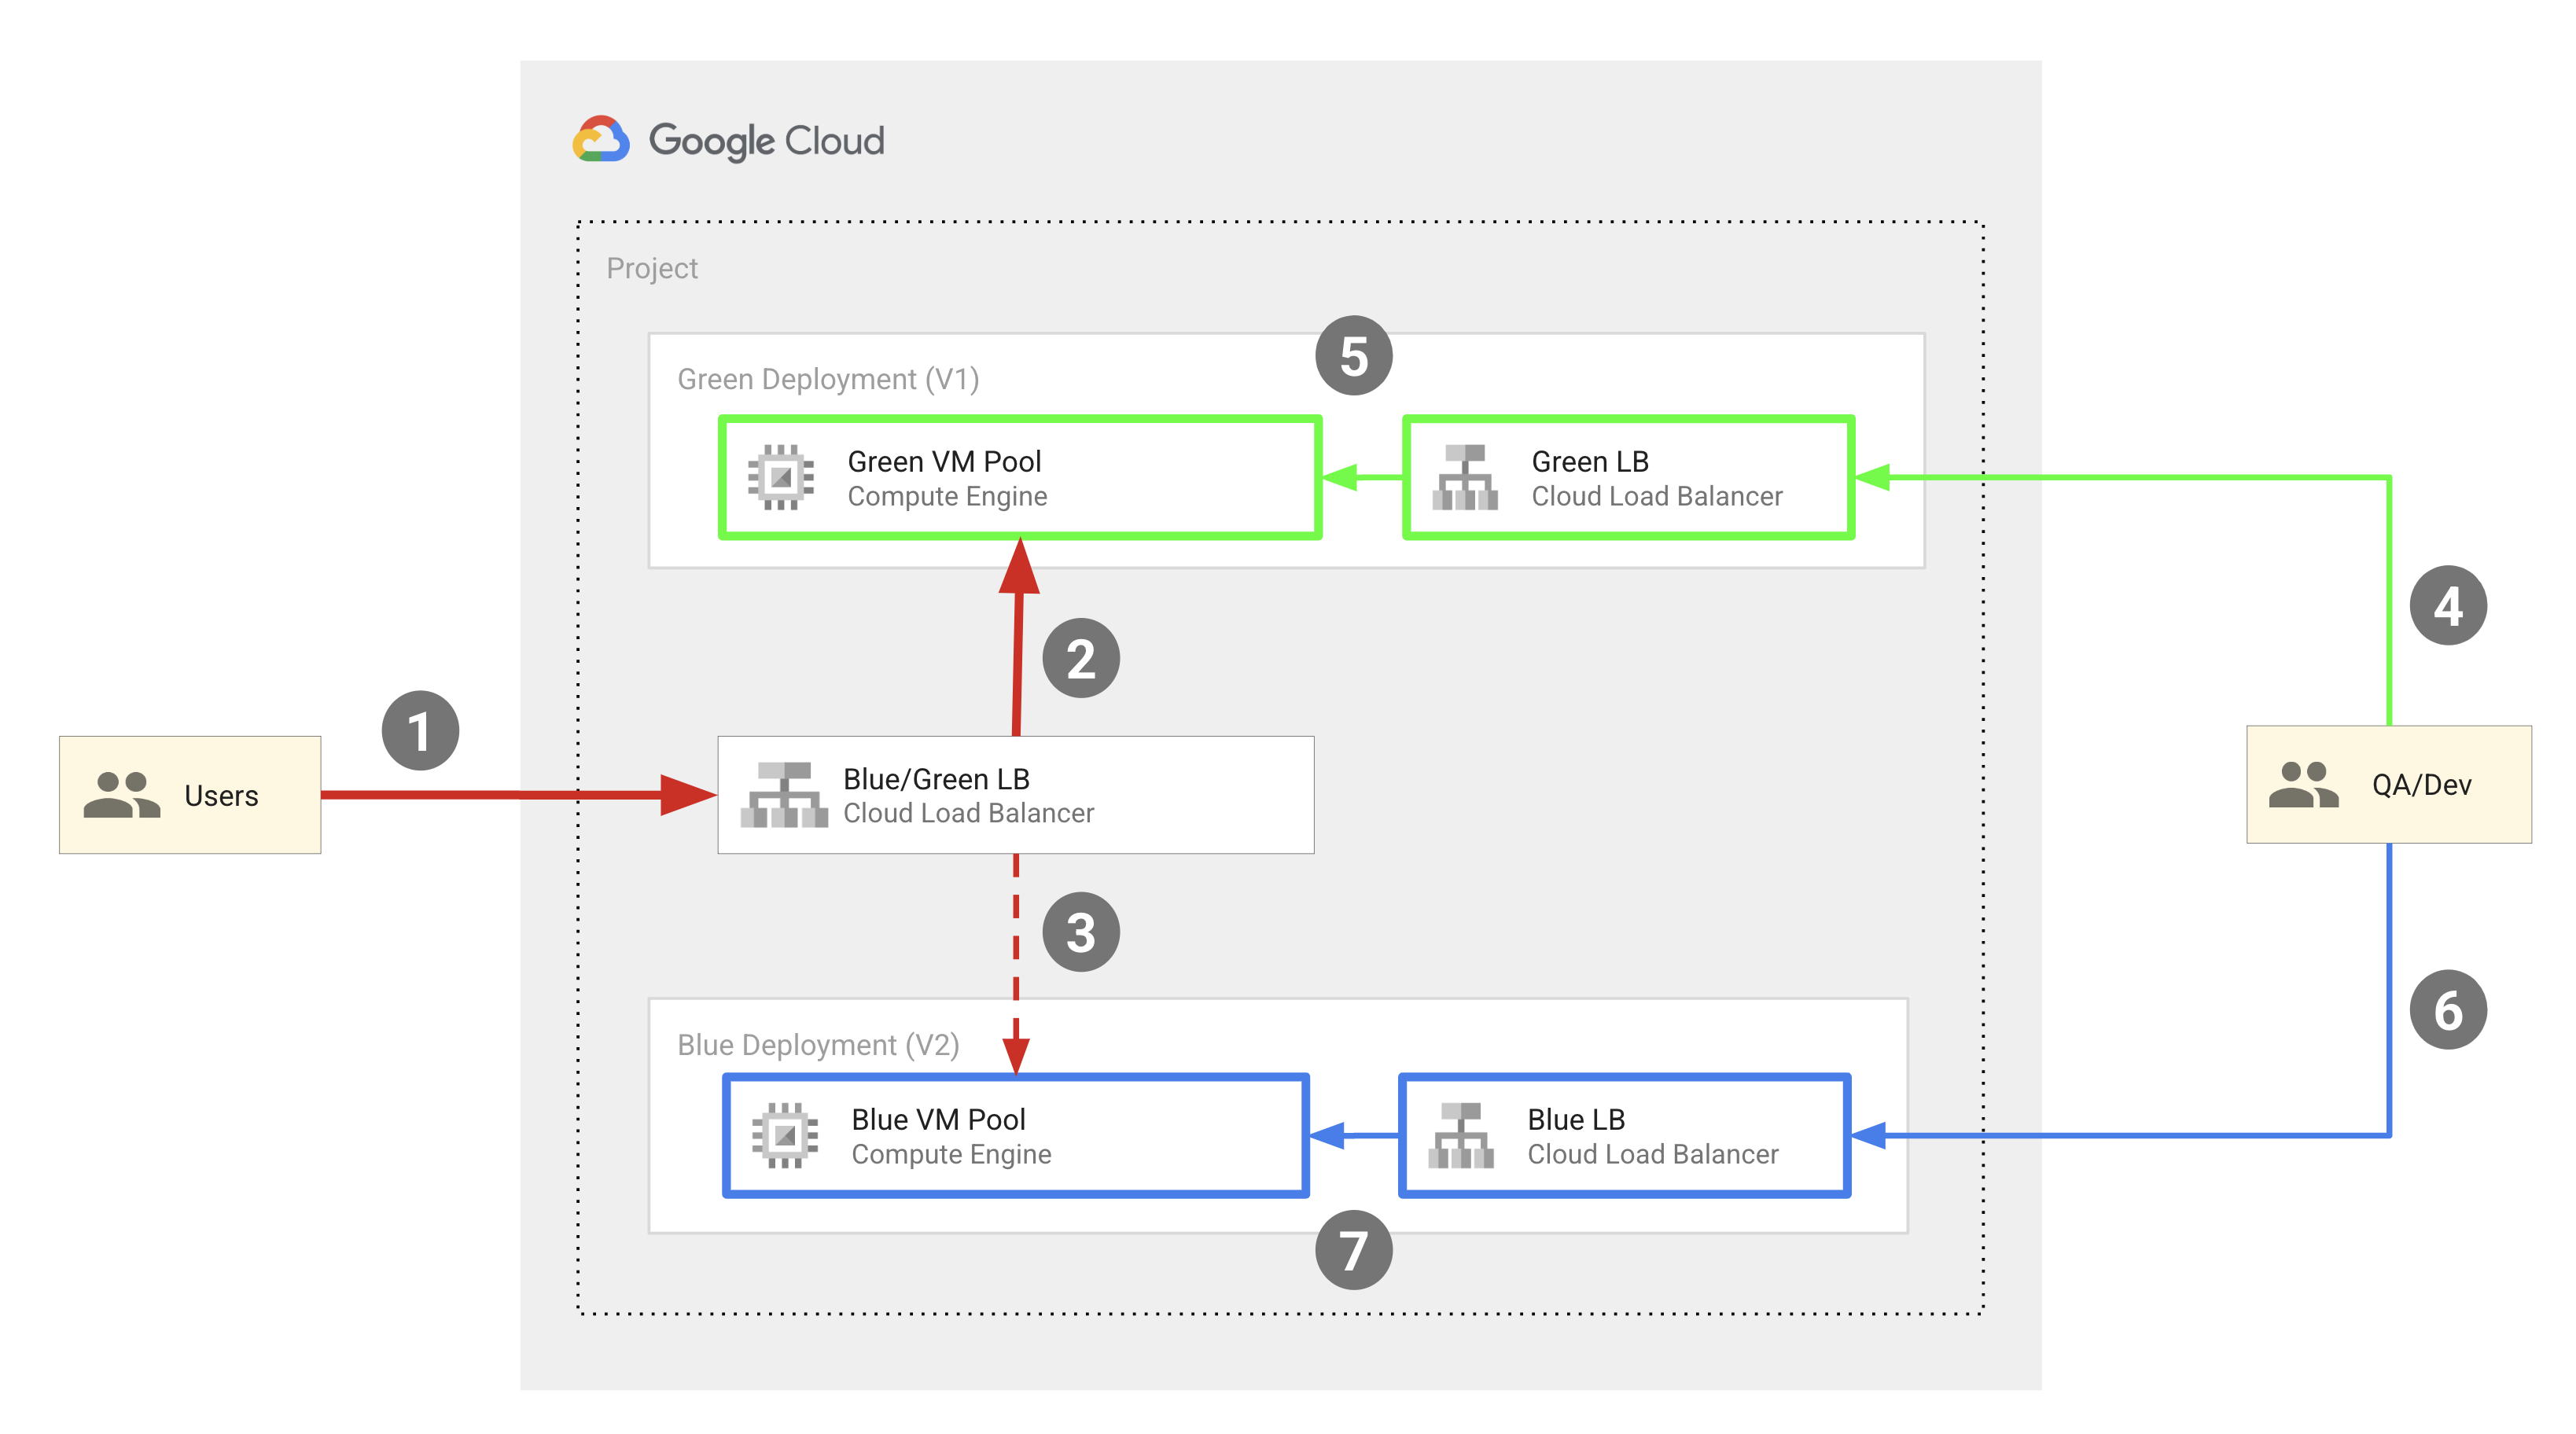
대략적으로 이 모델에는 다음 구성요소가 포함됩니다.
- 블루 및 그린의 Compute Engine VM 풀 두 개
- 3개의 외부 HTTP(S) 부하 분산기:
- 최종 사용자의 트래픽을 VM 인스턴스의 블루 또는 그린 풀로 라우팅하는 블루/그린 부하 분산기입니다.
- QA 엔지니어와 개발자로부터의 트래픽을 블루 VM 인스턴스 풀로 라우팅하는 블루 부하 분산기입니다.
- QA 엔지니어와 개발자로부터의 트래픽을 그린 인스턴스 풀로 라우팅하는 그린 부하 분산기입니다.
- 2개의 사용자 그룹:
- 블루 또는 그린 인스턴스 풀을 가리키는 블루/그린 부하 분산기에 액세스할 수 있는 최종 사용자입니다.
- 개발 및 테스트 목적으로 두 풀 집합에 모두 액세스해야 하는 QA 엔지니어 및 개발자입니다. 여기에 속하는 경우 블루 및 그린 부하 분산기에 모두 액세스할 수 있으며, 이는 사용자를 블루 인스턴스 풀과 그린 인스턴스 풀로 각각 라우팅합니다.
블루 및 그린 VM 풀은 Compute Engine MIG로 구현되며 외부 IP 주소는 외부 HTTP(S) 부하 분산기를 사용하여 MIG의 VM으로 라우팅됩니다. 이 문서에 설명된 코드 샘플은 Terraform을 사용하여 이 인프라를 구성합니다.
다음 다이어그램은 배포에서 발생하는 개발자 작업을 보여줍니다.
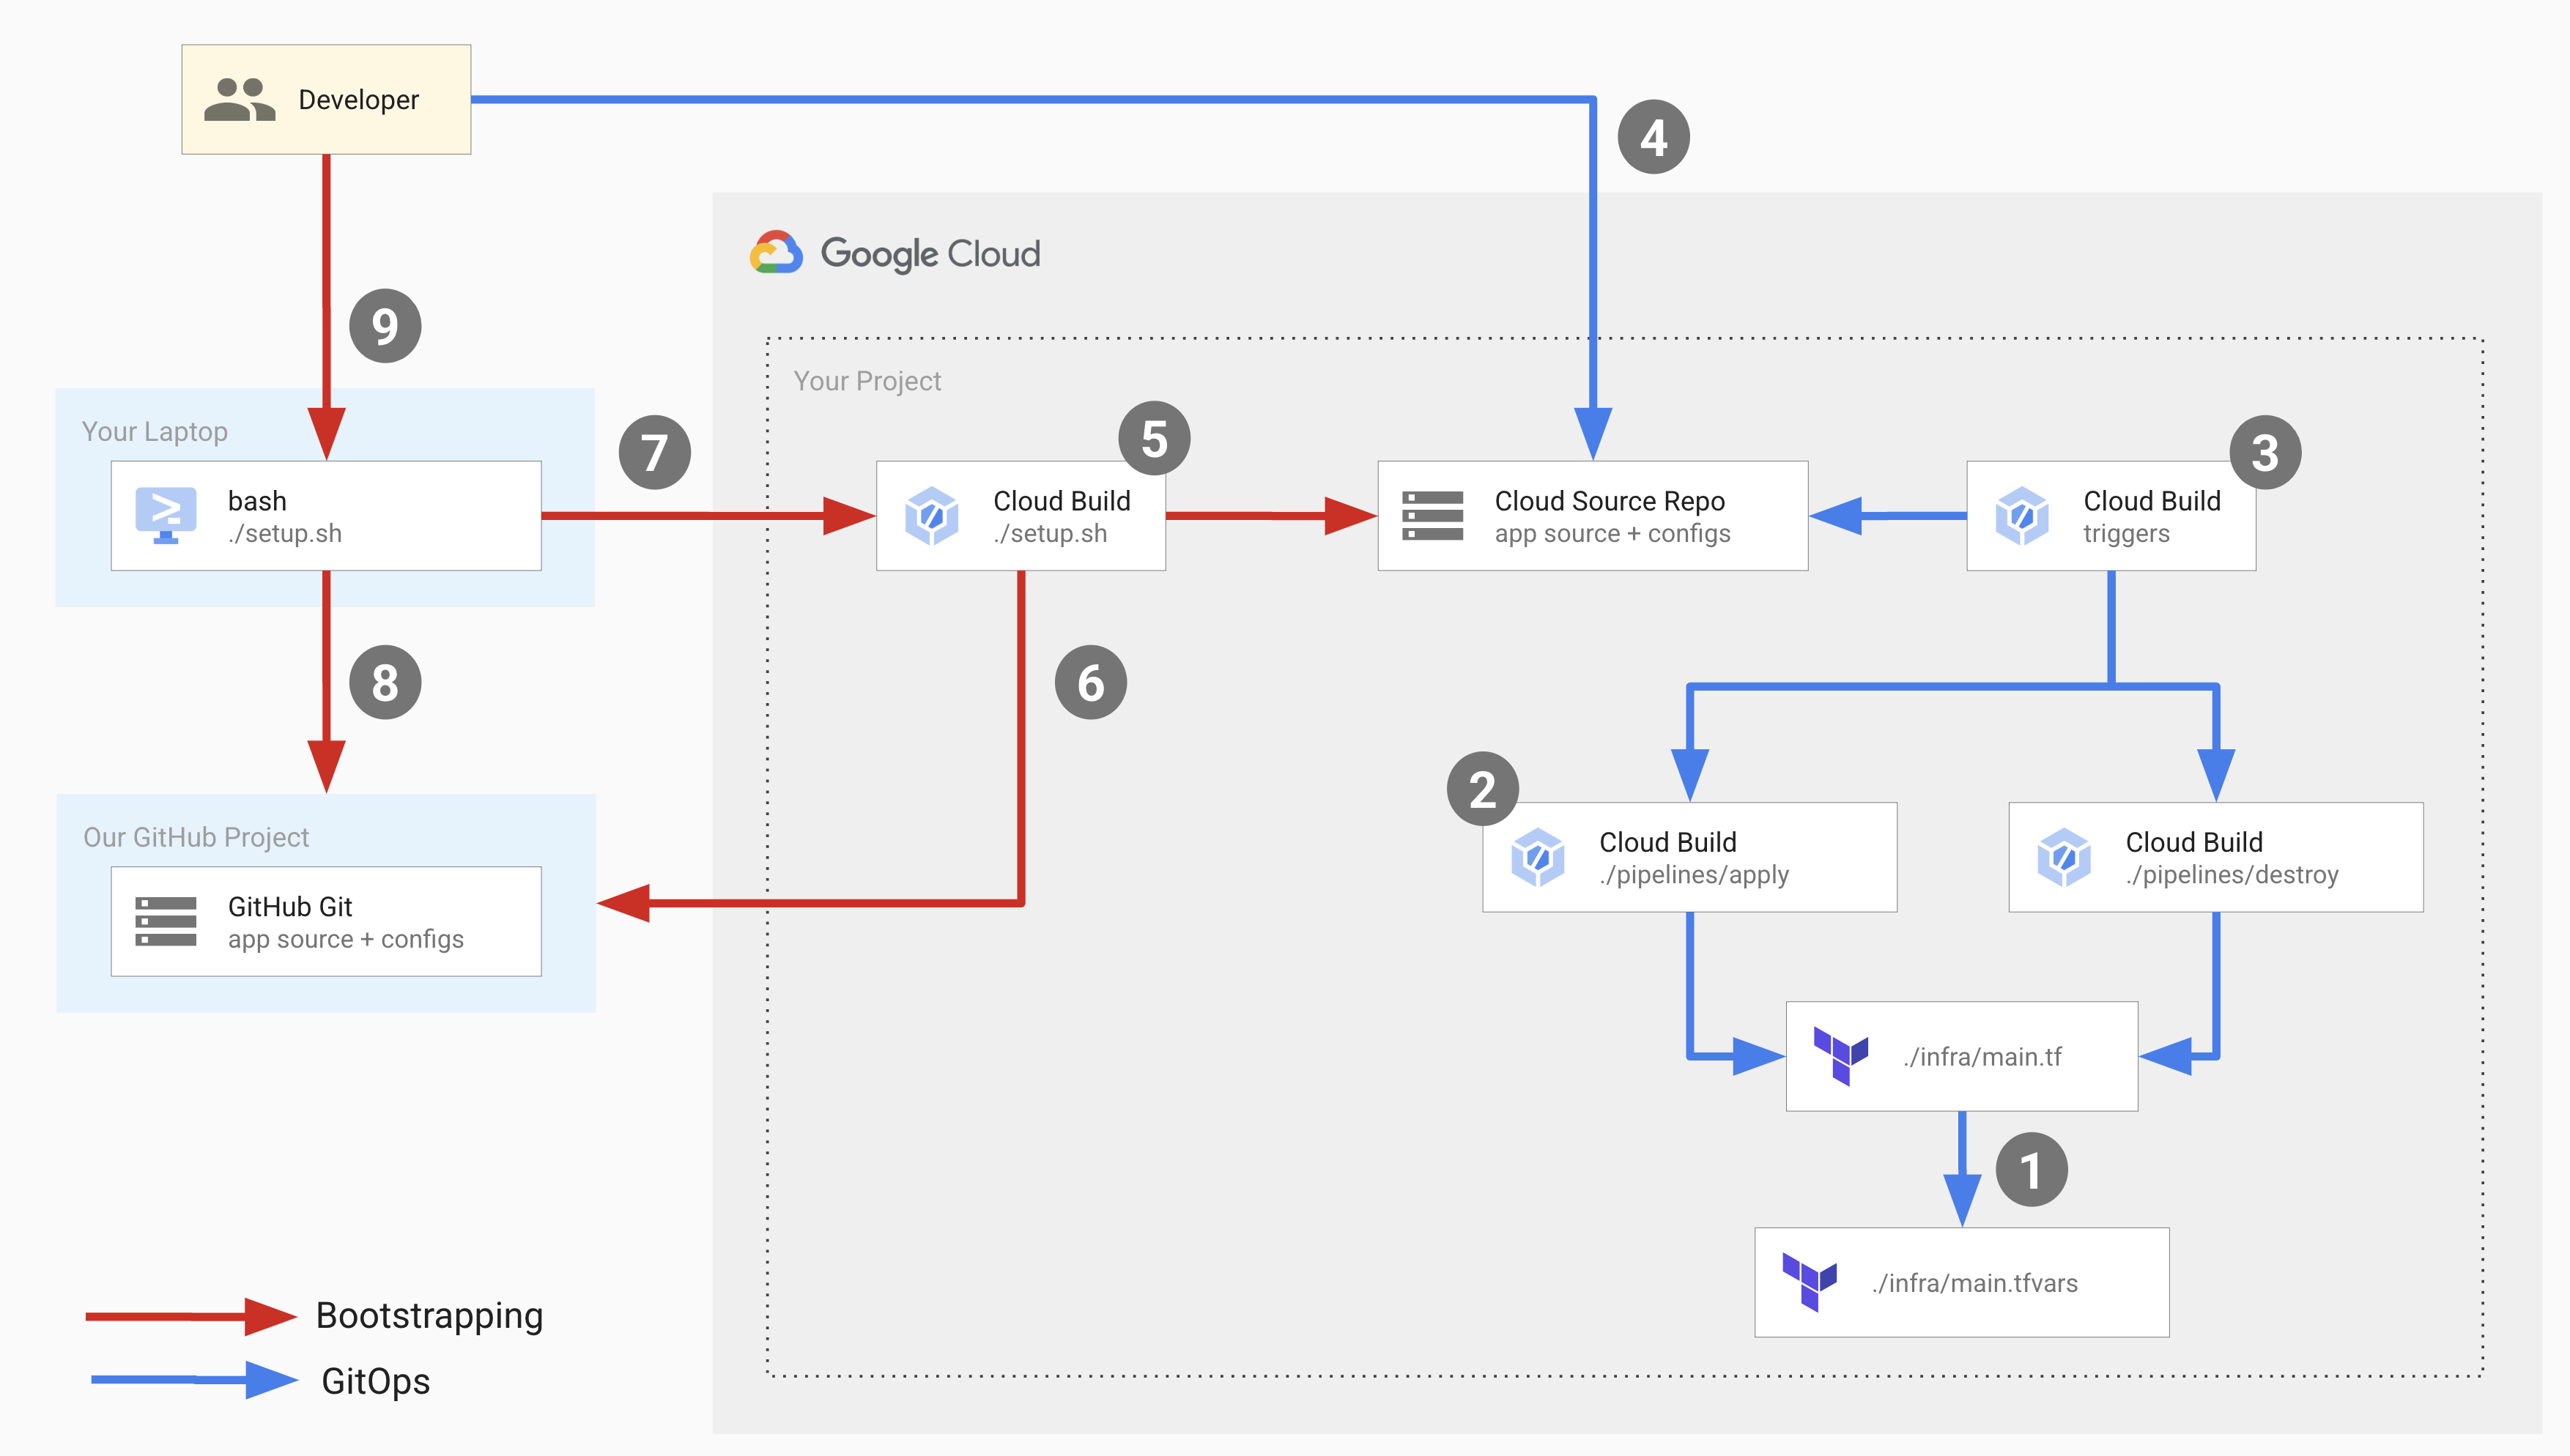
위의 다이어그램에서 빨간색 화살표는 배포 인프라를 처음 설정할 때 발생하는 부트스트랩 흐름을 나타내고, 파란색 화살표는 각 배포 중에 발생하는 GitOps 흐름을 나타냅니다.
이 인프라를 설정하려면 부트스트랩 프로세스를 시작하고 GitOps 흐름의 구성요소를 설정하는 설정 스크립트를 실행합니다.
설정 스크립트는 다음 작업을 수행하는 Cloud Build 파이프라인을 실행합니다.
- Cloud Source Repositories에
copy-of-gcp-mig-simple이라는 저장소를 만들고 소스 코드를 GitHub 샘플 저장소에서 Cloud Source Repositories의 저장소로 복사합니다. apply및destroy라는 이름의 Cloud Build 트리거 두 개를 만듭니다.
apply 트리거는 Cloud Source Repositories의 main.tfvars라는 Terraform 파일에 연결됩니다. 이 파일에는 블루 및 그린 부하 분산기를 나타내는 Terraform 변수가 포함되어 있습니다.
배포를 설정하려면 main.tfvars 파일에서 변수를 업데이트합니다.
apply 트리거는 tf_apply를 실행하고 다음 작업을 수행하는 Cloud Build 파이프라인을 실행합니다.
- Compute Engine MIG 2개(그린 1개, 블루 1개), Compute Engine VM 인스턴스 4개(그린 MIG 2개, 블루 MIG 2개), 부하 분산기 3개(블루, 그린, 분할기), 공개 IP 주소 3개를 만듭니다.
- 블루 및 그린 인스턴스에서 배포된 애플리케이션을 확인하는 데 사용할 수 있는 IP 주소를 출력합니다.
폐기 트리거는 수동으로 트리거되어 적용 트리거로 생성된 모든 리소스를 삭제합니다.
목표
Cloud Build 및 Terraform을 사용하여 Compute Engine VM 인스턴스 그룹 백엔드와 함께 외부 HTTP(S) 부하 분산기를 설정합니다.
VM 인스턴스에서 블루/그린 배포를 수행합니다.
비용
이 문서에서는 비용이 청구될 수 있는 Google Cloud구성요소( )를 사용합니다.
프로젝트 사용량을 기준으로 예상 비용을 산출하려면 가격 계산기를 사용합니다.
이 문서에 설명된 태스크를 완료했으면 만든 리소스를 삭제하여 청구가 계속되는 것을 방지할 수 있습니다. 자세한 내용은 삭제를 참조하세요.
시작하기 전에
- Sign in to your Google Cloud account. If you're new to Google Cloud, create an account to evaluate how our products perform in real-world scenarios. New customers also get $300 in free credits to run, test, and deploy workloads.
-
Install the Google Cloud CLI.
-
외부 ID 공급업체(IdP)를 사용하는 경우 먼저 제휴 ID로 gcloud CLI에 로그인해야 합니다.
-
gcloud CLI를 초기화하려면, 다음 명령어를 실행합니다.
gcloud init -
Create or select a Google Cloud project.
Roles required to select or create a project
- Select a project: Selecting a project doesn't require a specific IAM role—you can select any project that you've been granted a role on.
-
Create a project: To create a project, you need the Project Creator
(
roles/resourcemanager.projectCreator), which contains theresourcemanager.projects.createpermission. Learn how to grant roles.
-
Create a Google Cloud project:
gcloud projects create PROJECT_ID
Replace
PROJECT_IDwith a name for the Google Cloud project you are creating. -
Select the Google Cloud project that you created:
gcloud config set project PROJECT_ID
Replace
PROJECT_IDwith your Google Cloud project name.
-
Verify that billing is enabled for your Google Cloud project.
-
Install the Google Cloud CLI.
-
외부 ID 공급업체(IdP)를 사용하는 경우 먼저 제휴 ID로 gcloud CLI에 로그인해야 합니다.
-
gcloud CLI를 초기화하려면, 다음 명령어를 실행합니다.
gcloud init -
Create or select a Google Cloud project.
Roles required to select or create a project
- Select a project: Selecting a project doesn't require a specific IAM role—you can select any project that you've been granted a role on.
-
Create a project: To create a project, you need the Project Creator
(
roles/resourcemanager.projectCreator), which contains theresourcemanager.projects.createpermission. Learn how to grant roles.
-
Create a Google Cloud project:
gcloud projects create PROJECT_ID
Replace
PROJECT_IDwith a name for the Google Cloud project you are creating. -
Select the Google Cloud project that you created:
gcloud config set project PROJECT_ID
Replace
PROJECT_IDwith your Google Cloud project name.
-
Verify that billing is enabled for your Google Cloud project.
Google 코드 샘플 저장소에서 설정 스크립트를 실행합니다
bash <(curl https://raw.githubusercontent.com/GoogleCloudPlatform/cloud-build-samples/main/mig-blue-green/setup.sh)설정 스크립트에서 사용자 동의를 요청하면 yes를 입력합니다.
이 스크립트는 몇 초 후에 실행됩니다.
Google Cloud 콘솔에서 Cloud Build 빌드 기록 페이지를 엽니다.
최신 빌드를 클릭합니다.
세 가지 빌드 단계가 포함된 Cloud Build 파이프라인을 보여주는 빌드 세부정보 페이지가 표시됩니다. 첫 번째 빌드 단계에서는 Cloud Source Repositories에 저장소를 만들고 두 번째 단계는 GitHub 샘플 저장소의 콘텐츠를 Cloud Source Repositories에 클론하고, 세 번째 단계에서는 두 개의 빌드 트리거를 추가합니다.
Cloud Source Repositories를 엽니다.
저장소 목록에서
copy-of-gcp-mig-simple을 클릭합니다.페이지 하단의 기록 탭에는
copy-of-gcp-mig-simple이라는 저장소를 만들기 위해 Cloud Build가 수행한A copy of https://github.com/GoogleCloudPlatform/cloud-build-samples.git설명의 커밋 한개가 표시됩니다.Cloud Build 트리거 페이지를 엽니다.
배포 프로세스를 시작하려면
infra/main.tfvars파일을 업데이트합니다.터미널 창에서
deploy-compute-engine이라는 폴더를 만들고 이동합니다.mkdir ~/deploy-compute-engine cd ~/deploy-compute-enginecopy-of-gcp-mig-simple저장소를 클론합니다.gcloud source repos clone copy-of-mig-blue-green클론된 디렉터리로 이동합니다.
cd ./copy-of-mig-blue-greeninfra/main.tfvars를 업데이트하여 블루를 그린으로 바꿉니다.sed -i'' -e 's/blue/green/g' infra/main.tfvars업데이트된 파일을 추가합니다.
git add .파일을 커밋합니다.
git commit -m "Promote green"파일을 푸시합니다.
git pushinfra/main.tfvars를 변경하면apply트리거 실행이 트리거되고 배포가 시작됩니다.
Cloud Source Repositories를 엽니다.
저장소 목록에서
copy-of-gcp-mig-simple을 클릭합니다.페이지 하단의 기록 탭에 설명
Promote green이 포함된 커밋이 표시됩니다.apply트리거 실행을 보려면 Google Cloud 콘솔에서 빌드 기록 페이지를 엽니다.첫 번째 빌드를 클릭하여 빌드 세부정보 페이지를 엽니다.
두 개의 빌드 단계가 포함된
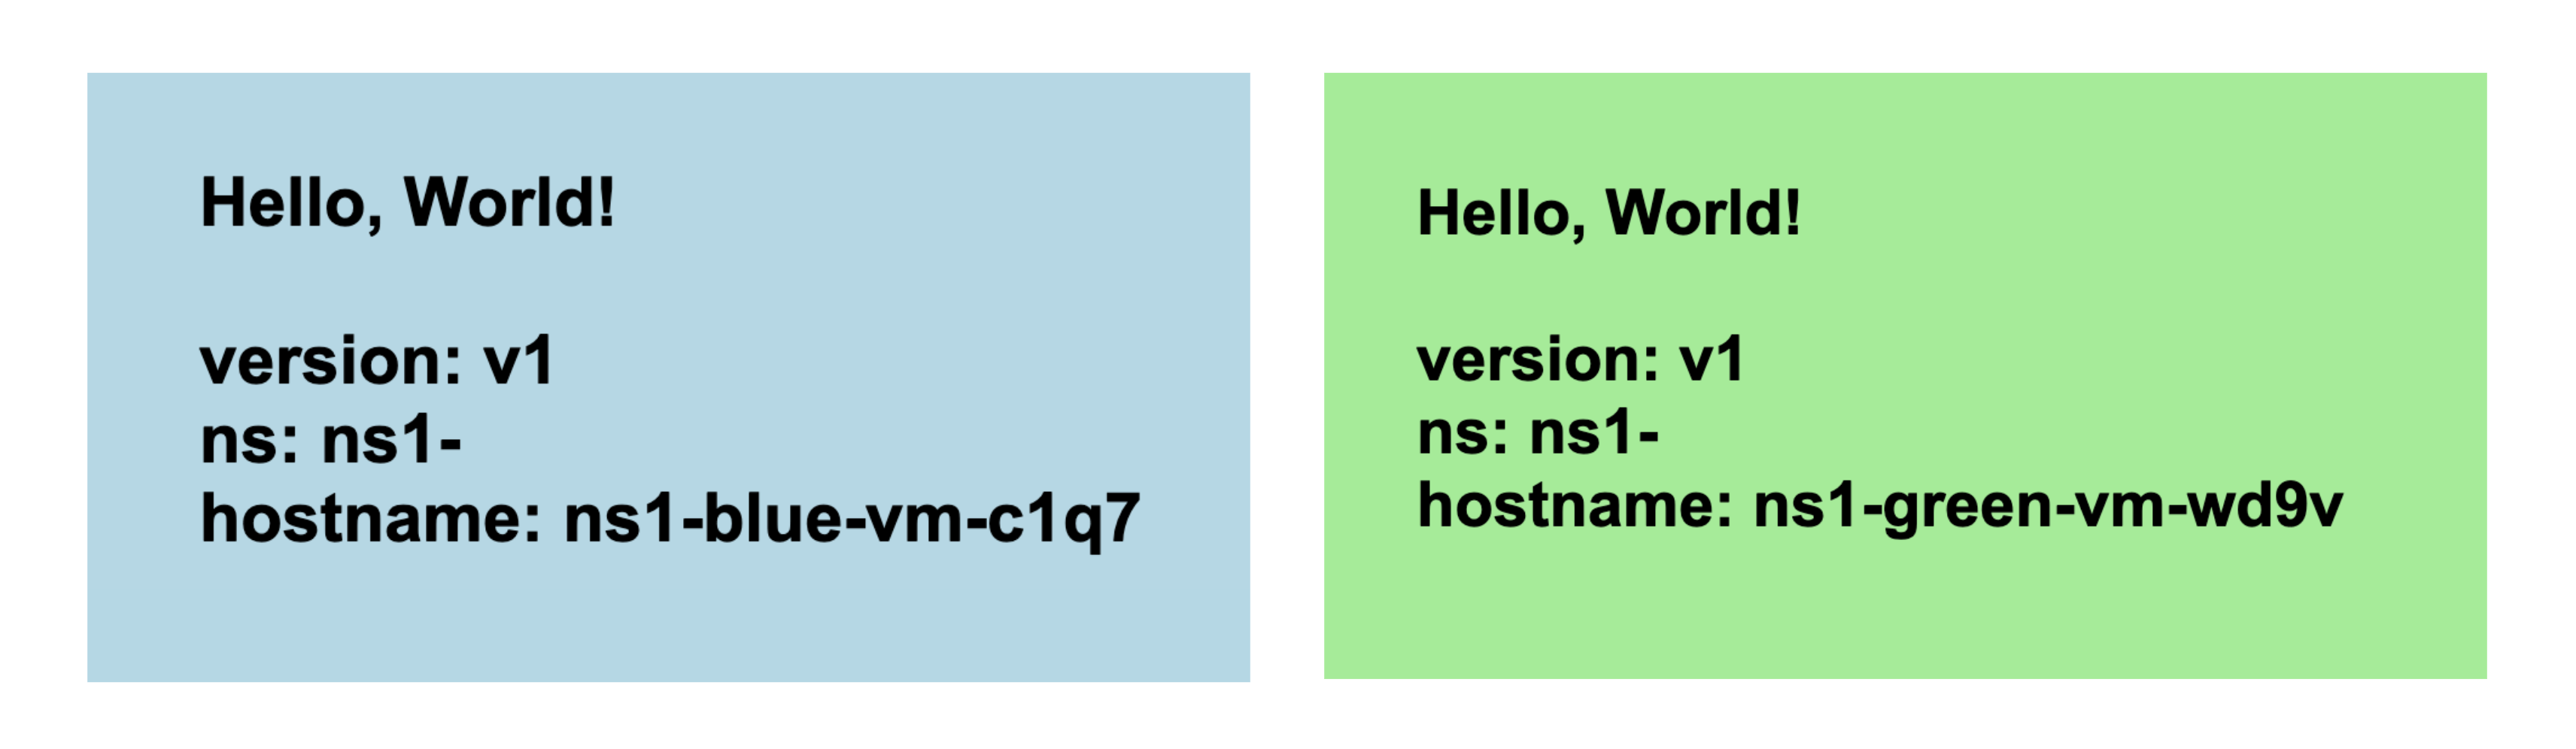
apply트리거 파이프라인이 표시됩니다. 첫 번째 빌드 단계에서는 Terraform 적용을 실행하여 배포를 위한 Compute Engine 및 부하 분산 리소스를 만듭니다. 두 번째 빌드 단계는 애플리케이션이 실행되는 것을 볼 수 있는 IP 주소를 출력합니다.브라우저에서 그린 MIG에 해당하는 IP 주소를 엽니다. 배포를 보여주는 다음과 비슷한 스크린샷이 표시됩니다.
Compute Engine 인스턴스 그룹 페이지로 이동하여 블루 및 그린 인스턴스 그룹을 확인합니다.
VM 인스턴스 페이지를 열어 VM 인스턴스 4개를 확인합니다.
외부 IP 주소 페이지를 열어 세 개의 부하 분산기를 확인합니다.
- 설정 스크립트와 관련된 소스 코드
- Cloud Build 파이프라인과 관련된 소스 코드
- Terraform 템플릿과 관련된 소스 코드
- Cloud Build, Resource Manager, Compute Engine, Cloud Source Repositories API를 사용 설정합니다.
- 프로젝트의 Cloud Build 서비스 계정에
roles/editorIAM 역할을 부여합니다. 이 역할은 Cloud Build에서 배포에 필요한 GitOps 구성요소를 만들고 설정하는 데 필요합니다. - 프로젝트의 Cloud Build 서비스 계정에
roles/source.adminIAM 역할을 부여합니다. 이 역할은 Cloud Build 서비스 계정에서 프로젝트에 Cloud Source Repositories를 만들고 샘플 GitHub 저장소의 콘텐츠를 Cloud Source Repositories에 클론하는 데 필요합니다. 다음 역할을 하는
bootstrap.cloudbuild.yaml인라인이라는 Cloud Build 파이프라인을 생성합니다.- Cloud Source Repositories에 새 저장소를 만듭니다.
- 샘플 GitHub 저장소의 소스 코드를 Cloud Source Repositories의 새 저장소로 복사합니다.
- 적용 트리거를 만들고 빌드 트리거를 폐기합니다.
tf_apply build: Terraform을 설치하는tf_install_in_cloud_build_step함수를 호출하는 빌드 단계입니다.tf_apply는 GitOps 흐름에 사용된 리소스를 만듭니다.tf_install_in_cloud_build_step및tf_apply함수는bash_utils.sh에 정의되어 있으며, 빌드 단계는source명령어를 사용하여 이를 호출합니다.describe_deployment: 부하 분산기의 IP 주소를 출력하는describe_deployment함수를 호출하는 빌드 단계입니다.main.tf: Terraform 구성 파일입니다.main.tfvars: 이 파일은 Terraform 변수를 정의합니다.mig/및splitter/: 이 폴더에는 부하 분산기를 정의하는 모듈이 포함됩니다.mig/폴더에는 블루 및 그린 부하 분산기의 MIG를 정의하는 Terraform 구성 파일이 포함되어 있습니다. 블루 및 그린 MIG는 동일하므로 한 번만 정의되며 블루 및 그린 객체에서 인스턴스화됩니다. 분할기 부하 분산기의 Terraform 구성 파일은splitter/폴더에 있습니다.- Google Cloud 프로젝트에 대한 변수가 정의됩니다.
- Google이 Terraform 제공업체로 설정됩니다.
- 변수는 네임스페이스에 정의됩니다. Terraform에서 생성되는 모든 객체에는 이 변수로 프리픽스가 붙어 애플리케이션의 여러 버전을 동일한 프로젝트에 배포할 수 있고 객체 이름이 서로 충돌하지 않습니다.
- 변수
MIG_VER_BLUE,MIG_VER_BLUE,MIG_ACTIVE_COLOR는infra/main.tfvars파일의 변수에 대한 바인딩입니다. 적용 트리거로 생성된 Compute Engine 리소스를 삭제합니다.
Cloud Build 트리거 페이지를 엽니다.
트리거 테이블에서 폐기 트리거에 해당하는 행을 찾고 실행을 클릭합니다. 트리거 실행이 완료되면 적용 트리거로 생성된 리소스가 삭제됩니다.
터미널 창에서 다음 명령어를 실행하여 부트스트랩 중에 생성된 리소스를 삭제합니다.
bash <(curl https://raw.githubusercontent.com/GoogleCloudPlatform/cloud-build-samples/main/mig-blue-green/teardown.sh)
사용해 보기
apply 및 destroy라는 빌드 트리거 두 개가 표시됩니다. apply 트리거는 main 분기의 infra/main.tfvars 파일에 연결됩니다. 이 트리거는 파일이 업데이트될 때마다 실행됩니다. destroy 트리거는 수동 트리거입니다.
코드 이해하기
이 코드 샘플의 소스 코드에는 다음이 포함됩니다.
설정 스크립트
setup.sh는 부트스트랩 프로세스를 실행하고 블루/그린 배포를 위한 구성요소를 만드는 설정 스크립트입니다. 스크립트는 다음 작업을 수행합니다.
Cloud Build 파이프라인
apply.cloudbuild.yaml 및 destroy.cloudbuild.yaml은 설정 스크립트가 GitOps 흐름의 리소스를 설정하는 데 사용하는 Cloud Build 구성 파일입니다. apply.cloudbuild.yaml에는 두 가지 빌드 단계가 포함됩니다.
destroy.cloudbuild.yaml은 tf_apply로 생성된 모든 리소스를 삭제하는 tf_destroy를 호출합니다.
tf_install_in_cloud_build_step, tf_apply, describe_deployment, tf_destroy 함수는 bash_utils.sh 파일에 정의됩니다.
빌드 구성 파일은 source 명령어를 사용하여 함수를 호출합니다.
다음 코드는 bash_utils.sh에 정의된 tf_install_in_cloud_build_step 함수를 보여줍니다. 빌드 구성 파일은 이 함수를 호출하여 Terraform을 즉시 설치합니다. Terraform 상태를 기록하는 Cloud Storage 버킷을 만듭니다.
다음 코드 스니펫은 bash_utils.sh에 정의된 tf_apply 함수를 보여줍니다. 먼저 모든 모듈과 커스텀 라이브러리를 로드하는 terraform init을 호출한 후 terraform apply를 실행하여 main.tfvars 파일에서 변수를 로드합니다.
다음 코드 스니펫은 bash_utils.sh에 정의된 describe_deployment 함수를 보여줍니다. gcloud compute addresses describe를 사용하여 이름으로 부하 분산기의 IP 주소를 가져와 출력합니다.
다음 코드 스니펫은 bash_utils.sh에 정의된 tf_destroy 함수를 보여줍니다. 모든 모듈과 커스텀 라이브러리를 로드하는 terraform init을 호출한 후 Terraform 변수를 언로드하는 terraform destroy를 실행합니다.
Terraform 템플릿
copy-of-gcp-mig-simple/infra/ 폴더에서 모든 Terraform 구성 파일과 변수를 찾을 수 있습니다.
다음 코드 스니펫은 infra/main.tfvars의 콘텐츠를 보여줍니다. 여기에는 블루 및 그린 풀에 배포할 애플리케이션 버전을 결정하는 2개의 변수와 활성 색상에 대한 변수(블루 또는 그린)의 세 가지 변수가 포함됩니다. 이 파일을 변경하면 배포가 트리거됩니다.
다음은 infra/main.tf의 코드 스니펫입니다. 이 스니펫에서는 다음 사항이 적용됩니다.
infra/main.tf의 다음 코드 스니펫은 분할기 모듈의 인스턴스화를 보여줍니다. 이 모듈은 분할기 부하 분산기가 애플리케이션을 배포할 MIG를 알 수 있도록 활성 색상을 사용합니다.
infra/main.tf의 다음 코드 스니펫은 블루 및 그린 MIG에 동일한 두 모듈을 정의합니다. 분할기 모듈에 정의된 색상, 네트워크, 서브네트워크를 사용합니다.
splitter/main.tf 파일은 분할기 MIG에 대해 생성된 객체를 정의합니다. 다음은 그린과 블루 MIG 간에 전환하는 로직이 포함된 splitter/main.tf의 코드 스니펫입니다. 두 가지 백엔드 리전(var.instance_group_blue 또는 var.instance_group_green)으로 트래픽을 라우팅할 수 있는 google_compute_region_backend_service 서비스가 지원됩니다.
capacity_scaler는 라우팅할 트래픽 양을 정의합니다.
다음 코드는 트래픽의 100%를 지정된 색상으로 라우팅하지만 카나리아 배포를 위해 이 코드를 업데이트하여 트래픽을 일부 사용자에게 라우팅할 수 있습니다.
mig/main.tf 파일은 블루 및 그린 MIG와 관련된 객체를 정의합니다. 이 파일의 다음 코드 스니펫은 VM 풀을 만드는 데 사용되는 Compute Engine 인스턴스 템플릿을 정의합니다. 이 인스턴스 템플릿에는 Terraform 수명 주기 속성이 create_before_destroy로 설정되어 있습니다.
이는 풀 버전을 업데이트할 때 이전 버전의 풀에서 템플릿을 계속 사용 중인 경우 템플릿을 사용하여 새 버전의 풀을 만들 수 없기 때문입니다. 하지만 새 템플릿을 만들기 전에 이전 버전의 풀이 삭제되면 풀이 다운되는 기간이 있습니다. 이 시나리오를 피하기 위해 Terraform 수명 주기를 create_before_destroy로 설정하여 이전 버전이 폐기되기 전에 최신 버전의 VM 풀이 먼저 생성되도록 합니다.
삭제
이 튜토리얼에서 사용된 리소스 비용이 Google Cloud 계정에 청구되지 않도록 하려면 리소스가 포함된 프로젝트를 삭제하거나 프로젝트를 유지하고 개별 리소스를 삭제하세요.
개별 리소스 삭제
프로젝트 삭제
Delete a Google Cloud project:
gcloud projects delete PROJECT_ID