Unterstützte Connectors für Application Integration
String in Großbuchstaben umwandeln
Mit der Aufgabe „Datenabgleich“ können Sie die Elemente eines String-Arrays durchlaufen und Transformationsfunktionen anwenden, um jeden String-Wert in Großbuchstaben zu konvertieren.
Codebeispiel
Beispiel für den Integrationsablauf
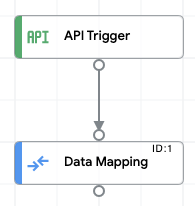
Die folgende Abbildung zeigt ein Beispiellayout des Integrationseditors für dieses Codebeispiel.
Beispielintegration hochladen und ausführen
So laden Sie die Beispielintegration hoch und führen sie aus:
- Speichern Sie das Integrationsbeispiel als JSON-Datei auf Ihrem System.
- Rufen Sie in der Google Cloud Console die Seite Application Integration auf.
- Klicken Sie im linken Navigationsmenü auf Integrationen, um die Seite Integrationen zu öffnen.
- Wählen Sie eine vorhandene Integration aus oder erstellen Sie eine neue Integration, indem Sie auf Integration erstellen klicken.
Wenn Sie eine neue Integration erstellen, gehen Sie so vor:
- Geben Sie im Dialogfeld Integration erstellen einen Namen und eine Beschreibung ein.
- Wählen Sie eine Region für die Integration aus.
- Wählen Sie ein Dienstkonto für die Integration aus. Sie können die Dienstkontodetails einer Integration jederzeit im Bereich Integrationsübersicht in der Symbolleiste für die Integration ändern oder aktualisieren.
- Klicken Sie auf Erstellen.
Dadurch wird die Integration auf der Seite Integrationseditor geöffnet.
- Klicken Sie im Integrationseditor auf das Menü zum Hochladen/Herunterladen und wählen Sie Integration hochladen aus.
- Wählen Sie im Dateibrowser-Dialogfeld die Datei aus, die Sie in Schritt 1 gespeichert haben, und klicken Sie dann auf Öffnen.
Eine neue Version der Integration wird mit der hochgeladenen Datei erstellt.
- Klicken Sie im Integrationseditor auf Testen.
- Klicken Sie auf Integration testen. Dadurch wird die Integration ausgeführt und das Ausführungsergebnis im Bereich Integration testen angezeigt.