See the supported connectors for Application Integration.
Make a REST call to a public API
Using the Call REST Endpoint task, make a call to https://mocktarget.apigee.net/json
, and save the response in a JSON variable.
Code sample
{
"triggerConfigs": [{
"label": "API Trigger",
"startTasks": [{
"taskId": "1"
}],
"properties": {
"Trigger name": "CallRestEndpointDemo_API_1"
},
"triggerType": "API",
"triggerNumber": "1",
"triggerId": "api_trigger/CallRestEndpointDemo_API_1"
}],
"taskConfigs": [{
"task": "GenericRestV2Task",
"taskId": "1",
"parameters": {
"throwError": {
"key": "throwError",
"value": {
"booleanValue": true
}
},
"responseBody": {
"key": "responseBody",
"value": {
"stringArray": {
"stringValues": ["$`Task_1_responseBody`$"]
}
}
},
"disableSSLValidation": {
"key": "disableSSLValidation",
"value": {
"booleanValue": false
}
},
"httpParams": {
"key": "httpParams"
},
"responseHeader": {
"key": "responseHeader",
"value": {
"stringArray": {
"stringValues": ["$`Task_1_responseHeader`$"]
}
}
},
"userAgent": {
"key": "userAgent",
"value": {
"stringValue": ""
}
},
"httpMethod": {
"key": "httpMethod",
"value": {
"stringValue": "GET"
}
},
"responseStatus": {
"key": "responseStatus",
"value": {
"stringArray": {
"stringValues": ["$`Task_1_responseStatus`$"]
}
}
},
"url": {
"key": "url",
"value": {
"stringValue": "https://mocktarget.apigee.net/json"
}
},
"urlFetchingService": {
"key": "urlFetchingService",
"value": {
"stringValue": "HARPOON"
}
},
"useSSL": {
"key": "useSSL",
"value": {
"booleanValue": false
}
},
"requestorId": {
"key": "requestorId",
"value": {
"stringValue": ""
}
},
"urlQueryStrings": {
"key": "urlQueryStrings"
},
"requestBody": {
"key": "requestBody",
"value": {
"stringValue": ""
}
},
"followRedirects": {
"key": "followRedirects",
"value": {
"booleanValue": true
}
},
"additionalHeaders": {
"key": "additionalHeaders"
}
},
"nextTasks": [{
"taskId": "2"
}],
"taskExecutionStrategy": "WHEN_ALL_SUCCEED",
"displayName": "Call REST Endpoint"
}, {
"task": "FieldMappingTask",
"taskId": "2",
"parameters": {
"FieldMappingConfigTaskParameterKey": {
"key": "FieldMappingConfigTaskParameterKey",
"value": {
"jsonValue": "{\n \"@type\": \"type.googleapis.com/enterprise.crm.eventbus.proto.FieldMappingConfig\",\n \"mappedFields\": [{\n \"inputField\": {\n \"fieldType\": \"JSON_VALUE\",\n \"transformExpression\": {\n \"initialValue\": {\n \"referenceValue\": \"$`Task_1_responseBody`$\"\n },\n \"transformationFunctions\": [{\n \"functionType\": {\n \"stringFunction\": {\n \"functionName\": \"TO_JSON\"\n }\n }\n }]\n }\n },\n \"outputField\": {\n \"referenceKey\": \"$OutputJson$\",\n \"fieldType\": \"JSON_VALUE\",\n \"cardinality\": \"OPTIONAL\"\n }\n }]\n}"
}
}
},
"taskExecutionStrategy": "WHEN_ALL_SUCCEED",
"displayName": "Data Mapping"
}],
"integrationParameters": [{
"key": "`Task_1_responseHeader`",
"dataType": "STRING_VALUE",
"displayName": "`Task_1_responseHeader`",
"isTransient": true,
"producer": "1_1"
}, {
"key": "`Task_1_responseBody`",
"dataType": "STRING_VALUE",
"displayName": "`Task_1_responseBody`",
"isTransient": true,
"producer": "1_1"
}, {
"key": "`Task_1_responseStatus`",
"dataType": "STRING_VALUE",
"displayName": "`Task_1_responseStatus`",
"isTransient": true,
"producer": "1_1"
}, {
"key": "OutputJson",
"dataType": "JSON_VALUE",
"displayName": "OutputJson",
"inputOutputType": "OUT"
}]
}
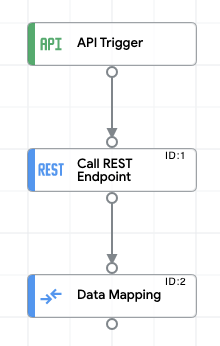
Sample integration flow
The following image shows a sample layout of the integration designer for this integration code sample.
Upload and run the sample integration
To upload and run the sample integration, do the following steps:
- Save the integration sample as a .json file on your system.
- In the Google Cloud console, go to the Application Integration page.
Go to Application Integration
- In the navigation menu, click Integrations. The Integrations List page appears.
- Select an existing integration or create a new integration by clicking Create integration.
If you are creating a new integration:
- Enter a name and description in the Create Integration dialog.
- Select a region for the integration.
- Click Create.
This opens the integration in the integration designer.
- In the integration designer, click publishUpload/download menu and then select Upload integration.
- In the file browser dialog, select the file that you saved in step 1, and then click Open.
A new version of the integration is created using the uploaded file.
- In the integration designer, click Test.
- Click Test integration. This runs the integration and displays the execution result in the Test Integration dialog.