Couchbase
The Couchbase connector lets you connect to a Couchbase database instance and perform the supported database operations.
Supported versions
Couchbase Server versions 4.0 and up (Enterprise Edition or Community Edition).
Couchbase Capella
Before you begin
Before using the Couchbase connector, do the following tasks:
- In your Google Cloud project:
- Ensure that network connectivity is set up. For information about network patterns, see Network connectivity.
- Grant the roles/connectors.admin IAM role to the user configuring the connector.
- Grant the following IAM roles to the service account that you want to use for the connector:
roles/secretmanager.viewerroles/secretmanager.secretAccessor
A service account is a special type of Google account intended to represent a non-human user that needs to authenticate and be authorized to access data in Google APIs. If you don't have a service account, you must create a service account. For more information, see Creating a service account.
- Enable the following services:
secretmanager.googleapis.com(Secret Manager API)connectors.googleapis.com(Connectors API)
To understand how to enable services, see Enabling services.
If these services or permissions have not been enabled for your project previously, you are prompted to enable them when configuring the connector.
- If required, create a Couchbase server. For more information, see Quickstart Couchbase Server. For information about Couchbase APIs, see Couchbase REST API Doc.
- If required, download the SSL certificate. For more information, see Secure Connection with TLS.
Configure the connector
A connection is specific to a data source. It means that if you have many data sources, you must create a separate connection for each data source. To create a connection, do the following:
- In the Cloud console, go to the Integration Connectors > Connections page and then select or create a Google Cloud project.
- Click + CREATE NEW to open the Create Connection page.
- In the Location section, choose the location for the connection.
- Region: Select a location from the drop-down list.
For the list of all the supported regions, see Locations.
- Click NEXT.
- Region: Select a location from the drop-down list.
- In the Connection Details section, complete the following:
- Connector: Select Couchbase from the drop down list of available Connectors.
- Connector version: Select the Connector version from the drop down list of available versions.
- In the Connection Name field, enter a name for the Connection instance.
Connection names must meet the following criteria:
- Connection names can use letters, numbers, or hyphens.
- Letters must be lower-case.
- Connection names must begin with a letter and end with a letter or number.
- Connection names cannot exceed 49 characters.
- Optionally, enter a Description for the connection instance.
- Optionally, enable Cloud logging,
and then select a log level. By default, the log level is set to
Error. - Service Account: Select a service account that has the required roles.
- Optionally, configure the Connection node settings:
- Minimum number of nodes: Enter the minimum number of connection nodes.
- Maximum number of nodes: Enter the maximum number of connection nodes.
A node is a unit (or replica) of a connection that processes transactions. More nodes are required to process more transactions for a connection and conversely, fewer nodes are required to process fewer transactions. To understand how the nodes affect your connector pricing, see Pricing for connection nodes. If you don't enter any values, by default the minimum nodes are set to 2 (for better availability) and the maximum nodes are set to 50.
- Allow JSON Parameters: Allows raw JSON to be used in parameters when QueryPassthrough is enabled.
- Analytics Port: The port for connecting to the Couchbase Analytics Endpoint.
- Child Separator: The character or characters used to denote child tables.
- Couchbase Service: Determines the Couchbase service to connect to. Default is N1QL. Available options are N1QL and Analytics.
- Create Table Ram Quota: The default RAM quota, in megabytes, to use when inserting buckets via the CREATE TABLE syntax.
- Dataverse Separator: The character or characters used to denote Analytics dataverses and scopes/collections.
- Flavor Separator: The character or characters used to denote flavors.
- N1QL Port: The port for connecting to the Couchbase N1QL Endpoint.
- Periods Separator: The character or characters used to denote hierarchy.
- Query Execution Timeout: This sets the server-side timeout for the query, which governs how long Couchbase will execute the query before returning a timeout error.
- Strict Comparison: Adjusts how precisely to translate filters on SQL input queries into Couchbase queries. This can be set to a comma-separated list of values, where each value can be one of: date, number, boolean, or string.
- Transaction Durability: Specifies how a document must be stored for a transaction to succeed. Specifies whether to use N1QL transactions when executing queries.
- Transaction Timeout: This sets the amount of time a transaction may execute before it is timed out by Couchbase.
- Use Collections For DDL: Whether to assume that CREATE TABLE statements use collections instead of flavors. Only takes effect when connecting to Couchbase v7+ and GenerateSchemaFiles is set to OnCreate.
- Use Transactions: Specifies whether to use N1QL transactions when executing queries.
- Validate JSON Parameters: Allows the provider to validate that string parameters are valid JSON before sending the query to Couchbase.
- Use proxy: Select this checkbox to configure a proxy server for the connection and configure the following values:
-
Proxy Auth Scheme: Select the authentication type to authenticate with the proxy server. The following authentication types are supported:
- Basic: Basic HTTP authentication.
- Digest: Digest HTTP authentication.
- Proxy User: A user name to be used to authenticate with the proxy server.
- Proxy Password: The Secret manager secret of the user's password.
-
Proxy SSL Type: The SSL type to use when connecting to the proxy server. The following authentication types are supported:
- Auto: Default setting. If the URL is an HTTPS URL, then the Tunnel option is used. If the URL is an HTTP URL, then the NEVER option is used.
- Always: The connection is always SSL enabled.
- Never: The connection is not SSL enabled.
- Tunnel: The connection is through a tunneling proxy. The proxy server opens a connection to the remote host and traffic flows back and forth through the proxy.
- In the Proxy Server section, enter details of the proxy server.
- Click + Add destination.
- Select a Destination Type.
- Host address: Specify the hostname or IP address of the destination.
If you want to establish a private connection to your backend system, do the following:
- Create a PSC service attachment.
- Create an endpoint attachment and then enter the details of the endpoint attachment in the Host address field.
- Host address: Specify the hostname or IP address of the destination.
- Optionally, click + ADD LABEL to add a label to the Connection in the form of a key/value pair.
- Click NEXT.
- In the Destinations section, enter details of the remote host (backend system) you want to connect to.
- Destination Type: Select a Destination Type.
- Select Host address from the list to specify the hostname or IP address of the destination.
- If you want to establish a private connection to your backend systems, select Endpoint attachment from the list, and then select the required endpoint attachment from the Endpoint Attachment list.
If you want to establish a public connection to your backend systems with additional security, you can consider configuring static outbound IP addresses for your connections, and then configure your firewall rules to allowlist only the specific static IP addresses.
To enter additional destinations, click +ADD DESTINATION.
- Click NEXT.
- Destination Type: Select a Destination Type.
-
In the Authentication section, enter the authentication details.
- Select an Authentication type and enter the relevant details.
The following authentication types are supported by the Couchbase connection:
- Username and password
- Click NEXT.
To understand how to configure these authentication types, see Configure authentication.
- Select an Authentication type and enter the relevant details.
- Review: Review your connection and authentication details.
- Click Create.
Configure authentication
Enter the details based on the authentication you want to use.
-
Username and password
- Username: Username for connector
- Password: Secret Manager Secret containing the password associated with the connector.
- UseSSL: This field sets whether SSL is enabled.
- SSLServerCert: SSLServerCert for Couchbase Connector
- Auth scheme: Auth scheme for Couchbase Connector
- Connection Mode: Determines how to connect to the Couchbase server. Must be either
DirectorCloud. ForCloud, SSL is mandatory. For more information, see Secure connections with TLS. - DNS Server: Determines what DNS server to use when retrieving Couchbase Cloud information. For example,
8.8.8.8.
Connection configuration samples
This section lists the sample values for the various fields that you configure when creating the Couchbase Connector.
SSL - Certificate connection type
| Field Name | Details |
|---|---|
| Region | us-central1 |
| Connector | Couchbase |
| Connector Version | 1 |
| Connector Name | Couchbase-basic-auth-conn |
| Service Account | NAME-compute@developer.gserviceaccount.com |
| Verbosity Level | 5 |
| Connection node settings: Min/Max number of nodes | 2/50 |
| SSL Configuration Enable SSL | True |
| Trust Store | Private |
| Custom Trust Store | A full PEM Certificate (-----BEGIN CERTIFICATE----- MIIChTCCAe4CAQAwDQYJKoZIhv......Qw== -----END CERTIFICATE-----) |
| Secret version | 1 |
| Host Address | xx.1HOST_NAME.cloud.couchbase.com:18xxx |
| Authentication | User Password |
| Username | username | Password | password |
| versions | 1 |
| vConnection Mode | Cloud |
| DNS Server | 192.0.2.0 |
| OAuth scheme | Basic |
Analytics Couchbase connection type
| Field Name | Details |
|---|---|
| Region | us-central1 |
| Connector | Couchbase |
| Connector Version | 1 |
| Connector Name | Couchbase-basic-auth-Analytics-conn |
| Service Account | NAME-compute@developer.gserviceaccount.com |
| Analytics Port | 18095 |
| Couchbase Service | Analytics |
| Verbosity Level | 5 |
| Connection node settings: Min/Max number of nodes | 2/50 |
| Host Address | xx.1HOST_NAME.cloud.couchbase.com:18095 |
| Authentication | User Password |
| Username | username |
| Password | password |
| versions | 1 |
| vConnection Mode | Cloud |
| DNS Server | 192.0.2.0 |
| OAuth scheme | Basic |
Entities, operations, and actions
All the Integration Connectors provide a layer of abstraction for the objects of the connected application. You can access an application's objects only through this abstraction. The abstraction is exposed to you as entities, operations, and actions.
- Entity: An entity can be thought of as an object, or a collection of properties, in the
connected application or service. The definition of an entity differs from a connector to a
connector. For example, in a database connector, tables are the entities, in a
file server connector, folders are the entities, and in a messaging system connector,
queues are the entities.
However, it is possible that a connector doesn't support or have any entities, in which case the
Entitieslist will be empty. - Operation: An operation is the activity that you can perform on an entity. You can perform
any of the following operations on an entity:
Selecting an entity from the available list, generates a list of operations available for the entity. For a detailed description of the operations, see the Connectors task's entity operations. However, if a connector doesn't support any of the entity operations, such unsupported operations aren't listed in the
Operationslist. - Action: An action is a first class function that is made available to the integration
through the connector interface. An action lets you make changes to an entity or entities, and
vary from connector to connector. Normally, an action will have some input parameters, and an output
parameter. However, it is possible
that a connector doesn't support any action, in which case the
Actionslist will be empty.
Actions
This connector supports execution of the following actions:
- User-defined stored procedures and functions. If you have any stored procedures and functions in your backend, those are listed
in the
Actionscolumn of theConfigure connector taskdialog. - Custom SQL queries. To execute custom SQL queries, the connector provides the Execute custom query action.
To create a custom query, follow these steps:
- Follow the detailed instructions to add a connectors task.
- When you configure the connector task, in the type of action you want to perform, select Actions.
- In the Action list, select Execute custom query, and then click Done.
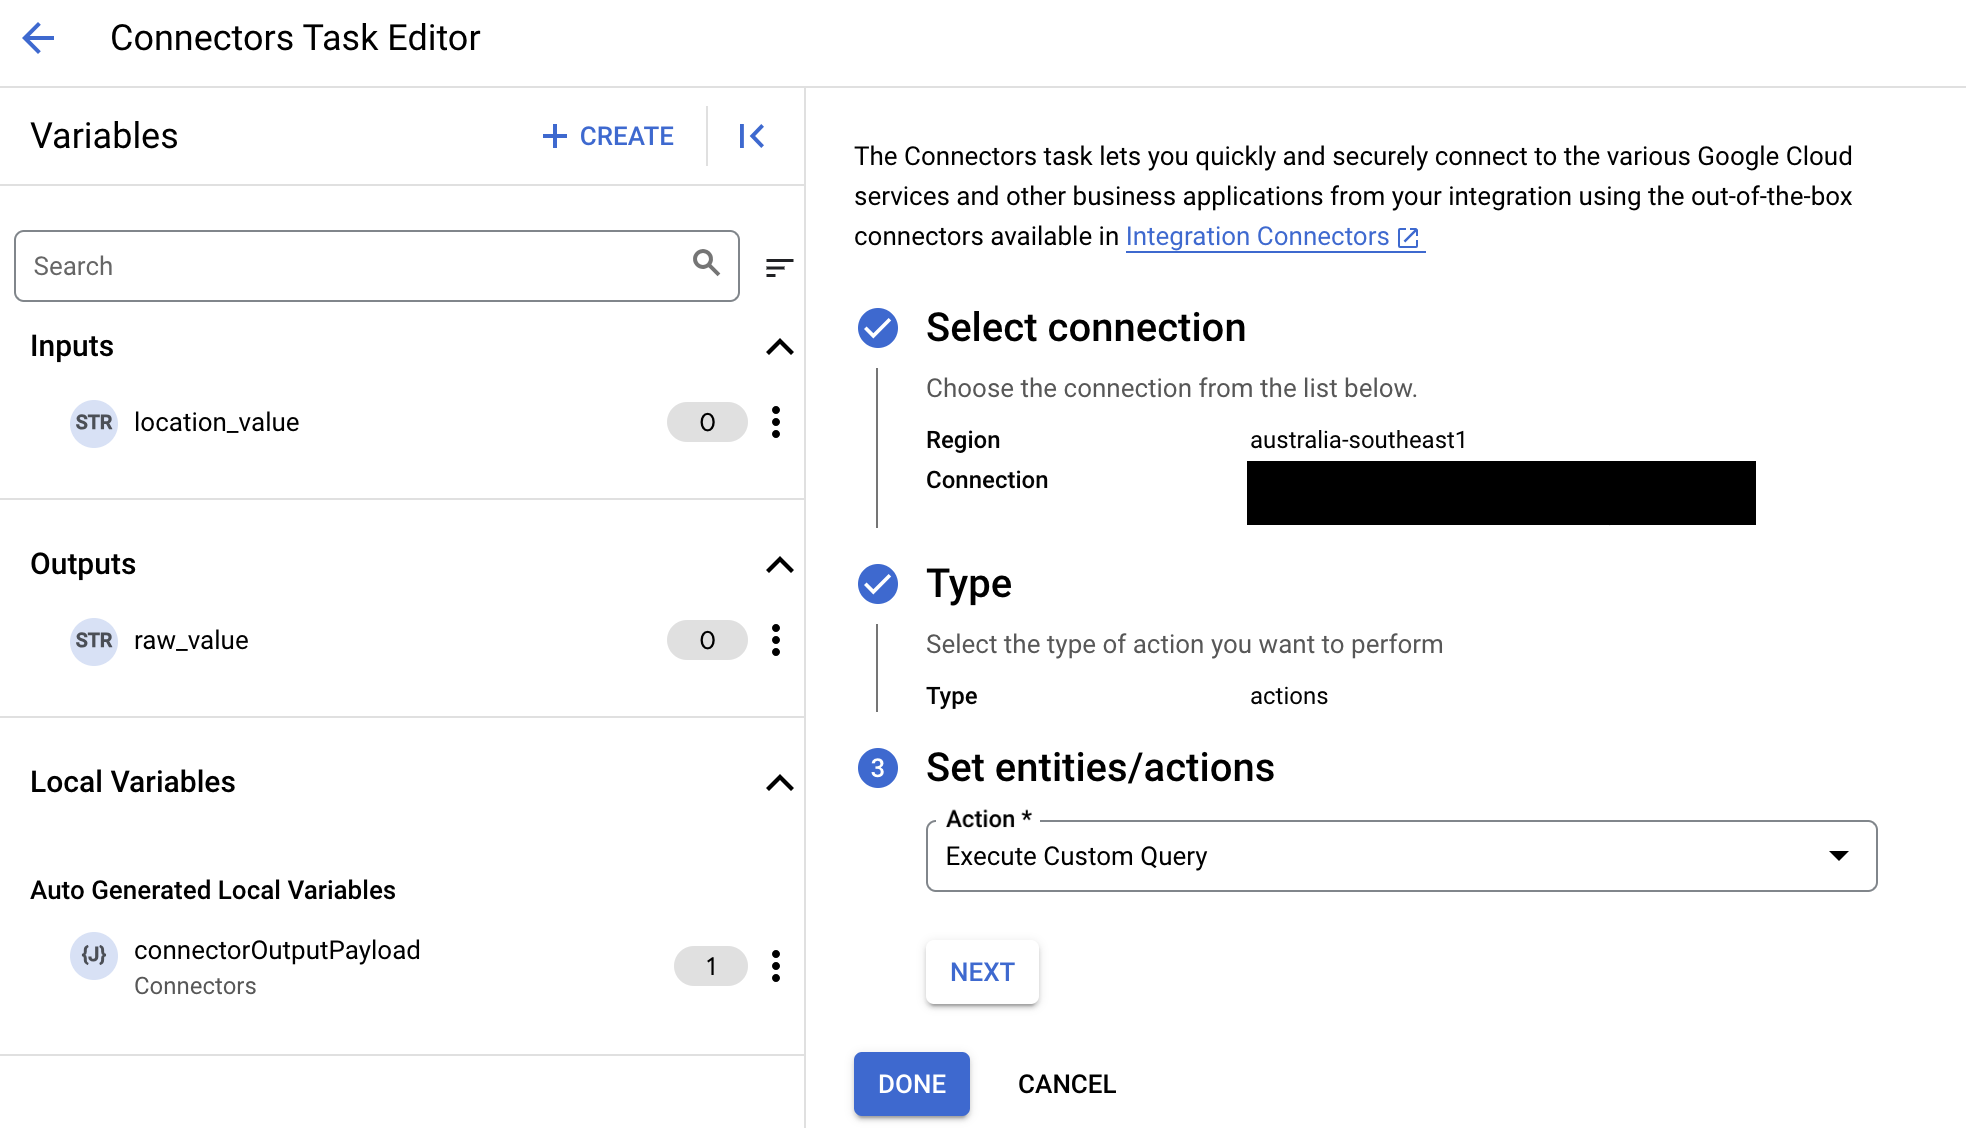
- Expand the Task input section, and then do the following:
- In the Timeout after field, enter the number of seconds to wait till the query executes.
Default value:
180seconds. - In the Maximum number of rows field, enter the maximum number of rows to be returned from the database.
Default value:
25. - To update the custom query, click Edit Custom Script. The Script editor dialog opens.
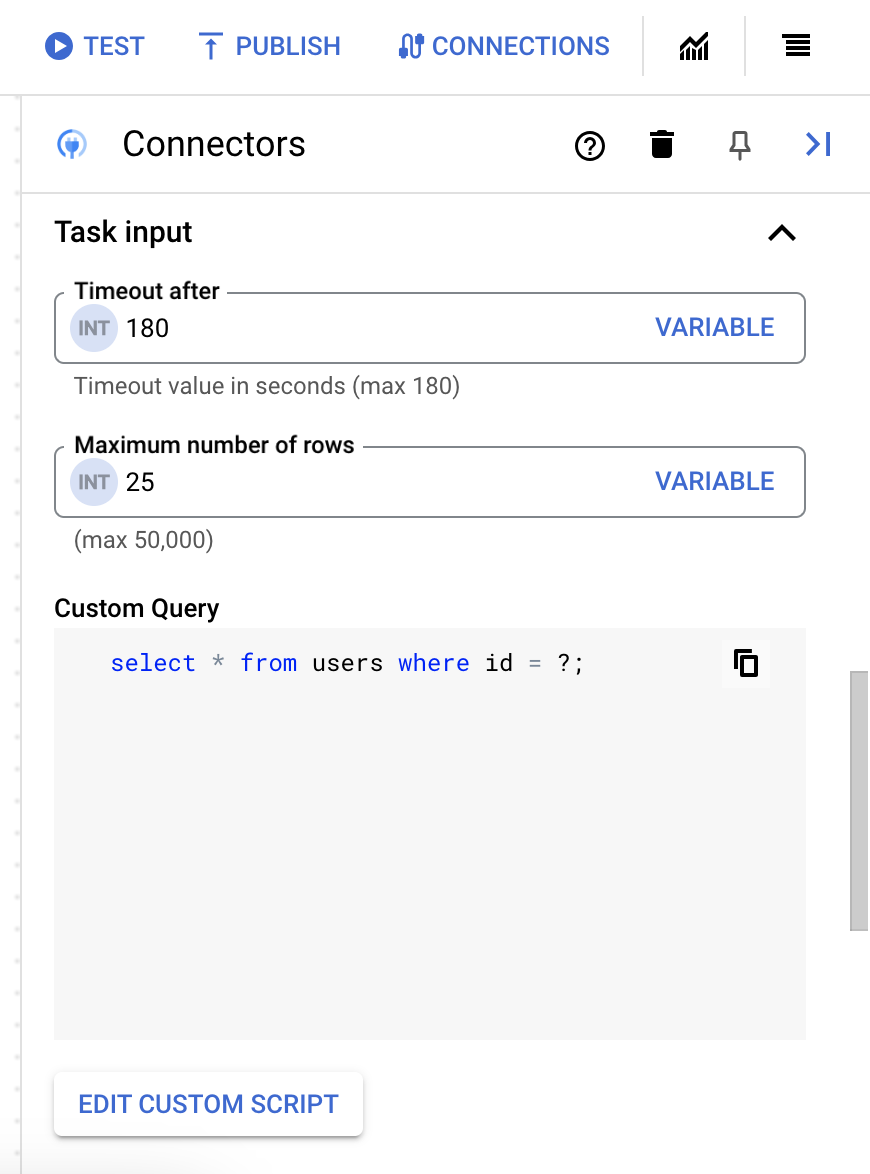
- In the Script editor dialog, enter the SQL query and click Save.
You can use a question mark (?) in a SQL statement to represent a single parameter that must be specified in the query parameters list. For example, the following SQL query selects all rows from the
Employeestable that matches the values specified for theLastNamecolumn:SELECT * FROM Employees where LastName=?
- If you've used question marks in your SQL query, you must add the parameter by clicking + Add Parameter Name for each question mark. While executing the integration, these parameters replace the question marks (?) in the SQL query sequentially. For example, if you have added three question marks (?), then you must add three parameters in order of sequence.
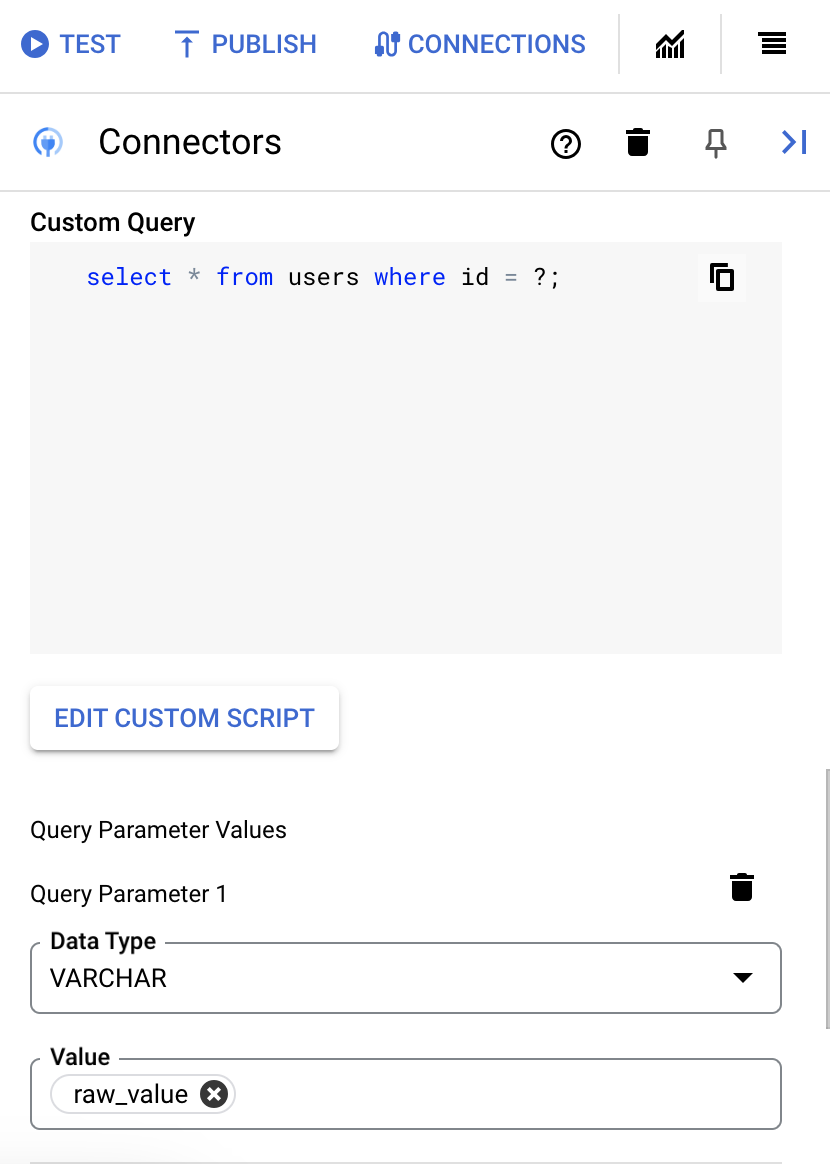
To add query parameters, do the following:
- From the Type list, select the data type of the parameter.
- In the Value field, enter the value of the parameter.
- To add multiple parameters, click + Add Query Parameter.
- In the Timeout after field, enter the number of seconds to wait till the query executes.
System limitations
The Couchbase connector can process 25 transactions per second, per node, and throttles any transactions beyond this limit. By default, Integration Connectors allocates 2 nodes (for better availability) for a connection.
For information on the limits applicable to Integration Connectors, see Limits.
Actions
This section lists the actions supported by the connector. To understand how to configure the actions, see Action examples.
AddDocument action
This action add documets in couchbase.
Input parameters of the AddDocument action
| Parameter Name | Data Type | Required | Description |
|---|---|---|---|
| BucketName | String | Yes | The bucket to insert the document into. |
| SourceTable | Object | No | The name of the temp table containing ID and Document columns. Required if no ID is specified. |
| ID | String | No | The primary key to insert the document under. Required if no SourceTable is specified. |
| Document | String | No | The JSON text of the document to insert. Required if not SourceTable is specified. |
Output parameters of the AddDocument action
This action returns the status 200 (OK) if the action is successful.
For example on how to configure the AddDocument action,
see Action examples.
CreateCollection action
This action creates a collection in an existing scope.
Input parameters of the CreateCollection action
| Parameter Name | Data Type | Required | Description |
|---|---|---|---|
| Bucket | String | Yes | The name of the bucket containing the collection. |
| Scope | String | Yes | The name of the scope containing the collection. |
| Name | String | Yes | The name of the collection to create. |
Output parameters of the CreateCollection action
This action returns the status 200 (OK) if the action is successful.
For example on how to configure the CreateCollection action,
see Action examples.
DeleteCollection action
This action deletes a collection in an existing scope.
Input parameters of the DeleteCollection action
| Parameter Name | Data Type | Required | Description |
|---|---|---|---|
| Bucket | string | True | The name of the bucket containing the collection. |
| Scope | String | True | The name of the scope containing the collection. |
| Name | string | True | The name of the collection to delete. |
Output parameters of the DeleteCollection action
This action returns the status 200 (OK) if the action is successful.
For example on how to configure the DeleteCollection action,
see Action examples.
CreateScope action
This action creates a scope in an existing bucket.
Input parameters of the CreateScope action
| Parameter Name | Data Type | Required | Description |
|---|---|---|---|
| Bucket | String | Yes | The name of the bucket containing the scope |
| Name | String | Yes | The name of the scope to create. |
Output parameters of the CreateScope action
This action returns the status 200 (OK) if the action is successful.
For example on how to configure the CreateScope action,
see Action examples.
DeleteScope action
This action deletes a scope and all its collections.
Input parameters of the DeleteScope action
| Parameter Name | Data Type | Required | Description |
|---|---|---|---|
| Bucket | String | Yes | The name of the bucket containing the scope. |
| Name | String | Yes | The name of the scope to delete. |
Output parameters of the DeleteScope action
This action returns the status 200 (OK) if the action is successful.
For example on how to configure the DeleteScope action,
see Action examples.
ListIndices action
This action lists all indices available in Couchbase.
Input parameters of the ListIndices action
N/AOutput parameters of the ListIndices action
This action returns the status 200 (OK) if the action is successful.
For example on how to configure the ListIndices action,
see Action examples.
ManageIndices action
This action creates or drops an index in a bucket.
Input parameters of the ManageIndices action
| Parameter Name | Data Type | Required | Description |
|---|---|---|---|
| BucketName | String | Yes | The target bucket to create or drop the index from. |
| ScopeName | object | No | The target scope to create or drop the index from (Couchbase version 7 and later) |
| CollectionName | String | No | The target collection to create or drop the index from (Couchbase version 7 and later) |
| Action | String | Yes | Specifies which action to perform on the index, can be Create or Drop. |
| Expressions | String | No | A list of expressions or functions, encoded as JSON, that the index will be based off of. At least one is required if IsPrimary is set to false and the action is Create. |
| Name | String | No | The name of the index to create or drop, required if IsPrimary is set to false. |
| IsPrimary | String | No | Specifies if the index should be a primary index.The default value is true. |
| Filters | String | No | A list of filters, encoded as JSON, to apply on the index. |
| IndexType | String | No | The type of index to create, can be GSI or View, only used if the action is Create. The default value is GSI. |
| ViewName | String | No | Deprecated, included for compatibility only. Does nothing. |
| Nodes | String | No | A list, encoded as JSON, of nodes to contain the index, must contain the port. Only used if the action is Create. |
| NumReplica | String | No | How many replicas to create among the index nodes in the cluster. |
Output parameters of the ManageIndices action
This action returns the status 200 (OK) if the action is successful.
For example on how to configure the ManageIndices action,
see Action examples.
ExecuteCustomQuery action
This action lets you execute a custom query.
To create a custom query, follow these steps:
- Follow the detailed instructions to add a connectors task.
- When you configure the connector task, in the type of action you want to perform, select Actions.
- In the Action list, select Execute custom query, and then click Done.
- Expand the Task input section, and then do the following:
- In the Timeout after field, enter the number of seconds to wait till the query executes.
Default value:
180seconds. - In the Maximum number of rows field, enter the maximum number of rows to be returned from the database.
Default value:
25. - To update the custom query, click Edit Custom Script. The Script editor dialog opens.
- In the Script editor dialog, enter the SQL query and click Save.
You can use a question mark (?) in a SQL statement to represent a single parameter that must be specified in the query parameters list. For example, the following SQL query selects all rows from the
Employeestable that matches the values specified for theLastNamecolumn:SELECT * FROM Employees where LastName=?
- If you've used question marks in your SQL query, you must add the parameter by clicking + Add Parameter Name for each question mark. While executing the integration, these parameters replace the question marks (?) in the SQL query sequentially. For example, if you have added three question marks (?), then you must add three parameters in order of sequence.
To add query parameters, do the following:
- From the Type list, select the data type of the parameter.
- In the Value field, enter the value of the parameter.
- To add multiple parameters, click + Add Query Parameter.
- In the Timeout after field, enter the number of seconds to wait till the query executes.
On successful execution, this action returns the status 200 (OK) with a response body that has the query results.
Action examples
This section describes how to perform some of the actions in this connector.
Example - Add a document
This example adds a document in a Couchbase bucket.
- In the
Configure connector taskdialog, clickActions. - Select the
AddDocumentaction, and then click Done. - In the Task Input section of the Connectors task, click
connectorInputPayloadand then enter a value similar to the following in theDefault Valuefield:{ "Document": "{\"ID\":10,\"Name\":\"TestDoc\"}", "BucketName": "CouchbaseTestBucket", "ID": "Test" }
If the action is successful, the
AddDocument task's connectorOutputPayload response
parameter will have a value similar to the following:
[{
"RowsAffected": "1"
}]
Example - Create a collection
This example creates a collection.
- In the
Configure connector taskdialog, clickActions. - Select the
CreateCollectionaction, and then click Done. - In the Task Input section of the Connectors task, click
connectorInputPayloadand then enter a value similar to the following in theDefault Valuefield:{ "bucket": "CouchbaseTestBucket", "scope": "TestScope", "name": "CollectionFromGoogleCloud" }
This example creates a collection under the TestScope. If the action is successful, the
CreateCollection task's connectorOutputPayload response
parameter will have a value similar to the following:
[{
"Success": true,
"scope": null,
"uid": null,
"collection": null,
"collections.uid": null,
"maxTTL": null,
"history": null
}]
Example - Delete a collection
This example deletes a collection.
- In the
Configure connector taskdialog, clickActions. - Select the
DeleteCollectionaction, and then click Done. - In the Task Input section of the Connectors task, click
connectorInputPayloadand then enter a value similar to the following in theDefault Valuefield:{ "bucket": "CouchbaseTestBucket", "scope": "TestScope", "name": "CollectionFromGoogleCloud" }
This example deletes a collection under the TestScope. If the action is successful, the
CreateCollection task's connectorOutputPayload response
parameter will have a value similar to the following:
[{
"Success": true,
"uid": "12"
}]
Example - Create a scope
This example creates a scope.
- In the
Configure connector taskdialog, clickActions. - Select the
CreateScopeaction, and then click Done. - In the Task Input section of the Connectors task, click
connectorInputPayloadand then enter a value similar to the following in theDefault Valuefield:{ "bucket": "CouchbaseTestBucket", "name": "ScopeFromGoogleCloud" }
This example creates a scope under CouchbaseTestBucket. If the action is successful, the
CreateScope task's connectorOutputPayload response
parameter will have a value similar to the following:
[{
"Success": true,
"name": null,
"uid": null,
"collections": null,
"collections.name": null,
"collections.uid": null,
"collections.maxTTL": null,
"collections.history": null
}]
Example - Delete a scope
This example deletes a scope.
- In the
Configure connector taskdialog, clickActions. - Select the
DeleteScopeaction, and then click Done. - In the Task Input section of the Connectors task, click
connectorInputPayloadand then enter a value similar to the following in theDefault Valuefield:{ "bucket": "CouchbaseTestBucket", "name": "ScopeFromGoogleCloud" }
This example deletes the ScopeFromGoogleCloud scope. If the action is successful, the
DeleteScope task's connectorOutputPayload response
parameter will have a value similar to the following:
[{
"Success": true,
"uid": "10"
}]
Example - List indices
This example lists all indices available in Couchbase.
- In the
Configure connector taskdialog, clickActions. - Select the
ListIndicesaction, and then click Done. - In the Task Input section of the Connectors task, click
connectorInputPayloadand then enter a value similar to the following in theDefault Valuefield:{ }
If the action is successful, the ListIndices task's connectorOutputPayload response
parameter will have a value similar to the following:
[{
"id": "3d8a78cd2e302ac2",
"datastore_id": "http://127.0.0.1:8091",
"namespace_id": "default",
"bucket_id": null,
"scope_id": null,
"keyspace_id": "CouchbaseTestBucket",
"index_key": "",
"condition": null,
"is_primary": "false",
"name": "test",
"state": "online",
"using": "gsi"
}, {
"id": "d6ce8c103b97a00d",
"datastore_id": "http://127.0.0.1:8091",
"namespace_id": "default",
"bucket_id": "CouchbaseTestBucket",
"scope_id": "TestScope",
"keyspace_id": "CouchBaseDatatypes",
"index_key": "",
"condition": null,
"is_primary": "true",
"name": "#primary",
"state": "online",
"using": "gsi"
},
{
"id": "58c25aef49dd32b3",
"datastore_id": "http://127.0.0.1:8091",
"namespace_id": "default",
"bucket_id": "CouchbaseTestBucket",
"scope_id": "TestScope",
"keyspace_id": "TestCollection",
"index_key": "",
"condition": null,
"is_primary": "false",
"name": "SearchIndexTest_1",
"state": "online",
"using": "fts"
}]
Example - Manage indices
This example deletes an index in the specified bucket.
- In the
Configure connector taskdialog, clickActions. - Select the
ManageIndicesaction, and then click Done. - In the Task Input section of the Connectors task, click
connectorInputPayloadand then enter a value similar to the following in theDefault Valuefield:{ "BucketName": "CouchbaseTestBucket", "Action": "DROP", "Name": "CouchBaseTestIndex" }
If the action is successful, the
ManageIndices task's connectorOutputPayload response
parameter will have a value similar to the following:
[{
"Success": "true"
}]
Entity operation examples
This section shows how to perform some of the entity operations in this connector.
Example - List all the records
This example lists all the records in the TestCollection entity.
- In the
Configure connector taskdialog, clickEntities. - Select
TestCollectionfrom theEntitylist. - Select the
Listoperation, and then click Done. - Optionally, in Task Input section of the Connectors task, you can filter your result set by specifying a filter clause. Specify the filter clause value always within the single quotes (').
Example - Get a record from an entity
This example gets a record with the specified ID from the TestCollection entity.
- In the
Configure connector taskdialog, clickEntities. - Select
TestCollectionfrom theEntitylist. - Select the
Getoperation, and then click Done. - In the Task Input section of the Connectors task, click EntityId and
then enter
120in the Default Value field.Here,
120is a unique record ID in theTestCollectionentity.
Example - Update a record in an entity
This example updates a record in the TestCollection entity.
- In the
Configure connector taskdialog, clickEntities. - Select
TestCollectionfrom theEntitylist. - Select the
Updateoperation, and then click Done. - In the Task Input section of the Connectors task, click
connectorInputPayloadand then enter a value similar to the following in theDefault Valuefield:{ "COL_TEXT": "CouchBase Update" }
- Click entityId, and then enter
120in the Default Value field.If the integration is successful, your connector task's
connectorOutputPayloadfield will have a value similar to the following:[{ "Document.Id": "120" }]
Example - Delete a record from an entity
This example deletes the record with the specified ID in the TestCollection entity.
- In the
Configure connector taskdialog, clickEntities. - Select
TestCollectionfrom theEntitylist. - Select the
Deleteoperation, and then click Done. - In the Task Input section of the Connectors task, click entityId and
then enter
20in the Default Value field.
Known issues
The create operation on entities isn't supported.
Use terraform to create connections
You can use the Terraform resource to create a new connection.To learn how to apply or remove a Terraform configuration, see Basic Terraform commands.
To view a sample terraform template for connection creation, see sample template.
When creating this connection by using Terraform, you must set the following variables in your Terraform configuration file:
| Parameter name | Data type | Required | Description |
|---|---|---|---|
| allow_jsonparameters | BOOLEAN | False | Allows raw JSON to be used in parameters when QueryPassthrough is enabled. |
| analytics_port | STRING | False | The port for connecting to the Couchbase Analytics Endpoint. |
| child_separator | STRING | False | The character or characters used to denote child tables. |
| couchbase_service | ENUM | False | Determines the Couchbase service to connect to. Default is N1QL. Available options are N1QL and Analytics. Supported values are: N1QL, Analytics |
| create_table_ram_quota | STRING | False | The default RAM quota, in megabytes, to use when inserting buckets via the CREATE TABLE syntax. |
| dataverse_separator | STRING | False | The character or characters used to denote Analytics dataverses and scopes/collections. |
| flavor_separator | STRING | False | The character or characters used to denote flavors. |
| n1_qlport | STRING | False | The port for connecting to the Couchbase N1QL Endpoint. |
| periods_separator | STRING | False | The character or characters used to denote hierarchy. |
| query_execution_timeout | STRING | False | This sets the server-side timeout for the query, which governs how long Couchbase will execute the query before returning a timeout error. |
| strict_comparison | STRING | False | Adjusts how precisely to translate filters on SQL input queries into Couchbase queries. This can be set to a comma-separated list of values, where each value can be one of: date, number, boolean, or string. |
| transaction_durability | STRING | False | Specifies how a document must be stored for a transaction to succeed. Specifies whether to use N1QL transactions when executing queries. |
| transaction_timeout | STRING | False | This sets the amount of time a transaction may execute before it is timed out by Couchbase. |
| use_collections_for_ddl | BOOLEAN | False | Whether to assume that CREATE TABLE statements use collections instead of flavors. Only takes effect when connecting to Couchbase v7+ and GenerateSchemaFiles is set to OnCreate. |
| use_transactions | STRING | False | Specifies whether to use N1QL transactions when executing queries. |
| validate_jsonparameters | BOOLEAN | False | Allows the provider to validate that string parameters are valid JSON before sending the query to Couchbase. |
| proxy_enabled | BOOLEAN | False | Select this checkbox to configure a proxy server for the connection. |
| proxy_auth_scheme | ENUM | False | The authentication type to use to authenticate to the ProxyServer proxy. Supported values are: BASIC, DIGEST, NONE |
| proxy_user | STRING | False | A user name to be used to authenticate to the ProxyServer proxy. |
| proxy_password | SECRET | False | A password to be used to authenticate to the ProxyServer proxy. |
| proxy_ssltype | ENUM | False | The SSL type to use when connecting to the ProxyServer proxy. Supported values are: AUTO, ALWAYS, NEVER, TUNNEL |
| verbosity | STRING | False | Verbosity level for connection, varies from 1-5. Higher verbosity level will log all the communication details (request,response & ssl certificates). |
Use the Couchbase connection in an integration
After you create the connection, it becomes available in both Apigee Integration and Application Integration. You can use the connection in an integration through the Connectors task.
- To understand how to create and use the Connectors task in Apigee Integration, see Connectors task.
- To understand how to create and use the Connectors task in Application Integration, see Connectors task.
Get help from the Google Cloud community
You can post your questions and discuss this connector in the Google Cloud community at Cloud Forums.What's next
- Understand how to suspend and resume a connection.
- Understand how to monitor connector usage.
- Understand how to view connector logs.