This page shows how to configure the Citrix load balancer for an Google Distributed Cloud cluster.
Google Distributed Cloud clusters can run with one of two load balancing modes: integrated, bundled, or manual. To use the Citrix load balancer, you use manual load balancing mode.
Citrix Netscaler version
The instructions in this topic are written for version 12.0 of the Citrix NetScaler VPX 1000 model.
If you are using a different version or model of the Citrix load balancer, the user interface might be different.
Steps common to all manual load balancing
Before you configure your Citrix load balancer, perform the following steps, which are common to all manual load balancing configurations:
Creating a Citrix ADC instance
To create a Citrix Application Delivery Controller (ADC), perform these steps:
In your vSphere environment, create a VM that runs the Citrix ADC, formerly called NetScaler ADC.
For instructions, see Install a Netscaler instance.
See the information about licensing your Citrix ADC.
Configure a management IP address for your Citrix ADC. For instructions, see Configuring the NetScaler IP Address (NSIP).
Adding network adapters
Your Citrix ADC VM has one network adapter, and the adapter is associated with the management IP address for the VM. Now you need to add one or two additional network adapters to your Citrix ADC VM.
One possibility is to create a one-armed configuration. In this kind of configuration, your Citrix ADC VM has one network adapter in addition to the management network adapter. The one additional network adapter is connected to a subnet that has your cluster nodes. You can reach IP addresses on this subnet from the internet.
Another possibility is to create a two-armed configuration. In this kind of configuration, your Citrix ADC VM has two network adapters in addition to the management network adapter. One of the additional network adapters is connected to a private subnet that has your cluster nodes. The other additional network adapter is connected to a subnet that allows external requests to reach the Citrix load balancer. This could be a subnet that is directly accessible from the internet, or it could be a subnet that is protected from the internet by a jumpbox.
The following diagram shows an example of a two-armed configuration:

To add one or two network adapters to your Citrix ADC VM, use the vSphere interface.
In the left pane, locate your Citrix ADC VM.
Right click your Citrix ADC VM, and select Edit Settings.

For New device, open the Select menu, and select Network. Click Add.
In the left pane, expand New Network. For VM Network, select the subnet where you want to connect your new network adapter.
Make other settings as desired, and click OK.
Using Terraform to configure Citrix ADC
Citrix has provided a Terraform script to automatically configure the Citrix ADC with servers, service groups, and virtual servers for the initial cluster set up.
You can choose to follow the manual steps below if preferred.
Configuring servers
Recall that you already have a list of IP addresses that you intend to use for your cluster nodes. In this section, you associate each of those IP addresses with a name.
In a browser, enter the management IP address of your Citrix VM. This opens a web interface to your Citrix load balancer. In the Citrix interface, the term for a cluster node is server.
Open the Configuration tab.
In the left pane, go to Traffic Management > Load Balancing > Servers.
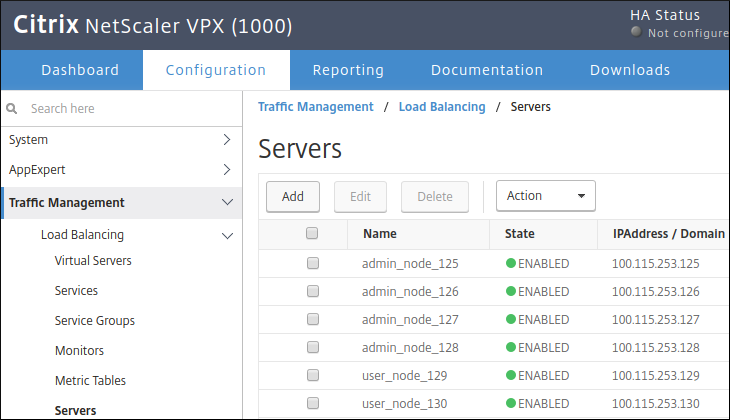
For each admin cluster node and each user cluster node that you intend to create, perform the following steps:
In the main pane, click Add.
Enter a name and IP address for the node.
Click Create.
Configuring service groups
In the Citrix interface, a service group is a set of servers along with a protocol and a port number. Here's an example:
({admin_node_1, admin_node_2, admin_node_3}, TCP, 30001)In this section, you create a service group for each of the following:
- Admin cluster control plane
- Admin cluster addon manager
- User cluster control plane
- User cluster HTTP ingress controller
- User cluster HTTPS ingress controller
In each service group, the protocol is TCP. The VIP is an address that you
previously set aside. The port is a nodePort value that you previously set
aside.
For example, suppose these are the names of your user cluster nodes:
- user_node_1
- user_node_2
- user_node_3
Also suppose you have chosen to use 203.0.113.1 as the VIP for the HTTP user
cluster ingress controller. And you have chosen to use 32001 as the nodePort
value for the HTTP user cluster ingress controller. Then you would create the
following service group:
({user_node_1, user_node_2, user_node_3}, TCP, 32001)To create a service group in the Citrix web interface, follow these steps:
- In the left pane, go to Traffic Management > Load Balancing > Service Groups.
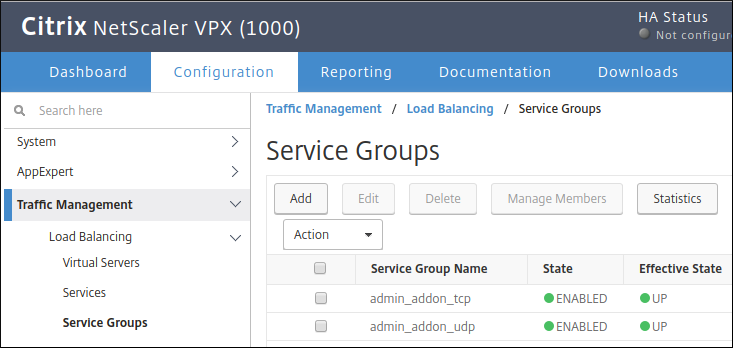
In the main pane, click Add.
Enter a name for the service group.
For Protocol, select TCP.
Click OK.
Under Service Group Members, click the bar that says No Service Group Member.
At the top of the page, select Server Based.
Under Select Server, click the box.
In the list of server names, select the servers that you want to be in your service group. Then click Select.
For Port, enter the
nodePortvalue for your service group.For Hash Id, enter a number of your choice.
Repeat these steps for each service group you want to create. You should create a service group for each of these components: admin cluster control plane, admin cluster addon manager, user cluster control plane, user cluster HTTP ingress controller, and the user cluster HTTPS ingress controller. Each user cluster requires its own service groups for the user cluster HTTP ingress controller and the user cluster HTTPS ingress controller.
Configuring virtual servers
At this point, you have seven service groups. In this section, you associate each service group with a VIP, a protocol, and a port.
For example, suppose the following:
The service group for your user cluster HTTP ingress controller is named
user_http_ingress.You have chosen to use 203.0.113.1 as the VIP for your user cluster HTTP ingress controller. And you want the load balancer to listen for requests sent to this VIP on TCP port 80.
You have chosen to use 32001 as the
nodePortvalue for the user cluster HTTP ingress controller.
Then you would create the following association:
user_http_ingress --> (203.0.113.1, TCP, 80)
In the Citrix interface, an association of this type is called a virtual server.
To create a virtual server in the Citrix web interface, follow these steps:
- In the left pane, go to Traffic Management > Load Balancing > Virtual Servers.
In the main pane, click Add.
Enter a name for the virtual server.
For Protocol, select TCP.
For IP Address, enter the VIP for your virtual server.
For Port, enter the TCP port for the virtual server. The load balancer will listen for requests sent to the VIP on this TCP port.
On the Load Balancing Virtual Server page, under Services and Service Groups, click No Load Balancing Virtual Server Service Group Binding.
Under Select Service Group Name, click the box.
Select the service group that you want for the virtual server.
At the top of the page, click Select.
Click Bind.
Go through the preceding steps seven times, so that you have a virtual server for each of your seven service groups.
Verifying the configuration
To verify that your VIPs have been configured on your Citrix ADC, ping each of your VIPs.
Modifying your Google Distributed Cloud configuration file
Before you install Google Distributed Cloud, modify your configuration files to include your static IP addresses, VIPs, and node port values.