概览
Chrome Enterprise Premium 是Google Cloud的零信任解决方案,可让组织的员工无需 VPN 即可随时随地安全地访问 Web 应用,并有助于防范恶意软件、钓鱼式攻击和数据丢失。
借助 Google Chrome 的强大功能,Chrome 企业进阶版可让用户通过任何设备访问应用。Chrome 企业进阶版正在扩展其功能,以应对开发者环境中的一些关键安全挑战。 通过为Google Cloud 控制台和 API 使用情境感知访问权限控制,Chrome Enterprise 进阶版可为 Cloud Workstations API 提供额外的安全防护。
下表列出了 Chrome Enterprise Premium 是否支持针对指定 Cloud Workstations 访问方法的上下文感知访问控制。
- 勾号表示 Chrome 企业进阶版限制了此 Cloud Workstations 访问方法。
- “不支持”图标 表示 Chrome Enterprise Premium 不会限制此 Cloud Workstations 访问方法。
目标
本文档介绍了管理员为 Cloud Workstations API 设置 Chrome Enterprise 进阶版访问权限控制,并提供有助于防止基于浏览器的 Cloud Workstations IDE 泄露源代码的其他机制的步骤。
费用
在本教程中,您可能需要让其他团队参与进来(例如,负责结算或 IAM 的团队),并且您还需要测试访问权限控制,以证明 Chrome Enterprise Premium 保护措施已到位。在本文档中,您将使用 Google Cloud的以下收费组件:
如需根据您的预计使用量来估算费用,请使用价格计算器。
完成本文档中描述的任务后,您可以通过删除所创建的资源来避免继续计费。如需了解详情,请参阅清理。
准备工作
- Sign in to your Google Cloud account. If you're new to Google Cloud, create an account to evaluate how our products perform in real-world scenarios. New customers also get $300 in free credits to run, test, and deploy workloads.
-
In the Google Cloud console, on the project selector page, select or create a Google Cloud project.
Roles required to select or create a project
- Select a project: Selecting a project doesn't require a specific IAM role—you can select any project that you've been granted a role on.
-
Create a project: To create a project, you need the Project Creator
(
roles/resourcemanager.projectCreator), which contains theresourcemanager.projects.createpermission. Learn how to grant roles.
-
Verify that billing is enabled for your Google Cloud project.
-
Enable the Workstations API.
Roles required to enable APIs
To enable APIs, you need the Service Usage Admin IAM role (
roles/serviceusage.serviceUsageAdmin), which contains theserviceusage.services.enablepermission. Learn how to grant roles. -
Make sure that you have the following role or roles on the project: Cloud Workstations > Cloud Workstations Admin.
Check for the roles
-
In the Google Cloud console, go to the IAM page.
Go to IAM - Select the project.
-
In the Principal column, find all rows that identify you or a group that you're included in. To learn which groups you're included in, contact your administrator.
- For all rows that specify or include you, check the Role column to see whether the list of roles includes the required roles.
Grant the roles
-
In the Google Cloud console, go to the IAM page.
前往 IAM - 选择项目。
- 点击 授予访问权限。
-
在新的主账号字段中,输入您的用户标识符。 这通常是 Google 账号的电子邮件地址。
- 在选择角色列表中,选择一个角色。
- 如需授予其他角色,请点击 添加其他角色,然后添加其他各个角色。
- 点击 Save(保存)。
-
-
确保您已为每位用户分配 Chrome 企业进阶版标准许可。只有拥有许可的用户才会受到访问权限控制的约束。如需了解详情,请参阅分配、移除和重新分配许可。
- 设置 Cloud Workstations。
- 创建演示用户和演示群组。
- 在 Access Context Manager 中创建访问权限级别。
- 启用 Chrome 企业进阶版 CAA。
- 添加具有访问权限级别的必需 Google 群组。
- 测试开发者对 Cloud Workstations 的访问权限。
- 创建具有自定义网域的工作站集群。
- 启用 IAP。
- 在集群中创建工作站配置。
使用您的管理员账号登录 Google Workspace 管理控制台: 菜单 > 目录 > 用户 > 添加新用户。
创建演示用户:
demo-user@<domain>。登录 Google Cloud 控制台,然后依次前往菜单 > IAM 和管理 > 群组。
为 Cloud Workstations 访问权限创建一个 IAM 群组,将其命名为
Cloud Workstations Users,然后分配之前创建的演示用户demo-user@<domain>。点击保存。
另创建一个 IAM 管理员群组,并将其命名为 Cloud Admin Users。将项目和组织管理员分配给此群组。
将演示用户
demo-user@<domain>添加到您创建的 Cloud Workstations 用户组:- 在 Google Cloud 控制台中,前往 Cloud Workstations > 工作站。
- 选择工作站,然后依次点击 more_vert更多 > 添加用户。
- 选择演示用户
demo-user@<domain>,然后选择Cloud Workstations User作为角色。 - 如需向演示用户授予工作站访问权限,请选择
demo-user@<domain>,选择Cloud Workstations Users作为角色,然后点击保存。
在 Google Cloud 控制台中,依次前往安全性 > Access Context Manager,以配置公司管理的设备政策。
点击创建访问权限级别,然后填写以下字段:
- 在访问权限级别标题字段中,输入
corpManagedDevice。 - 选择基本 模式。
- 在条件下,选择正确以启用该条件。
- 点击 + 设备 政策以展开选项,然后选中需要公司自有设备。
- 点击保存以保存访问权限政策。
- 在访问权限级别标题字段中,输入
在 Google Cloud 控制台中,依次前往安全性 > BeyondCorp Enterprise。
点击管理对 Google Cloud 控制台和 API 的访问权限。 您将来到 Chrome 企业进阶版组织级页面。
在安全 Google Cloud 控制台和 API 部分中,点击启用。
创建一个名为 CloudAdminAccess 的管理员访问权限政策,并将位置设置为管理员工作的区域。这样可确保即使有其他政策阻止管理员访问资源,管理员也能访问资源。
在 IAM 和管理 > 群组中创建具有管理员访问权限的 IAM 群组。
- 选择组织。
- 创建一个群组,并将其命名为 Cloud Admin Users。
- 将您自己和任何其他管理员分配到此群组。
- 点击保存。
前往安全性 > Chrome 企业进阶版。 点击管理访问权限,然后查看显示的群组和访问权限级别列表。
点击向 Google Cloud 控制台和 API 添加主账号。
- 对于 Google 群组,选择 Cloud 管理员用户。这是您在上一步中选择的 Google 群组。
- 选择您为管理员访问权限创建的访问权限级别 CloudAdminAccess。
- 点击保存。
依次前往安全性 > Chrome 企业进阶版,然后点击管理访问权限。
查看显示的群组和访问权限级别列表。
点击向 Google Cloud 控制台和 API 添加主账号。
- 对于 Google 群组,选择 Cloud Workstations 用户。 这是您在上一步中选择的 Google 群组。
- 选择您之前创建的访问权限级别
corpManagedDevice。 - 点击保存。
测试从非受管设备对工作站 API 的访问是否被阻止:
Chrome 企业进阶版会阻止尝试访问 Cloud Workstations API 的用户。当用户尝试登录时,系统会显示一条错误消息,提醒用户他们没有访问权限,或者应该检查网络连接和浏览器设置。
测试从公司自有设备访问工作站 API 的权限是否已启用:
拥有 Chrome Enterprise 进阶版和 Cloud Workstations 访问权限的开发者应该能够创建工作站,然后启动工作站。
依次前往设备 > Chrome > 设置 > 用户和浏览器。
选择组织部门标识符 (OU ID) 后,点击用户和浏览器设置下的搜索或添加过滤条件,然后选择类别子类型。
在类别子类型中搜索 Chrome 企业版连接器。
在下载内容分析中,选择 Google BeyondCorp Enterprise。
展开其他设置。
- 选择分析结束后才能访问文件。
- 在检查敏感数据 > 模式中,选择默认为开启(下列网址格式除外)。
点击保存以保存配置。
前往 Google Workspace 管理控制台,然后依次选择安全性 > 访问权限和数据控件 > 数据保护 > 管理规则。
如需创建新规则,请依次点击添加规则和新建规则。 系统随即会打开名称和范围页面。
在名称部分,输入名称和说明。例如,在名称字段中输入
CloudWorkstations-DLP-Rule1,在说明字段中输入Cloud Workstations Data Loss Prevention Rule 1。在范围部分,配置以下内容:
- 选择组织部门和/或群组。
- 点击包含组织部门,然后选择您的组织。
- 点击继续。
在应用部分,配置以下内容:
- 在 Chrome 选项中,选择上传了文件和下载了文件。
- 点击继续。
在条件页面中,配置以下内容:
- 点击添加条件以创建新条件。
- 选择所有内容。
- 选择与预定义的数据类型匹配(推荐)。
- 在选择数据类型中,选择文档 - 源代码文件。
- 对于可能性阈值字段,选择高。
- 在不重复匹配数量下限字段中,输入 1。
- 对于最低相符项目数字段,输入 1。
- 点击继续。
在操作页面上,配置以下内容:
- 在操作选项中,依次选择 Chrome > 屏蔽内容。
- 在提醒选项中,配置以下内容:
- 对于严重程度,请选择中。
- 选择发送至提醒中心。
- 点击继续。
- 确保设置正确无误。
- 如需继续,请点击创建。
- 在下一页上,确保选中有效。
- 如需完成规则的创建,请点击完成。
在新 Chrome 标签页中,输入
chrome://policy,然后点击重新加载政策,确保 Chrome 政策已更新。向下滚动,确保您看到政策列表。如果您看到这些,则表示政策已成功拉取。在这种情况下,请查找 OnFileDownloadEnterpriseConnector 政策。
前往 Google Cloud 控制台,然后创建 Cloud Workstations 配置。
创建工作站配置时,请务必选择基础映像上的代码编辑器,然后选择基本编辑器(适用于 Cloud Workstations 的 Code OSS) 预配置的基础映像。
访问启动工作站并连接到端口 80 后显示的 Code OSS for Cloud Workstations 网址。
使用 IDE 中的 Clone Git Repository 选项克隆代码库。 克隆代码库后,尝试下载包含源代码的文件。
如需在 Code OSS for Cloud Workstations 资源管理器视图中下载文件,请使用以下任一方法:
从“资源管理器”视图中拖动文件。
找到要使用的文件和目录,右键点击,然后选择下载。
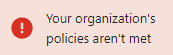
下载完成后,DLP 政策即会生效。看到一条下载被阻止的通知,其中指出不符合贵组织的政策:
- 如需详细了解 Chrome 企业进阶版,请参阅 Chrome 企业进阶版概览。
- 了解将 Chrome 企业进阶版应用到 Google Cloud 和本地资源的简要步骤。
第 1 部分:为 Cloud Workstations 设置 Chrome Enterprise Premium
本部分将引导您完成以下步骤,以帮助您确保对 Cloud Workstations API 的情境感知访问权限安全无虞:
设置 Cloud Workstations
如需与 Chrome Enterprise 进阶版集成,您的 Cloud Workstations 集群必须使用 Identity-Aware Proxy (IAP)。如果您已配置这些资源,请跳过此部分。
如需设置 Cloud Workstations,请执行以下操作:
如果您是刚接触 Cloud Workstations,请参阅概览和架构。
创建演示用户和演示群组
在 Google Workspace 管理控制台中,创建一个演示用户和一个新用户群组。启用后,Google Cloud 控制台的情境感知访问权限 (CAA) 会应用于所有用户和 Google 群组,因为这是一项全局设置。
创建访问权限级别
返回 Google Cloud 控制台,在 Access Context Manager 中创建访问权限级别。
请按照以下说明测试访问权限:
为 Google Cloud 控制台启用 Chrome Enterprise Premium CAA
如需为工作站分配情境感知访问权限控制 (CAA),请先为 Google Cloud 控制台启用 CAA:
添加具有访问权限级别的必需 Google 群组
添加所需的管理员群组,其中包含相关成员和正确的访问权限政策。
控制台
gcloud 和 API
如需启用模拟运行,请按照 Chrome 企业进阶版模拟运行教程操作。
为 Cloud Workstations 用户群组分配访问权限级别
如需向 Cloud Workstations 用户群组分配访问权限级别,请执行以下操作:
测试开发者对 Cloud Workstations 的访问权限
测试开发者从多个入口点对 Cloud Workstations API 的访问权限。对于公司自有设备,请确保开发者可以访问工作站 API。
第 2 部分:设置 Chrome 企业进阶版 DLP 功能
本部分包含利用 BeyondCorp Threat and Data Protection 集成数据泄露防护 (DLP) 功能的步骤。这有助于防止基于 Chrome 的 Cloud Workstations 基本编辑器(Cloud Workstations 的 Code OSS)中的源代码被窃取。
请按照以下步骤设置 Chrome 企业进阶版 DLP 功能,以帮助防止下载源代码:
启用威胁防范和数据保护
如需在 Google Workspace 管理控制台中启用威胁和数据保护功能,请按以下步骤操作:
创建 Chrome Enterprise Premium DLP 规则
如需创建 DLP 规则,请按以下步骤操作:
查看设置并创建规则
在检查页面上,检查您在之前页面中配置的设置:
测试数据泄露防护规则
添加 DLP 规则后,您可以在 Chrome 中通过 Cloud Workstations 进行测试:
恭喜!您已成功帮助防止下载源代码文件。
清理
为避免因本教程中使用的资源导致您的 Google Cloud 账号产生费用,请删除包含这些资源的项目,或者保留该项目但删除各个资源。如需了解详情,请参阅删除资源。