事前準備
開始使用 Cloud Workstations 前,請務必確認您具備必要權限,並完成下列必要設定步驟:
- Sign in to your Google Cloud account. If you're new to Google Cloud, create an account to evaluate how our products perform in real-world scenarios. New customers also get $300 in free credits to run, test, and deploy workloads.
-
In the Google Cloud console, on the project selector page, select or create a Google Cloud project.
Roles required to select or create a project
- Select a project: Selecting a project doesn't require a specific IAM role—you can select any project that you've been granted a role on.
-
Create a project: To create a project, you need the Project Creator
(
roles/resourcemanager.projectCreator), which contains theresourcemanager.projects.createpermission. Learn how to grant roles.
-
Verify that billing is enabled for your Google Cloud project.
-
Enable the Cloud Workstations API.
Roles required to enable APIs
To enable APIs, you need the Service Usage Admin IAM role (
roles/serviceusage.serviceUsageAdmin), which contains theserviceusage.services.enablepermission. Learn how to grant roles. -
如果您是管理員,請確認您具備專案的 Cloud Workstations 管理員 IAM 角色,才能建立工作站設定。
如果您是開發人員,且在 Google Cloud 控制台中沒有可用的工作站設定,請貴機構的 Cloud Workstations 管理員為您建立工作站設定,或確認您在專案中具備 Cloud Workstations 管理員 IAM 角色,以便自行建立這些資源。如要查看 IAM 角色,請前往 Google Cloud 控制台的「IAM」頁面:
找出 Posit Workbench 授權金鑰並妥善保管,因為後續步驟會用到。如需 Posit Workbench 授權金鑰,請洽詢 Posit 客戶成功代表,或傳送電子郵件至 sales@posit.co。
按照操作說明建立工作站設定。
在「程式碼編輯器」選單中,選取「Posit Workbench (包括 RStudio Pro) 第三方提供」。
按一下「Advanced container options」(進階容器選項) 區段中的arrow_drop_down展開箭頭。
前往「環境變數」部分,然後按一下「新增變數」。
在「Key」欄位中輸入
RSW_LICENSE,然後將 Posit Workbench 授權金鑰貼到「Value」欄位。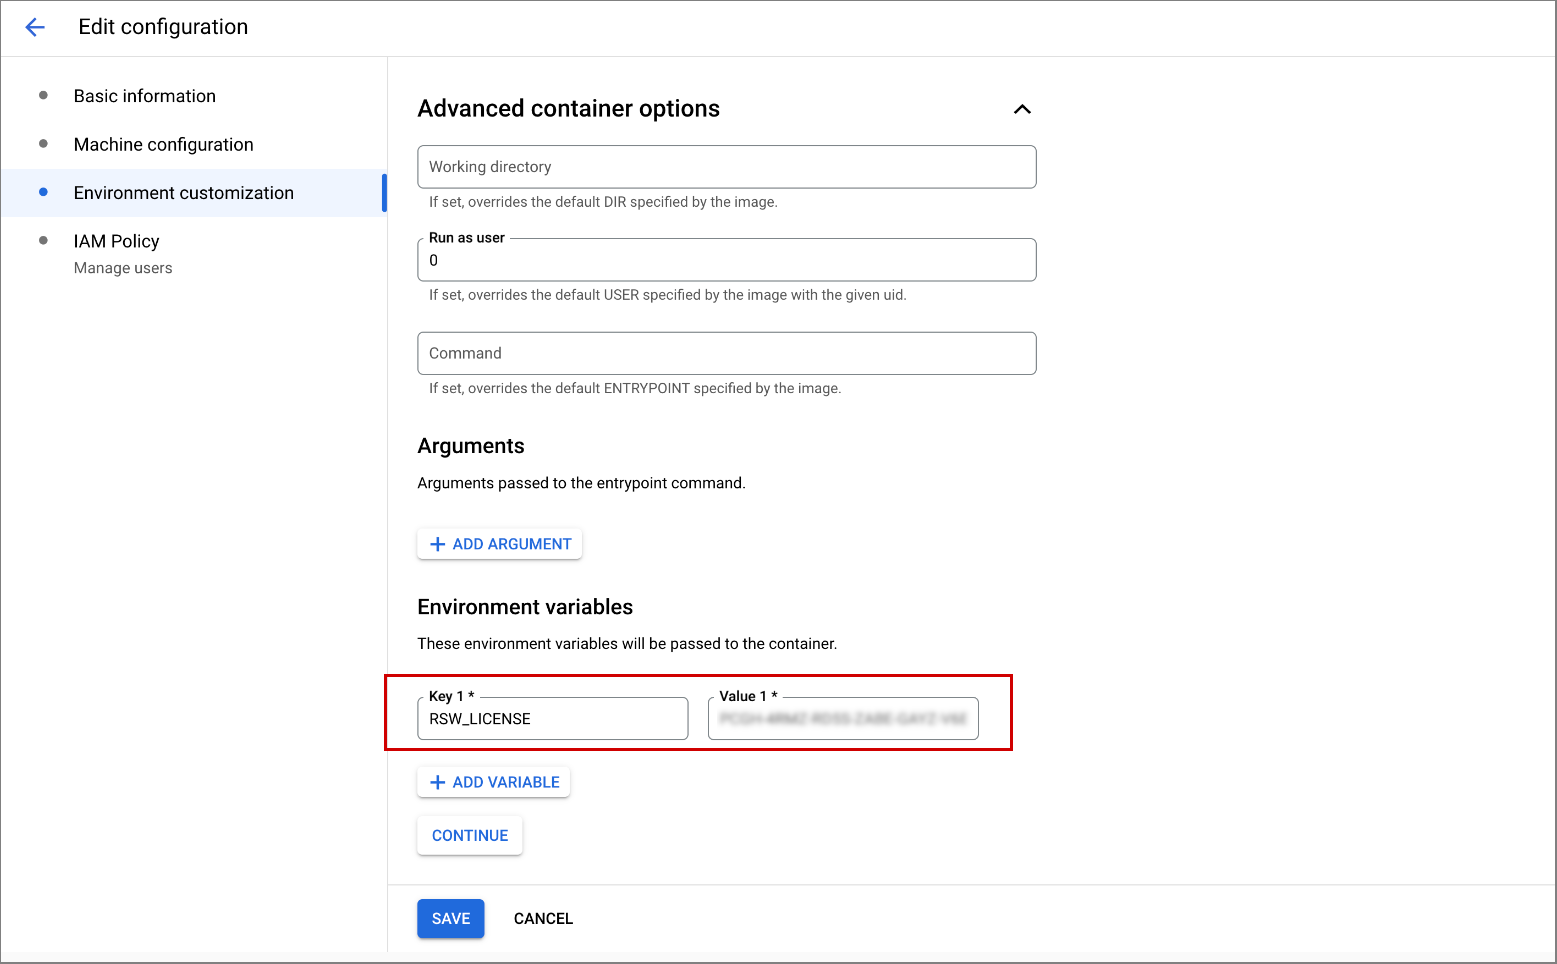
按一下「繼續」。
在「新增使用者」步驟中,請授予開發人員工作站設定的 Cloud Workstations IAM 存取權。
如要建立工作站設定並將這些使用者新增至該設定,請按一下「建立」。
如果您也選擇建立新叢集,叢集建立作業最多可能需要 20 分鐘才能完成。
團隊中的開發人員現在應該可以透過 Posit Workbench 建立工作站。
在 Google Cloud 控制台中,依序前往「Cloud Workstations」>「Workstations」(工作站) 頁面。
按一下「add_box」add_box「建立」。
如果專案沒有任何設定,或是您沒有查看設定的權限,則「Create」(建立) 連結可能會停用。請貴機構的 Cloud Workstations 管理員為您建立工作站設定。
輸入工作站名稱。
請按照 Compute Engine 資源命名慣例,在工作站叢集中選擇不重複的名稱。
按一下「Configuration」(設定) 欄位中的 arrow_drop_down 展開箭頭,然後選取「Posit Workbench (Third-party)」工作站設定。
按一下
「Create」(建立) 即可建立工作站。- 按一下「工作站」。
- 在可用工作站清單中找到您建立的工作站,選取旁邊的核取方塊,然後按一下「啟動」。系統就會啟動工作站,並確保該工作站與父項工作站設定相符。
- 如果系統提示您啟動工作站,請點選「啟動」加以確認。 在啟動作業執行期間,狀態會變更為「Starting」(啟動中) 且狀態圖示 refresh 會轉動。啟動工作站可能需要幾分鐘的時間。
- 工作站準備就緒後,狀態會變更為「Running」(執行中),狀態圖示則變更為 check_circle 勾號。
- 按一下「啟動」。
以下範例顯示 Posit Workbench 的歡迎頁面。 視貴機構定義工作站設定的方式而定,頁面可能會有不同顯示方式:
按一下「新增工作階段」。
選取「RStudio Pro」做為 IDE,並將「Cluster」設為「Local」。

如要進一步瞭解 Posit Workbench 和支援的 IDE (例如 Jupyter Notebook、JupyterLab 和 VS Code),請參閱 Posit 說明文件。
按一下「開始上課」。
等待工作階段啟動,然後開始編碼!
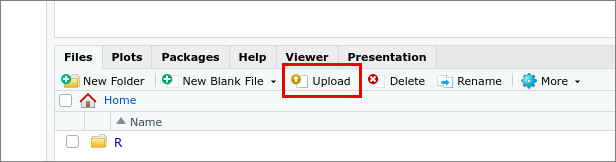
如要將檔案從本機電腦上傳至工作站,請按一下「上傳」。
選取要將檔案儲存在工作站的目標目錄。
按一下「選擇檔案」,選取要上傳的檔案。
按一下「確定」即可開始上傳。
如要從工作站匯入檔案,請按一下「匯入資料集」,然後選取資料集類型。

從工作站導覽並選取要匯入的資料集。
Posit Workbench IDE 依附於各種 R 軟體包,才能提供不同功能。舉例來說,如果您要上傳 Excel 檔案,就必須安裝特定套件。如果系統提示您安裝必要套件,請按一下「Yes」。
按一下「匯入」即可開始匯入。
建立工作站設定
如要使用 Posit Workbench (包括 RStudio Pro),您必須為貴機構的開發人員建立工作站設定:
設定工作站
如要建立工作站,請按照下列步驟操作:
啟動工作站
現在您已建立工作站,可以啟動這個工作站並用於開始開發作業。
啟動 Posit Workbench RStudio Pro 工作階段
將檔案上傳至工作站
如要上傳多個檔案或目錄,請建立 ZIP 檔案。上傳後,系統會展開 ZIP 檔案。
從工作站匯入檔案
取得 Posit Workbench 問題的相關支援
如果遇到 Posit Workbench 或 Posit Workbench 容器映像檔的問題,請透過 support@posit.co 向 Posit 回報。