Optical Character Recognition (OCR)
The Vision API can detect and extract text from images. There are two annotation features that support optical character recognition (OCR):
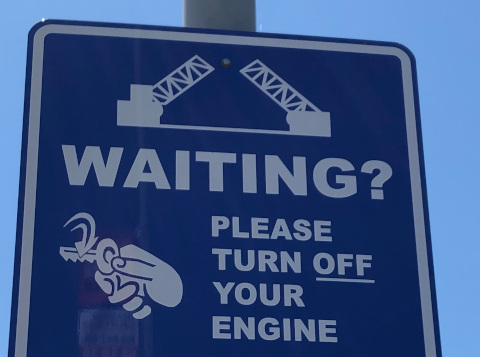
TEXT_DETECTIONdetects and extracts text from any image. For example, a photograph might contain a street sign or traffic sign. The JSON includes the entire extracted string, as well as individual words, and their bounding boxes.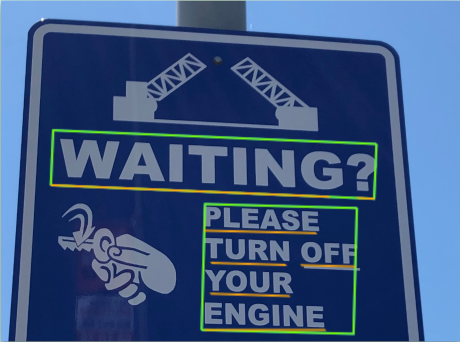
DOCUMENT_TEXT_DETECTIONalso extracts text from an image, but the response is optimized for dense text and documents. The JSON includes page, block, paragraph, word, and break information.
Learn more about
DOCUMENT_TEXT_DETECTIONfor handwriting extraction and text extraction from files (PDF/TIFF).
Try it for yourself
If you're new to Google Cloud, create an account to evaluate how Cloud Vision performs in real-world scenarios. New customers also get $300 in free credits to run, test, and deploy workloads.
Try Cloud Vision freeText detection requests
Set up your Google Cloud project and authentication
Detect text in a local image
You can use the Vision API to perform feature detection on a local image file.
For REST requests, send the contents of the image file as a base64 encoded string in the body of your request.
For gcloud and client library requests, specify the path to a local image in your
request.
gcloud
To perform text detection, use the
gcloud ml vision detect-text
command as shown in the following example:
gcloud ml vision detect-text ./path/to/local/file.jpg
REST
Before using any of the request data, make the following replacements:
- BASE64_ENCODED_IMAGE: The base64
representation (ASCII string) of your binary image data. This string should look similar to the
following string:
/9j/4QAYRXhpZgAA...9tAVx/zDQDlGxn//2Q==
- PROJECT_ID: Your Google Cloud project ID.
HTTP method and URL:
POST https://vision.googleapis.com/v1/images:annotate
Request JSON body:
{
  "requests": [
    {
      "image": {
        "content": "BASE64_ENCODED_IMAGE"
      },
      "features": [
        {
          "type": "TEXT_DETECTION"
        }
      ]
    }
  ]
}
To send your request, choose one of these options:
curl
Save the request body in a file named request.json,
and execute the following command:
curl -X POST \
     -H "Authorization: Bearer $(gcloud auth print-access-token)" \
     -H "x-goog-user-project: PROJECT_ID" \
     -H "Content-Type: application/json; charset=utf-8" \
     -d @request.json \
     "https://vision.googleapis.com/v1/images:annotate"
PowerShell
Save the request body in a file named request.json,
and execute the following command:
$cred = gcloud auth print-access-token
$headers = @{ "Authorization" = "Bearer $cred"; "x-goog-user-project" = "PROJECT_ID" }

Invoke-WebRequest `
    -Method POST `
    -Headers $headers `
    -ContentType: "application/json; charset=utf-8" `
    -InFile request.json `
    -Uri "https://vision.googleapis.com/v1/images:annotate" | Select-Object -Expand Content
If the request is successful, the server returns a 200 OK HTTP status code and
the response in JSON format.
A TEXT_DETECTION response includes the detected phrase, its bounding box,
and individual words and their bounding boxes.
Go
Before trying this sample, follow the Go setup instructions in the Vision quickstart using client libraries. For more information, see the Vision Go API reference documentation.
To authenticate to Vision, set up Application Default Credentials. For more information, see Set up authentication for a local development environment.
Java
Before trying this sample, follow the Java setup instructions in the Vision API Quickstart Using Client Libraries. For more information, see the Vision API Java reference documentation.
Node.js
Before trying this sample, follow the Node.js setup instructions in the Vision quickstart using client libraries. For more information, see the Vision Node.js API reference documentation.
To authenticate to Vision, set up Application Default Credentials. For more information, see Set up authentication for a local development environment.
Python
Before trying this sample, follow the Python setup instructions in the Vision quickstart using client libraries. For more information, see the Vision Python API reference documentation.
To authenticate to Vision, set up Application Default Credentials. For more information, see Set up authentication for a local development environment.
Additional languages
C#: Please follow the C# setup instructions on the client libraries page and then visit the Vision reference documentation for .NET.
PHP: Please follow the PHP setup instructions on the client libraries page and then visit the Vision reference documentation for PHP.
Ruby: Please follow the Ruby setup instructions on the client libraries page and then visit the Vision reference documentation for Ruby.
Detect text in a remote image
You can use the Vision API to perform feature detection on a remote image file that is located in Cloud Storage or on the Web. To send a remote file request, specify the file's Web URL or Cloud Storage URI in the request body.
gcloud
To perform text detection, use the
gcloud ml vision detect-text
command as shown in the following example:
gcloud ml vision detect-text gs://cloud-samples-data/vision/ocr/sign.jpg
REST
Before using any of the request data, make the following replacements:
- CLOUD_STORAGE_IMAGE_URI: the path to a valid
image file in a Cloud Storage bucket. You must at least have read privileges to the file.
Example:
gs://cloud-samples-data/vision/ocr/sign.jpg
- PROJECT_ID: Your Google Cloud project ID.
HTTP method and URL:
POST https://vision.googleapis.com/v1/images:annotate
Request JSON body:
{
  "requests": [
    {
      "image": {
        "source": {
          "imageUri": "CLOUD_STORAGE_IMAGE_URI"
        }
       },
       "features": [
         {
           "type": "TEXT_DETECTION"
         }
       ]
    }
  ]
}
To send your request, choose one of these options:
curl
Save the request body in a file named request.json,
and execute the following command:
curl -X POST \
     -H "Authorization: Bearer $(gcloud auth print-access-token)" \
     -H "x-goog-user-project: PROJECT_ID" \
     -H "Content-Type: application/json; charset=utf-8" \
     -d @request.json \
     "https://vision.googleapis.com/v1/images:annotate"
PowerShell
Save the request body in a file named request.json,
and execute the following command:
$cred = gcloud auth print-access-token
$headers = @{ "Authorization" = "Bearer $cred"; "x-goog-user-project" = "PROJECT_ID" }

Invoke-WebRequest `
    -Method POST `
    -Headers $headers `
    -ContentType: "application/json; charset=utf-8" `
    -InFile request.json `
    -Uri "https://vision.googleapis.com/v1/images:annotate" | Select-Object -Expand Content
If the request is successful, the server returns a 200 OK HTTP status code and
the response in JSON format.
A TEXT_DETECTION response includes the detected phrase, its bounding box,
and individual words and their bounding boxes.
Go
Before trying this sample, follow the Go setup instructions in the Vision quickstart using client libraries. For more information, see the Vision Go API reference documentation.
To authenticate to Vision, set up Application Default Credentials. For more information, see Set up authentication for a local development environment.
Java
Before trying this sample, follow the Java setup instructions in the Vision API Quickstart Using Client Libraries. For more information, see the Vision API Java reference documentation.
Node.js
Before trying this sample, follow the Node.js setup instructions in the Vision quickstart using client libraries. For more information, see the Vision Node.js API reference documentation.
To authenticate to Vision, set up Application Default Credentials. For more information, see Set up authentication for a local development environment.
Python
Before trying this sample, follow the Python setup instructions in the Vision quickstart using client libraries. For more information, see the Vision Python API reference documentation.
To authenticate to Vision, set up Application Default Credentials. For more information, see Set up authentication for a local development environment.
Additional languages
C#: Please follow the C# setup instructions on the client libraries page and then visit the Vision reference documentation for .NET.
PHP: Please follow the PHP setup instructions on the client libraries page and then visit the Vision reference documentation for PHP.
Ruby: Please follow the Ruby setup instructions on the client libraries page and then visit the Vision reference documentation for Ruby.
Specify the language (optional)
Both types of OCR requests support one or more languageHints that specify the
language of any text in the image. However, an empty value usually yields the best results,
because omitting a value enables automatic language detection. For languages based on the Latin
alphabet, setting languageHints is not needed. In rare cases, when the language of
the text in
the image is known, setting a hint helps get better results (although it can be a significant
hindrance if the hint is wrong). Text detection returns an error if one or more of the specified
languages is not one of the
supported languages.
If you choose to provide a language hint, modify the body of your request
(request.json file) to provide the string of one of the supported languages
in the imageContext.languageHints field as shown in the following sample:
{
  "requests": [
    {
      "image": {
        "source": {
          "imageUri": "IMAGE_URL"
        }
      },
      "features": [
        {
          "type": "DOCUMENT_TEXT_DETECTION"
        }
      ],
      "imageContext": {
        "languageHints": ["en-t-i0-handwrit"]
      }
    }
  ]
}
Multi-regional support
You can now specify continent-level data storage and OCR processing. The following regions are currently supported:
us: USA country onlyeu: The European Union
Locations
Cloud Vision offers you some control over where the resources for your project are stored and processed. In particular, you can configure Cloud Vision to store and process your data only in the European Union.
By default Cloud Vision stores and processes resources in a Global location, which means that Cloud Vision doesn't guarantee that your resources will remain within a particular location or region. If you choose the European Union location, Google will store your data and process it only in the European Union. You and your users can access the data from any location.
Setting the location using the API
The Vision API supports a global API endpoint (vision.googleapis.com) and also
two region-based endpoints: a European Union endpoint
(eu-vision.googleapis.com) and United States
endpoint (us-vision.googleapis.com). Use these endpoints for region-specific
processing. For example, to store and process your data in the European Union only, use the
URI eu-vision.googleapis.com in place of vision.googleapis.com
for your REST API calls:
- https://eu-vision.googleapis.com/v1/projects/PROJECT_ID/locations/eu/images:annotate
- https://eu-vision.googleapis.com/v1/projects/PROJECT_ID/locations/eu/images:asyncBatchAnnotate
- https://eu-vision.googleapis.com/v1/projects/PROJECT_ID/locations/eu/files:annotate
- https://eu-vision.googleapis.com/v1/projects/PROJECT_ID/locations/eu/files:asyncBatchAnnotate
To store and process your data in the United States only, use the US endpoint
(us-vision.googleapis.com) with the preceding methods.
Setting the location using the client libraries
The Vision API client libraries accesses the global API endpoint
(vision.googleapis.com) by default. To store and process your data in the
European Union only, you need to explicitly set the endpoint
(eu-vision.googleapis.com). The following code samples show how to configure
this setting.
REST
Before using any of the request data, make the following replacements:
- REGION_ID: One of the valid regional
location identifiers:
us: USA country onlyeu: The European Union
- CLOUD_STORAGE_IMAGE_URI: the path to a valid
image file in a Cloud Storage bucket. You must at least have read privileges to the file.
Example:
gs://cloud-samples-data/vision/ocr/sign.jpg
- PROJECT_ID: Your Google Cloud project ID.
HTTP method and URL:
POST https://REGION_ID-vision.googleapis.com/v1/projects/PROJECT_ID/locations/REGION_ID/images:annotate
Request JSON body:
{
  "requests": [
    {
      "image": {
        "source": {
          "imageUri": "CLOUD_STORAGE_IMAGE_URI"
        }
       },
       "features": [
         {
           "type": "TEXT_DETECTION"
         }
       ]
    }
  ]
}
To send your request, choose one of these options:
curl
Save the request body in a file named request.json,
and execute the following command:
curl -X POST \
     -H "Authorization: Bearer $(gcloud auth print-access-token)" \
     -H "x-goog-user-project: PROJECT_ID" \
     -H "Content-Type: application/json; charset=utf-8" \
     -d @request.json \
     "https://REGION_ID-vision.googleapis.com/v1/projects/PROJECT_ID/locations/REGION_ID/images:annotate"
PowerShell
Save the request body in a file named request.json,
and execute the following command:
$cred = gcloud auth print-access-token
$headers = @{ "Authorization" = "Bearer $cred"; "x-goog-user-project" = "PROJECT_ID" }

Invoke-WebRequest `
    -Method POST `
    -Headers $headers `
    -ContentType: "application/json; charset=utf-8" `
    -InFile request.json `
    -Uri "https://REGION_ID-vision.googleapis.com/v1/projects/PROJECT_ID/locations/REGION_ID/images:annotate" | Select-Object -Expand Content
If the request is successful, the server returns a 200 OK HTTP status code and
the response in JSON format.
A TEXT_DETECTION response includes the detected phrase, its bounding box,
and individual words and their bounding boxes.
Go
Before trying this sample, follow the Go setup instructions in the Vision quickstart using client libraries. For more information, see the Vision Go API reference documentation.
To authenticate to Vision, set up Application Default Credentials. For more information, see Set up authentication for a local development environment.
Java
Before trying this sample, follow the Java setup instructions in the Vision API Quickstart Using Client Libraries. For more information, see the Vision API Java reference documentation.
Node.js
Before trying this sample, follow the Node.js setup instructions in the Vision quickstart using client libraries. For more information, see the Vision Node.js API reference documentation.
To authenticate to Vision, set up Application Default Credentials. For more information, see Set up authentication for a local development environment.
Python
Before trying this sample, follow the Python setup instructions in the Vision quickstart using client libraries. For more information, see the Vision Python API reference documentation.
To authenticate to Vision, set up Application Default Credentials. For more information, see Set up authentication for a local development environment.
Try it
Try text detection and document text detection below. You can use the
image specified already (gs://cloud-samples-data/vision/ocr/sign.jpg) by clicking
Execute, or you can specify your own image in its place.
To try document text detection, update the value of type to
DOCUMENT_TEXT_DETECTION.
Request body:
{
  "requests": [
    {
      "features": [
        {
          "type": "TEXT_DETECTION"
        }
      ],
      "image": {
        "source": {
          "imageUri": "gs://cloud-samples-data/vision/ocr/sign.jpg"
        }
      }
    }
  ]
}