AutoML Vision 객체 감지는 학습을 시작할 때마다 새 모델을 만들기 때문에 프로젝트에 수많은 모델이 포함될 수 있습니다. 프로젝트에서 모델 목록을 가져오고 특정 모델을 가져오고 모델의 노드 번호를 업데이트하거나 더 이상 필요 없는 모델을 삭제할 수 있습니다.
모델 나열
프로젝트는 수많은 모델을 포함할 수 있습니다. 이 섹션에서는 프로젝트에 사용할 수 있는 모델 목록을 검색하는 방법에 대해 설명합니다.
웹 UI
AutoML Vision 객체 감지 UI를 사용해 사용 가능한 모델 목록을 표시하려면 왼쪽 탐색 메뉴 맨 위에 있는 모델 링크를 클릭합니다.
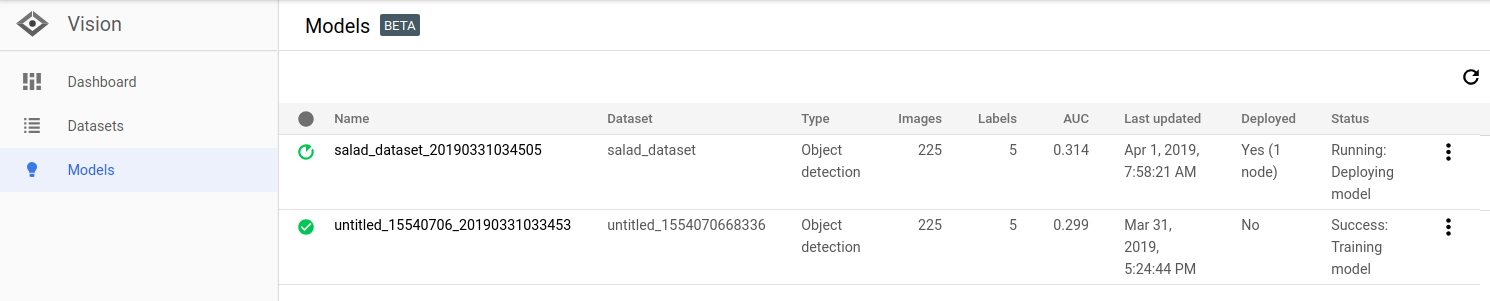
다른 프로젝트의 모델을 보려면 제목 표시줄 오른쪽 위에 있는 드롭다운 목록에서 프로젝트를 선택하세요.
REST
요청 데이터를 사용하기 전에 다음을 바꿉니다.
- project-id: GCP 프로젝트 ID입니다.
HTTP 메서드 및 URL:
GET https://automl.googleapis.com/v1/projects/PROJECT_ID/locations/us-central1/models
요청을 보내려면 다음 옵션 중 하나를 선택합니다.
curl
다음 명령어를 실행합니다.
curl -X GET \
     -H "Authorization: Bearer $(gcloud auth print-access-token)" \
     -H "x-goog-user-project: project-id" \
     "https://automl.googleapis.com/v1/projects/PROJECT_ID/locations/us-central1/models"
PowerShell
다음 명령어를 실행합니다.
$cred = gcloud auth print-access-token
$headers = @{ "Authorization" = "Bearer $cred"; "x-goog-user-project" = "project-id" }

Invoke-WebRequest `
    -Method GET `
    -Headers $headers `
    -Uri "https://automl.googleapis.com/v1/projects/PROJECT_ID/locations/us-central1/models" | Select-Object -Expand Content
다음 예시와 비슷한 JSON 응답이 표시됩니다. 이 응답은 2가지 클라우드 호스팅 모델에 대한 정보를 보여줍니다.
    {
  "model": [
    {
      "name": "projects/project-id/locations/us-central1/models/model-id-1",
      "displayName": "display-name-1",
      "datasetId": "dataset-id",
      "createTime": "2019-07-26T21:10:18.338846Z",
      "deploymentState": "UNDEPLOYED",
      "updateTime": "2019-08-07T22:24:07.720068Z",
      "imageObjectDetectionModelMetadata": {
        "modelType": "cloud-low-latency-1",
        "nodeQps": 1.2987012987012987,
        "stopReason": "MODEL_CONVERGED",
        "trainBudgetMilliNodeHours": "216000",
        "trainCostMilliNodeHours": "8230"
      }
    },
    {
      "name": "projects/project-id/locations/us-central1/models/model-id-2",
      "displayName": "display-name-2",
      "datasetId": "dataset-id",
      "createTime": "2019-07-22T18:35:06.881193Z",
      "deploymentState": "UNDEPLOYED",
      "updateTime": "2019-07-22T19:58:44.980357Z",
      "imageObjectDetectionModelMetadata": {
        "modelType": "mobile-versatile-1",
        "nodeQps": -1,
        "stopReason": "MODEL_CONVERGED",
        "trainBudgetMilliNodeHours": "24000",
        "trainCostMilliNodeHours": "9367"
      }
    },
    {
      "name": "projects/project-id/locations/us-central1/models/model-id-3",
      "displayName": "display-name-3",
      "datasetId": "dataset-id",
      "createTime": "2019-03-31T22:56:51.348238Z",
      "deploymentState": "UNDEPLOYED",
      "updateTime": "2019-07-22T18:42:44.594876Z",
      "imageObjectDetectionModelMetadata": {
        "modelType": "cloud-high-accuracy-1",
        "nodeQps": 0.6872852233676976
      }
    }
  ]
}
Go
이 샘플을 사용해 보기 전에 클라이언트 라이브러리 페이지에서 언어 설정 안내를 따르세요.
Java
이 샘플을 사용해 보기 전에 클라이언트 라이브러리 페이지에서 언어 설정 안내를 따르세요.
Node.js
이 샘플을 사용해 보기 전에 클라이언트 라이브러리 페이지에서 언어 설정 안내를 따르세요.
Python
이 샘플을 사용해 보기 전에 클라이언트 라이브러리 페이지에서 언어 설정 안내를 따르세요.
추가 언어
C#: 클라이언트 라이브러리 페이지의 C# 설정 안내를 따른 다음 .NET용 AutoML Vision 객체 감지 참고 문서를 참조하세요.
PHP: 클라이언트 라이브러리 페이지의 PHP 설정 안내를 따른 다음 PHP용 AutoML Vision 객체 감지 참고 문서를 참조하세요.
Ruby: 클라이언트 라이브러리 페이지의 Ruby 설정 안내를 따른 다음 Ruby용 AutoML Vision 객체 감지 참고 문서를 참조하세요.
모델 가져오기
수정하거나 예측을 위해 학습된 특정 모델을 가져올 수 있습니다.
웹 UI
AutoML Vision 객체 감지 UI를 사용해 사용 가능한 모델 목록을 표시하려면 왼쪽 탐색 메뉴 맨 위에 있는 모델 링크를 클릭합니다.
다른 프로젝트의 모델을 보려면 제목 표시줄 오른쪽 위에 있는 드롭다운 목록에서 프로젝트를 선택하세요.
REST
요청 데이터를 사용하기 전에 다음을 바꿉니다.
- project-id: GCP 프로젝트 ID입니다.
- model-id: 모델을 만들 때의 응답에서 모델의 ID입니다. ID는 모델 이름의 마지막 요소입니다.
예를 들면 다음과 같습니다.
- 모델 이름:
projects/project-id/locations/location-id/models/IOD4412217016962778756 - 모델 ID:
IOD4412217016962778756
- 모델 이름:
HTTP 메서드 및 URL:
GET https://automl.googleapis.com/v1/projects/project-id/locations/us-central1/models/model-id
요청을 보내려면 다음 옵션 중 하나를 선택합니다.
curl
다음 명령어를 실행합니다.
curl -X GET \
     -H "Authorization: Bearer $(gcloud auth print-access-token)" \
     -H "x-goog-user-project: project-id" \
     "https://automl.googleapis.com/v1/projects/project-id/locations/us-central1/models/model-id"
PowerShell
다음 명령어를 실행합니다.
$cred = gcloud auth print-access-token
$headers = @{ "Authorization" = "Bearer $cred"; "x-goog-user-project" = "project-id" }

Invoke-WebRequest `
    -Method GET `
    -Headers $headers `
    -Uri "https://automl.googleapis.com/v1/projects/project-id/locations/us-central1/models/model-id" | Select-Object -Expand Content
다음과 비슷한 JSON 응답이 표시됩니다.
    {
  "name": "projects/project-id/locations/us-central1/models/model-id",
  "displayName": "display-name",
  "datasetId": "dataset-id",
  "createTime": "2019-07-26T21:10:18.338846Z",
  "deploymentState": "UNDEPLOYED",
  "updateTime": "2019-07-26T22:28:57.464076Z",
  "imageObjectDetectionModelMetadata": {
    "modelType": "cloud-low-latency-1",
    "nodeQps": 1.2987012987012987,
    "stopReason": "MODEL_CONVERGED",
    "trainBudgetMilliNodeHours": "216000",
    "trainCostMilliNodeHours": "8230"
  }
}
Java
이 샘플을 사용해 보기 전에 클라이언트 라이브러리 페이지에서 언어 설정 안내를 따르세요.
Node.js
이 샘플을 사용해 보기 전에 클라이언트 라이브러리 페이지에서 언어 설정 안내를 따르세요.
Python
이 샘플을 사용해 보기 전에 클라이언트 라이브러리 페이지에서 언어 설정 안내를 따르세요.
추가 언어
C#: 클라이언트 라이브러리 페이지의 C# 설정 안내를 따른 다음 .NET용 AutoML Vision 객체 감지 참고 문서를 참조하세요.
PHP: 클라이언트 라이브러리 페이지의 PHP 설정 안내를 따른 다음 PHP용 AutoML Vision 객체 감지 참고 문서를 참조하세요.
Ruby: 클라이언트 라이브러리 페이지의 Ruby 설정 안내를 따른 다음 Ruby용 AutoML Vision 객체 감지 참고 문서를 참조하세요.
모델 노드 번호 업데이트
배포된 모델을 학습시켰으면 특정 트래픽 양에 대응하기 위해 모델이 배포된 노드 수를 업데이트할 수 있습니다. 예를 들어 예상한 것보다 초당 쿼리 수(QPS)가 많을 수 있습니다.
먼저 모델을 배포 취소하지 않아도 이 노드 수를 변경할 수 있습니다. 배포를 업데이트하면 제공된 예측 트래픽을 중단하지 않고도 노드 수가 변경됩니다.
웹 UI
AutoML Vision Object Detection UI에서 왼쪽 탐색 메뉴의 모델 탭(전구 아이콘이 있음)을 선택하여 사용 가능한 모델을 표시합니다.
다른 프로젝트의 모델을 보려면 제목 표시줄 오른쪽 위에 있는 드롭다운 목록에서 프로젝트를 선택하세요.
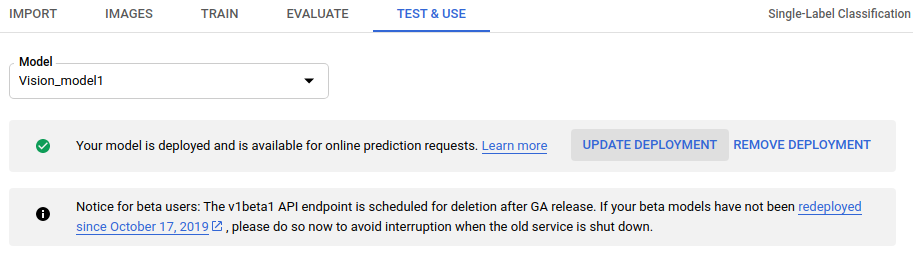
- 배포된 학습 모델을 선택합니다.
- 제목 표시줄 바로 아래에 있는 테스트 및 사용 탭을 선택합니다.
-
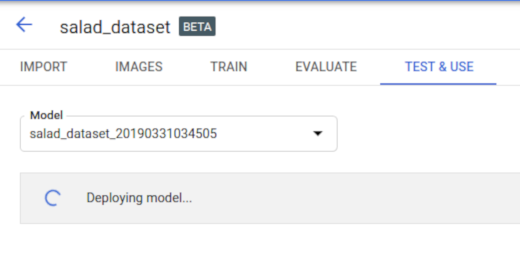
페이지 상단의 상자에 '모델이 배포되어 온라인 예측 요청에 사용할 수 있습니다'라는 메시지가 표시됩니다. 이 텍스트 옆의 배포 업데이트 옵션을 선택합니다.
- 배포 업데이트 창이 열리면 목록에서 모델을 배포할 새 노드 번호를 선택합니다. 노드 번호는 예상되는 예측 초당 쿼리 수(QPS)를 표시합니다.
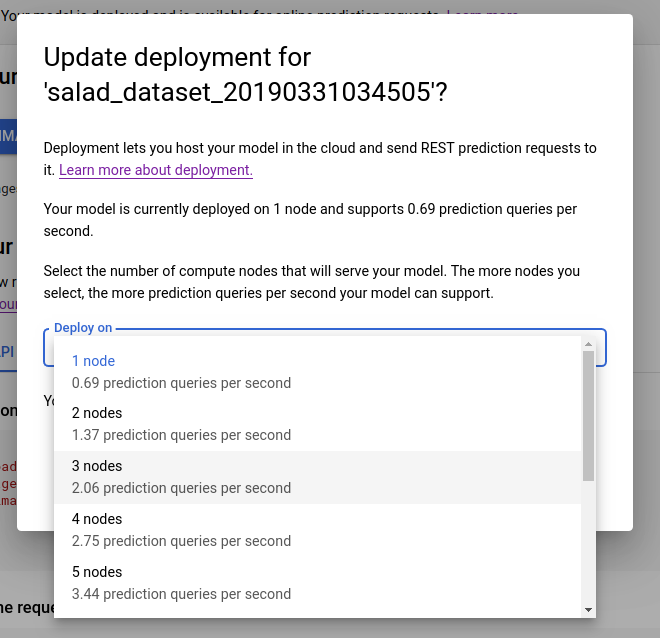
목록에서 새 노드 번호를 선택한 후 배포 업데이트를 선택하여 모델이 배포되는 노드 번호를 업데이트합니다.
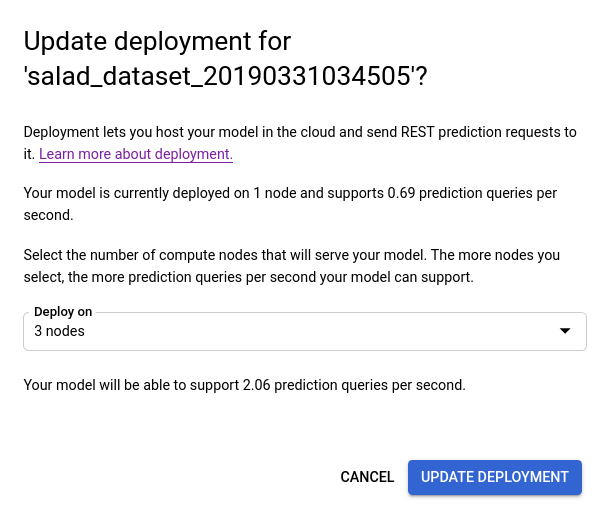
- 테스트 및 사용 창으로 돌아가게 되며, 텍스트 상자에 '모델 배포 중...'이라고 표시됩니다.
모델이 새 노드 번호에 성공적으로 배포되면 프로젝트와 연관된 주소로 이메일이 전송됩니다.
REST
처음에 모델을 배포하는 데 사용하는 것과 동일한 메서드를 사용하여 배포된 모델의 노드 번호를 변경합니다.요청 데이터를 사용하기 전에 다음을 바꿉니다.
- project-id: GCP 프로젝트 ID입니다.
- model-id: 모델을 만들 때의 응답에서 모델의 ID입니다. ID는 모델 이름의 마지막 요소입니다.
예를 들면 다음과 같습니다.
- 모델 이름:
projects/project-id/locations/location-id/models/IOD4412217016962778756 - 모델 ID:
IOD4412217016962778756
- 모델 이름:
필드 고려사항:
nodeCount- 모델을 배포할 노드 수입니다. 값은 1에서 100 사이여야 합니다(양 끝 값 포함). 노드는 모델의qps_per_node에서 지정된 온라인 예측의 초당 쿼리 수(QPS)를 처리할 수 있는 머신 리소스를 추상화한 것입니다.
HTTP 메서드 및 URL:
POST https://automl.googleapis.com/v1/projects/PROJECT_ID/locations/us-central1/models/MODEL_ID:deploy
JSON 요청 본문:
{
  "imageObjectDetectionModelDeploymentMetadata": {
    "nodeCount": 2
  }
}
요청을 보내려면 다음 옵션 중 하나를 선택합니다.
curl
요청 본문을 request.json 파일에 저장하고 다음 명령어를 실행합니다.
curl -X POST \
     -H "Authorization: Bearer $(gcloud auth print-access-token)" \
     -H "x-goog-user-project: project-id" \
     -H "Content-Type: application/json; charset=utf-8" \
     -d @request.json \
     "https://automl.googleapis.com/v1/projects/PROJECT_ID/locations/us-central1/models/MODEL_ID:deploy"
PowerShell
요청 본문을 request.json 파일에 저장하고 다음 명령어를 실행합니다.
$cred = gcloud auth print-access-token
$headers = @{ "Authorization" = "Bearer $cred"; "x-goog-user-project" = "project-id" }

Invoke-WebRequest `
    -Method POST `
    -Headers $headers `
    -ContentType: "application/json; charset=utf-8" `
    -InFile request.json `
    -Uri "https://automl.googleapis.com/v1/projects/PROJECT_ID/locations/us-central1/models/MODEL_ID:deploy" | Select-Object -Expand Content
다음과 비슷한 출력이 표시됩니다. 작업 ID를 사용하여 작업 상태를 가져올 수 있습니다. 예시를 보려면 장기 실행 작업 다루기를 참조하세요.
{
  "name": "projects/PROJECT_ID/locations/us-central1/operations/OPERATION_ID",
  "metadata": {
    "@type": "type.googleapis.com/google.cloud.automl.v1.OperationMetadata",
    "createTime": "2019-08-07T22:00:20.692109Z",
    "updateTime": "2019-08-07T22:00:20.692109Z",
    "deployModelDetails": {}
  }
}
Go
이 샘플을 사용해 보기 전에 클라이언트 라이브러리 페이지에서 언어 설정 안내를 따르세요.
Java
이 샘플을 사용해 보기 전에 클라이언트 라이브러리 페이지에서 언어 설정 안내를 따르세요.
Node.js
이 샘플을 사용해 보기 전에 클라이언트 라이브러리 페이지에서 언어 설정 안내를 따르세요.
Python
이 샘플을 사용해 보기 전에 클라이언트 라이브러리 페이지에서 언어 설정 안내를 따르세요.
추가 언어
C#: 클라이언트 라이브러리 페이지의 C# 설정 안내를 따른 다음 .NET용 AutoML Vision 객체 감지 참고 문서를 참조하세요.
PHP: 클라이언트 라이브러리 페이지의 PHP 설정 안내를 따른 다음 PHP용 AutoML Vision 객체 감지 참고 문서를 참조하세요.
Ruby: 클라이언트 라이브러리 페이지의 Ruby 설정 안내를 따른 다음 Ruby용 AutoML Vision 객체 감지 참고 문서를 참조하세요.
모델 삭제
모델 ID를 사용하여 모델 리소스를 삭제할 수 있습니다.
웹 UI
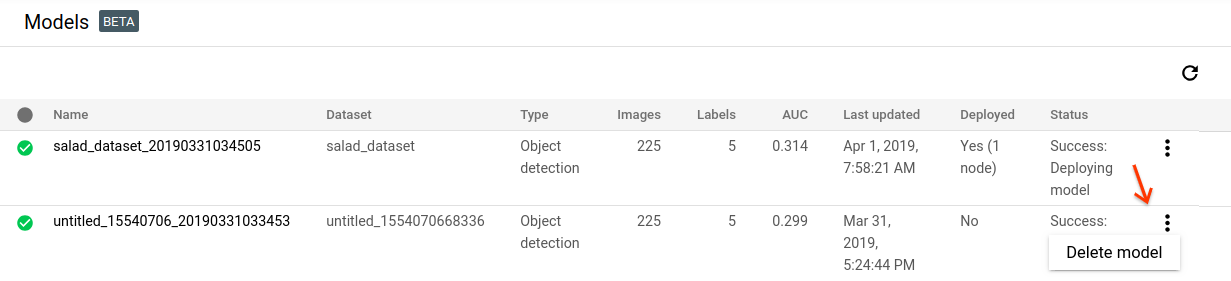
AutoML Vision 객체 감지 UI의 왼쪽 탐색 메뉴에서 전구 아이콘을 클릭해 사용 가능한 모델 목록을 표시합니다.
삭제하려는 행 맨 오른쪽에 있는 점 3개로 된 메뉴를 클릭하고 모델 삭제를 클릭합니다.
확인 대화상자에서 삭제를 클릭합니다.
REST
요청 데이터를 사용하기 전에 다음을 바꿉니다.
- project-id: GCP 프로젝트 ID입니다.
- model-id: 모델을 만들 때의 응답에서 모델의 ID입니다. ID는 모델 이름의 마지막 요소입니다.
예를 들면 다음과 같습니다.
- 모델 이름:
projects/project-id/locations/location-id/models/IOD4412217016962778756 - 모델 ID:
IOD4412217016962778756
- 모델 이름:
HTTP 메서드 및 URL:
DELETE https://automl.googleapis.com/v1/projects/PROJECT_ID/locations/us-
central1/models/MODEL_ID
요청을 보내려면 다음 옵션 중 하나를 선택합니다.
curl
다음 명령어를 실행합니다.
curl -X DELETE \
     -H "Authorization: Bearer $(gcloud auth print-access-token)" \
     -H "x-goog-user-project: project-id" \
     "https://automl.googleapis.com/v1/projects/PROJECT_ID/locations/us-
central1/models/MODEL_ID"
PowerShell
다음 명령어를 실행합니다.
$cred = gcloud auth print-access-token
$headers = @{ "Authorization" = "Bearer $cred"; "x-goog-user-project" = "project-id" }

Invoke-WebRequest `
    -Method DELETE `
    -Headers $headers `
    -Uri "https://automl.googleapis.com/v1/projects/PROJECT_ID/locations/us-
central1/models/MODEL_ID" | Select-Object -Expand Content
다음과 비슷한 출력이 표시됩니다. 작업 ID를 사용하여 작업 상태를 가져올 수 있습니다. 예시를 보려면 장기 실행 작업 다루기를 참조하세요.
{
  "name": "projects/PROJECT_ID/locations/us-central1/operations/OPERATION_ID",
  "metadata": {
    "@type": "type.googleapis.com/google.cloud.automl.v1.OperationMetadata",
    "createTime": "2018-11-01T15:59:36.196506Z",
    "updateTime": "2018-11-01T15:59:36.196506Z",
    "deleteDetails": {}
  }
}
Go
이 샘플을 사용해 보기 전에 클라이언트 라이브러리 페이지에서 언어 설정 안내를 따르세요.
Java
이 샘플을 사용해 보기 전에 클라이언트 라이브러리 페이지에서 언어 설정 안내를 따르세요.
Node.js
이 샘플을 사용해 보기 전에 클라이언트 라이브러리 페이지에서 언어 설정 안내를 따르세요.
Python
이 샘플을 사용해 보기 전에 클라이언트 라이브러리 페이지에서 언어 설정 안내를 따르세요.
추가 언어
C#: 클라이언트 라이브러리 페이지의 C# 설정 안내를 따른 다음 .NET용 AutoML Vision 객체 감지 참고 문서를 참조하세요.
PHP: 클라이언트 라이브러리 페이지의 PHP 설정 안내를 따른 다음 PHP용 AutoML Vision 객체 감지 참고 문서를 참조하세요.
Ruby: 클라이언트 라이브러리 페이지의 Ruby 설정 안내를 따른 다음 Ruby용 AutoML Vision 객체 감지 참고 문서를 참조하세요.