Vertex AI Vision is an AI-powered platform you can use to ingest, analyze, and store video data. Vertex AI Vision lets you build and deploy AI applications. You can build end-to-end Vertex AI Vision solutions by leveraging Vertex AI Vision's integration with other product components.
To start implementing solutions using the Vertex AI Vision platform, review the following Vertex AI Vision concepts and components:
Streams: Represent a video streaming layer from your solution. The stream source can be a live video (for example, an IP camera) or a video file (for example, an MP4 file).
Applications: Enable the connection between a stream and an AI processor to perform a machine learning operation on the video. For example, you can connect a camera stream to an AI model that counts people passing in front of it.
Media warehouses: Store the video ingested by streams out to Google Cloud storage. Storing data out to this destination lets you query analysis output and metadata from the AI processors used on data from the ingested streams.
Create a stream
To create a streaming video analysis app, you must first create and register a stream resource. As the resource that receives the video data from the users, the stream is required on any scenario you build using Vertex AI Vision.Console
To create a new stream in the Google Cloud console, use the following steps.
Open the Streams tab of the Vertex AI Vision dashboard.
Click Register.
Enter
input-streamas the stream name and select the region where you want to create your stream.Click Register to create one or more streams.

Ingest video into the stream
After you create a stream resource, you can use the vaictl command-line tool
to send video data to the stream.
IP camera
If you're testing using a live IP camera, you need to get the IP address of the camera. You must provide this information with the request, along with other variable substitutions:
- PROJECT_ID: Your Google Cloud project ID.
- LOCATION_ID: Your location ID. For example,
us-central1. For more information, see Cloud locations. - RTSP_ADDRESS: The address of your Real Time Streaming
Protocol (RTSP) feed. For example,
rtsp://192.168.1.180:540.
This command sends an RTSP feed into the stream. You must run this command in the network that has direct access to the RTSP feed.
vaictl -p PROJECT_ID \
       -l LOCATION_ID \
       -c application-cluster-0 \
       --service-endpoint visionai.googleapis.com \
send rtsp to streams input-stream --rtsp-uri RTSP_ADDRESS
If the command runs successfully, you get the following output:
[...]
Waiting for long running operation projects/your-project/locations/us-central1/operations/operation-1651364156981-5dde82db7e4a9-dfb17ca5-1051eb20 ⠙
I20220430 21:16:28.024988 211449 gstvaisink.cc:417] cluster-id=application-cluster-0
I20220430 21:16:28.025032 211449 gstvaisink.cc:418] cluster-endpoint=c8khq35ftg78mn61ef50.us-central1.visionai.goog
I20220430 21:16:28.025040 211449 gstvaisink.cc:419] event-id=ev-1651364114183255223
I20220430 21:16:28.025048 211449 gstvaisink.cc:420] stream-id=input-stream
I20220430 21:16:28.025053 211449 gstvaisink.cc:421] series-id=ev-1651364114183255223--input-stream
I20220430 21:16:28.025060 211449 gstvaisink.cc:422] Sending data
Local video file
You can also send video file data to a stream instead of a live video feed. This option can be useful if you don't have access to an IP camera.
The only difference in this option is the vaictl command
parameters. Instead of passing the IP camera information, pass
the path for the local video file. Make the following variable
substitutions:
- PROJECT_ID: Your Google Cloud project ID.
- LOCATION_ID: Your location ID. For example,
us-central1. More information. - LOCAL_FILE.EXT: The filename of a local video file.
For example,
my-video.mp4. --loopflag: Optional. Loops file data to simulate streaming.
This command streams a video file to a stream. If using the
--loop flag, the video is looped into the stream until you
stop the command:
vaictl -p PROJECT_ID \
       -l LOCATION_ID \
       -c application-cluster-0 \
       --service-endpoint visionai.googleapis.com \
send video-file to streams 'input-stream' --file-path LOCAL_FILE.EXT --loop
It might take ~100 seconds between starting the vaictl ingest operation and
the video appearing in the dashboard.
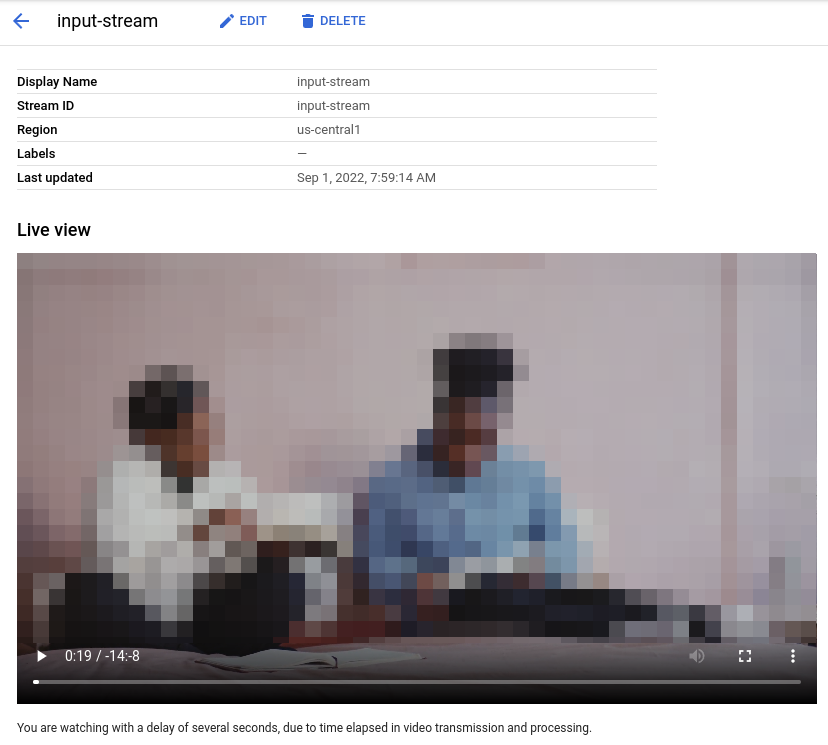
After the stream ingestion is available,
you can see the video feed in the Streams tab of the Vertex AI Vision
dashboard by selecting the input-stream stream.
Create a face blur application
After you create a stream and ingest data into the stream, it's time to create a Vertex AI Vision app to process the data. An app can be thought of as an automated pipeline that connects the following:
- Data ingestion: A video feed is ingested into a stream.
- Data analysis: An AI model can be added after the ingestion. Any computer vision operation can be performed on the ingested video information.
- Data storage: The two versions of the video feed (the original stream and the stream processed by the AI model) can be stored in a media warehouse.
In the Google Cloud console an app is represented as a graph. Additionally, in Vertex AI Vision an app graph must have at least two nodes: a video source node (stream), and at least one more node (a processing model or output destination).
Create an empty application
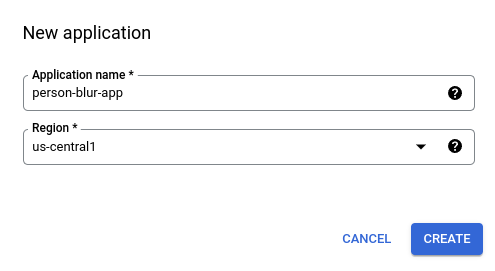
Before you can populate the app graph, you must first create an empty app.Console
Create an app in the Google Cloud console.
Open the Applications tab of the Vertex AI Vision dashboard.
Click the Create button.
Enter
person-blur-appas the app name and choose your region.Click Create.
Add app component nodes
After you have created the empty application, you can then add the three nodes to the app graph:
- Ingestion node: The stream resource that's already ingesting data.
- Processing node: The person blur model that acts on ingested data.
- Storage node: The media warehouse that stores processed videos, and also serves as a metadata store. The warehouse allows analytics information to be generated about ingested video data, as well as stores information inferred about the data by the AI models.
Console
Add component nodes to your app in the console.
Open the Applications tab of the Vertex AI Vision dashboard.
In the
person-blur-appline, select View graph. This takes you to the graph visualization of the processing pipeline.
Add a data ingestion node
To add the input stream node, select the Streams option in the Connectors section of the side menu.
In the Source section of the Stream menu that opens, select Add streams.
In the Add streams menu, choose Select from existing streams and select
person-blur-appfrom the list of stream resources.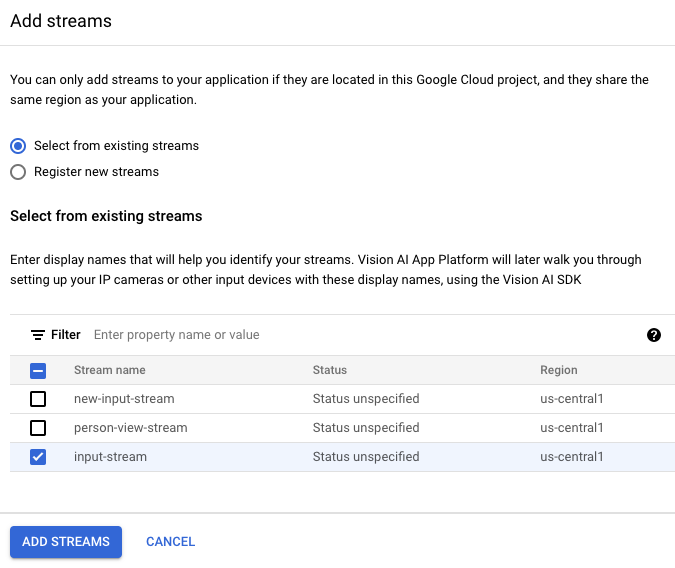
To add the stream to the app graph, click Add streams.
Add a data processing node
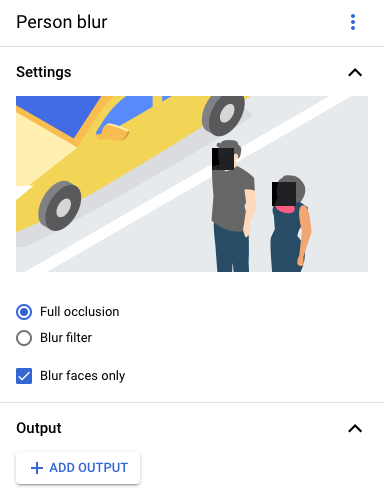
To add the person blur model node, select the Person blur option in the General processors section of the side menu.
In the "Person blur" option menu that opens, leave Full occlusion selected and enable the Blur faces only option.
Add a data storage node
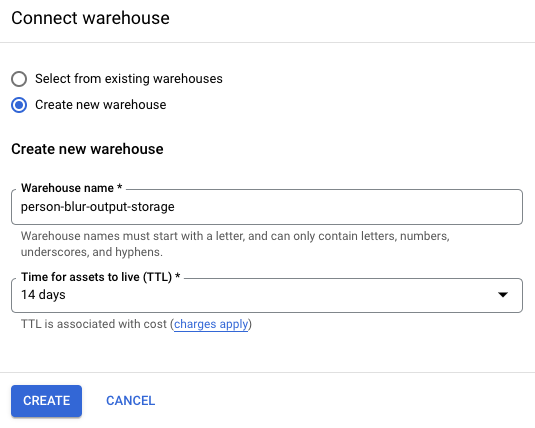
To add the output destination (storage) node, select the Vertex AI Vision's Media Warehouse option in the Connectors section of the side menu.
In the Vertex AI Vision's Media Warehouse menu, click Connect warehouse.
In the Connect warehouse menu, select Create new warehouse. Name the warehouse
person-blur-app, and leave the TTL duration at 14 days.To add the warehouse, click Create.
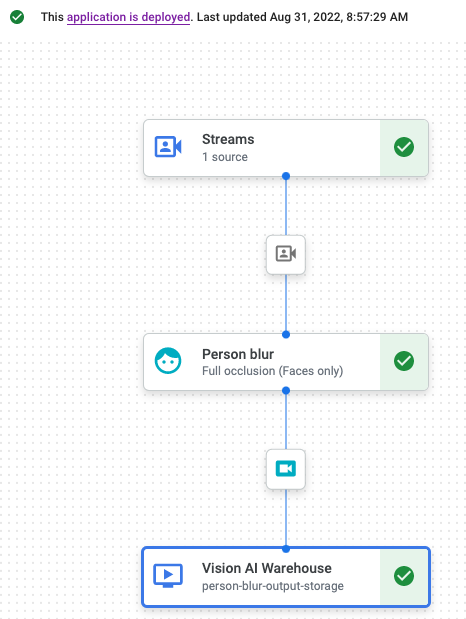
Deploy your application
After you have built your end-to-end app with all the necessary components, the last step to using the app is to deploy it.Console
Open the Applications tab of the Vertex AI Vision dashboard.
Select View graph next to the
person-blur-appapp in the list.From the application graph builder page, click the Deploy button.
In the following confirmation dialog, select Deploy.
The deploy operation might take several minutes to complete. After deployment finishes, green check marks appear next to the nodes.
View processed output data
Console
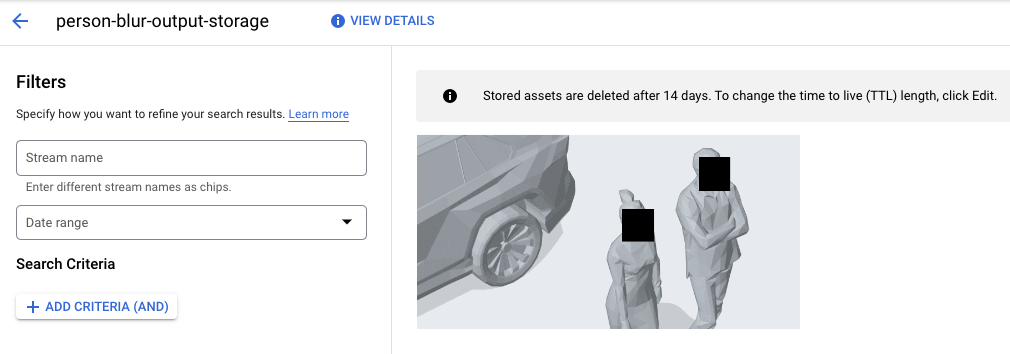
Open the Warehouses tab of the Vertex AI Vision dashboard.
Find the
person-blur-output-storagewarehouse in the list, and click View assets.