Crea un'app nella console
Scopri come creare una semplice app di rilevamento di oggetti Vertex AI Vision nella consoleGoogle Cloud .
Per seguire le indicazioni dettagliate per questa attività direttamente nella Google Cloud console, fai clic su Procedura guidata:
Prima di iniziare
- Sign in to your Google Cloud account. If you're new to Google Cloud, create an account to evaluate how our products perform in real-world scenarios. New customers also get $300 in free credits to run, test, and deploy workloads.
-
In the Google Cloud console, on the project selector page, select or create a Google Cloud project.
Roles required to select or create a project
- Select a project: Selecting a project doesn't require a specific IAM role—you can select any project that you've been granted a role on.
-
Create a project: To create a project, you need the Project Creator
(
roles/resourcemanager.projectCreator), which contains theresourcemanager.projects.createpermission. Learn how to grant roles.
-
Verify that billing is enabled for your Google Cloud project.
-
Enable the Vision AI API.
Roles required to enable APIs
To enable APIs, you need the Service Usage Admin IAM role (
roles/serviceusage.serviceUsageAdmin), which contains theserviceusage.services.enablepermission. Learn how to grant roles. -
In the Google Cloud console, on the project selector page, select or create a Google Cloud project.
Roles required to select or create a project
- Select a project: Selecting a project doesn't require a specific IAM role—you can select any project that you've been granted a role on.
-
Create a project: To create a project, you need the Project Creator
(
roles/resourcemanager.projectCreator), which contains theresourcemanager.projects.createpermission. Learn how to grant roles.
-
Verify that billing is enabled for your Google Cloud project.
-
Enable the Vision AI API.
Roles required to enable APIs
To enable APIs, you need the Service Usage Admin IAM role (
roles/serviceusage.serviceUsageAdmin), which contains theserviceusage.services.enablepermission. Learn how to grant roles. Apri la scheda Applicazioni della dashboard di Vertex AI Vision.
Fai clic sul pulsante Crea.
Inserisci
quickstart-appcome nome dell'app e scegli la tua regione.Fai clic su Crea.
Apri la scheda Applicazioni della dashboard di Vertex AI Vision.
Nella riga
quickstart-app, seleziona Visualizza grafico. Viene visualizzata la visualizzazione del grafico della pipeline di elaborazione.Per aggiungere un nodo di flusso di input, seleziona l'opzione Flussi nella sezione Connettori del menu laterale.
Nella sezione Origine del menu Stream che si apre, seleziona Aggiungi stream.
Nel menu Aggiungi flussi, scegli Registra nuovi flussi e aggiungi
quickstart-streamcome nome del flusso.Per aggiungere lo stream al grafico dell'app, fai clic su Aggiungi stream.
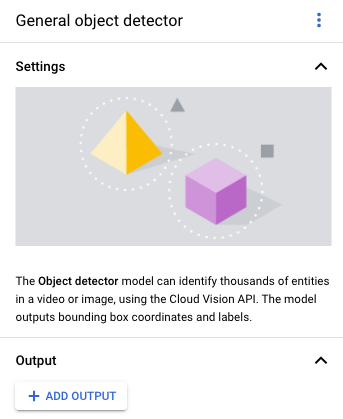
Per aggiungere il nodo del modello di rilevamento di oggetti, seleziona l'opzione Rilevamento di oggetti nella sezione Modelli preaddestrati del menu laterale.
Per aggiungere il nodo di destinazione di output (spazio di archiviazione), seleziona l'opzione Media Warehouse di Vertex AI Vision nella sezione Connettori del menu laterale.
Nel menu Media Warehouse di Vertex AI Vision, fai clic su Connetti warehouse.
Nel menu Connetti warehouse, seleziona Crea nuovo warehouse. Assegna al warehouse il nome
quickstart-warehousee lascia la durata TTL a 14 giorni.Fai clic sul pulsante Crea per aggiungere il warehouse.
Apri la scheda Applicazioni della dashboard di Vertex AI Vision.
Seleziona Visualizza grafico accanto all'app
quickstart-appnell'elenco.Nella pagina del builder del grafico delle applicazioni, fai clic sul pulsante Deploy (Implementa).
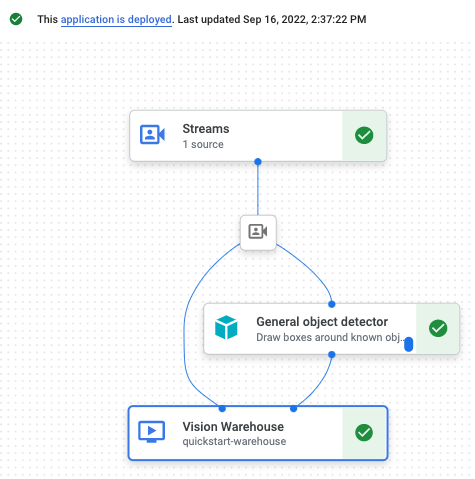
Nella finestra di dialogo di conferma successiva, seleziona Esegui il deployment.
Il completamento dell'operazione di deployment potrebbe richiedere diversi minuti. Al termine del deployment, accanto ai nodi vengono visualizzati segni di spunta verdi.
- In the Google Cloud console, go to the Manage resources page.
- In the project list, select the project that you want to delete, and then click Delete.
- In the dialog, type the project ID, and then click Shut down to delete the project.
- In the Google Cloud console, go to the Warehouses page.
-
Locate
your
quickstart-warehousewarehouse. - To delete the warehouse, click Actions, click Delete warehouse, and then follow the instructions.
- In the Google Cloud console, go to the Streams page.
-
Locate
your
quickstart-streamstream. - To delete the stream, click Actions, click Delete stream, and then follow the instructions.
- In the Google Cloud console, go to the Applications page.
-
Locate
your
quickstart-appapp. - To delete the app, click Actions, click Delete application, and then follow the instructions.
- Prima di utilizzare gli strumenti a riga di comando, leggi Configurazione di un progetto e di un ambiente di sviluppo.
- Scopri come importare dati nella tua nuova app e scopri gli altri componenti che puoi aggiungere in Creazione di un'app.
- Per saperne di più sulle opzioni di archiviazione ed elaborazione degli output, consulta Collegare l'output dell'app a una destinazione di dati.
- Scopri come cercare i dati di Search Warehouse nella console.
- Scopri di più sulle pratiche di AI responsabile.
Crea un'applicazione di rilevamento di oggetti
Dopo aver configurato l'ambiente, puoi creare l'app.
Nella console Google Cloud , un'app è rappresentata come un grafico. Inoltre, in Vertex AI Vision, un grafico dell'app deve avere almeno due nodi: un nodo di origine video (stream) e almeno un altro nodo (un modello di elaborazione o una destinazione di output).
Crea un'app vuota
Prima di poter compilare il grafico dell'app, devi creare un'app vuota.
Console
Crea un'app nella Google Cloud console.
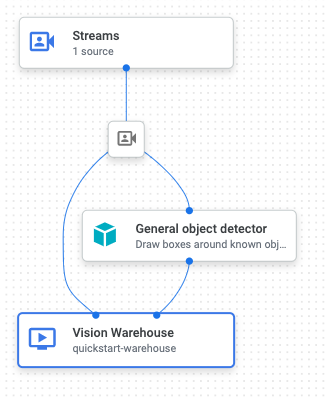
Aggiungi nodi dei componenti dell'app
Dopo aver creato l'applicazione vuota, puoi aggiungere i tre nodi al grafico dell'app: il nodo di importazione che può ricevere dati di stream, il nodo di elaborazione che esegue un'attività di computer vision sui dati e un nodo di destinazione dei dati, una destinazione di archiviazione warehouse in questo esempio.
Console
Aggiungi nodi dei componenti all'app nella console.
Aggiungere un nodo di importazione dati
Aggiungere un nodo di elaborazione dei dati
Aggiungere un nodo di archiviazione dei dati
Esegui il deployment dell'app per utilizzarla
Dopo aver creato l'app end-to-end con tutti i componenti necessari, l'ultimo passaggio per utilizzarla è il deployment.Console
Complimenti! Hai appena creato e implementato la tua prima app Vertex AI Vision. La creazione e l'implementazione di un'app sono i primi passaggi per l'importazione e l'utilizzo dei dati multimediali elaborati con Vertex AI Vision.
Esegui la pulizia
Per evitare che al tuo account Google Cloud vengano addebitati costi relativi alle risorse utilizzate in questa guida rapida, elimina il progetto che contiene le risorse oppure mantieni il progetto ed elimina le singole risorse.