Créer une application dans la console
Découvrez comment créer une application de détection d'objets Vertex AI Vision simple dans la consoleGoogle Cloud .
Pour obtenir des instructions détaillées sur cette tâche directement dans la console Google Cloud , cliquez sur Visite guidée :
Avant de commencer
- Sign in to your Google Cloud account. If you're new to Google Cloud, create an account to evaluate how our products perform in real-world scenarios. New customers also get $300 in free credits to run, test, and deploy workloads.
-
In the Google Cloud console, on the project selector page, select or create a Google Cloud project.
Roles required to select or create a project
- Select a project: Selecting a project doesn't require a specific IAM role—you can select any project that you've been granted a role on.
-
Create a project: To create a project, you need the Project Creator
(
roles/resourcemanager.projectCreator), which contains theresourcemanager.projects.createpermission. Learn how to grant roles.
-
Verify that billing is enabled for your Google Cloud project.
-
Enable the Vision AI API.
Roles required to enable APIs
To enable APIs, you need the Service Usage Admin IAM role (
roles/serviceusage.serviceUsageAdmin), which contains theserviceusage.services.enablepermission. Learn how to grant roles. -
In the Google Cloud console, on the project selector page, select or create a Google Cloud project.
Roles required to select or create a project
- Select a project: Selecting a project doesn't require a specific IAM role—you can select any project that you've been granted a role on.
-
Create a project: To create a project, you need the Project Creator
(
roles/resourcemanager.projectCreator), which contains theresourcemanager.projects.createpermission. Learn how to grant roles.
-
Verify that billing is enabled for your Google Cloud project.
-
Enable the Vision AI API.
Roles required to enable APIs
To enable APIs, you need the Service Usage Admin IAM role (
roles/serviceusage.serviceUsageAdmin), which contains theserviceusage.services.enablepermission. Learn how to grant roles. Ouvrez l'onglet Applications du tableau de bord Vertex AI Vision.
Cliquez sur le bouton Créer.
Saisissez
quickstart-appcomme nom d'application, puis choisissez votre région.Cliquez sur Créer.
Ouvrez l'onglet Applications du tableau de bord Vertex AI Vision.
Sur la ligne
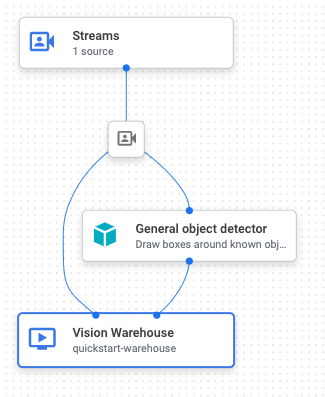
quickstart-app, sélectionnez Afficher le graphique. Vous êtes alors redirigé vers la visualisation graphique du pipeline de traitement.Pour ajouter un nœud de flux d'entrée, sélectionnez l'option Flux dans la section Connecteurs du menu latéral.
Dans la section Source du menu Flux qui s'affiche, sélectionnez Ajouter des flux.
Dans le menu Ajouter des flux, sélectionnez Enregistrer les nouveaux flux et ajoutez
quickstart-streamcomme nom de flux.Pour ajouter le flux au graphique de l'application, cliquez sur Ajouter des flux.
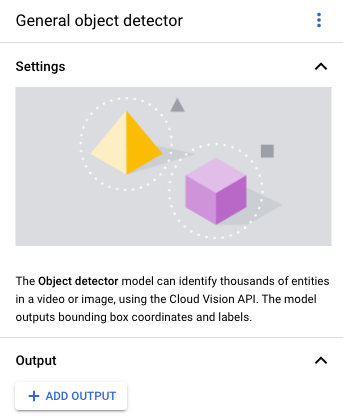
Pour ajouter le nœud de modèle de détecteur d'objets, sélectionnez l'option Détecteur d'objets dans la section Modèles pré-entraînés du menu latéral.
Pour ajouter le nœud de destination de sortie (stockage), sélectionnez l'option Entrepôt de données multimédias de Vertex AI Vision dans la section Connecteurs du menu latéral.
Dans le menu Entrepôt de données multimédias de Vertex AI Vision, cliquez sur Connecter un entrepôt.
Dans le menu Connecter un entrepôt, sélectionnez Créer un entrepôt. Nommez l'entrepôt
quickstart-warehouseet laissez la durée TTL à 14 jours.Cliquez sur le bouton Créer pour ajouter l'entrepôt.
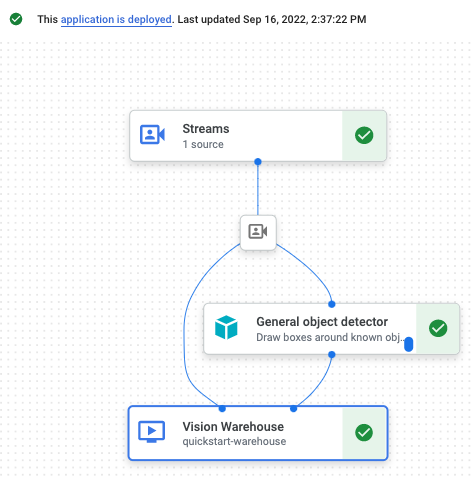
Ouvrez l'onglet Applications du tableau de bord Vertex AI Vision.
Sélectionnez Afficher le graphique à côté de l'application
quickstart-appdans la liste.Sur la page du générateur de graphiques d'application, cliquez sur le bouton Deploy (Déployer) .
Dans la boîte de dialogue de confirmation suivante, sélectionnez Déployer.
L'opération de déploiement peut prendre plusieurs minutes. Une fois le déploiement terminé, des coches vertes s'affichent à côté des nœuds.
- In the Google Cloud console, go to the Manage resources page.
- In the project list, select the project that you want to delete, and then click Delete.
- In the dialog, type the project ID, and then click Shut down to delete the project.
- In the Google Cloud console, go to the Warehouses page.
-
Locate
your
quickstart-warehousewarehouse. - To delete the warehouse, click Actions, click Delete warehouse, and then follow the instructions.
- In the Google Cloud console, go to the Streams page.
-
Locate
your
quickstart-streamstream. - To delete the stream, click Actions, click Delete stream, and then follow the instructions.
- In the Google Cloud console, go to the Applications page.
-
Locate
your
quickstart-appapp. - To delete the app, click Actions, click Delete application, and then follow the instructions.
- Consultez la section Configurer un projet et un environnement de développement avant d'utiliser les outils de ligne de commande.
- Apprenez à ingérer des données dans votre nouvelle application et découvrez les autres composants que vous pouvez ajouter dans la section Créer une application.
- Découvrez les autres options de stockage et de traitement des résultats dans Associer la sortie de l'application à une destination de données.
- Découvrez comment accéder aux données de l'entrepôt de données sur les recherches dans la console.
- Apprenez-en plus sur les pratiques d'IA responsable.
Créer une application de détecteur d'objets
Une fois votre environnement configuré, vous pouvez créer votre application.
Dans la console Google Cloud , une application est représentée sous forme de graphique. De plus, dans Vertex AI Vision, un graphique d'application doit comporter au moins deux nœuds : un nœud de source vidéo (flux) et au moins un autre nœud (un modèle de traitement ou une destination de sortie).
Créer une application vide
Avant de pouvoir remplir le graphique de l'application, vous devez d'abord créer une application vide.
Console
Créez une application dans la console Google Cloud .
Ajouter des nœuds de composant d'application
Une fois l'application vide créée, vous pouvez ajouter les trois nœuds au graphique de l'application : le nœud d'ingestion qui peut recevoir des données de flux, le nœud de traitement qui effectue une tâche d'image informatique sur les données et un nœud de destination des données, qui est une destination de stockage d'entrepôt dans cet exemple.
Console
Ajoutez des nœuds de composant à votre application dans la console.
Ajouter un nœud d'ingestion de données
Ajouter un nœud de traitement des données
Ajouter un nœud de stockage de données
Déployer votre application pour l'utiliser
Une fois que vous avez créé votre application de bout en bout avec tous les composants nécessaires, la dernière étape pour l'utiliser consiste à la déployer.Console
Félicitations ! Vous venez de créer et de déployer votre première application Vertex AI Vision. La création et le déploiement d'une application sont les premières étapes pour ingérer et utiliser des données multimédias traitées avec Vertex AI Vision.
Effectuer un nettoyage
Pour éviter que les ressources utilisées dans ce guide de démarrage rapide soient facturées sur votre compte Google Cloud, supprimez le projet contenant les ressources, ou conservez le projet et supprimez chaque ressource individuellement.