Crear una aplicación en la consola
Aprende a crear una aplicación sencilla de detección de objetos de Vertex AI Vision en laGoogle Cloud consola.
Para seguir las instrucciones paso a paso de esta tarea directamente en la Google Cloud consola, haga clic en Ayúdame:
Antes de empezar
- Sign in to your Google Cloud account. If you're new to Google Cloud, create an account to evaluate how our products perform in real-world scenarios. New customers also get $300 in free credits to run, test, and deploy workloads.
-
In the Google Cloud console, on the project selector page, select or create a Google Cloud project.
Roles required to select or create a project
- Select a project: Selecting a project doesn't require a specific IAM role—you can select any project that you've been granted a role on.
-
Create a project: To create a project, you need the Project Creator
(
roles/resourcemanager.projectCreator), which contains theresourcemanager.projects.createpermission. Learn how to grant roles.
-
Verify that billing is enabled for your Google Cloud project.
-
Enable the Vision AI API.
Roles required to enable APIs
To enable APIs, you need the Service Usage Admin IAM role (
roles/serviceusage.serviceUsageAdmin), which contains theserviceusage.services.enablepermission. Learn how to grant roles. -
In the Google Cloud console, on the project selector page, select or create a Google Cloud project.
Roles required to select or create a project
- Select a project: Selecting a project doesn't require a specific IAM role—you can select any project that you've been granted a role on.
-
Create a project: To create a project, you need the Project Creator
(
roles/resourcemanager.projectCreator), which contains theresourcemanager.projects.createpermission. Learn how to grant roles.
-
Verify that billing is enabled for your Google Cloud project.
-
Enable the Vision AI API.
Roles required to enable APIs
To enable APIs, you need the Service Usage Admin IAM role (
roles/serviceusage.serviceUsageAdmin), which contains theserviceusage.services.enablepermission. Learn how to grant roles. Abre la pestaña Aplicaciones del panel de control de Vertex AI Vision.
Haz clic en el botón Crear.
Introduce
quickstart-appcomo nombre de la aplicación y elige tu región.Haz clic en Crear.
Abre la pestaña Aplicaciones del panel de control de Vertex AI Vision.
En la línea
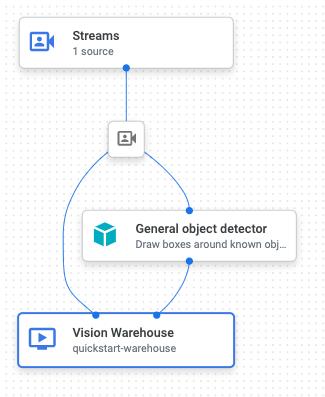
quickstart-app, selecciona Ver gráfico. De esta forma, accederás a la visualización del gráfico de la canalización de procesamiento.Para añadir un nodo de flujo de entrada, selecciona la opción Streams (Flujos) en la sección Connectors (Conectores) del menú lateral.
En la sección Fuente del menú Stream que se abre, selecciona Añadir streams.
En el menú Añadir emisiones, elige Registrar nuevas emisiones y añade
quickstart-streamcomo nombre de la emisión.Para añadir el flujo al gráfico de la aplicación, haz clic en Añadir flujos.
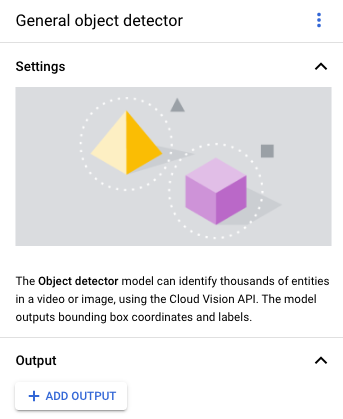
Para añadir el nodo del modelo de detector de objetos, selecciona la opción Detector de objetos en la sección Modelos preentrenados del menú lateral.
Para añadir el nodo de destino de salida (almacenamiento), selecciona la opción Vertex AI Vision's Media Warehouse (Almacén de contenido multimedia de Vertex AI Vision) en la sección Connectors (Conectores) del menú lateral.
En el menú Media Warehouse de Vertex AI Vision, haz clic en Conectar almacén.
En el menú Conectar almacén, selecciona Crear almacén. Ponle el nombre
quickstart-warehouseal almacén y deja la duración del TTL en 14 días.Haz clic en el botón Crear para añadir el almacén.
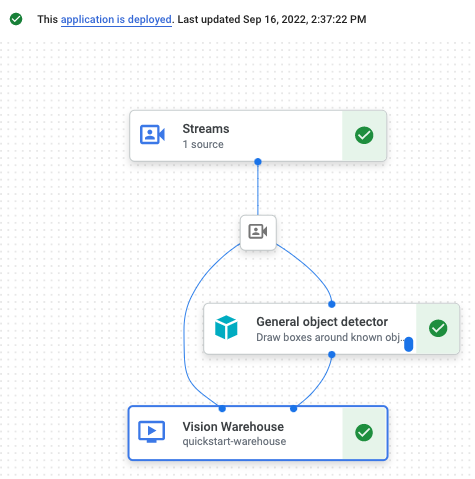
Abre la pestaña Aplicaciones del panel de control de Vertex AI Vision.
Selecciona Ver gráfico junto a la aplicación
quickstart-appde la lista.En la página del creador de gráficos de aplicaciones, haz clic en el botón Implementar.
En el cuadro de diálogo de confirmación que aparece, selecciona Implementar.
La operación de implementación puede tardar varios minutos en completarse. Cuando finalice la implementación, aparecerán marcas de verificación verdes junto a los nodos.
- In the Google Cloud console, go to the Manage resources page.
- In the project list, select the project that you want to delete, and then click Delete.
- In the dialog, type the project ID, and then click Shut down to delete the project.
- In the Google Cloud console, go to the Warehouses page.
-
Locate
your
quickstart-warehousewarehouse. - To delete the warehouse, click Actions, click Delete warehouse, and then follow the instructions.
- In the Google Cloud console, go to the Streams page.
-
Locate
your
quickstart-streamstream. - To delete the stream, click Actions, click Delete stream, and then follow the instructions.
- In the Google Cloud console, go to the Applications page.
-
Locate
your
quickstart-appapp. - To delete the app, click Actions, click Delete application, and then follow the instructions.
- Lee el artículo Configurar un proyecto y un entorno de desarrollo antes de usar las herramientas de línea de comandos.
- Consulta cómo ingerir datos en tu nueva aplicación y lee sobre otros componentes que puedes añadir en Crear una aplicación.
- Consulta otras opciones de almacenamiento y tratamiento de resultados en Conectar los resultados de la aplicación con un destino de datos .
- Consulta cómo buscar datos de Search Warehouse en la consola.
- Consulta más información sobre las prácticas de IA responsable.
Crear una aplicación de detección de objetos
Una vez que hayas configurado tu entorno, podrás crear tu aplicación.
En la Google Cloud consola, una aplicación se representa como un gráfico. Además, en Vertex AI Vision, un gráfico de aplicación debe tener al menos dos nodos: un nodo de origen de vídeo (flujo) y al menos otro nodo (un modelo de procesamiento o un destino de salida).
Crear una aplicación vacía
Antes de rellenar el gráfico de aplicaciones, debes crear una aplicación vacía.
Consola
Crea una aplicación en la Google Cloud consola.
Añadir nodos de componentes de aplicaciones
Después de crear la aplicación vacía, puedes añadir los tres nodos al gráfico de la aplicación: el nodo de ingestión, que puede recibir datos de streaming, el nodo de procesamiento, que realiza una tarea de imagen por ordenador en los datos, y un nodo de destino de datos, que en este ejemplo es un destino de almacenamiento de almacén.
Consola
Añade nodos de componentes a tu aplicación en la consola.
Añadir un nodo de ingestión de datos
Añadir un nodo de procesamiento de datos
Añadir un nodo de almacenamiento de datos
Desplegar una aplicación para usarla
Una vez que hayas creado tu aplicación integral con todos los componentes necesarios, el último paso para usarla es implementarla.Consola
¡Enhorabuena! Acabas de crear y desplegar tu primera aplicación de Vertex AI Vision. Crear y desplegar una aplicación son los primeros pasos para ingerir y usar datos multimedia procesados con Vertex AI Vision.
Limpieza
Para evitar que los recursos utilizados en esta guía de inicio rápido se cobren en tu cuenta de Google Cloud, elimina el proyecto que contiene los recursos o conserva el proyecto y elimina los recursos.