データセットの管理
データセットには、ラベルを付けるコンテンツ タイプの代表的なサンプルと、モデルで使用する境界ボックスのラベルが含まれます。このデータセットを入力値として利用し、モデルをトレーニングします。
データセットの主な作成手順は次のとおりです。
- データセットを作成し、各項目に複数のラベルを付けるかどうかを指定します。
- データセットにデータ項目をインポートします。
モデルをトレーニングする前にデータを準備してください。
1 つのプロジェクトに複数のデータセットを含めることができます。各データセットはそれぞれ別個のモデルのトレーニングに使用します。使用可能なデータセットの一覧の取得と、不要になったデータセットの削除ができます。
データセットの作成
モデルを作成するには、まず空のデータセットを作成します。作成したデータセットには、最終的にそのモデルのトレーニング データが格納されます。
ウェブ UI
AutoML Video Object Tracking UI を使用すると、新しいデータセットの作成とそのデータセットへの項目のインポートを同じページで行えます。- AutoML Video Object Tracking UI を開きます。[データセット] ページに、現在のプロジェクトにこれまでに作成されたデータセットのステータスが表示されます。
 別のプロジェクトのデータセットを追加するには、タイトルバーの右上にあるプルダウン リストからプロジェクトを選択します。
 - [データセット] ページで、[データセットを作成] をクリックします。
- [新しいデータセットの作成] ダイアログで、次の操作を行います。
- このデータセットの名前を指定します。
- [動画オブジェクト トラッキング] を選択します。
- [データセットを作成] をクリックします。
- データセットのページで、トレーニング データの URI を含む CSV ファイルの Cloud Storage URI を指定します。先頭の
gs://は外してください。 - 同じページで [続行] をクリックしてトレーニングを開始します。
REST
次の例では、オブジェクト トラッキングのユースケースをサポートする my_dataset01 という名前のデータセットを作成します。新しく作成されたデータセットには、項目をインポートするまでデータは含まれません。
コマンドのレスポンスから新しいデータセットの "name" をメモしておきます。これはデータセットへの項目のインポートやモデルのトレーニングなどの操作で使用します。
リクエストのデータを使用する前に、次のように置き換えます。
- dataset-name: ターゲット データセットの名前。
例:my_dataset_01 - 注:
- project-number: プロジェクトの番号。
- location-id: アノテーションを実行する Cloud リージョン。サポート対象のクラウド リージョンは
us-east1、us-west1、europe-west1、asia-east1です。リージョンを指定しないと、動画ファイルの場所に基づいてリージョンが決まります。
HTTP メソッドと URL:
POST https://automl.googleapis.com/v1beta1/projects/project-number/locations/location-id/datasets
リクエストの本文(JSON):
{
    "displayName": "dataset-name",
    "videoObjectTrackingDatasetMetadata": { }
}
リクエストを送信するには、次のいずれかのオプションを選択します。
curl
リクエスト本文を request.json という名前のファイルに保存して、次のコマンドを実行します。
curl -X POST \
     -H "Authorization: Bearer $(gcloud auth print-access-token)" \
     -H "x-goog-user-project: project-number" \
     -H "Content-Type: application/json; charset=utf-8" \
     -d @request.json \
     "https://automl.googleapis.com/v1beta1/projects/project-number/locations/location-id/datasets"
PowerShell
リクエスト本文を request.json という名前のファイルに保存して、次のコマンドを実行します。
$cred = gcloud auth print-access-token
$headers = @{ "Authorization" = "Bearer $cred"; "x-goog-user-project" = "project-number" }

Invoke-WebRequest `
    -Method POST `
    -Headers $headers `
    -ContentType: "application/json; charset=utf-8" `
    -InFile request.json `
    -Uri "https://automl.googleapis.com/v1beta1/projects/project-number/locations/location-id/datasets" | Select-Object -Expand Content
VOT12345.... です。
Java
AutoML Video Object Tracking への認証を行うには、アプリケーションのデフォルト認証情報を設定します。 詳細については、ローカル開発環境の認証の設定をご覧ください。
Node.js
AutoML Video Object Tracking への認証を行うには、アプリケーションのデフォルト認証情報を設定します。 詳細については、ローカル開発環境の認証の設定をご覧ください。
Python
AutoML Video Object Tracking への認証を行うには、アプリケーションのデフォルト認証情報を設定します。 詳細については、ローカル開発環境の認証の設定をご覧ください。
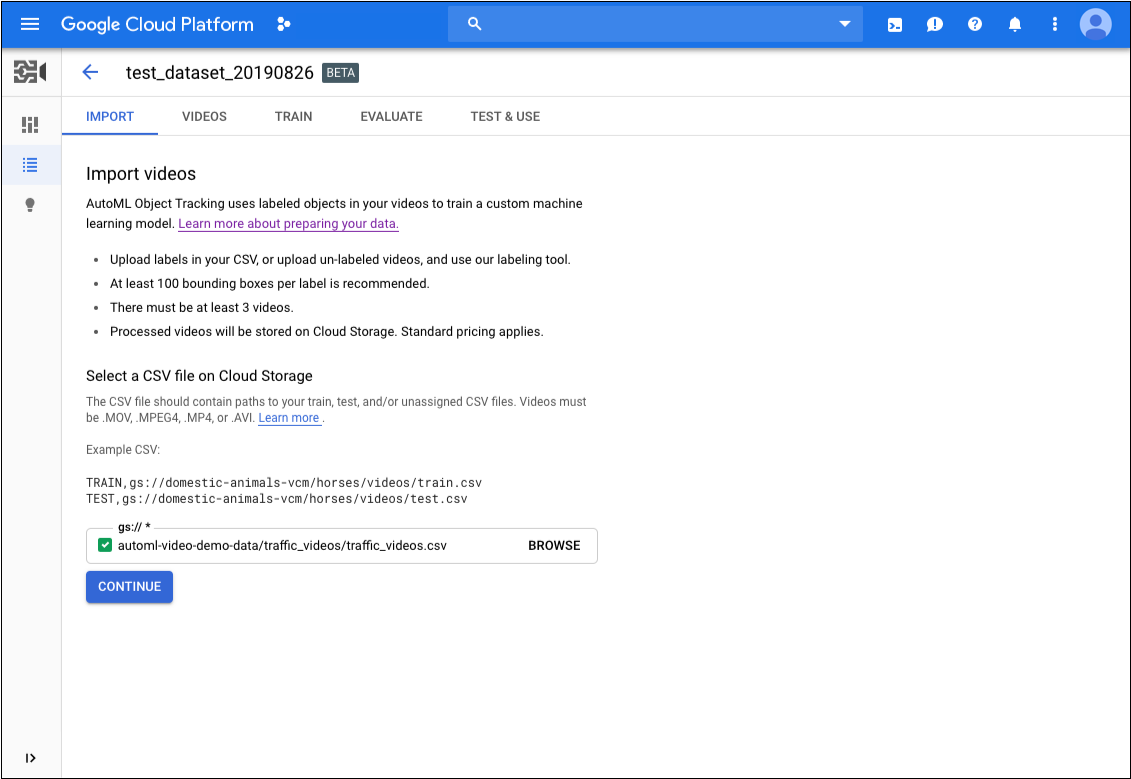
データセットへの項目のインポート
データセットを作成したら、Cloud Storage バケットに保存されている CSV ファイルからラベル付きデータをインポートできます。データの準備とインポート用の CSV ファイルの作成の詳細については、トレーニング データの準備をご覧ください。
空のデータセットに項目をインポートすることも、既存のデータセットに追加項目をインポートすることもできます。
ウェブ UI
通常は、データセットを作成するときにデータをインポートします。ただし、データセットの作成後にデータをインポートする必要がある場合は、次の操作を行います。
- AutoML Video Object Tracking UI を開きます。[データセット] ページに、現在のプロジェクトにこれまでに作成されたデータセットのステータスが表示されます。
- リストから、データのインポート先となるデータセットをクリックします。
- [インポート] タブで、トレーニング データの URI を含む CSV ファイルの Cloud Storage URI を指定します。先頭の
gs://は外してください。 - また、データセットの [インポート] タブで、[続行] をクリックしてインポートを開始します。
REST
トレーニング データをインポートするには、importData メソッドを使用します。この方法では、次の 2 つのパラメータを指定する必要があります。
リクエストのデータを使用する前に、次のように置き換えます。
- dataset-id: データセットの IDこの ID は、データセットの名前の最後の要素です。例:
- データセット名:
projects/project-number/locations/location-id/datasets/3104518874390609379 - データセット ID:
3104518874390609379
- データセット名:
- bucket-name: モデル トレーニング ファイルリストの CSV ファイルを保存した Cloud Storage バケットの名前に置き換えます。
- csv-file-name: モデル トレーニング ファイルリストの CSV ファイル名に置き換えます。
- 注:
- project-number: プロジェクトの番号。
- location-id: アノテーションを実行する Cloud リージョン。サポート対象のクラウド リージョンは
us-east1、us-west1、europe-west1、asia-east1です。リージョンを指定しないと、動画ファイルの場所に基づいてリージョンが決まります。
HTTP メソッドと URL:
POST https://automl.googleapis.com/v1beta1/projects/project-number/locations/location-id/datasets/dataset-id:importData
リクエストの本文(JSON):
{
  "inputConfig": {
    "gcsSource": {
      "inputUris": ["gs://bucket-name/csv-file-name.csv"]
    }
  }
}
リクエストを送信するには、次のいずれかのオプションを選択します。
curl
リクエスト本文を request.json という名前のファイルに保存して、次のコマンドを実行します。
curl -X POST \
     -H "Authorization: Bearer $(gcloud auth print-access-token)" \
     -H "x-goog-user-project: project-number" \
     -H "Content-Type: application/json; charset=utf-8" \
     -d @request.json \
     "https://automl.googleapis.com/v1beta1/projects/project-number/locations/location-id/datasets/dataset-id:importData"
PowerShell
リクエスト本文を request.json という名前のファイルに保存して、次のコマンドを実行します。
$cred = gcloud auth print-access-token
$headers = @{ "Authorization" = "Bearer $cred"; "x-goog-user-project" = "project-number" }

Invoke-WebRequest `
    -Method POST `
    -Headers $headers `
    -ContentType: "application/json; charset=utf-8" `
    -InFile request.json `
    -Uri "https://automl.googleapis.com/v1beta1/projects/project-number/locations/location-id/datasets/dataset-id:importData" | Select-Object -Expand Content
VOT7506374678919774208 を含むレスポンスを示しています。
Java
AutoML Video Object Tracking への認証を行うには、アプリケーションのデフォルト認証情報を設定します。 詳細については、ローカル開発環境の認証の設定をご覧ください。
Node.js
AutoML Video Object Tracking への認証を行うには、アプリケーションのデフォルト認証情報を設定します。 詳細については、ローカル開発環境の認証の設定をご覧ください。
Python
AutoML Video Object Tracking への認証を行うには、アプリケーションのデフォルト認証情報を設定します。 詳細については、ローカル開発環境の認証の設定をご覧ください。
トレーニング項目のラベル付け
モデルのトレーニングで役立つように、データセット内の各項目には少なくとも 1 つの境界ボックスと 1 つのカテゴリラベルが割り当てられている必要があります。トレーニング項目には、次の 2 つの方法でラベルと境界ボックスを付けることができます。
- CSV ファイルにラベルと境界ボックスを含める
- AutoML Video Object Tracking UI でラベルと境界ボックスを適用する
.csv ファイルで項目にラベルを付ける方法については、トレーニング データの準備をご覧ください。
AutoML Video Object Tracking UI で項目にラベルを付けるには、データセットの一覧ページからデータセットを選択してデータセットの詳細を表示します。選択したデータセットの表示名がタイトルバーに表示され、データセット内の個々の項目がラベルと一緒にページに一覧表示されます。 左側のナビゲーション バーには、ラベル付き項目数とラベルなし項目数の要約が表示されます。項目の一覧をラベル別にフィルタすることもできます。

ラベルのない動画へのラベルや境界ボックスの割り当て、または動画ラベルと境界ボックスを変更するには、次の操作を行います。
- データセットのページで、ラベルを追加する動画をクリックします。
動画のページで次の操作を行います。
- ラベルを付ける項目が表示されるまで、動画を実行します。
- カーソルをドラッグしてアイテムの周囲に境界ボックスを描画します。
- 境界ボックスを描画したら、使用するラベルを選択します。
- [保存] をクリックします。
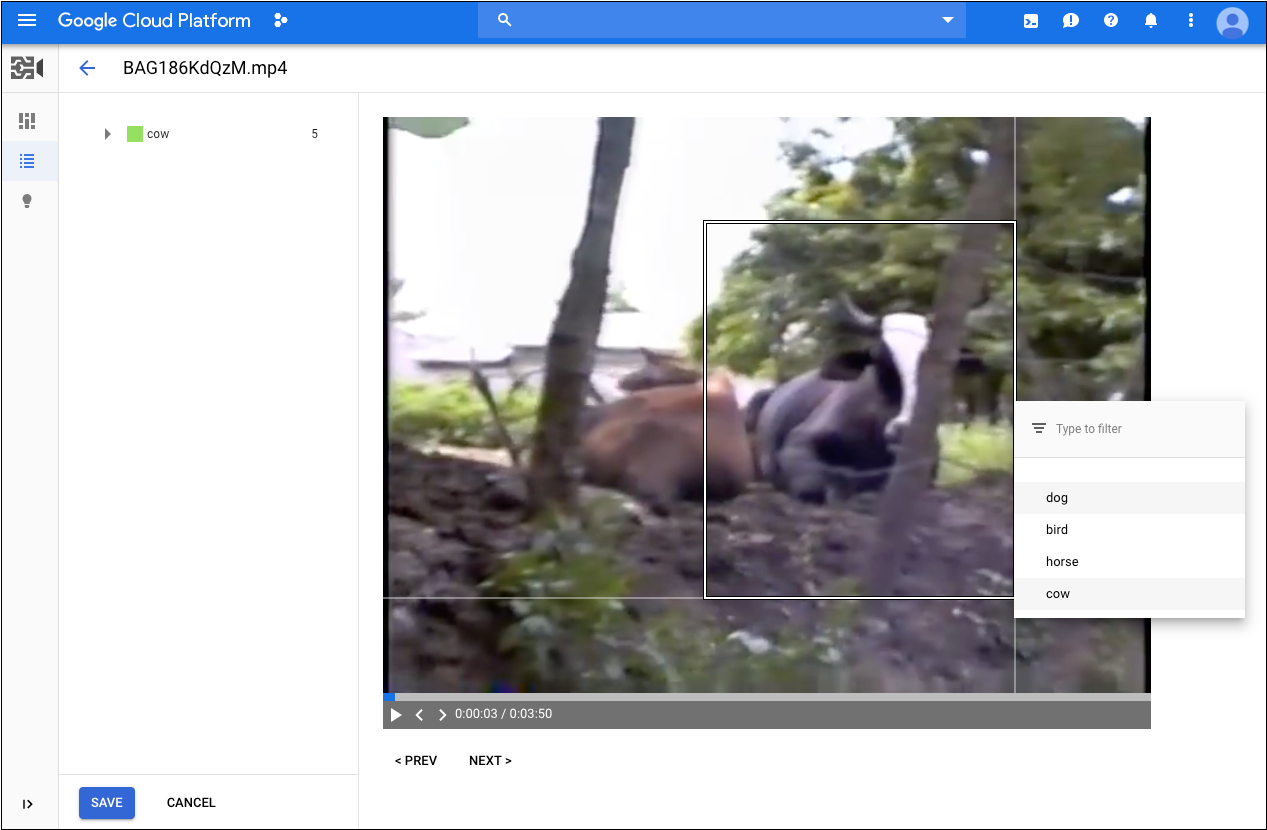
データセットに新しいラベルを追加するには、データセットのページで、既存ラベルの一覧の上部にある [Filter labels] の横のその他のメニューをクリックし、[Add new label] をクリックします。
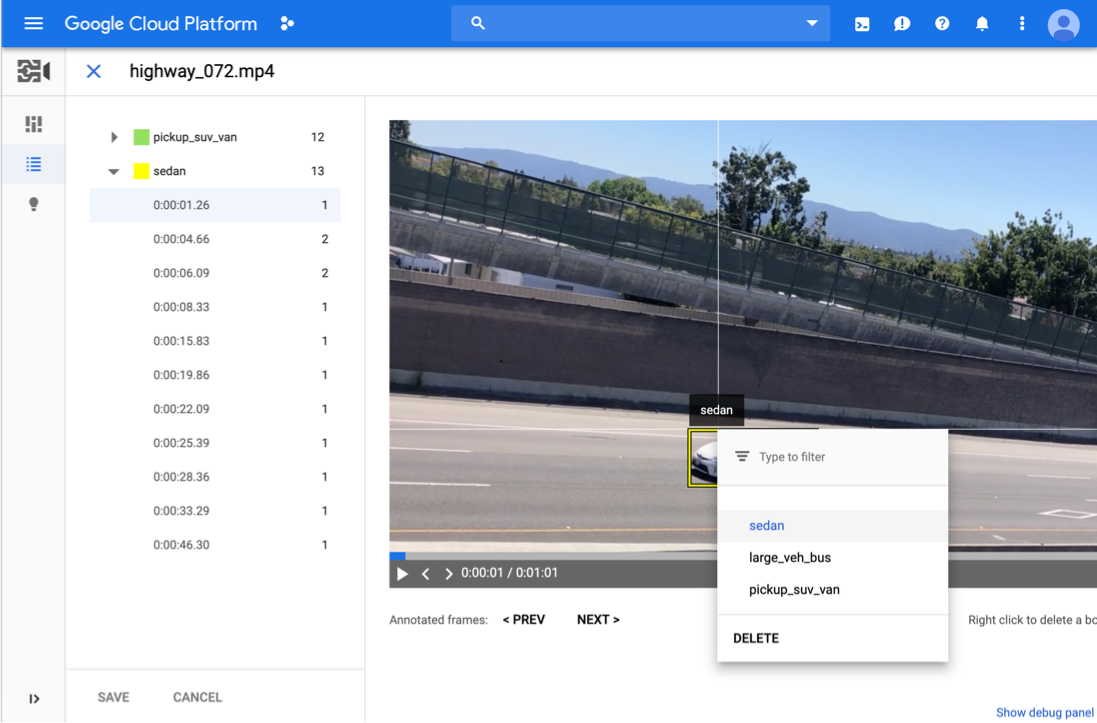
データ内のラベルの変更
データセット内の動画に適用されているラベルを変更することもできます。AutoML Video Object Tracking UI で、次の操作を行います。
- データセットのページで、ラベルを変更する動画をクリックします。
動画のページで次の操作を行います。
- 左側のラベルのリストで、変更するラベルを選択します。
- 動画のプレビューで、動画の境界ボックスを右クリックして、目的のラベルを選択します。
- [保存] をクリックします。
データセットの一覧表示
1 つのプロジェクトには多数のデータセットを含めることができます。このセクションでは、プロジェクトで使用できるデータセットを一覧表示する方法を説明します。
ウェブ UI
AutoML Video Object Tracking UI を使って利用可能なデータセットを一覧表示するには、[データセット] ページに移動します。
別のプロジェクトのデータセットを表示するには、タイトルバーの右上にあるプルダウン リストからプロジェクトを選択します。
REST
次のcurl または PowerShell コマンドを使用して、データセットのリストと、データセットにインポートされたサンプル動画の数を取得します。
リクエストのデータを使用する前に、次のように置き換えます。
- project-number: プロジェクトの数
- location-id: アノテーションを実行する Cloud リージョン。サポート対象のクラウド リージョンは
us-east1、us-west1、europe-west1、asia-east1です。リージョンを指定しないと、動画ファイルの場所に基づいてリージョンが決まります。
HTTP メソッドと URL:
GET https://automl.googleapis.com/v1beta1/projects/project-number/locations/location-id/datasets
リクエストを送信するには、次のいずれかのオプションを選択します。
curl
次のコマンドを実行します。
curl -X GET \
     -H "Authorization: Bearer $(gcloud auth print-access-token)" \
     -H "x-goog-user-project: project-number" \
     "https://automl.googleapis.com/v1beta1/projects/project-number/locations/location-id/datasets
"
PowerShell
次のコマンドを実行します。
$cred = gcloud auth print-access-token
$headers = @{ "Authorization" = "Bearer $cred"; "x-goog-user-project" = "project-number" }

Invoke-WebRequest `
    -Method GET `
    -Headers $headers `
    -Uri "https://automl.googleapis.com/v1beta1/projects/project-number/locations/location-id/datasets
" | Select-Object -Expand Content
VOT3940649673949184000 は、リクエストに対して作成され、オペレーション開始時にレスポンスで指定された、長時間実行オペレーションのオペレーション ID です。
Java
AutoML Video Object Tracking への認証を行うには、アプリケーションのデフォルト認証情報を設定します。 詳細については、ローカル開発環境の認証の設定をご覧ください。
Node.js
AutoML Video Object Tracking への認証を行うには、アプリケーションのデフォルト認証情報を設定します。 詳細については、ローカル開発環境の認証の設定をご覧ください。
Python
AutoML Video Object Tracking への認証を行うには、アプリケーションのデフォルト認証情報を設定します。 詳細については、ローカル開発環境の認証の設定をご覧ください。
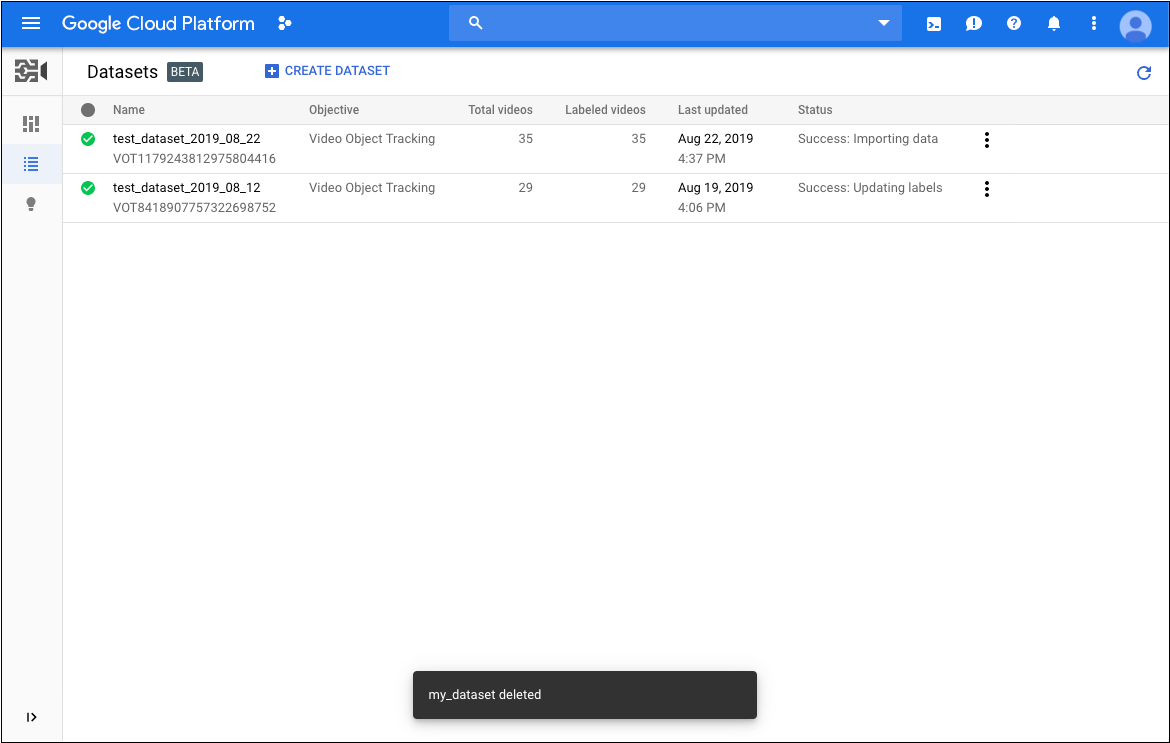
データセットの削除
次のコードは、データセットを削除する方法を示しています。
ウェブ UI
-
AutoML Video Object Tracking UI で [データセット] ページに移動します。
- 削除する行の右端にあるその他メニューをクリックし、[Delete dataset] を選択します。
- 確認ダイアログ ボックスで [確認] をクリックします。
REST
リクエストのデータを使用する前に、次のように置き換えます。
- project-number: プロジェクトの数
- location-id: アノテーションを実行する Cloud リージョン。サポート対象のクラウド リージョンは
us-east1、us-west1、europe-west1、asia-east1です。リージョンを指定しないと、動画ファイルの場所に基づいてリージョンが決まります。 - datase-id: データセット ID の ID に置き換えます。
HTTP メソッドと URL:
DELETE https://automl.googleapis.com/v1beta1/projects/project-number/locations/location-id/datasets/dataset-id
リクエストを送信するには、次のいずれかのオプションを展開します。
成功したことを示すステータス コード(2xx)と空のレスポンスが返されます。
Java
AutoML Video Object Tracking への認証を行うには、アプリケーションのデフォルト認証情報を設定します。 詳細については、ローカル開発環境の認証の設定をご覧ください。
Node.js
AutoML Video Object Tracking への認証を行うには、アプリケーションのデフォルト認証情報を設定します。 詳細については、ローカル開発環境の認証の設定をご覧ください。
Python
AutoML Video Object Tracking への認証を行うには、アプリケーションのデフォルト認証情報を設定します。 詳細については、ローカル開発環境の認証の設定をご覧ください。