用語集の作成と使用(高度な機能)
用語集は、お客様のドメイン固有の用語を統一して翻訳するために Cloud Translation API が使用するカスタム辞書です。用語集には通常、固有表現の対訳も含まれます。
用語集は次のようなユースケースで使用できます。
- 商品名: たとえば、「Google Home」は「Google Home」に翻訳する必要があります。
- あいまいな単語: たとえば、「bat」という単語は、スポーツ用品や動物を指します。スポーツに関する単語を翻訳する場合は、用語集を使用して、動物の「コウモリ」ではなく「バット」というスポーツ用語としての翻訳を Cloud Translation API に渡すことをおすすめします。
- 借用語: たとえば、フランス語の「bouillabaisse」は英語の「bouillabaisse」に翻訳されます。英語では、19 世紀にフランス語から「bouillabaisse」という語を取り入れました。フランスの文化的背景のない英語スピーカーは、bouillabaisse が魚の煮込み料理であるとは知らないかもしれません。用語集は、フランス語の「bouillabaisse」が英語の「fish stew」に翻訳されるように翻訳をオーバーライドできます。
始める前に
Cloud Translation API を使用するには、Cloud Translation API が有効になっているプロジェクトと適切な認証情報が必要です。また、この API の呼び出しを支援する一般的なプログラミング言語のクライアント ライブラリをインストールすることもできます。詳細については、設定ページをご覧ください。
必要な権限
用語集を操作するには、サービス アカウントに用語集に固有の権限が必要です。サービス アカウントにロールを付与するには、Cloud Translation API 編集者(roles/cloudtranslate.editor)などの IAM 事前定義ロールの 1 つを使用するか、必要な権限を付与するカスタムロールを作成します。Cloud Translation API のすべての権限は、IAM の権限のリファレンスで確認できます。Cloud Translation の権限は cloudtranslate で始まります。
用語集を作成するには、用語集ファイルが存在する Cloud Storage バケット内のオブジェクトを読み取る権限も必要です。サービス アカウントにロールを付与するには、ストレージ オブジェクト閲覧者(roles/storage.objectViewer)などの IAM 事前定義ロールの 1 つを使用するか、オブジェクトを読み取る権限を付与するカスタムロールを作成します。
ロールにアカウントを追加する方法については、リソースに対するアクセス権の付与、変更、取り消しをご覧ください。
用語集を作成する
用語集には、単一のトークン(単語)または短いフレーズ(通常は 5 単語未満)が登録されています。用語集を使用する主な手順は次のとおりです。
- 用語集ファイルを作成する
- Cloud Translation API を使用して用語集リソースを作成する
- 翻訳を依頼するときに、使用する用語集を指定する
1 つのプロジェクトで複数の用語集を使用することもあります。この場合、利用可能な用語集のリストを取得したり、不要になった用語集を削除したりできます。
ストップ語
Cloud Translation は、用語集に含まれている一部の用語を無視します。このような用語をストップ語と呼びます。Cloud Translation でストップ語を翻訳すると、一致する用語集エントリは無視されます。すべてのストップ語のリストについては、用語集のストップ語をご覧ください。
用語集ファイルを作成する
基本的に、用語集は 1 つの用語と各国語の訳語が 1 行に記述されているテキスト ファイルです。用語集には、ソース言語とターゲット言語のペアが 1 つだけの用語集と、1 つの用語が複数の言語で定義されている多言語の用語セットがありますが、Cloud Translation API はこの両方をサポートしています。
用語集入力ファイル内の用語の合計数は、すべての言語の合計で 1,040 万(10,485,760)UTF-8 バイト以下にしてください。用語集の用語は、1 件につき 1024 UTF-8 バイト未満にする必要があります。1,024 バイトより長い用語は無視されます。
デフォルトでは、用語集の一致は大文字と小文字が区別されます。用語集を適用する場合、すべてのエントリの大文字と小文字の区別は無視できます。大文字と小文字を区別する用語と区別しない用語が混在している場合は、デフォルトの動作を使用します。区別しない用語については、用語集に両方のフォームを含めてください。
単一言語ペアの用語集
Cloud Translation API は TSV、CSV、TMX ファイルに対応しています。
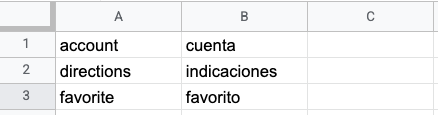
TSV と CSV
タブ区切り値(TSV)とカンマ区切り値(CSV)の場合、各行には 1 つのタブ(\t)またはカンマ(,)で区切られた用語のペアが含まれます。次の例に示すように、最初の列にはソース言語の用語が含まれ、2 番目の列にはターゲット言語の用語が含まれます。
Translation Memory eXchange(TMX)
Translation Memory eXchange(TMX)は、原文と訳文を提供する標準的な XML 形式です。Cloud Translation API は、TMX バージョン 1.4 形式の入力ファイルをサポートしています。必須となる構造を次の例で示します。
<?xml version='1.0' encoding='utf-8'?>
<!DOCTYPE tmx SYSTEM "tmx14.dtd">
<tmx version="1.4">
  <header segtype="sentence" o-tmf="UTF-8"
  adminlang="en" srclang="en" datatype="PlainText"/>
  <body>
    <tu>
      <tuv xml:lang="en">
        <seg>account</seg>
      </tuv>
      <tuv xml:lang="es">
        <seg>cuenta</seg>
      </tuv>
    </tu>
    <tu>
      <tuv xml:lang="en">
        <seg>directions</seg>
      </tuv>
      <tuv xml:lang="es">
        <seg>indicaciones</seg>
      </tuv>
    </tu>
  </body>
</tmx>
整形式の TMX ファイルの <header> 要素は、srclang 属性を使用してソース言語を指定しなければなりません。また、すべての <tuv> 要素は、xml:lang 属性を使用して、含まれるテキストの言語を指定する必要があります。ソース言語とターゲット言語の指定には、ISO-639 コードを使用します。
すべての <tu> 要素には、同じソース言語とターゲット言語での <tuv> 要素のペアが含まれます。1 つの <tu> 要素に 3 つ以上の <tuv> 要素が含まれる場合、Cloud Translation API はソース言語に一致する最初の <tuv> とターゲット言語に一致する最初の同要素のみを処理し、残りは無視します。<tu> 要素の中に対応する <tuv> 要素のペアがない場合、Cloud Translation API はその無効な <tu> 要素をスキップします。
Cloud Translation API は、<seg> 要素の前後のマークアップ タグを削除してから、それを処理します。1 つの <tuv> 要素に複数の <seg> 要素が含まれている場合、Cloud Translation API はスペースを間に挿入してそれらのテキストを 1 つの要素に連結します。
ファイルに上記以外の XML タグが含まれている場合、Cloud Translation API はこれらのタグを無視します。
ファイルが XML と TMX の正しい形式に従っていない場合(たとえば、終了タグや <tmx> 要素がない場合)、Cloud Translation API はファイルの処理を中止します。Cloud Translation API は、1,024 個を超える無効な <tu> 要素をスキップした場合も処理を中止します。
多言語の用語セット(CSV)
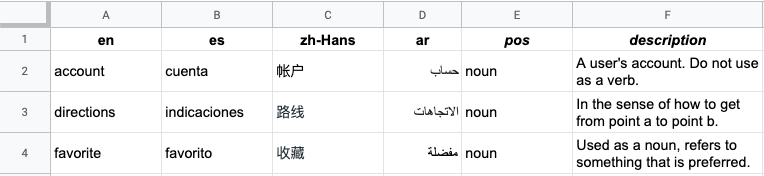
多言語の用語セットでは、Cloud Translation API は CSV 形式のファイルのみに対応しています。多言語の用語セットを定義するには、複数列の CSV ファイルを作成します。1 行に 1 つの用語を定義し、各国語の対訳を同じ行に記述します。
ファイルの先頭行は、各列の言語を表すヘッダーになります。言語の指定には ISO-639 または BCP-47 言語コードを使用します。また、品詞(pos)や説明(description)の列を追加することもできます。現在、アルゴリズムでは pos の情報は使用されず、pos の値は検証されません。
以降の行では、ヘッダーに指定されている言語の順番で対訳が並びます。1 つの用語に対して、すべての言語で訳語があるとは限りません。その場合、該当する列を空白にします。
用語集リソースを作成する
多言語の用語セットを準備したら、用語集リソースを作成して Cloud Translation API で用語集ファイルを使用できるようにします。
単一言語ペアの用語集
単一言語ペアの用語集の作成時は、ソース言語(source_language_code)とターゲット言語(target_language_code)を指定して言語ペア(language_pair)を示す必要があります。次の例では、REST API とコマンドラインを使用していますが、クライアント ライブラリを使用して単一言語ペアの用語集を作成することもできます。
REST
新しい用語集を作成する場合は、用語集 ID(リソース名)を指定します。例:projects/my-project/locations/us-central1/glossaries/my-en-to-ru-glossary
my-project は PROJECT_NUMBER_OR_ID で、my-en-ru-glossary はユーザーが指定した glossary-id です。
リクエストのデータを使用する前に、次のように置き換えます。
- PROJECT_NUMBER_OR_ID: Google Cloud プロジェクトの数字または英数字の ID
- glossary-id: 用語集 ID(例: my_en_ru_glossary)
- bucket-name: 用語集ファイルが存在するバケットの名前
- glossary-filename: 用語集のファイル名
HTTP メソッドと URL:
POST https://translation.googleapis.com/v3/projects/PROJECT_NUMBER_OR_ID/locations/us-central1/glossaries
リクエストの本文(JSON):
{
  "name":"projects/PROJECT_NUMBER_OR_ID/locations/us-central1/glossaries/glossary-id",
  "languagePair": {
    "sourceLanguageCode": "en",
    "targetLanguageCode": "ru"
    },
  "inputConfig": {
    "gcsSource": {
      "inputUri": "gs://bucket-name/glossary-filename"
    }
  }
}
リクエストを送信するには、次のいずれかのオプションを展開します。
次のような JSON レスポンスが返されます。
{
  "name": "projects/project-number/locations/us-central1/operations/operation-id",
  "metadata": {
    "@type": "type.googleapis.com/google.cloud.translation.v3beta1.CreateGlossaryMetadata",
    "name": "projects/project-number/locations/us-central1/glossaries/glossary-id",
    "state": "RUNNING",
    "submitTime": "2019-11-19T19:05:10.650047636Z"
  }
}
多言語用語セットの用語集
多言語用語セットを準備したら、用語集リソースを作成して Cloud Translation API で用語集ファイルを使用できるようにします。
REST
リクエストのデータを使用する前に、次のように置き換えます。
- PROJECT_NUMBER_OR_ID: Google Cloud プロジェクトの数字または英数字の ID
- glossary-id: 用語集 ID
- bucket-name: 用語集ファイルが存在するバケットの名前
- glossary-filename: 用語集のファイル名
HTTP メソッドと URL:
POST https://translation.googleapis.com/v3/projects/PROJECT_NUMBER_OR_ID/locations/us-central1/glossaries
リクエストの本文(JSON):
{
  "name":"projects/PROJECT_NUMBER_OR_ID/locations/us-central1/glossaries/glossary-id",
  "languageCodesSet": {
    "languageCodes": ["en", "en-GB", "ru", "fr", "pt-BR", "pt-PT", "es"]
  },
  "inputConfig": {
    "gcsSource": {
"inputUri": "gs://bucket-name/glossary-file-name"
    }
  }
}
リクエストを送信するには、次のいずれかのオプションを展開します。
次のような JSON レスポンスが返されます。
{
  "name": "projects/project-number/locations/us-central1/operations/20191103-09061569945989-5d937985-0000-21ac-816d-f4f5e80782d4",
  "metadata": {
    "@type": "type.googleapis.com/google.cloud.translation.v3beta1.CreateGlossaryMetadata",
    "name": "projects/project-number/locations/us-central1/glossaries/glossary-id",
    "state": "RUNNING",
    "submitTime": "2019-11-03T16:06:29.134496675Z"
  }
}
Go
このサンプルを試す前に、Cloud Translation クイックスタート: クライアント ライブラリの使用にある Go の設定手順を完了してください。詳細については、Cloud Translation Go API リファレンス ドキュメントをご覧ください。
Cloud Translation に対する認証を行うには、アプリケーションのデフォルト認証情報を設定します。詳細については、ローカル開発環境の認証を設定するをご覧ください。
Java
このサンプルを試す前に、Cloud Translation クイックスタート: クライアント ライブラリの使用にある手順で Java の設定を完了してください。詳細については、Cloud Translation Java API リファレンス ドキュメントをご覧ください。
Cloud Translation に対する認証を行うには、アプリケーションのデフォルト認証情報を設定します。詳細については、ローカル開発環境の認証を設定するをご覧ください。
Node.js
このサンプルを試す前に、Cloud Translation クイックスタート: クライアント ライブラリの使用にある手順で Node.js の設定を完了してください。詳細については、Cloud Translation Node.js API リファレンス ドキュメントをご覧ください。
Cloud Translation に対する認証を行うには、アプリケーションのデフォルト認証情報を設定します。詳細については、ローカル開発環境の認証を設定するをご覧ください。
Python
このサンプルを試す前に、Cloud Translation クイックスタート: クライアント ライブラリの使用にある手順で Python の設定を完了してください。詳細については、Cloud Translation Python API リファレンス ドキュメントをご覧ください。
Cloud Translation に対する認証を行うには、アプリケーションのデフォルト認証情報を設定します。詳細については、ローカル開発環境の認証を設定するをご覧ください。
その他の言語
C#: クライアント ライブラリ ページの C# の設定手順を行ってから、.NET 用の Cloud Translation リファレンス ドキュメントをご覧ください。
PHP: クライアント ライブラリ ページの PHP の設定手順を行ってから、PHP 用の Cloud Translation リファレンス ドキュメントをご覧ください。
Ruby: クライアント ライブラリ ページの Ruby の設定手順を行ってから、Ruby 用の Cloud Translation リファレンス ドキュメントをご覧ください。
オペレーションのステータス
用語集の作成は長時間実行されるオペレーションであるため、完了までにかなりの時間がかかることがあります。このオペレーションのステータスをポーリングして、オペレーションが完了しているかどうか確認できます。また、オペレーションをキャンセルすることもできます。
詳しくは、長時間実行オペレーションをご覧ください。
用語集を使用する
用語集を使用してテキストを翻訳する
Cloud Translation - Advanced では、テキストの翻訳に使用する翻訳モデルを明示的に指定する必要があります。翻訳 LLM、NMT、カスタムモデルは用語集と組み合わせて呼び出すことができますが、文脈を考慮した用語集による最新の品質向上をサポートしているのは翻訳 LLM のみです。この機能を使用するには、BOOLEAN_CONTEXTUAL: を TRUE に設定します。ドメイン固有の用語に使用する用語集を指定することもできます。
REST
この例では、デフォルトの NMT モデルと用語集を使用してテキストを翻訳します。
リクエストのデータを使用する前に、次のように置き換えます。
- PROJECT_NUMBER_OR_ID: Google Cloud プロジェクトの数字または英数字の ID。
- GLOSSARY_ID: 用語集 ID(例:
my-en-ru-glossary)。 - BOOLEAN: 一致の際に大文字と小文字が区別されないかどうか。デフォルト値は
falseです。 - BOOLEAN_CONTEXTUAL: 用語集の翻訳で文脈を考慮するかどうか。デフォルト値は
falseです。
HTTP メソッドと URL:
POST https://translation.googleapis.com/v3/projects/PROJECT_NUMBER_OR_ID/locations/us-central1:translateText
リクエストの本文(JSON):
{
  "sourceLanguageCode": "en",
  "targetLanguageCode": "ru",
  "contents": "Dr. Watson, please discard your trash. You've shared unsolicited email with me. Let's talk about spam and importance ranking in a confidential mode.",
  "glossaryConfig": {
    "glossary": "projects/project-number/locations/us-central1/glossaries/GLOSSARY_ID",
    "ignoreCase": BOOLEAN,
    "contextual_translation_enabled": BOOLEAN_CONTEXTUAL
  }
}
リクエストを送信するには、次のいずれかのオプションを展開します。
次のような JSON レスポンスが返されます。
{
  "glossaryTranslations": {
    "translatedText": "Доктор Ватсон, пожалуйста, откажитесь от своего мусора. Вы поделились нежелательной электронной почтой со я . Давайте поговорим о спаме и важности рейтинга в конфиденциальном режиме.",
    "glossaryConfig": {
      "glossary": "projects/project-number/locations/us-central1/glossaries/GLOSSARY_ID",
      "ignoreCase": BOOLEAN,
      "contextual_translation_enabled": BOOLEAN_CONTEXTUAL
    }
  },
  "translations": {
    "translatedText": "Доктор Ватсон, пожалуйста, откажитесь от своего мусора. Вы поделились нежелательной электронной почтой со мной. Давайте поговорим о спаме и важности рейтинга в конфиденциальном режиме.",
  }
}
translations フィールドには、用語集を適用する前の通常の機械翻訳が含まれています。glossaryTranslations フィールドには、用語集を適用した後の翻訳が含まれています。contextual_translation_enabled フィールドを true に設定すると、レスポンスには glossaryTranslations フィールドのみが含まれ、translations フィールドは含まれません。
Go
このサンプルを試す前に、Cloud Translation クイックスタート: クライアント ライブラリの使用にある手順で Go の設定を完了してください。詳細については、Cloud Translation Go API リファレンス ドキュメントをご覧ください。
Cloud Translation に対する認証を行うには、アプリケーションのデフォルト認証情報を設定します。詳細については、ローカル開発環境の認証を設定するをご覧ください。
Java
このサンプルを試す前に、Cloud Translation クイックスタート: クライアント ライブラリの使用にある手順で Java の設定を完了してください。詳細については、Cloud Translation Java API リファレンス ドキュメントをご覧ください。
Cloud Translation に対する認証を行うには、アプリケーションのデフォルト認証情報を設定します。詳細については、ローカル開発環境の認証を設定するをご覧ください。
Node.js
このサンプルを試す前に、Cloud Translation クイックスタート: クライアント ライブラリの使用にある手順で Node.js の設定を完了してください。詳細については、Cloud Translation Node.js API リファレンス ドキュメントをご覧ください。
Cloud Translation に対する認証を行うには、アプリケーションのデフォルト認証情報を設定します。詳細については、ローカル開発環境の認証を設定するをご覧ください。
Python
このサンプルを試す前に、Cloud Translation クイックスタート: クライアント ライブラリの使用にある手順で Python の設定を完了してください。詳細については、Cloud Translation Python API リファレンス ドキュメントをご覧ください。
Cloud Translation に対する認証を行うには、アプリケーションのデフォルト認証情報を設定します。詳細については、ローカル開発環境の認証を設定するをご覧ください。
その他の言語
C#: クライアント ライブラリ ページの C# の設定手順を行ってから、.NET 用の Cloud Translation リファレンス ドキュメントをご覧ください。
PHP: クライアント ライブラリ ページの PHP の設定手順を行ってから、PHP 用の Cloud Translation リファレンス ドキュメントをご覧ください。
Ruby: クライアント ライブラリ ページの Ruby の設定手順を行ってから、Ruby 用の Cloud Translation リファレンス ドキュメントをご覧ください。
用語集を使用した適応型翻訳
適応型翻訳リクエストで用語集を使用するには、リクエストに用語集の構成を含めます。
REST
リクエストのデータを使用する前に、次のように置き換えます。
- PROJECT_NUMBER_OR_ID: Google Cloud プロジェクトの数字または英数字の ID
- LOCATION: ソース データセットが配置されているリージョン(
us-central1など)。 - DATASET_NAME: Cloud Translation が翻訳のカスタマイズに使用するデータセットの名前(
projects/PROJECT_ID/locations/LOCATION/adaptiveMtDatasets/DATASET_ID形式)。データセット名を取得するには、プロジェクト内のすべてのデータセットを一覧表示します。 - SOURCE_TEXT: 翻訳するテキスト。
- MIME_TYPE(省略可): ソーステキストの形式(
text/html、text/plainなど)。デフォルトでは、MIME タイプはtext/plainに設定されます。 - GLOSSARY_ID: 用語集 ID(例:
my-en-ru-glossary)。 - BOOLEAN(省略可): 一致で大文字と小文字を区別するかどうか。デフォルト値は
falseです。 - BOOLEAN_CONTEXTUAL(省略可): 用語集の翻訳でコンテキストを考慮するかどうか。デフォルト値は
falseです。
HTTP メソッドと URL:
POST https://translation.googleapis.com/v3/projects/PROJECT_ID/locations/LOCATION:adaptiveMtTranslate
リクエストの本文(JSON):
{
  "dataset": "DATASET_NAME",
  "content": ["SOURCE_TEXT"],
  "mimeType": "MIME_TYPE",
  "glossaryConfig": {
    "glossary": "projects/project-number/locations/LOCATION/glossaries/GLOSSARY_ID",
    "ignoreCase": BOOLEAN,
    "contextual_translation_enabled": BOOLEAN_CONTEXTUAL
  }
}
リクエストを送信するには、次のいずれかのオプションを展開します。
次のような JSON レスポンスが返されます。
{
  "translations": [
    {
      "translatedText": "TRANSLATED_TEXT"
    }
  ],
  "languageCode": "TARGET_LANGUAGE",
  "glossaryTranslations": {
    "translatedText": "TRANSLATED_TEXT",
    "glossaryConfig": {
      "glossary": "projects/project-number/locations/LOCATION/glossaries/GLOSSARY_ID",
      "ignoreCase": BOOLEAN,
      "contextual_translation_enabled": BOOLEAN_CONTEXTUAL
    }
  },
}
Java
このサンプルを試す前に、Cloud Translation クイックスタート: クライアント ライブラリの使用にある Java の設定手順を完了してください。詳細については、Cloud Translation Java API リファレンス ドキュメントをご覧ください。
Cloud Translation に対する認証を行うには、アプリケーションのデフォルト認証情報を設定します。詳細については、ローカル開発環境の認証を設定するをご覧ください。
  {% dynamic setvar launch_stage %}preview{% dynamic endsetvar %}
{% dynamic setvar launch_type %}feature{% dynamic endsetvar %}
{% include "cloud/_shared/_info_launch_stage_disclaimer.html" %}

/** Translates using AdaptiveMt. */
private static void adaptiveMtTranslate(
    TranslationServiceClient translationServiceClient, String projectId, String datasetId) {
  String adaptiveMtDatasetName =
      String.format(
          "projects/%s/locations/LOCATION/adaptiveMtDatasets/%s", projectId, datasetId);
  String glossaryId = "your-glossary-display-name";
  GlossaryName glossaryName = GlossaryName.of(projectId, location, glossaryId);
  GlossaryConfig glossaryConfig =
      GlossaryConfig.newBuilder().setGlossary(glossaryName.toString()).build();

  AdaptiveMtTranslateRequest request =
      AdaptiveMtTranslateRequest.newBuilder()
          .setParent(LocationName.of(projectId, "us-central1").toString())
          .setDataset(adaptiveMtDatasetName)
          .addContent("Sample translation text")
          .setGlossaryConfig(glossaryConfig)
          .build();
  AdaptiveMtTranslateResponse response = translationServiceClient.adaptiveMtTranslate(request);

  System.out.println("Translating using AdaptiveMt");
  System.out.println(response);
}
Node.js
このサンプルを試す前に、Cloud Translation クイックスタート: クライアント ライブラリの使用にある Node.js の設定手順を完了してください。 詳細については、Cloud Translation Node.js API リファレンス ドキュメントをご覧ください。
Cloud Translation に対する認証を行うには、アプリケーションのデフォルト認証情報を設定します。詳細については、ローカル開発環境の認証を設定するをご覧ください。
  async function translate() {
  /**
  * TODO(developer): Uncomment these variables before running the sample.
  */
  // const projectId = 'YOUR_PROJECT_ID';
  // const location = 'global';
  // const glossaryId = 'YOUR_GLOSSARY_ID';

  const glossaryConfig = {
    glossary: `projects/${projectId}/locations/${location}/glossaries/${glossaryId}`,
  };
  const request = {
    parent: `projects/${projectId}/locations/${location}`,
    dataset: `projects/${projectId}/locations/${location}/adaptiveMtDatasets/${
        adaptiveMtDatasetName}`,
    content: ['Sample translate query'],
    glossaryConfig: glossaryConfig,
  } const [response] = await translationClient.adaptiveMtTranslate(request)
  console.log('Translating')
  console.log(response)
}
Python
このサンプルを試す前に、Cloud Translation クイックスタート: クライアント ライブラリの使用にある Python の設定手順を完了してください。 詳細については、Cloud Translation Python API リファレンス ドキュメントをご覧ください。
Cloud Translation に対する認証を行うには、アプリケーションのデフォルト認証情報を設定します。詳細については、ローカル開発環境の認証を設定するをご覧ください。
  def adaptive_mt_translate(
    project_id: str = "YOUR_PROJECT_ID",
    glossary_id: str = "YOUR_GLOSSARY_ID"):
    # Create a client
    client = translate.TranslationServiceClient()
    # Create a glossary
    glossary = client.glossary_path(
        project_id, "us-central1", glossary_id  # The location of the glossary
    )

    glossary_config = translate.GlossaryConfig(glossary=glossary)
    # Initialize the request
    request = translate.AdaptiveMtTranslateRequest(
        parent="projects/PROJECT_ID/locations/LOCATION",
        dataset="projects/PROJECT_ID/locations/LOCATION/adaptiveMtDatasets/DATASET_ID",
        content=["Sample translation request"]
        glossary_config=glossary_config,
    )
    # Make the request
    response = client.adaptive_mt_translate(request)
    # Handle the response
    print(response)
用語集に関する情報を取得する
REST
リクエストのデータを使用する前に、次のように置き換えます。
- PROJECT_NUMBER_OR_ID: Google Cloud プロジェクトの数字または英数字の ID
- glossary-id: 用語集 ID(例: my-en-to-ru-glossary)
HTTP メソッドと URL:
GET https://translation.googleapis.com/v3/projects/PROJECT_NUMBER_OR_ID/locations/us-central1/glossaries/glossary-id
リクエストを送信するには、次のいずれかのオプションを展開します。
次のような JSON レスポンスが返されます。
{
  "name": "projects/project-number/locations/us-central1/glossaries/glossary-id",
  "languagePair": {
    "sourceLanguageCode": "en",
    "targetLanguageCode": "ru"
  },
  "inputConfig": {
    "gcsSource": {
  "inputUri": "gs://bucket-name/glossary-file-name"
    }
  },
  "entryCount": 9603
}
Go
このサンプルを試す前に、Cloud Translation クイックスタート: クライアント ライブラリの使用にある Go の設定手順を完了してください。詳細については、Cloud Translation Go API リファレンス ドキュメントをご覧ください。
Cloud Translation に対する認証を行うには、アプリケーションのデフォルト認証情報を設定します。詳細については、ローカル開発環境の認証を設定するをご覧ください。
Java
このサンプルを試す前に、Cloud Translation クイックスタート: クライアント ライブラリの使用にある手順で Java の設定を完了してください。詳細については、Cloud Translation Java API リファレンス ドキュメントをご覧ください。
Cloud Translation に対する認証を行うには、アプリケーションのデフォルト認証情報を設定します。詳細については、ローカル開発環境の認証を設定するをご覧ください。
Node.js
このサンプルを試す前に、Cloud Translation クイックスタート: クライアント ライブラリの使用にある手順で Node.js の設定を完了してください。詳細については、Cloud Translation Node.js API リファレンス ドキュメントをご覧ください。
Cloud Translation に対する認証を行うには、アプリケーションのデフォルト認証情報を設定します。詳細については、ローカル開発環境の認証を設定するをご覧ください。
Python
このサンプルを試す前に、Cloud Translation クイックスタート: クライアント ライブラリの使用にある手順で Python の設定を完了してください。詳細については、Cloud Translation Python API リファレンス ドキュメントをご覧ください。
Cloud Translation に対する認証を行うには、アプリケーションのデフォルト認証情報を設定します。詳細については、ローカル開発環境の認証を設定するをご覧ください。
その他の言語
C#: クライアント ライブラリ ページの C# の設定手順を行ってから、.NET 用の Cloud Translation リファレンス ドキュメントをご覧ください。
PHP: クライアント ライブラリ ページの PHP の設定手順を行ってから、PHP 用の Cloud Translation リファレンス ドキュメントをご覧ください。
Ruby: クライアント ライブラリ ページの Ruby の設定手順を行ってから、Ruby 用の Cloud Translation リファレンス ドキュメントをご覧ください。
用語集を一覧表示する
1 つのプロジェクトで複数の用語集が使用されていることもあります。このセクションでは、プロジェクトで使用できる用語集を一覧表示する方法を説明します。
REST
この例では、指定したプロジェクトに関連付けられているすべての用語集を一覧表示します。
リクエストのデータを使用する前に、次のように置き換えます。
- PROJECT_NUMBER_OR_ID: Google Cloud プロジェクトの数字または英数字の ID
HTTP メソッドと URL:
GET https://translation.googleapis.com/v3/projects/PROJECT_NUMBER_OR_ID/locations/us-central1/glossaries
リクエストを送信するには、次のいずれかのオプションを展開します。
次のような JSON レスポンスが返されます。
{
  "glossaries": [
    {
      "name": "projects/project-number/locations/us-central1/glossaries/glossary-id",
      "languagePair": {
        "sourceLanguageCode": "en",
        "targetLanguageCode": "ru"
      },
      "inputConfig": {
        "gcsSource": {
          "inputUri": "gs://bucket-name/glossary-file-name"
        }
      },
      "entryCount": 9603
    },
    ...
  ]
}
Go
このサンプルを試す前に、Cloud Translation クイックスタート: クライアント ライブラリの使用にある Go の設定手順を完了してください。詳細については、Cloud Translation Go API リファレンス ドキュメントをご覧ください。
Cloud Translation に対する認証を行うには、アプリケーションのデフォルト認証情報を設定します。詳細については、ローカル開発環境の認証を設定するをご覧ください。
Java
このサンプルを試す前に、Cloud Translation クイックスタート: クライアント ライブラリの使用にある手順で Java の設定を完了してください。詳細については、Cloud Translation Java API リファレンス ドキュメントをご覧ください。
Cloud Translation に対する認証を行うには、アプリケーションのデフォルト認証情報を設定します。詳細については、ローカル開発環境の認証を設定するをご覧ください。
Node.js
このサンプルを試す前に、Cloud Translation クイックスタート: クライアント ライブラリの使用にある手順で Node.js の設定を完了してください。詳細については、Cloud Translation Node.js API リファレンス ドキュメントをご覧ください。
Cloud Translation に対する認証を行うには、アプリケーションのデフォルト認証情報を設定します。詳細については、ローカル開発環境の認証を設定するをご覧ください。
Python
このサンプルを試す前に、Cloud Translation クイックスタート: クライアント ライブラリの使用にある手順で Python の設定を完了してください。詳細については、Cloud Translation Python API リファレンス ドキュメントをご覧ください。
Cloud Translation に対する認証を行うには、アプリケーションのデフォルト認証情報を設定します。詳細については、ローカル開発環境の認証を設定するをご覧ください。
その他の言語
C#: クライアント ライブラリ ページの C# の設定手順を行ってから、.NET 用の Cloud Translation リファレンス ドキュメントをご覧ください。
PHP: クライアント ライブラリ ページの PHP の設定手順を行ってから、PHP 用の Cloud Translation リファレンス ドキュメントをご覧ください。
Ruby: クライアント ライブラリ ページの Ruby の設定手順を行ってから、Ruby 用の Cloud Translation リファレンス ドキュメントをご覧ください。
用語集を更新する
用語集の名前を更新したり、すべてのエントリを新しい用語集入力ファイルで置き換えることができます。用語集エントリへの変更をロールバックする必要がある場合は、元の用語集ファイルを使用して、変更した用語集を置き換えてください。
REST
用語集を更新するには、glossary.patch メソッドを使用して PATCH リクエストを送信します。次の例では、同等の用語セットの用語集を更新します。特定の用語集の ID を確認するには、list メソッドを使用します。
update_mask クエリ パラメータは、用語集入力ファイルと用語集の表示名の両方を更新するかを指定します。少なくとも 1 つの更新マスク パラメータが必要です。
リクエストのデータを使用する前に、次のように置き換えます。
- PROJECT_NUMBER_OR_ID: Google Cloud プロジェクトの数字または英数字の ID。
- LOCATION: 更新する用語集が配置されているリージョン(
us-central1など)。 - GLOSSARY_ID: 既存の用語集の ID。
- LANGUAGE_CODE: この多言語の用語セットの用語集の言語を指定する言語コード。
- GLOSSARY_FILE_PATH: 用語集入力ファイルの場所とファイル名。
HTTP メソッドと URL:
PATCH https://translation.googleapis.com/v3/projects/PROJECT_NUMBER_OR_ID/locations/LOCATION/glossaries/GLOSSARY_ID?update_mask=input_config&update_mask=display_name
リクエストの本文(JSON):
{
  "name":"projects/PROJECT_NUMBER_OR_ID/locations/LOCATION/glossaries/GLOSSARY_ID",
  "languageCodesSet": {
    "languageCodes": ["LANGUAGE_CODE", ...]
  },
  "inputConfig": {
    "gcsSource": {
      "inputUri": "gs://GLOSSARY_FILE_PATH"
    }
  }
}
リクエストを送信するには、次のいずれかのオプションを展開します。
次のような JSON レスポンスが返されます。
{
  "name": "projects/PROJECT_NUMBER/locations/LOCATION/operations/OPERATION_ID",
  "metadata": {
    "@type": "type.googleapis.com/google.cloud.translation.v3.UpdateGlossaryMetadata",
    "glossary": {
      "name": "projects/PROJECT_NUMBER/locations/LOCATION/glossaries/GLOSSARY_ID",
      "languageCodesSet": {
        "languageCodes": ["LANGUAGE_CODE", ...]
      },
      "inputConfig": {
        "gcsSource": {
        "inputUri": "gs://GLOSSARY_FILE_PATH"
        }
      },
      "entryCount": NUMBER_OF_ENTRIES,
      "submitTime": "2022-04-22T23:16:30.628806944Z",
      "endTime": "2022-04-22T23:41:15.115797Z",
      "displayName": "GLOSSARY_ID"
    },
    "state": "RUNNING",
    "submitTime": "2022-04-22T23:50:24.337964527Z"
  }
}
その他の言語
C#: クライアント ライブラリ ページの C# の設定手順を行ってから、.NET 用の Cloud Translation リファレンス ドキュメントをご覧ください。
PHP: クライアント ライブラリ ページの PHP の設定手順を行ってから、PHP 用の Cloud Translation リファレンス ドキュメントをご覧ください。
Ruby: クライアント ライブラリ ページの Ruby の設定手順を行ってから、Ruby 用の Cloud Translation リファレンス ドキュメントをご覧ください。
用語集を削除する
次の例では、用語集を削除します。
REST
リクエストのデータを使用する前に、次のように置き換えます。
- PROJECT_NUMBER_OR_ID: Google Cloud プロジェクトの数字または英数字の ID
- glossary-id: 用語集 ID
HTTP メソッドと URL:
DELETE https://translation.googleapis.com/v3/projects/PROJECT_NUMBER_OR_ID/locations/us-central1/glossaries/glossary-id
リクエストを送信するには、次のいずれかのオプションを展開します。
成功したことを示すステータス コード(2xx)と空のレスポンスが返されます。
Go
このサンプルを試す前に、Cloud Translation クイックスタート: クライアント ライブラリの使用にある Go の設定手順を完了してください。詳細については、Cloud Translation Go API リファレンス ドキュメントをご覧ください。
Cloud Translation に対する認証を行うには、アプリケーションのデフォルト認証情報を設定します。詳細については、ローカル開発環境の認証を設定するをご覧ください。
Java
このサンプルを試す前に、Cloud Translation クイックスタート: クライアント ライブラリの使用にある手順で Java の設定を完了してください。詳細については、Cloud Translation Java API リファレンス ドキュメントをご覧ください。
Cloud Translation に対する認証を行うには、アプリケーションのデフォルト認証情報を設定します。詳細については、ローカル開発環境の認証を設定するをご覧ください。
Node.js
このサンプルを試す前に、Cloud Translation クイックスタート: クライアント ライブラリの使用にある手順で Node.js の設定を完了してください。詳細については、Cloud Translation Node.js API リファレンス ドキュメントをご覧ください。
Cloud Translation に対する認証を行うには、アプリケーションのデフォルト認証情報を設定します。詳細については、ローカル開発環境の認証を設定するをご覧ください。
Python
このサンプルを試す前に、Cloud Translation クイックスタート: クライアント ライブラリの使用にある手順で Python の設定を完了してください。詳細については、Cloud Translation Python API リファレンス ドキュメントをご覧ください。
Cloud Translation に対する認証を行うには、アプリケーションのデフォルト認証情報を設定します。詳細については、ローカル開発環境の認証を設定するをご覧ください。
その他の言語
C#: クライアント ライブラリ ページの C# の設定手順を行ってから、.NET 用の Cloud Translation リファレンス ドキュメントをご覧ください。
PHP: クライアント ライブラリ ページの PHP の設定手順を行ってから、PHP 用の Cloud Translation リファレンス ドキュメントをご覧ください。
Ruby: クライアント ライブラリ ページの Ruby の設定手順を行ってから、Ruby 用の Cloud Translation リファレンス ドキュメントをご覧ください。
用語集エントリを管理する
用語集エントリでは、ある言語の用語が別の言語の用語にマッピングされています。用語集への新しいエントリの追加、既存の用語集へのすべてのエントリの一覧表示、既存のエントリの変更を行うことができます。
新しいエントリを作成する
既存の用語集に用語を追加するには、新しいエントリを作成します。単一言語ペアの用語集の場合、一方の用語がソース言語と、他方の用語がターゲット言語にある場合に、用語のペアを指定します。多言語の用語セットの用語集には、用語セットを指定します。用語セットに含まれる各項目は、用語とその言語コードを指定します。
REST
次の例では、同等の用語セットの用語集にエントリを作成します。リクエストごとに作成できるエントリは 1 つだけです。詳細については、glossaryEntries.create メソッドをご覧ください。
リクエストのデータを使用する前に、次のように置き換えます。
- PROJECT_NUMBER_OR_ID: Google Cloud プロジェクトの数字または英数字の ID。
- LOCATION: 更新する用語集が配置されているリージョン(
us-central1など)。 - GLOSSARY_ID: 既存の用語集の ID。
- LANGUAGE_CODE: 語句の言語を指定する言語コード。
- TERM: 用語集に追加する用語。
- DESCRIPTION: 用語集エントリに関する情報。
HTTP メソッドと URL:
POST https://translation.googleapis.com/v3/projects/PROJECT_NUMBER_OR_ID/locations/LOCATION/glossaries/GLOSSARY_ID/glossaryEntries
リクエストの本文(JSON):
{
  termsSet: {
   terms: {
     languageCode: "LANGUAGE_CODE",
     text: "TERM"
    },
    ...
  },
  description: "DESCRIPTION"
}
リクエストを送信するには、次のいずれかのオプションを展開します。
次のような JSON レスポンスが返されます。
{
  "name": "projects/PROJECT_NUMBER/locations/LOCATION/glossaries/GLOSSARY_ID/glossaryEntries/GLOSSARY_ENTRY_ID",
  "termsSet": {
    "terms": [
      {
        "languageCode": "LANGUAGE_CODE",
        "text": "TERM"
      },
      ...
    ]
  },
  "description": "DESCRIPTION"
}
その他の言語
C#: クライアント ライブラリ ページの C# の設定手順を行ってから、.NET 用の Cloud Translation リファレンス ドキュメントをご覧ください。
PHP: クライアント ライブラリ ページの PHP の設定手順を行ってから、PHP 用の Cloud Translation リファレンス ドキュメントをご覧ください。
Ruby: クライアント ライブラリ ページの Ruby の設定手順を行ってから、Ruby 用の Cloud Translation リファレンス ドキュメントをご覧ください。
用語集のエントリを一覧表示する
既存の用語集のすべてのエントリを一覧表示します。これは、特定の用語集に含まれている用語や言語を確認する場合などに便利です。
REST
すべての用語集エントリを一覧表示するには、glossaryEntries.list メソッドを使用して GET リクエストを送信します。
リクエストのデータを使用する前に、次のように置き換えます。
- PROJECT_NUMBER_OR_ID: Google Cloud プロジェクトの数字または英数字の ID。
- LOCATION: 更新する用語集が配置されているリージョン(
us-central1など)。 - GLOSSARY_ID: 既存の用語集の ID。
HTTP メソッドと URL:
GET https://translation.googleapis.com/v3/projects/PROJECT_NUMBER_OR_ID/locations/LOCATION/glossaries/GLOSSARY_ID/glossaryEntries
リクエストを送信するには、次のいずれかのオプションを展開します。
次のような JSON レスポンスが返されます。
{
  "glossaryEntries": [
    {
      "name": "projects/PROJECT_NUMBER/locations/LOCATION/glossaries/GLOSSARY_ID/glossaryEntries/GLOSSARY_ENTRY_ID",
      "termsSet": {
        "terms": [
          {
            "languageCode": "LANGUAGE_CODE",
            "text": "TERM"
          },
        ...
        ]
      },
      "description": "DESCRIPTION"
    },
    ...
  ]
}
その他の言語
C#: クライアント ライブラリ ページの C# の設定手順を行ってから、.NET 用の Cloud Translation リファレンス ドキュメントをご覧ください。
PHP: クライアント ライブラリ ページの PHP の設定手順を行ってから、PHP 用の Cloud Translation リファレンス ドキュメントをご覧ください。
Ruby: クライアント ライブラリ ページの Ruby の設定手順を行ってから、Ruby 用の Cloud Translation リファレンス ドキュメントをご覧ください。
用語集のエントリを取得する
単一のエントリを取得して情報を表示します。
REST
1 つの用語集エントリを取得するには、glossaryEntries.get メソッドを使用して GET リクエストを送信します。list メソッドを使用して、特定のエントリの ID を検索します。
リクエストのデータを使用する前に、次のように置き換えます。
- PROJECT_NUMBER_OR_ID: Google Cloud プロジェクトの数字または英数字の ID。
- LOCATION: 更新する用語集が配置されているリージョン(
us-central1など)。 - GLOSSARY_ID: 既存の用語集の ID。
- GLOSSARY_ENTRY_ID: 既存の用語集エントリの ID。
HTTP メソッドと URL:
GET https://translation.googleapis.com/v3/projects/PROJECT_NUMBER_OR_ID/locations/LOCATION/glossaries/GLOSSARY_ID/glossaryEntries/GLOSSARY_ENTRY_ID
リクエストを送信するには、次のいずれかのオプションを展開します。
次のような JSON レスポンスが返されます。
{
  "name": "projects/PROJECT_NUMBER/locations/LOCATION/glossaries/GLOSSARY_ID/glossaryEntries/GLOSSARY_ENTRY_ID",
  "termsSet": {
    "terms": [
      {
        "languageCode": "LANGUAGE_CODE",
        "text": "TERM"
      },
      ...
    ]
  },
  "description": "DESCRIPTION"
}
その他の言語
C#: クライアント ライブラリ ページの C# の設定手順を行ってから、.NET 用の Cloud Translation リファレンス ドキュメントをご覧ください。
PHP: クライアント ライブラリ ページの PHP の設定手順を行ってから、PHP 用の Cloud Translation リファレンス ドキュメントをご覧ください。
Ruby: クライアント ライブラリ ページの Ruby の設定手順を行ってから、Ruby 用の Cloud Translation リファレンス ドキュメントをご覧ください。
用語集のエントリを更新する
1 つのエントリを更新することも、用語集のすべてのエントリを置き換えることもできます。すべてのエントリを置換するには、用語集を更新するをご覧ください。
単一言語ペアの用語集のエントリを変更するには、用語のペアを指定します。ここで、一方の用語はソース言語で、他方の用語はターゲット言語です。多言語の用語セットの用語集には、用語セットを指定します。用語セットに含まれる各項目は、用語とその言語コードを指定します。
REST
次の例では、同じ用語セットの用語集のエントリを更新します。詳細については、glossaryEntries.patch メソッドをご覧ください。
リクエストのデータを使用する前に、次のように置き換えます。
- PROJECT_NUMBER_OR_ID: Google Cloud プロジェクトの数字または英数字の ID。
- LOCATION: 更新する用語集が配置されているリージョン(
us-central1など)。 - GLOSSARY_ID: 更新するエントリを含む既存の用語集の ID。
- GLOSSARY_ENTRY_ID: 更新する用語集エントリの ID。
- LANGUAGE_CODE: 語句の言語を指定する言語コード。
- TERM: 更新する用語。
- DESCRIPTION: 用語集エントリに関する情報。
HTTP メソッドと URL:
PATCH https://translation.googleapis.com/v3/projects/PROJECT_NUMBER_OR_ID/locations/LOCATION/glossaries/GLOSSARY_ID/glossaryEntries/GLOSSARY_ENTRY_ID
リクエストの本文(JSON):
{
  termsSet: {
   terms: {
     languageCode: "LANGUAGE_CODE",
     text: "TERM"
    },
    ...
  },
  description: "DESCRIPTION"
}
リクエストを送信するには、次のいずれかのオプションを展開します。
次のような JSON レスポンスが返されます。
{
  "name": "projects/PROJECT_NUMBER/locations/LOCATION/glossaries/GLOSSARY_ID/glossaryEntries/GLOSSARY_ENTRY_ID",
  "termsSet": {
    "terms": [
      {
        "languageCode": "LANGUAGE_CODE",
        "text": "TERM"
      },
      ...
    ]
  },
  "description": "DESCRIPTION"
}
その他の言語
C#: クライアント ライブラリ ページの C# の設定手順を行ってから、.NET 用の Cloud Translation リファレンス ドキュメントをご覧ください。
PHP: クライアント ライブラリ ページの PHP の設定手順を行ってから、PHP 用の Cloud Translation リファレンス ドキュメントをご覧ください。
Ruby: クライアント ライブラリ ページの Ruby の設定手順を行ってから、Ruby 用の Cloud Translation リファレンス ドキュメントをご覧ください。
用語集のエントリを削除する
1 つの用語集エントリを削除します。
REST
1 つの用語集エントリを削除するには、glossaryEntries.delete メソッドを使用して DELETE リクエストを送信します。list メソッドを使用して、特定のエントリの ID を検索します。
リクエストのデータを使用する前に、次のように置き換えます。
- PROJECT_NUMBER_OR_ID: Google Cloud プロジェクトの数字または英数字の ID。
- LOCATION: 更新する用語集が配置されているリージョン(
us-central1など)。 - GLOSSARY_ID: 削除するエントリを含む既存の用語集の ID。
- GLOSSARY_ENTRY_ID: 削除する用語集エントリの ID。
HTTP メソッドと URL:
DELETE https://translation.googleapis.com/v3/projects/PROJECT_NUMBER_OR_ID/locations/LOCATION/glossaries/GLOSSARY_ID/glossaryEntries/GLOSSARY_ENTRY_ID
リクエストを送信するには、次のいずれかのオプションを展開します。
成功したことを示すステータス コード(2xx)と空のレスポンスが返されます。
その他の言語
C#: クライアント ライブラリ ページの C# の設定手順を行ってから、.NET 用の Cloud Translation リファレンス ドキュメントをご覧ください。
PHP: クライアント ライブラリ ページの PHP の設定手順を行ってから、PHP 用の Cloud Translation リファレンス ドキュメントをご覧ください。
Ruby: クライアント ライブラリ ページの Ruby の設定手順を行ってから、Ruby 用の Cloud Translation リファレンス ドキュメントをご覧ください。
参考情報
- 一般的な問題またはエラーの解決に関するヘルプについては、トラブルシューティングページをご覧ください。