モデルの作成と管理

You create a custom model by training it using a prepared dataset. AutoML Translation uses the items from the dataset to train the model, test it, and evaluate its performance. You review the results, adjust the training dataset as needed and train a new model using the improved dataset.

Training a model can take several hours to complete. The AutoML API enables you to check the status of training.

Since AutoML Translation creates a new model each time you start training, your project may include numerous models. You can get a list of the models in your project and can delete models that you no longer need.

モデルのトレーニング

トレーニング用の確固とした文のペアを含むデータセットを用意したら、カスタムモデルの作成とトレーニングを行える状態です。

ウェブ UI

  1. AutoML Translation UI を開きます。

    [データセット] に、現在のプロジェクトの使用可能データセットが表示されます。

  2. カスタムモデルのトレーニングに使用するデータセットを選択します。

    選択したデータセットの表示名がタイトルバーに表示され、データセット内の個々のアイテムが [トレーニング]、[検証]、[テスト] の各ラベルとともに表示されます。

  3. データセットの確認を終えたら、タイトルバーのすぐ下にある [トレーニング] タブをクリックします。

    my_dataset データセットの [トレーニング] タブ

  4. [トレーニングを開始] をクリックします。

    [新しいモデルのトレーニング] ダイアログ ボックスが表示されます。

  5. モデルの名前を指定します。

  6. [トレーニングを開始] をクリックして、カスタムモデルのトレーニングを開始します。

モデルのトレーニングが完了するまで数時間かかることがあります。モデルのトレーニングが正常に終了したら、プログラムの登録に使用したメールアドレスにメッセージが届きます。

REST

リクエストのデータを使用する前に、次のように置き換えます。

  • project-id: Google Cloud Platform プロジェクト ID
  • model-name: 新しいモデルの名前
  • dataset-id: データセットの IDこの ID は、データセットの名前の最後の要素です。たとえば、データセットの名前が projects/434039606874/locations/us-central1/datasets/3104518874390609379 の場合、データセットの ID は 3104518874390609379 です。

HTTP メソッドと URL:

POST https://automl.googleapis.com/v1/projects/project-id/locations/us-central1/models

リクエストの本文(JSON):

{
    "displayName": "model-name",
    "dataset_id": "dataset-id",
    "translationModelMetadata": {
        "base_model" : ""
    }
}

リクエストを送信するには、次のいずれかのオプションを展開します。

次のような JSON レスポンスが返されます。

{
  "name": "projects/project-number/locations/us-central1/operations/operation-id",
  "metadata": {
    "@type": "type.googleapis.com/google.cloud.automl.v1.OperationMetadata",
    "createTime": "2019-10-02T18:40:04.010343Z",
    "updateTime": "2019-10-02T18:40:04.010343Z",
    "createModelDetails": {}
  }
}

Go

AutoML Translation 用のクライアント ライブラリをインストールして使用する方法については、AutoML Translation クライアント ライブラリをご覧ください。詳細については、AutoML Translation Go API のリファレンス ドキュメントをご覧ください。

AutoML Translation で認証を行うには、アプリケーションのデフォルト認証情報を設定します。詳細については、ローカル開発環境の認証を設定するをご覧ください。

import (
	"context"
	"fmt"
	"io"

	automl "cloud.google.com/go/automl/apiv1"
	"cloud.google.com/go/automl/apiv1/automlpb"
)

// translateCreateModel creates a model for translate.
func translateCreateModel(w io.Writer, projectID string, location string, datasetID string, modelName string) error {
	// projectID := "my-project-id"
	// location := "us-central1"
	// datasetID := "TRL123456789..."
	// modelName := "model_display_name"

	ctx := context.Background()
	client, err := automl.NewClient(ctx)
	if err != nil {
		return fmt.Errorf("NewClient: %w", err)
	}
	defer client.Close()

	req := &automlpb.CreateModelRequest{
		Parent: fmt.Sprintf("projects/%s/locations/%s", projectID, location),
		Model: &automlpb.Model{
			DisplayName: modelName,
			DatasetId:   datasetID,
			ModelMetadata: &automlpb.Model_TranslationModelMetadata{
				TranslationModelMetadata: &automlpb.TranslationModelMetadata{},
			},
		},
	}

	op, err := client.CreateModel(ctx, req)
	if err != nil {
		return fmt.Errorf("CreateModel: %w", err)
	}
	fmt.Fprintf(w, "Processing operation name: %q\n", op.Name())
	fmt.Fprintf(w, "Training started...\n")

	return nil
}

Java

AutoML Translation 用のクライアント ライブラリをインストールして使用する方法については、AutoML Translation クライアント ライブラリをご覧ください。詳細については、AutoML Translation Java API のリファレンス ドキュメントをご覧ください。

AutoML Translation で認証を行うには、アプリケーションのデフォルト認証情報を設定します。詳細については、ローカル開発環境の認証を設定するをご覧ください。

import com.google.api.gax.longrunning.OperationFuture;
import com.google.cloud.automl.v1.AutoMlClient;
import com.google.cloud.automl.v1.LocationName;
import com.google.cloud.automl.v1.Model;
import com.google.cloud.automl.v1.OperationMetadata;
import com.google.cloud.automl.v1.TranslationModelMetadata;
import java.io.IOException;
import java.util.concurrent.ExecutionException;

class TranslateCreateModel {

  public static void main(String[] args)
      throws IOException, ExecutionException, InterruptedException {
    // TODO(developer): Replace these variables before running the sample.
    String projectId = "YOUR_PROJECT_ID";
    String datasetId = "YOUR_DATASET_ID";
    String displayName = "YOUR_DATASET_NAME";
    createModel(projectId, datasetId, displayName);
  }

  // Create a model
  static void createModel(String projectId, String datasetId, String displayName)
      throws IOException, ExecutionException, InterruptedException {
    // Initialize client that will be used to send requests. This client only needs to be created
    // once, and can be reused for multiple requests. After completing all of your requests, call
    // the "close" method on the client to safely clean up any remaining background resources.
    try (AutoMlClient client = AutoMlClient.create()) {
      // A resource that represents Google Cloud Platform location.
      LocationName projectLocation = LocationName.of(projectId, "us-central1");
      TranslationModelMetadata translationModelMetadata =
          TranslationModelMetadata.newBuilder().build();
      Model model =
          Model.newBuilder()
              .setDisplayName(displayName)
              .setDatasetId(datasetId)
              .setTranslationModelMetadata(translationModelMetadata)
              .build();

      // Create a model with the model metadata in the region.
      OperationFuture<Model, OperationMetadata> future =
          client.createModelAsync(projectLocation, model);
      // OperationFuture.get() will block until the model is created, which may take several hours.
      // You can use OperationFuture.getInitialFuture to get a future representing the initial
      // response to the request, which contains information while the operation is in progress.
      System.out.format("Training operation name: %s\n", future.getInitialFuture().get().getName());
      System.out.println("Training started...");
    }
  }
}

Node.js

AutoML Translation 用のクライアント ライブラリをインストールして使用する方法については、AutoML Translation クライアント ライブラリをご覧ください。詳細については、AutoML Translation Node.js API のリファレンス ドキュメントをご覧ください。

AutoML Translation で認証を行うには、アプリケーションのデフォルト認証情報を設定します。詳細については、ローカル開発環境の認証を設定するをご覧ください。

/**
 * TODO(developer): Uncomment these variables before running the sample.
 */
// const projectId = 'YOUR_PROJECT_ID';
// const location = 'us-central1';
// const dataset_id = 'YOUR_DATASET_ID';
// const displayName = 'YOUR_DISPLAY_NAME';

// Imports the Google Cloud AutoML library
const {AutoMlClient} = require('@google-cloud/automl').v1;

// Instantiates a client
const client = new AutoMlClient();

async function createModel() {
  // Construct request
  const request = {
    parent: client.locationPath(projectId, location),
    model: {
      displayName: displayName,
      datasetId: datasetId,
      translationModelMetadata: {},
    },
  };

  // Don't wait for the LRO
  const [operation] = await client.createModel(request);
  console.log('Training started...');
  console.log(`Training operation name: ${operation.name}`);
}

createModel();

Python

AutoML Translation 用のクライアント ライブラリをインストールして使用する方法については、AutoML Translation クライアント ライブラリをご覧ください。詳細については、AutoML Translation Python API のリファレンス ドキュメントをご覧ください。

AutoML Translation で認証を行うには、アプリケーションのデフォルト認証情報を設定します。詳細については、ローカル開発環境の認証を設定するをご覧ください。

from google.cloud import automl

# TODO(developer): Uncomment and set the following variables
# project_id = "YOUR_PROJECT_ID"
# dataset_id = "YOUR_DATASET_ID"
# display_name = "YOUR_MODEL_NAME"

client = automl.AutoMlClient()

# A resource that represents Google Cloud Platform location.
project_location = f"projects/{project_id}/locations/us-central1"
translation_model_metadata = automl.TranslationModelMetadata()
model = automl.Model(
    display_name=display_name,
    dataset_id=dataset_id,
    translation_model_metadata=translation_model_metadata,
)

# Create a model with the model metadata in the region.
response = client.create_model(parent=project_location, model=model)

print(f"Training operation name: {response.operation.name}")
print("Training started...")

その他の言語

C#: クライアント ライブラリ ページの C# の設定手順を行ってから、.NET 用の AutoML Translation リファレンス ドキュメントをご覧ください。

PHP: クライアント ライブラリ ページの PHP の設定手順を行ってから、PHP 用の AutoML Translation リファレンス ドキュメントをご覧ください。

Ruby: クライアント ライブラリ ページの Ruby の設定手順を行ってから、Ruby 用の AutoML Translation リファレンス ドキュメントをご覧ください。

オペレーションのステータスの取得

タスクの開始時にレスポンスで返されたオペレーション ID を使用して、長時間実行タスク(データセットへの項目のインポートモデルのトレーニング)のステータスを確認できます。

AutoML API を使用して確認できるのはオペレーションのステータスのみです。

トレーニング操作のステータスを取得するには、GET リクエストを operations リソースに送信する必要があります。このようなリクエストを送信する方法は次のとおりです。

リクエストのデータを使用する前に、次のように置き換えます。

  • operation-name: 元の API への呼び出しへのレスポンスで返されるオペレーションの名前
  • project-id: Google Cloud Platform プロジェクト ID

HTTP メソッドと URL:

GET https://automl.googleapis.com/v1/operation-name

リクエストを送信するには、次のいずれかのオプションを展開します。

次のような JSON レスポンスが返されます。

{
  "metadata": {
    "@type": "type.googleapis.com/google.cloud.automl.v1.OperationMetadata",
    "createTime": "2019-10-01T22:13:48.155710Z",
    "updateTime": "2019-10-01T22:13:52.321072Z",
    ...
  },
  "done": true,
  "response": {
    "@type": "resource-type",
    "name": "resource-name"
  }
}

オペレーションのキャンセル

オペレーション ID を使用して、インポート タスクやトレーニング タスクをキャンセルできます。

リクエストのデータを使用する前に、次のように置き換えます。

  • operation-name: オペレーションの完全な名前。完全な名前の形式は projects/project-id/locations/us-central1/operations/operation-id です。
  • project-id: Google Cloud Platform プロジェクト ID

HTTP メソッドと URL:

POST https://automl.googleapis.com/v1/operation-name:cancel

リクエストを送信するには、次のいずれかのオプションを展開します。

成功したことを示すステータス コード(2xx)と空のレスポンスが返されます。

モデルの管理

モデルに関する情報の取得

トレーニングが完了したら、新しく作成したモデルに関する情報を取得できます。

このセクションの例では、モデルに関する基本のメタデータが返されます。モデルの正確性と準備状況の詳細を確認するには、モデルの評価をご覧ください。

REST

リクエストのデータを使用する前に、次のように置き換えます。

  • model-name: モデルの完全な名前。モデルの完全な名前には、プロジェクト名とロケーションが含まれています。モデル名は次の例のようになります。projects/project-id/locations/us-central1/models/model-id
  • project-id: Google Cloud Platform プロジェクト ID

HTTP メソッドと URL:

GET https://automl.googleapis.com/v1/model-name

リクエストを送信するには、次のいずれかのオプションを展開します。

次のような JSON レスポンスが返されます。

{
  "name": "projects/project-number/locations/us-central1/models/model-id",
  "displayName": "model-display-name",
  "datasetId": "dataset-id",
  "createTime": "2019-10-01T21:51:44.115634Z",
  "deploymentState": "DEPLOYED",
  "updateTime": "2019-10-02T00:22:36.330849Z",
  "translationModelMetadata": {
    "sourceLanguageCode": "source-language",
    "targetLanguageCode": "target-language"
  }
}

Go

AutoML Translation 用のクライアント ライブラリをインストールして使用する方法については、AutoML Translation クライアント ライブラリをご覧ください。詳細については、AutoML Translation Go API のリファレンス ドキュメントをご覧ください。

AutoML Translation で認証を行うには、アプリケーションのデフォルト認証情報を設定します。詳細については、ローカル開発環境の認証を設定するをご覧ください。

import (
	"context"
	"fmt"
	"io"

	automl "cloud.google.com/go/automl/apiv1"
	"cloud.google.com/go/automl/apiv1/automlpb"
)

// getModel gets a model.
func getModel(w io.Writer, projectID string, location string, modelID string) error {
	// projectID := "my-project-id"
	// location := "us-central1"
	// modelID := "TRL123456789..."

	ctx := context.Background()
	client, err := automl.NewClient(ctx)
	if err != nil {
		return fmt.Errorf("NewClient: %w", err)
	}
	defer client.Close()

	req := &automlpb.GetModelRequest{
		Name: fmt.Sprintf("projects/%s/locations/%s/models/%s", projectID, location, modelID),
	}

	model, err := client.GetModel(ctx, req)
	if err != nil {
		return fmt.Errorf("GetModel: %w", err)
	}

	// Retrieve deployment state.
	deploymentState := "undeployed"
	if model.GetDeploymentState() == automlpb.Model_DEPLOYED {
		deploymentState = "deployed"
	}

	// Display the model information.
	fmt.Fprintf(w, "Model name: %v\n", model.GetName())
	fmt.Fprintf(w, "Model display name: %v\n", model.GetDisplayName())
	fmt.Fprintf(w, "Model create time:\n")
	fmt.Fprintf(w, "\tseconds: %v\n", model.GetCreateTime().GetSeconds())
	fmt.Fprintf(w, "\tnanos: %v\n", model.GetCreateTime().GetNanos())
	fmt.Fprintf(w, "Model deployment state: %v\n", deploymentState)

	return nil
}

Java

AutoML Translation 用のクライアント ライブラリをインストールして使用する方法については、AutoML Translation クライアント ライブラリをご覧ください。詳細については、AutoML Translation Java API のリファレンス ドキュメントをご覧ください。

AutoML Translation で認証を行うには、アプリケーションのデフォルト認証情報を設定します。詳細については、ローカル開発環境の認証を設定するをご覧ください。

import com.google.cloud.automl.v1.AutoMlClient;
import com.google.cloud.automl.v1.Model;
import com.google.cloud.automl.v1.ModelName;
import java.io.IOException;

class GetModel {

  static void getModel() throws IOException {
    // TODO(developer): Replace these variables before running the sample.
    String projectId = "YOUR_PROJECT_ID";
    String modelId = "YOUR_MODEL_ID";
    getModel(projectId, modelId);
  }

  // Get a model
  static void getModel(String projectId, String modelId) throws IOException {
    // Initialize client that will be used to send requests. This client only needs to be created
    // once, and can be reused for multiple requests. After completing all of your requests, call
    // the "close" method on the client to safely clean up any remaining background resources.
    try (AutoMlClient client = AutoMlClient.create()) {
      // Get the full path of the model.
      ModelName modelFullId = ModelName.of(projectId, "us-central1", modelId);
      Model model = client.getModel(modelFullId);

      // Display the model information.
      System.out.format("Model name: %s\n", model.getName());
      // To get the model id, you have to parse it out of the `name` field. As models Ids are
      // required for other methods.
      // Name Format: `projects/{project_id}/locations/{location_id}/models/{model_id}`
      String[] names = model.getName().split("/");
      String retrievedModelId = names[names.length - 1];
      System.out.format("Model id: %s\n", retrievedModelId);
      System.out.format("Model display name: %s\n", model.getDisplayName());
      System.out.println("Model create time:");
      System.out.format("\tseconds: %s\n", model.getCreateTime().getSeconds());
      System.out.format("\tnanos: %s\n", model.getCreateTime().getNanos());
      System.out.format("Model deployment state: %s\n", model.getDeploymentState());
    }
  }
}

Node.js

AutoML Translation 用のクライアント ライブラリをインストールして使用する方法については、AutoML Translation クライアント ライブラリをご覧ください。詳細については、AutoML Translation Node.js API のリファレンス ドキュメントをご覧ください。

AutoML Translation で認証を行うには、アプリケーションのデフォルト認証情報を設定します。詳細については、ローカル開発環境の認証を設定するをご覧ください。

/**
 * TODO(developer): Uncomment these variables before running the sample.
 */
// const projectId = 'YOUR_PROJECT_ID';
// const location = 'us-central1';
// const modelId = 'YOUR_MODEL_ID';

// Imports the Google Cloud AutoML library
const {AutoMlClient} = require('@google-cloud/automl').v1;

// Instantiates a client
const client = new AutoMlClient();

async function getModel() {
  // Construct request
  const request = {
    name: client.modelPath(projectId, location, modelId),
  };

  const [response] = await client.getModel(request);

  console.log(`Model name: ${response.name}`);
  console.log(
    `Model id: ${
      response.name.split('/')[response.name.split('/').length - 1]
    }`
  );
  console.log(`Model display name: ${response.displayName}`);
  console.log('Model create time');
  console.log(`\tseconds ${response.createTime.seconds}`);
  console.log(`\tnanos ${response.createTime.nanos / 1e9}`);
  console.log(`Model deployment state: ${response.deploymentState}`);
}

getModel();

Python

AutoML Translation 用のクライアント ライブラリをインストールして使用する方法については、AutoML Translation クライアント ライブラリをご覧ください。詳細については、AutoML Translation Python API のリファレンス ドキュメントをご覧ください。

AutoML Translation で認証を行うには、アプリケーションのデフォルト認証情報を設定します。詳細については、ローカル開発環境の認証を設定するをご覧ください。

from google.cloud import automl

# TODO(developer): Uncomment and set the following variables
# project_id = "YOUR_PROJECT_ID"
# model_id = "YOUR_MODEL_ID"

client = automl.AutoMlClient()
# Get the full path of the model.
model_full_id = client.model_path(project_id, "us-central1", model_id)
model = client.get_model(name=model_full_id)

# Retrieve deployment state.
if model.deployment_state == automl.Model.DeploymentState.DEPLOYED:
    deployment_state = "deployed"
else:
    deployment_state = "undeployed"

# Display the model information.
print(f"Model name: {model.name}")
print("Model id: {}".format(model.name.split("/")[-1]))
print(f"Model display name: {model.display_name}")
print(f"Model create time: {model.create_time}")
print(f"Model deployment state: {deployment_state}")

その他の言語

C#: クライアント ライブラリ ページの C# の設定手順を行ってから、.NET 用の AutoML Translation リファレンス ドキュメントをご覧ください。

PHP: クライアント ライブラリ ページの PHP の設定手順を行ってから、PHP 用の AutoML Translation リファレンス ドキュメントをご覧ください。

Ruby: クライアント ライブラリ ページの Ruby の設定手順を行ってから、Ruby 用の AutoML Translation リファレンス ドキュメントをご覧ください。

モデルの一覧表示

1 つのプロジェクトに多数のモデルが含まれる場合があります。このセクションでは、プロジェクトで使用できるモデルを一覧表示する方法を説明します。

ウェブ UI

AutoML Translation UI を使用して使用可能なモデルを一覧表示するには、左側のナビゲーション バーの電球アイコンをクリックします。

1 つのモデルを一覧表示するモデルタブ

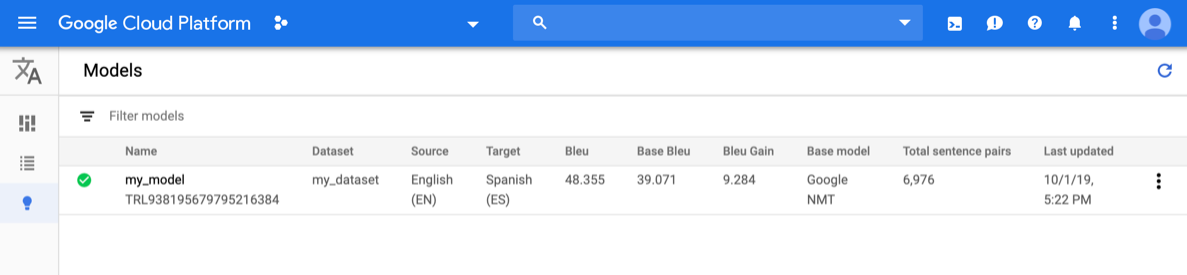
別のプロジェクトのモデルを表示するには、タイトルバーの右上にあるプルダウン リストからプロジェクトを選択します。

REST

リクエストのデータを使用する前に、次のように置き換えます。

  • project-id: Google Cloud Platform プロジェクト ID

HTTP メソッドと URL:

GET https://automl.googleapis.com/v1/projects/project-id/locations/us-central1/models

リクエストを送信するには、次のいずれかのオプションを展開します。

次のような JSON レスポンスが返されます。

{
  "model": [
    {
      "name": "projects/project-number/locations/us-central1/models/model-id",
      "displayName": "model-display-name",
      "datasetId": "dataset-id",
      "createTime": "2019-10-01T21:51:44.115634Z",
      "deploymentState": "DEPLOYED",
      "updateTime": "2019-10-02T00:22:36.330849Z",
      "translationModelMetadata": {
        "sourceLanguageCode": "source-language",
        "targetLanguageCode": "target-language"
      }
    }
  ]
}

Go

AutoML Translation 用のクライアント ライブラリをインストールして使用する方法については、AutoML Translation クライアント ライブラリをご覧ください。詳細については、AutoML Translation Go API のリファレンス ドキュメントをご覧ください。

AutoML Translation で認証を行うには、アプリケーションのデフォルト認証情報を設定します。詳細については、ローカル開発環境の認証を設定するをご覧ください。

import (
	"context"
	"fmt"
	"io"

	automl "cloud.google.com/go/automl/apiv1"
	"cloud.google.com/go/automl/apiv1/automlpb"
	"google.golang.org/api/iterator"
)

// listModels lists existing models.
func listModels(w io.Writer, projectID string, location string) error {
	// projectID := "my-project-id"
	// location := "us-central1"

	ctx := context.Background()
	client, err := automl.NewClient(ctx)
	if err != nil {
		return fmt.Errorf("NewClient: %w", err)
	}
	defer client.Close()

	req := &automlpb.ListModelsRequest{
		Parent: fmt.Sprintf("projects/%s/locations/%s", projectID, location),
	}

	it := client.ListModels(ctx, req)

	// Iterate over all results
	for {
		model, err := it.Next()
		if err == iterator.Done {
			break
		}
		if err != nil {
			return fmt.Errorf("ListModels.Next: %w", err)
		}

		// Retrieve deployment state.
		deploymentState := "undeployed"
		if model.GetDeploymentState() == automlpb.Model_DEPLOYED {
			deploymentState = "deployed"
		}

		// Display the model information.
		fmt.Fprintf(w, "Model name: %v\n", model.GetName())
		fmt.Fprintf(w, "Model display name: %v\n", model.GetDisplayName())
		fmt.Fprintf(w, "Model create time:\n")
		fmt.Fprintf(w, "\tseconds: %v\n", model.GetCreateTime().GetSeconds())
		fmt.Fprintf(w, "\tnanos: %v\n", model.GetCreateTime().GetNanos())
		fmt.Fprintf(w, "Model deployment state: %v\n", deploymentState)
	}

	return nil
}

Java

AutoML Translation 用のクライアント ライブラリをインストールして使用する方法については、AutoML Translation クライアント ライブラリをご覧ください。詳細については、AutoML Translation Java API のリファレンス ドキュメントをご覧ください。

AutoML Translation で認証を行うには、アプリケーションのデフォルト認証情報を設定します。詳細については、ローカル開発環境の認証を設定するをご覧ください。

import com.google.cloud.automl.v1.AutoMlClient;
import com.google.cloud.automl.v1.ListModelsRequest;
import com.google.cloud.automl.v1.LocationName;
import com.google.cloud.automl.v1.Model;
import java.io.IOException;

class ListModels {

  static void listModels() throws IOException {
    // TODO(developer): Replace these variables before running the sample.
    String projectId = "YOUR_PROJECT_ID";
    listModels(projectId);
  }

  // List the models available in the specified location
  static void listModels(String projectId) throws IOException {
    // Initialize client that will be used to send requests. This client only needs to be created
    // once, and can be reused for multiple requests. After completing all of your requests, call
    // the "close" method on the client to safely clean up any remaining background resources.
    try (AutoMlClient client = AutoMlClient.create()) {
      // A resource that represents Google Cloud Platform location.
      LocationName projectLocation = LocationName.of(projectId, "us-central1");

      // Create list models request.
      ListModelsRequest listModelsRequest =
          ListModelsRequest.newBuilder()
              .setParent(projectLocation.toString())
              .setFilter("")
              .build();

      // List all the models available in the region by applying filter.
      System.out.println("List of models:");
      for (Model model : client.listModels(listModelsRequest).iterateAll()) {
        // Display the model information.
        System.out.format("Model name: %s\n", model.getName());
        // To get the model id, you have to parse it out of the `name` field. As models Ids are
        // required for other methods.
        // Name Format: `projects/{project_id}/locations/{location_id}/models/{model_id}`
        String[] names = model.getName().split("/");
        String retrievedModelId = names[names.length - 1];
        System.out.format("Model id: %s\n", retrievedModelId);
        System.out.format("Model display name: %s\n", model.getDisplayName());
        System.out.println("Model create time:");
        System.out.format("\tseconds: %s\n", model.getCreateTime().getSeconds());
        System.out.format("\tnanos: %s\n", model.getCreateTime().getNanos());
        System.out.format("Model deployment state: %s\n", model.getDeploymentState());
      }
    }
  }
}

Node.js

AutoML Translation 用のクライアント ライブラリをインストールして使用する方法については、AutoML Translation クライアント ライブラリをご覧ください。詳細については、AutoML Translation Node.js API のリファレンス ドキュメントをご覧ください。

AutoML Translation で認証を行うには、アプリケーションのデフォルト認証情報を設定します。詳細については、ローカル開発環境の認証を設定するをご覧ください。

/**
 * TODO(developer): Uncomment these variables before running the sample.
 */
// const projectId = 'YOUR_PROJECT_ID';
// const location = 'us-central1';

// Imports the Google Cloud AutoML library
const {AutoMlClient} = require('@google-cloud/automl').v1;

// Instantiates a client
const client = new AutoMlClient();

async function listModels() {
  // Construct request
  const request = {
    parent: client.locationPath(projectId, location),
    filter: 'translation_model_metadata:*',
  };

  const [response] = await client.listModels(request);

  console.log('List of models:');
  for (const model of response) {
    console.log(`Model name: ${model.name}`);
    console.log(`
      Model id: ${model.name.split('/')[model.name.split('/').length - 1]}`);
    console.log(`Model display name: ${model.displayName}`);
    console.log('Model create time');
    console.log(`\tseconds ${model.createTime.seconds}`);
    console.log(`\tnanos ${model.createTime.nanos / 1e9}`);
    console.log(`Model deployment state: ${model.deploymentState}`);
  }
}

listModels();

Python

AutoML Translation 用のクライアント ライブラリをインストールして使用する方法については、AutoML Translation クライアント ライブラリをご覧ください。詳細については、AutoML Translation Python API のリファレンス ドキュメントをご覧ください。

AutoML Translation で認証を行うには、アプリケーションのデフォルト認証情報を設定します。詳細については、ローカル開発環境の認証を設定するをご覧ください。

from google.cloud import automl

# TODO(developer): Uncomment and set the following variables
# project_id = "YOUR_PROJECT_ID"

client = automl.AutoMlClient()
# A resource that represents Google Cloud Platform location.
project_location = f"projects/{project_id}/locations/us-central1"

request = automl.ListModelsRequest(parent=project_location, filter="")
response = client.list_models(request=request)

print("List of models:")
for model in response:
    # Display the model information.
    if model.deployment_state == automl.Model.DeploymentState.DEPLOYED:
        deployment_state = "deployed"
    else:
        deployment_state = "undeployed"

    print(f"Model name: {model.name}")
    print("Model id: {}".format(model.name.split("/")[-1]))
    print(f"Model display name: {model.display_name}")
    print(f"Model create time: {model.create_time}")
    print(f"Model deployment state: {deployment_state}")

その他の言語

C#: クライアント ライブラリ ページの C# の設定手順を行ってから、.NET 用の AutoML Translation リファレンス ドキュメントをご覧ください。

PHP: クライアント ライブラリ ページの PHP の設定手順を行ってから、PHP 用の AutoML Translation リファレンス ドキュメントをご覧ください。

Ruby: クライアント ライブラリ ページの Ruby の設定手順を行ってから、Ruby 用の AutoML Translation リファレンス ドキュメントをご覧ください。

モデルの削除

次の例では、モデルを削除します。

ウェブ UI

  1. AutoML Translation UI で、左側のナビゲーション メニューにある電球アイコンをクリックして使用可能なモデルを一覧表示します。

    1 つのモデルを一覧表示するモデルタブ

  2. 削除する行の右端にあるその他メニューをクリックし、[モデルの削除] を選択します。

  3. 確認ダイアログ ボックスで [削除] をクリックします。

REST

リクエストのデータを使用する前に、次のように置き換えます。

  • model-name: モデルの完全な名前。モデルの完全な名前には、プロジェクト名とロケーションが含まれています。モデル名は次の例のようになります。projects/project-id/locations/us-central1/models/model-id
  • project-id: Google Cloud Platform プロジェクト ID

HTTP メソッドと URL:

DELETE https://automl.googleapis.com/v1/model-name

リクエストを送信するには、次のいずれかのオプションを展開します。

次のような JSON レスポンスが返されます。

{
  "name": "projects/project-number/locations/us-central1/operations/operation-id",
  "metadata": {
    "@type": "type.googleapis.com/google.cloud.automl.v1beta1.OperationMetadata",
    "progressPercentage": 100,
    "createTime": "2018-04-27T02:33:02.479200Z",
    "updateTime": "2018-04-27T02:35:17.309060Z"
  },
  "done": true,
  "response": {
    "@type": "type.googleapis.com/google.protobuf.Empty"
  }
}

Go

AutoML Translation 用のクライアント ライブラリをインストールして使用する方法については、AutoML Translation クライアント ライブラリをご覧ください。詳細については、AutoML Translation Go API のリファレンス ドキュメントをご覧ください。

AutoML Translation で認証を行うには、アプリケーションのデフォルト認証情報を設定します。詳細については、ローカル開発環境の認証を設定するをご覧ください。

import (
	"context"
	"fmt"
	"io"

	automl "cloud.google.com/go/automl/apiv1"
	"cloud.google.com/go/automl/apiv1/automlpb"
)

// deleteModel deletes a model.
func deleteModel(w io.Writer, projectID string, location string, modelID string) error {
	// projectID := "my-project-id"
	// location := "us-central1"
	// modelID := "TRL123456789..."

	ctx := context.Background()
	client, err := automl.NewClient(ctx)
	if err != nil {
		return fmt.Errorf("NewClient: %w", err)
	}
	defer client.Close()

	req := &automlpb.DeleteModelRequest{
		Name: fmt.Sprintf("projects/%s/locations/%s/models/%s", projectID, location, modelID),
	}

	op, err := client.DeleteModel(ctx, req)
	if err != nil {
		return fmt.Errorf("DeleteModel: %w", err)
	}
	fmt.Fprintf(w, "Processing operation name: %q\n", op.Name())

	if err := op.Wait(ctx); err != nil {
		return fmt.Errorf("Wait: %w", err)
	}

	fmt.Fprintf(w, "Model deleted.\n")

	return nil
}

Java

AutoML Translation 用のクライアント ライブラリをインストールして使用する方法については、AutoML Translation クライアント ライブラリをご覧ください。詳細については、AutoML Translation Java API のリファレンス ドキュメントをご覧ください。

AutoML Translation で認証を行うには、アプリケーションのデフォルト認証情報を設定します。詳細については、ローカル開発環境の認証を設定するをご覧ください。

import com.google.cloud.automl.v1.AutoMlClient;
import com.google.cloud.automl.v1.ModelName;
import com.google.protobuf.Empty;
import java.io.IOException;
import java.util.concurrent.ExecutionException;

class DeleteModel {

  public static void main(String[] args)
      throws IOException, ExecutionException, InterruptedException {
    // TODO(developer): Replace these variables before running the sample.
    String projectId = "YOUR_PROJECT_ID";
    String modelId = "YOUR_MODEL_ID";
    deleteModel(projectId, modelId);
  }

  // Delete a model
  static void deleteModel(String projectId, String modelId)
      throws IOException, ExecutionException, InterruptedException {
    // Initialize client that will be used to send requests. This client only needs to be created
    // once, and can be reused for multiple requests. After completing all of your requests, call
    // the "close" method on the client to safely clean up any remaining background resources.
    try (AutoMlClient client = AutoMlClient.create()) {
      // Get the full path of the model.
      ModelName modelFullId = ModelName.of(projectId, "us-central1", modelId);

      // Delete a model.
      Empty response = client.deleteModelAsync(modelFullId).get();

      System.out.println("Model deletion started...");
      System.out.println(String.format("Model deleted. %s", response));
    }
  }
}

Node.js

AutoML Translation 用のクライアント ライブラリをインストールして使用する方法については、AutoML Translation クライアント ライブラリをご覧ください。詳細については、AutoML Translation Node.js API のリファレンス ドキュメントをご覧ください。

AutoML Translation で認証を行うには、アプリケーションのデフォルト認証情報を設定します。詳細については、ローカル開発環境の認証を設定するをご覧ください。

/**
 * TODO(developer): Uncomment these variables before running the sample.
 */
// const projectId = 'YOUR_PROJECT_ID';
// const location = 'us-central1';
// const modelId = 'YOUR_MODEL_ID';

// Imports the Google Cloud AutoML library
const {AutoMlClient} = require('@google-cloud/automl').v1;

// Instantiates a client
const client = new AutoMlClient();

async function deleteModel() {
  // Construct request
  const request = {
    name: client.modelPath(projectId, location, modelId),
  };

  const [response] = await client.deleteModel(request);
  console.log(`Model deleted: ${response}`);
}

deleteModel();

Python

AutoML Translation 用のクライアント ライブラリをインストールして使用する方法については、AutoML Translation クライアント ライブラリをご覧ください。詳細については、AutoML Translation Python API のリファレンス ドキュメントをご覧ください。

AutoML Translation で認証を行うには、アプリケーションのデフォルト認証情報を設定します。詳細については、ローカル開発環境の認証を設定するをご覧ください。

from google.cloud import automl

# TODO(developer): Uncomment and set the following variables
# project_id = "YOUR_PROJECT_ID"
# model_id = "YOUR_MODEL_ID"

client = automl.AutoMlClient()
# Get the full path of the model.
model_full_id = client.model_path(project_id, "us-central1", model_id)
response = client.delete_model(name=model_full_id)

print(f"Model deleted. {response.result()}")

その他の言語

C#: クライアント ライブラリ ページの C# の設定手順を行ってから、.NET 用の AutoML Translation リファレンス ドキュメントをご覧ください。

PHP: クライアント ライブラリ ページの PHP の設定手順を行ってから、PHP 用の AutoML Translation リファレンス ドキュメントをご覧ください。

Ruby: クライアント ライブラリ ページの Ruby の設定手順を行ってから、Ruby 用の AutoML Translation リファレンス ドキュメントをご覧ください。