이 페이지에서는 Google Cloud NetApp Volumes 성능을 최적화하는 방법을 자세히 설명합니다.
시작하기 전에
성능을 최적화하기 위해 볼륨을 변경하기 전에 성능 고려사항을 검토하세요.
볼륨 설정 조정
다음 볼륨 설정을 조정하여 성능을 최적화할 수 있습니다.
볼륨 용량 늘리기: 프리미엄, 익스트림 또는 표준 서비스 수준 볼륨의 용량을 늘려 달성 가능한 최대 볼륨 처리량을 개선할 수 있습니다. Flex 서비스 수준의 볼륨의 경우 스토리지 풀 용량을 늘리세요.
서비스 수준 업그레이드: 처리량을 개선하기 위해 프리미엄 서비스 수준 볼륨을 익스트림 서비스 수준으로 업그레이드할 수 있습니다. 서비스 수준이 다른 다른 스토리지 풀에 볼륨을 할당하는 것이 좋습니다.
수동 QoS 풀을 사용하여 더 큰 처리량 할당: 처리량 요구사항이 낮은 대량의 할당된 처리량을 줄이고 성능이 더 필요한 소량의 처리량을 사용 가능한 풀 처리량까지 늘릴 수 있습니다.
볼륨 용량을 늘리고 서비스 수준을 업그레이드해도 볼륨에서 진행 중인 I/O 워크로드가 중단되지 않으며 볼륨 액세스에 어떤 방식으로도 영향을 미치지 않습니다.
클라이언트 조정
클라이언트에서 다음 설정을 조정하여 성능을 개선할 수 있습니다.
클라이언트 공동 배치: 지연 시간 결과는 클라이언트의 기능과 위치에 직접적인 영향을 받습니다. 최상의 결과를 얻으려면 클라이언트를 볼륨과 동일한 리전에 배치하거나 최대한 가까운 리전에 배치하세요. 각 영역의 클라이언트에서 지연 시간을 테스트하여 영역별 영향을 테스트하고 지연 시간이 가장 낮은 영역을 사용합니다.
Compute Engine 네트워크 대역폭 구성: Compute Engine 가상 머신의 네트워크 기능은 사용된 인스턴스 유형에 따라 달라집니다. 일반적으로 대형 인스턴스는 더 많은 네트워크 처리량을 제공할 수 있습니다. 적절한 네트워크 대역폭 기능이 있는 클라이언트 가상 머신을 선택하고, Google 가상 NIC (gVNIC) 네트워크 인터페이스를 선택하고,
Tier_1성능을 사용 설정하는 것이 좋습니다. 자세한 내용은 네트워크 대역폭에 관한 Compute Engine 문서를 참고하세요.여러 TCP 세션 열기: 애플리케이션에 높은 처리량이 필요한 경우 일반 NFS 및 SMB 세션의 기반이 되는 단일 전송 제어 프로토콜 (TCP) 세션이 결국 포화될 수 있습니다. 이러한 경우 NFS 및 SMB 연결에서 사용하는 TCP 세션 수를 늘리세요.
다음 탭 중 하나를 사용하여 클라이언트 유형에 따라 클라이언트를 조정합니다.
Linux
일반적으로 NFS 클라이언트는 스토리지 엔드포인트를 공유하는 모든 NFS 마운트 파일 시스템에 단일 TCP 세션을 사용합니다.
nconnect마운트 옵션을 사용하면 지원되는 TCP 세션 수를 최대 16개까지 늘릴 수 있습니다.nconnect를 최대한 활용하려면 Linux 클라이언트 유형을 조정할 때 다음 권장사항을 따르는 것이 좋습니다.nconnect로 TCP 세션 수 늘리기: TCP 세션이 추가될 때마다 미해결 요청 128개의 대기열이 추가되어 잠재적 동시성이 개선됩니다.sunrpc.max_tcp_slot_table_entries매개변수 설정:sunrpc.max_tcp_slot_table_entries은 연결 수준 조정 매개변수로, 수정하여 성능을 제어할 수 있습니다.sunrpc.max_tpc_slot_table_enteries을 연결당 128개 요청으로 설정하고 NetApp 볼륨에 연결된 단일 프로젝트 내 모든 NFS 클라이언트의 슬롯이 10,000개를 초과하지 않도록 하는 것이 좋습니다.sunrpc.max_tcp_slot_table_entries매개변수를 설정하려면/etc/sysctl.conf파일에 매개변수를 추가하고sysctl -p명령어를 사용하여 매개변수 파일을 다시 로드합니다.세션당 지원되는 최대 값을 180으로 조정: NFSv3와 달리 NFSv4.1 클라이언트는 세션에서 클라이언트와 서버 간의 관계를 정의합니다. NetApp Volumes는 NFSv3를 사용하여 연결당 최대 128개의 미해결 요청을 지원하지만 NFSv4.1은 세션당 180개의 미해결 요청으로 제한됩니다. Linux NFSv4.1 클라이언트는 세션당
64 max_session_slots로 기본 설정되지만 필요에 따라 이 값을 조정할 수 있습니다. 세션당 지원되는 최대값을 180으로 변경하는 것이 좋습니다.max_session_slots를 조정하려면/etc/modprobe.d아래에 구성 파일을 만드세요. 따옴표 (" ")가 인라인으로 표시되지 않는지 확인합니다. 그렇지 않으면 옵션이 적용되지 않습니다.$ echo "options nfs max_session_slots=180" > /etc/modprobe/d/nfsclient/conf $ reboot Use the systool -v -m nfs command to see the current maximum in use by the client. For the command to work, at least one NFSv4.1 mount must be in place. $ systool -v -v nfs { Module = "nfs" … Parameters: … Max_session_slots = "63" <- … }
다음 NFS
nconnect비교 그래프는 nconnect 구성을 사용할 때 NFS 워크로드에 미치는 영향을 보여줍니다. 이 정보는 다음 설정을 사용하여 Fio로 캡처되었습니다.100% 읽기 워크로드
단일 볼륨에 대한 8KiB 블록 크기
n2-standard-32Red Hat 9 OS를 사용하는 가상 머신6TiB 작업 세트
nconnect값을 16으로 사용하면 사용 설정하지 않았을 때보다 성능이 5배 더 향상되었습니다.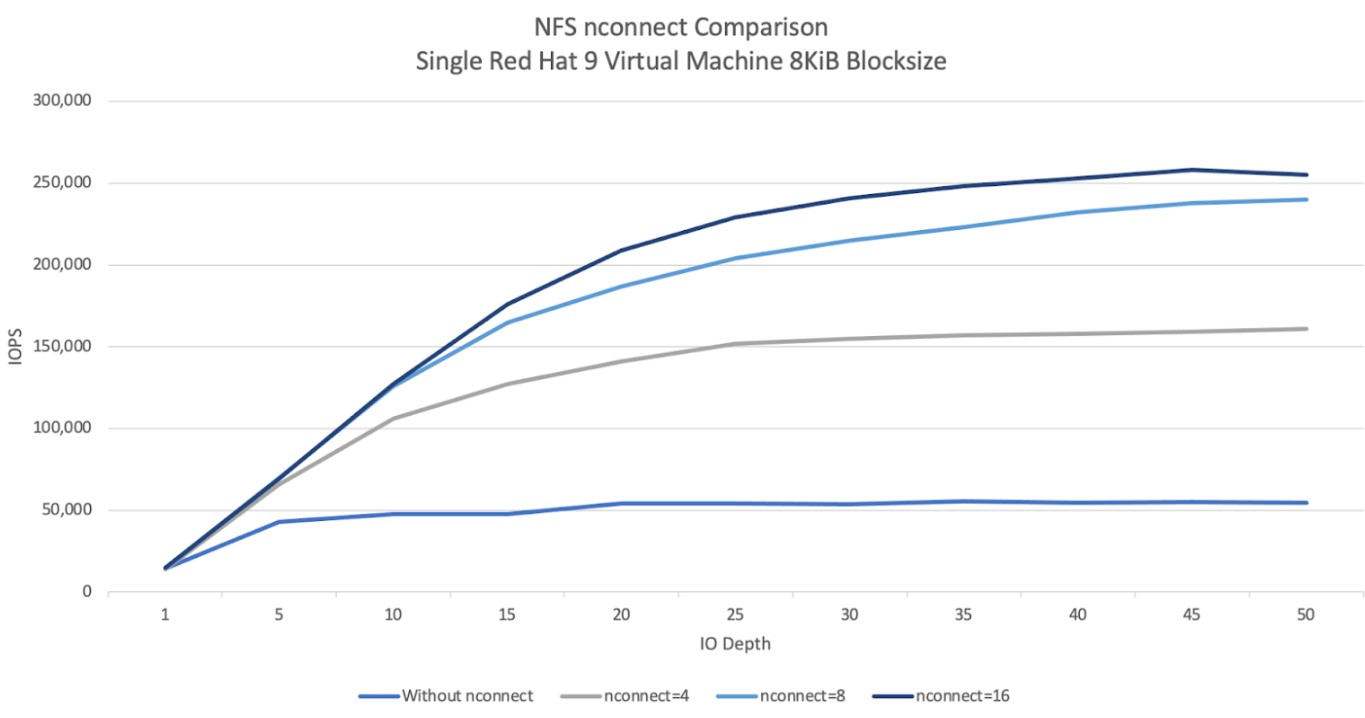
Windows
Windows 기반 클라이언트의 경우 클라이언트는 수신 측 확장 (RSS)과 함께 SMB 멀티채널을 사용하여 여러 TCP 연결을 열 수 있습니다. 이 구성을 달성하려면 가상 머신에 RSS를 지원하는 할당된 네트워크 어댑터가 있어야 합니다. RSS를 4개 또는 8개 값으로 설정하는 것이 좋지만 1보다 큰 값은 처리량을 늘려야 합니다.
다음 그래프는 RSS 구성을 사용할 때 SMB 워크로드에 미칠 수 있는 차이를 보여줍니다. 이 정보는 다음 설정을 사용하여 Fio로 캡처되었습니다.
100% 읽기 워크로드
단일 볼륨에 대한 8KiB 블록 크기
Windows 2022 OS를 실행하는 단일
n2-standard-32가상 머신6TiB 작업 세트
테스트 실행 간에 SMB 클라이언트 RSS 옵션만 변경하여 8개의 작업을 실행했습니다. RSS 값을 4, 8, 16으로 사용하면 값 1을 사용하는 경우에 비해 성능이 두 배로 향상되었습니다. 각 RSS 인스턴스는
numjobs매개변수가 8인 상태로 9번 실행되었습니다.iodepth매개변수는 최대 처리량에 도달할 때까지 실행마다 5씩 증가했습니다.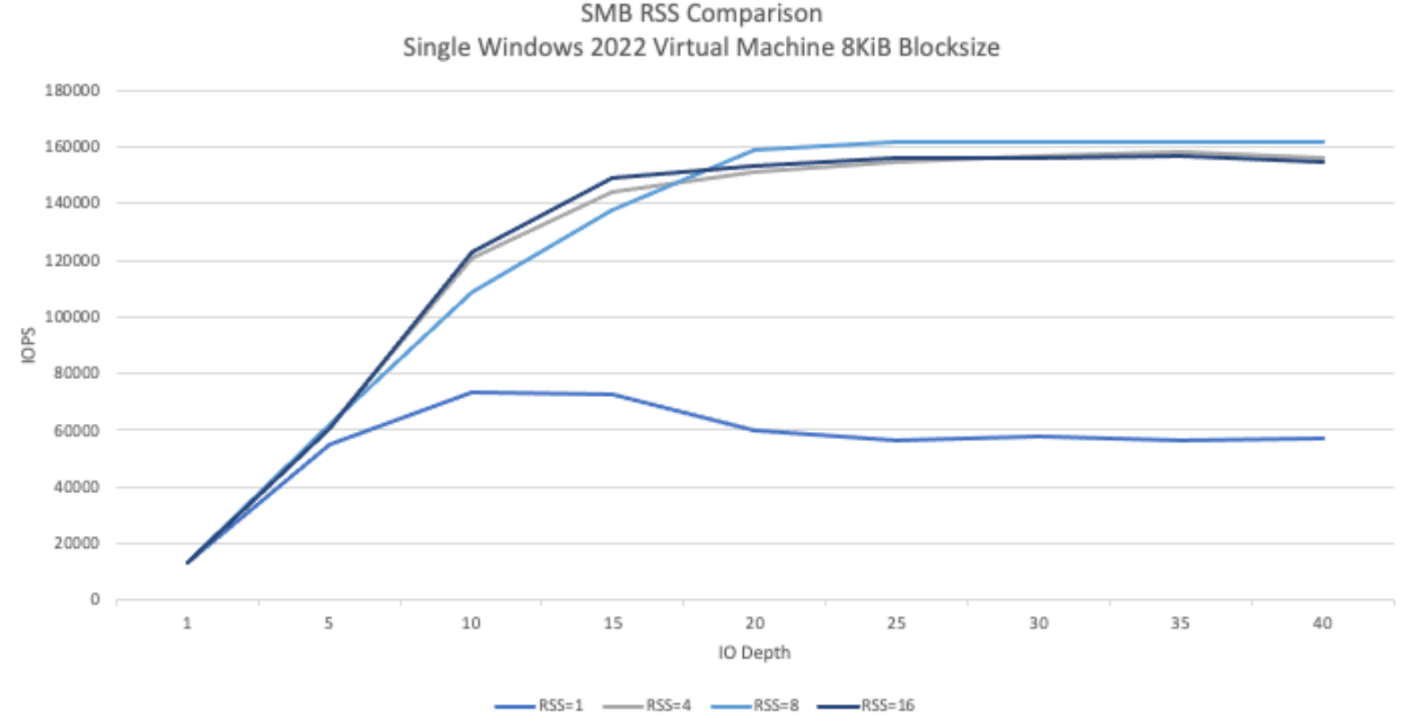
수동 QoS
NetApp Volumes의 수동 서비스 품질 (QoS)을 사용하면 워크로드 요구사항을 충족하도록 볼륨 성능을 조정하고 스토리지 비용을 관리할 수 있습니다.
수동 QoS는 다음과 같은 이점을 제공합니다.
비용 최적화: 스토리지 풀 용량 내에서 볼륨 성능을 확장하여 클라우드 비용을 최적화합니다.
즉각적인 처리량 조정: 다운타임 없이 볼륨 처리량을 조정합니다.
재해 복구 비용 절감: 복제된 볼륨의 QoS를 낮춰 대상 풀의 재해 복구 비용을 절감합니다.
클론 또는 캐시 성능 향상: 할당된 크기가 작은 클론 또는 캐시 볼륨의 성능을 높입니다.
유연한 워크로드 관리: 여러 워크로드의 컨테이너로 더 큰 스토리지 풀을 사용하고 필요에 따라 각 볼륨의 처리량을 조정합니다.
고려사항
Google Cloud CLI, NetApp Volumes API 또는 Terraform을 사용하여 수동 QoS를 관리할 수 있습니다. Google Cloud 콘솔은 지원되지 않습니다.
수동 QoS는 Standard, Premium, Extreme 서비스 수준에서 지원되며 Flex 서비스 수준에서는 사용할 수 없습니다.
수동 QoS 한도 설정
수동 QoS 스토리지 풀 내의 볼륨의 경우 처리량과 용량을 독립적으로 설정할 수 있습니다. 수동 QoS 풀에 있는 모든 볼륨의 전체 처리량은 풀의 총 처리량에 의해 제한됩니다. 풀 처리량은 할당된 용량과 서비스 수준에 따라 결정됩니다. 예를 들어 40TiB Premium 풀은 TiB당 64MiBps에서 최대 2,560MiBps의 처리량을 달성할 수 있는 반면 200TiB Extreme 풀은 결합된 처리량이 25,600MiBps인 볼륨을 지원할 수 있습니다.
수동 QoS 풀이 설정되면 풀 내 각 볼륨에 필요한 처리량 한도를 설정할 수 있습니다. 단일 볼륨의 최대 처리량 한도는 4.5GiBps이며, 대용량 볼륨의 경우 30GiBps입니다.
풀 및 볼륨 명령어 또는 API는 총 처리량을 관리하는 데 도움이 되도록 풀의 사용 가능한 처리량 값과 할당된 처리량 값을 표시합니다. 수동 QoS 풀을 만들고 볼륨 처리량을 정의하려면 스토리지 풀 만들기 및 볼륨 만들기를 참고하세요.
스토리지 풀 만들기
gcloud
수동 QoS를 사용하여 스토리지 풀을 만듭니다.
    gcloud netapp storage-pools create POOL_NAME \
       --project=PROJECT_ID \
       --location=LOCATION \
       --capacity=CAPACITY \
       --service-level=SERVICE_LEVEL \
       --qos-type=QOS_TYPE \
       --network=name=NETWORK_NAME
다음 정보를 바꿉니다.
POOL_NAME: 만들 풀의 이름입니다. 풀 이름은 위치별로 고유해야 합니다.PROJECT_ID: 스토리지 풀을 만들려는 프로젝트의 이름입니다.LOCATION: 만들 풀의 위치입니다.CAPACITY: 풀의 용량(GiB)입니다.SERVICE_LEVEL: 스토리지 풀의 서비스 수준입니다(Standard, Premium, Extreme).QOS_TYPE: 스토리지 풀의 QoS 유형입니다(auto 또는 manual).NETWORK_NAME: VPC의 이름
스토리지 풀 수정
gcloud
수동 QoS를 사용하도록 기존 자동 QoS 스토리지 풀을 수정합니다.
    gcloud netapp storage-pools update POOL_NAME \
       --project=PROJECT_ID \
       --location=LOCATION \
       --qos-type=QOS_TYPE
다음 정보를 바꿉니다.
POOL_NAME: 업데이트하려는 풀의 이름입니다.PROJECT_ID: 프로젝트의 이름입니다.LOCATION: 풀의 위치입니다.QOS_TYPE: 스토리지 풀의 업데이트된 QoS 유형입니다. 수동 구성만 지원됩니다.
볼륨 만들기
gcloud
다음 명령어를 사용하여 지정된 수동 QoS 처리량 한도로 볼륨을 만듭니다.
gcloud netapp volumes create VOLUME_NAME \
  --project=PROJECT_ID \
  --location=LOCATION \
  --storage-pool=STORAGE_POOL \
  --capacity=CAPACITY \
  --protocols=PROTOCOLS \
  --share-name=SHARE_NAME \
  --throughput-mibps=THROUGHPUT_MIBPS
다음 정보를 바꿉니다.
VOLUME_NAME: 볼륨 이름입니다. 이 이름은 위치별로 고유해야 합니다.PROJECT_ID: 볼륨을 만들 프로젝트의 이름입니다.LOCATION: 볼륨의 위치입니다.STORAGE_POOL: 볼륨을 만들 스토리지 풀입니다.CAPACITY: 볼륨의 용량입니다. NAS 클라이언트에 표시되는 용량을 정의합니다.PROTOCOLS: 볼륨이 내보내지는 NAS 프로토콜을 선택합니다. 유효한 선택사항은 NFSv3, NFSv4, SMB 및 다음 조합입니다.nfsv3,nfsv4nfsv3,smbnfsv4,smb
선택한 프로토콜 유형에 따라
export-policy또는smb-settings와 같은 프로토콜별 매개변수를 추가하는 것이 좋습니다.SHARE_NAME: 볼륨의 NFS 내보내기 경로 또는 SMB 공유 이름입니다.THROUGHPUT_MIBPS: 볼륨의 처리량 한도(MiBps)입니다.
추가 선택적 플래그에 관한 자세한 내용은 볼륨 생성에 관한 Google Cloud SDK 문서를 참고하세요.
다음 단계
스토리지 풀에 대해 알아보기