This document describes how to create and manage log views on your Cloud Logging buckets. Log views give you advanced and granular control over who has access to the logs within your log buckets.
You can configure and manage your log views by using the Google Cloud console, the gcloud CLI, Terraform, or the Cloud Logging API.
For general information about the Logging storage model, see Routing and storage overview.
About log views
Log views let you grant a user access to only a subset of the logs stored in a log bucket. For example, consider a scenario in which you store your organization's logs in a central project. You might create one log view for each project that contributes logs to the log bucket. You can then grant each user access to one or more log views, and thereby restrict which logs the users can view.
You can create a maximum of 30 log views per log bucket.
Control access to a log view
Cloud Logging uses IAM policies to control who has access to log views. IAM policies can exist at the resource, project, folder, and organization levels. For Cloud Logging, you can create an IAM policy for each log view. To determine whether a principal is authorized for an action, IAM evaluates all applicable policies, with the first evaluation at the resource level.
Principals with the role of roles/logging.viewAccessor on a
Google Cloud project can access views and logs in any log bucket
in the project.
To grant a principal access to only a specific log view, do one of the following:
Create an IAM policy for the log view, and then add an IAM binding to that policy which grants the principal access to the log view.
If you create large numbers of log views, then we recommend this approach.
Grant the principal the IAM role of
roles/logging.viewAccessoron the project that contains the log view, but attach an IAM condition to restrict the grant to the specific log view. If you omit the condition, then you grant the principal access to all log views. There is a limit of 20 role bindings in the policy file for a Google Cloud project that include the same role and the same principal, but different condition expressions.
For more information, see the following sections of this document:
Automatically created log views
Cloud Logging automatically creates an _AllLogs view for every
log bucket and a _Default view for the _Default log bucket:
_AllLogsview: You can view all logs in the log bucket._Defaultview: You can view all non-Data Access audit logs in the log bucket.
You can't modify views that are automatically created by Cloud Logging;
however, you can delete the _AllLogs view.
Log view filter
Each log view contains a filter that determines which log entries that are visible in the view. Filters can compare any of the following values:
A data source using the
sourcefunction. Thesourcefunction returns log entries from a particular resource in the organizations, folders, and Google Cloud projects hierarchy.A log ID using the
log_idfunction. Thelog_idfunction returns log entries that match the givenLOG_IDargument from thelogNamefield.A valid resource type using the
resource.type=FIELD_NAME comparison.
A log view filter can contain multiple statements that are joined
by logical AND operators. For example, the following filter includes only
Compute Engine stdout
log entries from a Google Cloud project called myproject:
source("projects/myproject") AND
resource.type = "gce_instance" AND
log_id("stdout")
You can also apply the negation operator to a
data source, a log ID, or to a resource type. For example, the following
filter excludes Compute Engine stdout log entries from the log view:
source("projects/myproject") AND
NOT resource.type = "gce_instance" AND
log_id("stdout")
You can apply the negation operator to a data source, a log ID, or to a
resource type. You can't apply this operator to a compound statement.
For example, a statement of the form NOT (A AND B) isn't supported.
Also, you can't include logical OR operators in log view filters.
For details about the filtering syntax, see Comparisons.
How log views differ from analytics views
Log views and analytics views are different.
A log view on a log bucket controls
which log entries in the log bucket that you can see. When you use
Log Analytics, the LogEntry data structure determines the schema of the
data that you query.
An analytics view contains a SQL query over one or
more log views. By using Log Analytics, you can write queries against an
analytics view. Because the creator of an analytics view determines the
schema, one use case for analytics views is to transform log data from the
LogEntry format into a format that is more suitable for you.
Before you begin
Before you create or update a log view, complete the following steps:
If you haven't already done so, in the appropriate Google Cloud project, create a Logging bucket for which you want to configure a custom log view.
-
To get the permissions that you need to create and manage log views and to grant access to log views, ask your administrator to grant you the following IAM roles on your project:
-
Logs Configuration Writer (
roles/logging.configWriter) -
To add a role binding to a project:
Project IAM Admin (
roles/resourcemanager.projectIamAdmin) -
To add a role binding to a log view:
Logging Admin (
roles/logging.admin)
For more information about granting roles, see Manage access to projects, folders, and organizations.
You might also be able to get the required permissions through custom roles or other predefined roles.
-
Logs Configuration Writer (
-
Select the tab for how you plan to use the samples on this page:
Console
When you use the Google Cloud console to access Google Cloud services and APIs, you don't need to set up authentication.
gcloud
In the Google Cloud console, activate Cloud Shell.
At the bottom of the Google Cloud console, a Cloud Shell session starts and displays a command-line prompt. Cloud Shell is a shell environment with the Google Cloud CLI already installed and with values already set for your current project. It can take a few seconds for the session to initialize.
Terraform
To use the Terraform samples on this page in a local development environment, install and initialize the gcloud CLI, and then set up Application Default Credentials with your user credentials.
Install the Google Cloud CLI.
If you're using an external identity provider (IdP), you must first sign in to the gcloud CLI with your federated identity.
If you're using a local shell, then create local authentication credentials for your user account:
gcloud auth application-default login
You don't need to do this if you're using Cloud Shell.
If an authentication error is returned, and you are using an external identity provider (IdP), confirm that you have signed in to the gcloud CLI with your federated identity.
For more information, see Set up ADC for a local development environment in the Google Cloud authentication documentation.
Determine which logs you want to include in the view. You use this information to specify the filter of the log view.
Determine who should have access to the log view and whether you want to add bindings to the IAM policy of the log view or the Google Cloud project. For more information, see Control access to a log view.
Create a log view
You can create a maximum of 30 log views per log bucket.
Console
To create a log view, do the following:
-
In the Google Cloud console, go to the Logs Storage page:
If you use the search bar to find this page, then select the result whose subheading is Logging.
- Select the project, folder, or organization that stores the log bucket.
- In the Log buckets pane, select the name of the log bucket on which you want to create a log view.
- In the details page for the log bucket, go to the Log views pane, and then click Create log view.
In the Define log view page, complete the following:
- Enter a name for the log view. You can't change this name after the log view is created. The name is limited to 100 characters and can include only letters, digits, underscores, and hyphens.
- Enter a description for the log view.
- In the Build filter field, enter an expression that determines which log entries in the log bucket are included in the log view. For information about the structure of this field, see the Log view filter section of this document.
Optional: To add a role binding to the log view resource, do the following:
- Click Continue and advance to the Set permissions page.
- Click Grant access.
- In the Add principals section, expand the New principals menu and then select a principal.
- In the Assign roles section, select the Logs View Accessor role.
- Click Save.
Click Save view.
If you didn't grant principals access to your log view as part of the create flow, then complete the steps in the following section.
gcloud
To create a log view, do the following:
Run the
gcloud logging views createcommand.Before using any of the command data below, make the following replacements:
- LOG_VIEW_ID: The identifier of the log view, which is limited to 100 characters and can include only letters, digits, underscores, and hyphens.
- BUCKET_NAME: The name of the log bucket.
- LOCATION: The location of the log bucket.
- FILTER: A filter that defines the log view. When empty, the log view includes all logs. For example, to filter by Compute Engine VM instances logs, enter
"resource.type=gce_instance". - DESCRIPTION: A description of the log view. For example, you might enter the following for the
description
"Compute logs". - PROJECT_ID: The identifier of the project. To create a log view in a folder or an organization, replace
--projectwith--folderor--organization.
Execute the
gcloud logging views createcommand:Linux, macOS, or Cloud Shell
gcloud logging views create LOG_VIEW_ID --bucket=BUCKET_NAME \
 --location=LOCATION --log-filter=FILTER --description=DESCRIPTION \
 --project=PROJECT_ID
Windows (PowerShell)
gcloud logging views create LOG_VIEW_ID --bucket=BUCKET_NAME `
 --location=LOCATION --log-filter=FILTER --description=DESCRIPTION `
 --project=PROJECT_ID
Windows (cmd.exe)
gcloud logging views create LOG_VIEW_ID --bucket=BUCKET_NAME ^
 --location=LOCATION --log-filter=FILTER --description=DESCRIPTION ^
 --project=PROJECT_ID
This command doesn't provide a response. To confirm the changes, you can run the
gcloud logging views listcommand.Grant principals access to your log view. The following section contains information about these steps.
Terraform
To learn how to apply or remove a Terraform configuration, see Basic Terraform commands. For more information, see the Terraform provider reference documentation.
To create a log view in a project, folder, or organization, by using Terraform, do the following:
Use the Terraform resource
google_logging_log_view.In the command, set the following fields:
name: Set to name fully-qualified name of the log view. For example, for projects, the format of this field is:"projects/PROJECT_ID/locations/LOCATION/buckets/BUCKET_NAME/view/LOG_VIEW_ID"In the previous expression, LOCATION is the location of the log bucket.
bucket: Set to the fully-qualified name of the log bucket. For example, this field might be:"projects/PROJECT_ID/locations/LOCATION/buckets/BUCKET_NAME"filter: The filter which describes which log entries are included in the log view.description: A brief description.
Grant principals access to your log view. The following section contains information about these steps.
Grant access to a log view
To restrict a principal to a specific log view on a user-defined log bucket, there are two approaches that you can use:
When you create a large number of log views, we recommend that you control access by using the IAM policy file of the log view.
Log view: Add role bindings
This section describes how to use the IAM policy file for a log view to control who has access to the log entries in that log view. When you use this approach, you add a binding to the log view's policy file, the binding grants the specified principal access to the log view.
This section also describes how to list the role binding contained in the IAM policy file for a log view.
Console
To update the IAM policy file of a log view, do the following:
-
In the Google Cloud console, go to the Logs Storage page:
If you use the search bar to find this page, then select the result whose subheading is Logging.
- Select the project, folder, or organization that stores the log bucket.
- In the Log buckets pane, select the name of the log bucket that hosts the log view.
- In the details page for the log bucket, go to the Log views pane.
For the log view whose IAM policy file that you want to modify, click more_vert Actions, and then select Adjust permissions.
The permissions flyout opens and displays the permissions associated with the log view.
In the permissions flyout, click Add principal.
In the Add principals section, expand the New principals menu, and then select a principal.
In the Assign roles section, select the Logs View Accessor role.
Click Save.
The permissions flyout updates with the new permissions.
The section labeled Logs View Accessor (N) lists the principals with project-level grants of the role Logs View Accessor. These principals have access to all log views in the project.
Sections labeled like Logs View Accessor condition:Condition-specific descriptive text (N) list the principals who have conditional project-level grants of the role Logs View Accessor. These principals have access only to the log view specified by the condition.
The section labeled like Logs View Accessor condition:abcde (N), lists the principals who have log view-level grants.
The following screenshot shows a permissions flyout where two principals have project-level role grants, which are identified by the project icon,
 , and one principal has a log view-level grant:
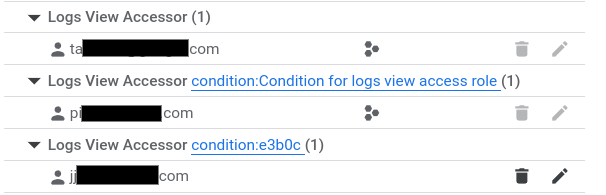
To close the flyout, click X.
gcloud
To update the IAM policy file of a log view, do the following:
Run the
gcloud logging views add-iam-policy-bindingcommand.Before using any of the command data below, make the following replacements:
- LOG_VIEW_ID: The identifier of the log view, which is limited to 100 characters and can include only letters, digits, underscores, and hyphens.
- PRINCIPAL: An identifier for the principal that you want to
grant the role to. Principal identifiers usually have the following form:
PRINCIPAL-TYPE:ID. For example,user:my-user@example.com. For a full list of the formats thatPRINCIPALcan have, see Principal identifiers. - BUCKET_NAME: The name of the log bucket.
- LOCATION: The location of the log bucket.
- PROJECT_ID: The identifier of the project. When necessary, replace
--projectwith--folderor--organization.
Execute the
gcloud logging views add-iam-policy-bindingcommand:Linux, macOS, or Cloud Shell
gcloud logging views add-iam-policy-binding LOG_VIEW_ID \
  --member=PRINCIPAL --role='roles/logging.viewAccessor' \
  --bucket=BUCKET_NAME --location=LOCATION \
  --project=PROJECT_ID
Windows (PowerShell)
gcloud logging views add-iam-policy-binding LOG_VIEW_ID `
  --member=PRINCIPAL --role='roles/logging.viewAccessor' `
  --bucket=BUCKET_NAME --location=LOCATION `
  --project=PROJECT_ID
Windows (cmd.exe)
gcloud logging views add-iam-policy-binding LOG_VIEW_ID ^
  --member=PRINCIPAL --role='roles/logging.viewAccessor' ^
  --bucket=BUCKET_NAME --location=LOCATION ^
  --project=PROJECT_ID
The following illustrates the response when a single binding is added:
Updated IAM policy for logging view [projects/PROJECT_ID/locations/global/buckets/BUCKET_NAME/views/LOG_VIEW_ID].
bindings:
- members:
  - PRINCIPAL
  role: roles/logging.viewAccessor
etag: BwYXfSd9-Gw=
version: 1
To verify the update, run the
gcloud logging views get-iam-policycommand:Before using any of the command data below, make the following replacements:
- LOG_VIEW_ID: The identifier of the log view, which is limited to 100 characters and can include only letters, digits, underscores, and hyphens.
- BUCKET_NAME: The name of the log bucket.
- LOCATION: The location of the log bucket.
- PROJECT_ID: The identifier of the project. When necessary, replace
--projectwith--folderor--organization.
Execute the
gcloud logging views get-iam-policycommand:Linux, macOS, or Cloud Shell
gcloud logging views get-iam-policy LOG_VIEW_ID \
 --bucket=BUCKET_NAME --location=LOCATION \
 --project=PROJECT_ID
Windows (PowerShell)
gcloud logging views get-iam-policy LOG_VIEW_ID `
 --bucket=BUCKET_NAME --location=LOCATION `
 --project=PROJECT_ID
Windows (cmd.exe)
gcloud logging views get-iam-policy LOG_VIEW_ID ^
 --bucket=BUCKET_NAME --location=LOCATION ^
 --project=PROJECT_ID
When a log view doesn't contain any bindings, the response contains only an
etagfield. The following illustrates the response when a log view contains a single binding:bindings: - members: - PRINCIPAL role: roles/logging.viewAccessor etag: BwYXfSd9-Gw= version: 1
Terraform
To learn how to apply or remove a Terraform configuration, see Basic Terraform commands. For more information, see the Terraform provider reference documentation.
To provision IAM associations for a log view by using Terraform, several different resources are available:
google_logging_log_view_iam_policygoogle_logging_log_view_iam_bindinggoogle_logging_log_view_iam_member
For more information, see IAM policy for Cloud Logging LogView.
To list IAM associations for log views by using Terraform,
use the data source
google_logging_log_view_iam_policy.
Google Cloud project: Add role bindings
This section describes how to add a role binding to a Google Cloud project, and how to list the bindings attached to a project. When you use this approach, to restrict a principal to having access to the log entries stored in a specific log view, you must add an IAM condition to the grant.
Console
To add a role binding to the IAM policy file of a Google Cloud project, in the project where you created the log bucket, do the following:
-
In the Google Cloud console, go to the IAM page:
If you use the search bar to find this page, then select the result whose subheading is IAM & Admin.
The IAM page lists all principals, their IAM roles, and any conditions attached to those roles, that are applied at the project level. This page doesn't show role bindings that are attached to the policy file of a log view.
Click Grant access.
In the New principals field, add the user's email account.
In the Select a role drop-down menu, select Logs View Accessor.
This role provides users with read access to all views. To limit user access to a specific view, add a condition based on the resource name.
Click Add IAM condition.
Enter a Title and Description for the condition.
In the Condition type drop-down menu, select Resource > Name.
In the Operator drop-down menu, select is.
In the Value field, enter the ID of the log view, including the full path to the view.
For example:
projects/PROJECT_ID/locations/LOCATION/buckets/BUCKET_NAME/views/LOG_VIEW_ID
Click Save to add the condition.
Click Save to set the permissions.
gcloud
To add a role binding to the IAM policy file of a Google Cloud project, complete the following steps:
Create a JSON or yaml file with your condition.
For example, you might create a file named
condition.yamlwith the following contents:expression: "resource.name == \"projects/PROJECT_ID/locations/LOCATION/buckets/BUCKET_NAME/views/LOG_VIEW_ID\"" title: "My title" description: "My description"Optional: To verify that the JSON or yaml file is properly formatted, run the following command:
gcloud alpha iam policies lint-condition --condition-from-file=condition.yamlUpdate the IAM policy on the Google Cloud project by calling the
gcloud projects add-iam-policy-bindingmethod.Before using the following command, make the following replacements:
- PROJECT_ID: The identifier of the project.
- PRINCIPAL: An identifier for the principal that you want to
grant the role to. Principal identifiers usually have the following form:
PRINCIPAL-TYPE:ID. For example,user:my-user@example.com. For a full list of the formats thatPRINCIPALcan have, see Principal identifiers.
Execute the
gcloud projects add-iam-policy-bindingcommand:gcloud projects add-iam-policy-binding PROJECT_ID --member=PRINCIPAL --role='roles/logging.viewAccessor' --condition-from-file=condition.yamlThe response to the previous command includes all role bindings.
- condition:
    description: My description
    expression: resource.name == "projects/PROJECT_ID/locations/LOCATION/buckets/BUCKET_NAME/views/LOG_VIEW_ID"
    title: My title
  members:
  - PRINCIPAL
  role: roles/logging.viewAccessor
Optional: To list the role bindings on a Google Cloud project, use the
gcloud projects get-iam-policycommand:gcloud projects get-iam-policy PROJECT_IDBefore using the following command, make the following replacements:
- PROJECT_ID: The identifier of the project.
The response to the previous command includes all role bindings.
- condition:
    description: My description
    expression: resource.name == "projects/PROJECT_ID/locations/LOCATION/buckets/BUCKET_NAME/views/LOG_VIEW_ID"
    title: My title
  members:
  - PRINCIPAL
  role: roles/logging.viewAccessor
Terraform
To learn how to apply or remove a Terraform configuration, see Basic Terraform commands. For more information, see the Terraform provider reference documentation.
To provision IAM associations for projects by using Terraform, several different resources are available:
google_project_iam_policygoogle_project_iam_bindinggoogle_project_iam_member
For more information, see IAM policy for projects.
To list IAM associations for projects by using Terraform,
use the data source
google_project_iam_policy.
List all role bindings for a log view
The IAM page in the Google Cloud console lists project-level role bindings. This page doesn't list role bindings that are attached to resources like log views. This section describes how you can view all role bindings for a specific log view.
To list the IAM bindings that are attached to a log view, complete the following steps.
-
In the Google Cloud console, go to the Logs Storage page:
If you use the search bar to find this page, then select the result whose subheading is Logging.
- Select the project, folder, or organization that stores the log bucket.
- In the Log buckets pane, select the name of the log bucket that hosts the log view.
- In the details page for the log bucket, go to the Log views pane.
For the log view whose role bindings you want to view, click more_vert Actions, and then select Adjust permissions.
The permissions flyout displays all permissions associated with the log view:
The section labeled Logs View Accessor (N) lists the principals with project-level grants of the role Logs View Accessor. These principals have access to all log views in the project.
Sections labeled like Logs View Accessor condition:Condition-specific descriptive text (N) list the principals who have conditional project-level grants of the role Logs View Accessor. These principals have access only to the log view specified by the condition.
The section labeled like Logs View Accessor condition:abcde (N), lists the principals who have log view-level grants.
The following screenshot shows a permissions flyout where two principals have project-level role grants, which are identified by the project icon,
, and one principal has a log view-level grant: To close the flyout, click X.
List log views on a log bucket
Console
-
In the Google Cloud console, go to the Logs Storage page:
If you use the search bar to find this page, then select the result whose subheading is Logging.
- Select the project, folder, or organization that stores the log bucket.
In the Log buckets pane, select the name of the log bucket that hosts the log view.
The details page for the log bucket opens. The Log views pane lists the log views on the log bucket.
gcloud
To list the log views created for a log bucket,
use the gcloud logging views list command.
Before using any of the command data below, make the following replacements:
- BUCKET_NAME: The name of the log bucket.
- LOCATION: The location of the log bucket.
- PROJECT_ID: The identifier of the project. When necessary, replace
--projectwith--folderor--organization.
Execute the
gcloud logging views list
command:
Linux, macOS, or Cloud Shell
gcloud logging views list \
 --bucket=BUCKET_NAME --location=LOCATION \
 --project=PROJECT_ID
Windows (PowerShell)
gcloud logging views list `
 --bucket=BUCKET_NAME --location=LOCATION `
 --project=PROJECT_ID
Windows (cmd.exe)
gcloud logging views list ^
 --bucket=BUCKET_NAME --location=LOCATION ^
 --project=PROJECT_ID
The response data is a list of log views. For each log view, the filter is shown along with
the create and last update dates. When the create and update dates are empty, the log view was
created when the Google Cloud project was creatd. The following example output shows that ther are
two view IDs, _AllLogs and compute, on the log bucket that was queried:
VIEW_ID: _AllLogs
FILTER:
CREATE_TIME:
UPDATE_TIME:

VIEW_ID: compute
FILTER: resource.type="gce_instance"
CREATE_TIME: 2024-02-20T17:41:17.405162921Z
UPDATE_TIME: 2024-02-20T17:41:17.405162921Z
Terraform
You can use Terraform to create and modify a log view. However, you can't use Terraform to list your log views.
Update a log view
Console
-
In the Google Cloud console, go to the Logs Storage page:
If you use the search bar to find this page, then select the result whose subheading is Logging.
- Select the project, folder, or organization that stores the log bucket.
- In the Log buckets pane, select the name of the log bucket that hosts the log view.
- In the details page for the log bucket, go to the Log views pane.
On the log view whose details you want to update, click more_vert More, and then click Edit view.
You can edit the description and the filter for the log view.
When your changes are complete, click Save view.
gcloud
To update or modify a log view,
use the gcloud logging views update command.
If you don't know the view ID, then see List log views.
Before using any of the command data below, make the following replacements:
- LOG_VIEW_ID: The identifier of the log view, which is limited to 100 characters and can include only letters, digits, underscores, and hyphens.
- BUCKET_NAME: The name of the log bucket.
- LOCATION: The location of the log bucket.
- FILTER: A filter that defines the log view. When empty, the log view includes all logs. For example, to filter by Compute Engine VM instances logs, enter
"resource.type=gce_instance". - DESCRIPTION: A description of the log view. For example, you might enter the following for the
description
"New description for the log view". - PROJECT_ID: The identifier of the project. When necessary, replace
--projectwith--folderor--organization.
Execute the
gcloud logging views update
command:
Linux, macOS, or Cloud Shell
gcloud logging views update LOG_VIEW_ID \
 --bucket=BUCKET_NAME --location=LOCATION \
 --log-filter=FILTER --description=DESCRIPTION \
 --project=PROJECT_ID
Windows (PowerShell)
gcloud logging views update LOG_VIEW_ID `
 --bucket=BUCKET_NAME --location=LOCATION `
 --log-filter=FILTER --description=DESCRIPTION `
 --project=PROJECT_ID
Windows (cmd.exe)
gcloud logging views update LOG_VIEW_ID ^
 --bucket=BUCKET_NAME --location=LOCATION ^
 --log-filter=FILTER --description=DESCRIPTION ^
 --project=PROJECT_ID
This command doesn't provide a response. To confirm the changes, you can run the
gcloud logging views describe command.
Terraform
To learn how to apply or remove a Terraform configuration, see Basic Terraform commands. For more information, see the Terraform provider reference documentation.
To modify a log view in a project, folder, or organization by using Terraform,
use the Terraform resource
google_logging_log_view.
Delete a log view
When you no longer need a log view that you created, you can delete it. However, before you delete a log view, we recommend that you verify that the log view isn't being referenced by another resource, such as a saved query.
You can't delete the _Default log view on the _Default log bucket.
Console
-
In the Google Cloud console, go to the Logs Storage page:
If you use the search bar to find this page, then select the result whose subheading is Logging.
- Select the project, folder, or organization that stores the log bucket.
- In the Log buckets pane, select the name of the log bucket that hosts the log view.
- In the details page for the log bucket, go to the Log views pane, and then select the checkbox for the log view that you want to delete.
- In the toolbar of the Log views pane, click Delete view, and then complete the dialog.
gcloud
To delete a log view, do the following:
Recommended: Review your Google Cloud project to ensure that the log view isn't being referenced. Consider examining the following:
- Queries run from the Logs Explorer or Log Analytics pages that were saved or shared.
- Custom dashboards.
Use the
gcloud logging views deletecommand. If you don't know the view ID, then see List log views.Before using any of the command data below, make the following replacements:
- LOG_VIEW_ID: The identifier of the log view, which is limited to 100 characters and can include only letters, digits, underscores, and hyphens.
- BUCKET_NAME: The name of the log bucket.
- LOCATION: The location of the log bucket.
- PROJECT_ID: The identifier of the project. When necessary, replace
--projectwith--folderor--organization.
Execute the
gcloud logging views deletecommand:Linux, macOS, or Cloud Shell
gcloud logging views delete LOG_VIEW_ID \
 --bucket=BUCKET_NAME --location=LOCATION \
 --project=PROJECT_ID
Windows (PowerShell)
gcloud logging views delete LOG_VIEW_ID `
 --bucket=BUCKET_NAME --location=LOCATION `
 --project=PROJECT_ID
Windows (cmd.exe)
gcloud logging views delete LOG_VIEW_ID ^
 --bucket=BUCKET_NAME --location=LOCATION ^
 --project=PROJECT_ID
The response confirms the deletion. For example, the following shows the response to deleting a log view named
tester:Deleted [tester].
Terraform
To learn how to apply or remove a Terraform configuration, see Basic Terraform commands. For more information, see the Terraform provider reference documentation.
Describe a log view
Console
-
In the Google Cloud console, go to the Logs Storage page:
If you use the search bar to find this page, then select the result whose subheading is Logging.
- In the Log buckets pane, select the name of the log bucket that hosts the log view.
- In the details page for the log bucket, go to the Log views pane.
- On the log view whose details you want to see, click more_vert More, and then click Edit view.
- To close the dialog without saving any changes, click Cancel.
gcloud
To retrieve detailed information about a log view,
use the gcloud logging views describe command.
If you don't know the view ID, then see List log views.
Before using any of the command data below, make the following replacements:
- LOG_VIEW_ID: The identifier of the log view, which is limited to 100 characters and can include only letters, digits, underscores, and hyphens.
- BUCKET_NAME: The name of the log bucket.
- LOCATION: The location of the log bucket.
- PROJECT_ID: The identifier of the project. When necessary, replace
--projectwith--folderor--organization.
Execute the
gcloud logging views describe
command:
Linux, macOS, or Cloud Shell
gcloud logging views describe LOG_VIEW_ID \
 --bucket=BUCKET_NAME --location=LOCATION\
 --project=PROJECT_ID
Windows (PowerShell)
gcloud logging views describe LOG_VIEW_ID `
 --bucket=BUCKET_NAME --location=LOCATION`
 --project=PROJECT_ID
Windows (cmd.exe)
gcloud logging views describe LOG_VIEW_ID ^
 --bucket=BUCKET_NAME --location=LOCATION^
 --project=PROJECT_ID
The response always includes the description and the fully-qualified name of the log view. It also includes the filter, when the filter field isn't empty. The following is a sample response:
createTime: '2024-02-20T17:41:17.405162921Z'
filter: resource.type="gce_instance"
name: projects/my-project/locations/global/buckets/my-bucket/views/compute
updateTime: '2024-02-20T17:41:17.405162921Z'
Terraform
You can use Terraform to create and modify a log view. However, you can't use Terraform to display the details of a log view.
View logs associated with a log view
You can display the log entries in a log view by using the Logs Explorer or by using the Log Analytics page. When you use the Logs Explorer, you must configure the scope and select a log view. When you use the Log Analytics page, you query a log view.
To query a log view by using the Logs Explorer, do the following:
-
In the Google Cloud console, go to the Logs Explorer page:
If you use the search bar to find this page, then select the result whose subheading is Logging.
Select the resources searched for log entries:
When the toolbar displays
Project logs,
expand the menu, select
Log view, and then select the log view that you want to query.When the toolbar displays something like
 1 log view,
expand the menu, select Log view, and then select the log view or
log views that you want to query.
1 log view,
expand the menu, select Log view, and then select the log view or
log views that you want to query.Otherwise, the toolbar displays an
 icon and
the name of a log scope, such as _Default. Expand the menu, select
Log view, and then select the log view that you want to query.
icon and
the name of a log scope, such as _Default. Expand the menu, select
Log view, and then select the log view that you want to query.
For more information, see the Logs Explorer documentation.
What's next
To learn how to control access to specific fields in a log entry, see Configure field-level access.