SAP ERP
借助 SAP ERP 连接器,您可以对 SAP ERP 数据执行插入、删除、更新和读取操作。
支持的版本
SAP ERP 连接器可以使用以下方法与 SAP R/3 系统通信:
- 业务应用编程接口 (BAPI)
- 远程函数调用 (RFC)
- SAP 表
- SAP 查询
- IDoc 消息
- SAP ECC
- SAP ERP
- SAP R/3
- SAP S/4 Hana 本地
- SAP JCo 版本。
此连接器需要在创建连接期间提供两个 JCo 文件:
sapjco3.jar和libsapjco3.so(适用于 Unix)。您可以从 SAP 连接器网站下载 JCo 3.1.5 版本。
如果 SAP 系统支持 RFC 连接并且所需的 RFC 可用,则与 SAP 系统的连接正常。其他支持 RFC 连接的版本也可能受支持。
SAP 表:SAP 表通过 TableMode 连接属性自动公开为视图。使用 Views 连接属性指定要处理的 SAP 表,该属性会替换 TableMode。SAP 不建议直接修改表。建议使用 BAPI 来修改任何表格数据。不支持直接修改 SAP 表。
BAPI 和 RFC:BAPI 和 RFC 直接作为存储过程公开。默认情况下,以关键字 BAPI 开头的所有 RFC 都会显示为可用的存储过程。
IDoc:中间文档 (IDoc) 文件是 SAP 对象,以电子消息的形式将业务交易数据从一个系统传输到另一个系统。IDoc 通过电子数据交换 (EDI) 系统将数据从 SAP 传输到非 SAP 系统。
如需详细了解这些术语,请参阅 SAP 术语表。
准备工作
在使用 SAP ERP 连接器之前,请先完成以下任务:
- 在您的 Google Cloud 项目中:
- 确保已设置网络连接。如需了解网络模式,请参阅网络连接。
- 向配置连接器的用户授予 roles/connectors.admin IAM 角色。
- 将以下 IAM 角色授予您要用其来使用连接器的服务账号:
roles/secretmanager.viewerroles/secretmanager.secretAccessorroles/storage.objectViewer
服务账号是一种特殊类型的 Google 账号,用于表示需要验证身份并获得授权以访问 Google API 数据的非人类用户。如果您没有服务账号,则必须创建一个服务账号。连接器和服务账号必须属于同一项目。如需了解详情,请参阅创建服务账号。
- 启用以下服务:
secretmanager.googleapis.com(Secret Manager API)connectors.googleapis.com(Connectors API)
如需了解如何启用服务,请参阅启用服务。
如果之前没有为您的项目启用这些服务或权限,则在您配置连接器时,系统会提示您启用。
如果您启用事件订阅,则必须配置 ABAP SDK。如需了解如何配置 ABAP SDK,请参阅 ABAP SDK for Google Cloud 概览。
-
您必须创建一个指定存储桶,并上传从 SAP ERP 门户下载的以下对象 ID:
- JCo jar Cloud Storage 路径:Java 连接器 (JCo) JAR 文件的 Cloud Storage 路径。
- libsapjco3 Cloud Storage 路径:libsapjco3 JAR 文件的 Cloud Storage 路径。
配置连接器
一个连接需专用于一个数据源。这意味着,如果您有许多数据源,则必须为每个数据源创建单独的连接。如需创建连接,请执行以下操作:
- 在 Cloud 控制台 中,进入 Integration Connectors > 连接页面,然后选择或创建一个 Google Cloud 项目。
- 点击 + 新建以打开创建连接页面。
-
在位置部分中,选择连接的位置。
- 区域:从下拉列表中选择一个位置。
如需查看所有受支持区域的列表,请参阅位置。
- 点击下一步。
- 区域:从下拉列表中选择一个位置。
- 在连接详情部分中,完成以下操作:
- 连接器:从可用连接器的下拉列表中选择 SAP ERP。
- 连接器版本:从可用版本的下拉列表中选择一个连接器版本。
- 在连接名称字段中,输入连接实例的名称。
连接名称必须符合以下条件:
- 连接名称可以使用字母、数字或连字符。
- 字母必须小写。
- 连接名称必须以字母开头,以字母或数字结尾。
- 连接名称不能超过 49 个字符。
- 对于支持事件订阅的连接器,连接名称不得以“goog”前缀开头。
- (可选)输入连接的说明。
- 您可以选择启用 Cloud Logging,然后选择日志级别。默认情况下,日志级别设置为
Error。 - 服务账号:选择具有所需角色的服务账号。
- 如需将连接用于事件订阅,请选择启用事件订阅。选择此选项后,系统会显示以下选项:
- 启用包含实体和操作的事件订阅:选择此选项可将连接用于事件订阅和连接器操作(实体和操作)。
- 仅启用事件订阅:选择此选项可仅将连接用于事件订阅。如果您选择此选项,请点击下一步,然后配置事件订阅。
- 客户端:向 SAP 系统进行身份验证的客户端。
- 系统 ID:SAP 系统的系统 ID 或 R3Name 是一个字符串,最多包含三个字符。它通常用于负载均衡连接。
- 系统编号:用于定义目标系统的编号。用于设置主机连接属性。
- 项目 ID:包含 SAP JCo JAR 的 GCS 存储桶所在的 Google Cloud 项目的 ID。
- 存储桶:包含 sapjco3.jar 和 libsapjco3.so 文件的存储桶的名称。
- JCo jar Cloud Storage 路径:JCo jar 的 Cloud Storage 路径。
- libsapjco3 Cloud Storage 路径:libsapjco3 JAR 的 Cloud Storage 路径。
- 表格模式:选择要显示为视图的 SAP 表。
- 读取表函数:用于读取表的函数的名称。如需了解详情,请参阅使用自定义读取表函数。
- 系统 ID:SAP 系统的系统 ID 或 R3Name。您最多可以输入 3 个字符。
- 查询模式:选择哪些 SAP 表必须显示为视图。
-
可浏览的视图:输入以英文逗号分隔的要显示的视图列表。
例如
ViewA,ViewB,ViewC。 - 语言:将此属性设置为您在登录 SAP 时指定的语言。此属性是 SAP 系统所用语言的 ISO 639-1 代码。默认情况下,系统将使用 EN。
- 服务条目:要用于连接的服务条目。
-
SNC 模式:选择此选项可为 Integration Connectors 与 SAP 系统之间的身份验证启用 SNC。如果您选择此选项,请指定以下详细信息:
- SNC_LIB 对象 ID:SNC 库的对象 ID。
- PSE 名称:适用于相应存储桶的个人安全环境 (PSE) 文件的名称。PSE 文件以 ASN.1 结构存储公钥/私钥对以及 X.509 证书。
- SNC 密码:选择 SNC 库密码的 Secret Manager 密钥。
- 密文版本:选择密文版本。
- SNC 名称:输入 SNC 连接的名称。
-
SNC qop:选择保护级别。支持的级别如下:
- 1 - 仅应用身份验证。
- 2 - 应用完整性保护。还包括身份验证保护。
- 3 - 应用隐私保护。这还包括完整性和身份验证保护。
- 8 - 应用默认保护。
- 9 - 应用最高级别的保护。
- SNC 合作伙伴名称:输入应用服务器的 SNC 名称。
-
连接方案:指定您是连接到具有消息服务器(组服务器)的 SAP 系统,还是连接到应用服务器。如需了解连接到具有消息服务器的 SAP 系统时必须满足的前提条件,请参阅消息服务器(组服务器)连接类型。
如果您选择 GroupServer,则必须指定以下详细信息:
- 消息服务器:连接到使用负载均衡的 SAP 系统时,请指定消息服务器。
- 消息服务器服务:要连接的消息服务器服务。
- 组:所用的登录组。只有在连接到使用负载均衡的 SAP 系统时,才必须指定此属性。
如果您要连接到具有消息服务器(组服务器)的 SAP 系统,则无需在 Destinations 部分中指定主机地址。
- (可选)配置连接节点设置:
- 节点数下限:输入连接节点数下限。
- 节点数上限:输入连接节点数上限。
节点是处理事务的连接单元(或副本)。 连接处理越多事务就需要越多节点,相反,处理越少事务需要越少节点。 如需了解节点如何影响连接器价格,请参阅连接节点的价格。如果未输入任何值,则默认情况下,节点数下限设置为 2(以便提高可用性),节点数上限设置为 50。
- (可选)点击 + 添加标签,以键值对的形式向连接添加标签。
- 点击下一步。
- 在目标部分中,输入要连接到的远程主机(后端系统)的详细信息。如果您要连接到具有消息服务器的 SAP 系统,则无需指定主机地址。
- 目标类型:选择目标类型。
- 从列表中选择主机地址,以指定目标的主机名或 IP 地址。
- 如果要与后端系统建立专用连接,请从列表中选择端点连接,然后从端点连接列表中选择所需的端点连接。
如果您想建立与后端系统的公共连接,同时提高安全性,可以考虑为连接配置静态出站 IP 地址,然后配置防火墙规则,仅允许特定静态 IP 地址加入许可名单。
若要输入其他目标,请点击 + 添加目标。
- 点击下一步。
- 目标类型:选择目标类型。
-
在身份验证部分中,输入身份验证详细信息。
- 选择身份验证类型,然后输入相关详细信息。
SAP ERP 连接支持以下身份验证类型:
- 基于 X509 证书的身份验证
- 用户名和密码
- 点击下一步。
如需了解如何配置这些身份验证类型,请参阅配置身份验证。
- 选择身份验证类型,然后输入相关详细信息。
- 如果您已启用事件订阅,连接创建页面上会显示事件订阅详情部分。如需了解如何配置事件订阅详细信息,请参阅配置事件订阅。
- 查看:查看您的连接和身份验证详细信息。
- 点击创建。
配置身份验证
根据您要使用的身份验证输入详细信息。
-
基于 X509Certificate 的身份验证
- X509Certificate:用于登录的 X509 证书。
- 密文版本:选择密文版本。
-
用户名和密码
- 用户名:连接器的用户名
- 密码:包含与连接器关联的密码的 Secret Manager Secret。
配置事件订阅
如果您启用事件订阅,则必须配置 ABAP SDK。如需了解如何配置 ABAP SDK,请参阅 ABAP SDK for Google Cloud 概览。
在事件订阅详细信息部分中,输入以下值:
-
为事件监听器选择以下任一身份验证类型。
- Google 身份验证。如果您启用此选项,请按照使用 JSON Web 令牌进行身份验证中的步骤为 ABAP SDK 配置身份验证。此外,请确保服务账号具有 roles/connectors.listener 角色,该角色的访问令牌用于身份验证。
- API 密钥身份验证。如果您选择此选项,则必须已创建 API 密钥,然后将该密钥保存为 Secret Manager Secret。如需了解详情,请参阅创建 API 密钥。
-
输入事件类型字段名称。此字段用于标识与传入的事件请求关联的事件类型。
{
"event_type": "user.created",
...
// other request fields
...
}
- 选择启用专用连接,以在后端应用与连接之间建立安全连接。如果您选择此选项,则必须在创建连接后执行额外的配置步骤。如需了解详情,请参阅活动订阅的专用连接。
- 输入死信配置。如果您配置了死信,连接会将未处理的事件写入指定的 Pub/Sub 主题。输入以下详细信息:
- 死信项目 ID: 您已配置死信 Pub/Sub 主题的 Google Cloud 项目 ID。
- 死信主题: 您要将未处理事件的详细信息写入到的 Pub/Sub 主题。
连接配置示例
以下部分列出了创建 SAP ERP 连接时各个字段的示例值,以及不同连接类型所需的参数。
连接到分布式 SAP 系统
如果您连接到分布式 SAP 系统(例如使用负载均衡的系统),则必须指定以下其他连接属性。管理员可以在 SAP 系统中“系统条目属性”对话框的“连接”标签页中获取这些连接属性。
- 系统 ID:指定从 SystemId 属性获取的值。系统 ID 是 SAP 系统的系统 ID/R3Name。系统 ID 是一个字符串,最多包含三个字符。
- 消息服务器:当您连接到使用负载均衡的 SAP 系统时,必须指定“消息服务器”字段。将此属性设置为从 SAP 系统中的 MessageServer 属性获取的值。此外,还需在“消息服务器”字段的值前面添加 SAProuter 框的值。
- Group:将此属性设置为从 Group/Server 属性中获得的值。Group 属性用于指定所用的登录组。默认值为 PUBLIC。
连接到自定义应用服务器
如果您连接到具有专用应用服务器或自定义应用服务器的 SAP 系统,则必须指定以下其他连接属性。管理员可以从 SAP 系统获取这些连接属性。
- 系统 ID:指定从 SystemId 属性获取的值。这是 SAP 系统的系统 ID 或 R3Name。系统 ID 是一个字符串,最多包含三个字符。
- 主机:指定从应用服务器获取的值。
用于指定目标系统的主机名。此值可以是常规主机名、IP 地址或 SAP 路由器地址。
- 系统编号:指定从 SystemNumber 属性获取的值。
SystemNumber 属性用于定义目标系统。
配置安全网络连接
如果管理员已配置安全网络通信 (SNC),您必须设置以下其他属性。在 SAP 系统中,您可以在“系统条目属性”对话框的“网络”标签页上获取以下 SNC 连接字符串属性。
- SNC 模式:如果 SAP 中启用了“启用安全网络连接”复选框,请将 SNC 模式连接属性设置为 True。否则,将 SNC 模式连接属性设置为 False。
SNCMode 连接属性是一个布尔值,用于确定您是否使用 SNC。默认值为 False。
- SNC PartnerName:SNC PartnerName 用于指定应用服务器的 SNC 名称。例如:p:CN=IDS, OU=IT, O=CSW, C=DE
- SNC 名称:可选。SNCName 属性用于指定 SNC 连接的名称。设置此属性可确保连接使用正确的 SNC 名称。
- SNC Qop:将此属性设置为“安全网络设置”部分中的所选选项。例如,如果选择“完整性”选项,请将 SNCQop 属性设置为 3。
SNCQop 属性用于指定数据保护级别(或质量)。如果未指定此属性,则此属性会设置为整数 -1。有效值为 1、2、3、8 或 9,分别对应于不同的保护级别。
- SNC_Lib 对象 ID:将此属性设置为 SNC 库的路径和文件名。指定您使用的安全库的完整路径,例如
C:\Secude\secude.xll.
ApplicationServer 连接类型
对于应用服务器连接,必须在网络端点组 (NEG) 和健康检查中配置 Private Service Connect 和负载均衡器,并使用 SAP 系统 IP 和端口 33XX。其中,XX 是所用 SAP 系统的系统或实例编号。下表列出了 ApplicationServer 连接类型的示例配置值。请参阅控制台中的连接创建界面,了解哪些字段是必填字段,哪些是选填字段。
| 字段名称 | 示例值 |
|---|---|
| 区域 | us-central1 |
| 连接器 | SAP ERP |
| 连接器版本 | 1 |
| 连接器名称 | saperp-applicationserver-conn |
| 说明 | 不适用 |
| 服务账号 | xxxxxxxx-compute@developer.gserviceaccount.com |
| 客户 | 800 |
| 系统编号 | 00 |
| 项目 ID | xxxx-gcp-project |
| 存储桶 | sap-erp-bucket |
| Jco Jar 对象 ID | sapjco3.jar |
| libsapjco3 对象 ID | libsapjco3.so |
| 表格模式 | TransparentApplication/TransparentCustomer/TransparentSystem/Pooled/Cluster/None |
| 读取表函数 | Z_CUSTOM_READ_TABLE |
| 连接方案 | ApplicationServer |
| 系统 ID | SA1 |
| 查询模式 | 不适用 |
| 可浏览的视图 | 不适用 |
| 详细程度 | 5 |
| 节点数下限 | 2 |
| 节点数上限 | 50 |
| 主机地址 | 10.30.X.XX 或外部 SAP 系统的路由器字符串。 |
| 身份验证 | 用户密码 |
| 用户名 | 12345 |
| 密码 | xyz@12345 |
| 版本 | 1 |
消息服务器(群组服务器)连接类型
在连接到具有消息服务器(组服务器)的 SAP 系统之前,请确保满足以下前提条件:- 必须在网络端点组 (NEG) 和健康检查中,将 Private Service Connect 和负载均衡器配置为使用端口 33XX 和 36XX 上的 SAP 系统 IP。其中,XX 是所用 SAP 系统的系统或实例编号。
- 您必须在 Cloud DNS 上创建 DNS 区域,并将应用服务器的端点连接(在 33XX 端口上配置,使用 SAP 系统的相应主机名)进行映射。
- 只有当消息服务器返回应用服务器的完全限定域名 (FDQN) 地址时,您才能连接到具有消息服务器(组服务器)的 SAP 系统。如果消息服务器返回 IP 地址,您将无法连接到具有消息服务器(组服务器)的 SAP 系统。
- 当应用发出请求时,消息服务器必须响应应用需要连接的应用服务器的 DNS。
- 应用服务器的 DNS 必须是唯一的,并且不能被任何其他 SAP 系统使用。
- 在 SAP 应用中,必须在 gw/alternative_hostnames 参数下维护应用服务器和消息服务器的端点附件 IP。
- 前往事务代码 - RZ10,并在实例配置文件中为“gw/alternative_hostname”参数创建一个条目。
- 将
ms/lg\_with\_hostname参数设置为 1,以将 SAP 消息服务器版本(低于 7.53)配置为返回主机名。版本 7.53 及更高版本默认返回主机名。 - 重启 SAP 应用,使参数生效。
下表列出了 Group Server 连接类型的示例配置值:
| 字段名称 | 示例值 |
|---|---|
| 区域 | us-central1 |
| 连接器 | SAP ERP |
| 连接器版本 | 1 |
| 连接器名称 | saperp-groupserver-conn |
| 说明 | 不适用 |
| 服务账号 | SA-compute@developer.gserviceaccount.com |
| 客户 | 800 |
| 系统编号 | 00 |
| 项目 ID | Google-cloud-project |
| 存储桶 | sap-erp-bucket |
| Jco Jar 对象 ID | sapjco3.jar |
| libsapjco3 对象 ID | libsapjco3.so |
| 表格模式 | TransparentApplication/TransparentCustomer/TransparentSystem/Pooled/Cluster/None |
| 群组 | 公开 |
| 消息服务器 | 10.30.X.XX |
| 读取表函数 | Z_CUSTOM_READ_TABLE |
| 连接方案 | GroupServer |
| 系统 ID | SA1 |
| 查询模式 | 不适用 |
| 可浏览的视图 | 不适用 |
| 详细程度 | 5 |
| 节点数下限 | 2 |
| 节点数上限 | 50 |
| 身份验证 | 用户密码 |
| 用户名 | 用户名 |
| 密码 | PASSWORD |
| 版本 | 1 |
X509 证书连接类型
对于采用 X509 连接的安全网络通信 (SNC),必须在网络端点组 (NEG) 和健康检查中配置 SAP 系统 IP 和端口 48XX 的 Private Service Connect 和负载均衡器。其中,XX 是所用 SAP 系统的系统或实例编号。下表列出了 X509 certificate 连接类型的示例配置值。请参阅控制台中的连接创建界面,了解必填字段和选填字段。
在 Linux 系统上配置 SNC
在 Linux 系统上开始 SNC 之前,请确保您拥有以下文件:
- SAP 系统证书文件,例如
SA1cert.crt。 - 用于生成 .PSE 文件的相应 SAPCAR 文件版本,例如
SAPCAR.exe。 .SAR file,其中包含libsapcrypto.so和sapgenpse库中的 DLL 文件,例如SAPCRYPTOLIBP_*.SAR。
- 在所需位置创建一个名为
snc的目录,并将上述所有文件复制到该目录中。在此示例中,snc目录是在/home/admin/snc位置创建的。 使用终端/虚拟机/SSH 客户端(例如 PuTTY)创建目录。 - 运行以下命令以提取 SAR 归档文件以及
sapgenpse和libsapcrypto.so二进制文件:./SAPCAR.exe -xvf SAPCRYPTOLIBP_8524-20011697.SAR。 - 使用以下命令生成个人安全环境 (PSE) 文件:
./sapgenpse get_pse -p EHP8_GCP_SA1.pse -x google,123。系统会提示您输入 PSE 名称,格式如下:
CN=EHP8_GCP_SA1, OU=IT, O=CSW, C=DE。其中,EHP8_GCP_SA1是您和 PSE 提供的名称。系统还会提示您输入口令,该口令用作密码,您必须记下以供日后参考。
SNC PSE 包含用于保护 SNC 连接的服务器安全信息。 此信息包括服务器的公钥和私钥以及相应的证书列表。
如果您收到错误消息(例如
SECUDIR is not set),请运行以下命令:SECUDIR=/home/admin/snc; export SECUDIR。 - 从新创建的 PSE 文件中导出客户端证书:
./sapgenpse export_own_cert -o EHP8_GCP_SA1.crt -p EHP8_GCP_SA1.pse -x google,123。此命令会生成客户端证书EHP8_GCP_SA1.crt,其中包含 SNC 身份的公钥。您需要在此处提供证书名称。建议保持 PSE 名称与客户端证书名称一致。
- 将系统证书与 PSE 相关联:
./sapgenpse maintain_pk -a SA1cert.crt -p EHP8_GCP_SA1.pse,这会将 SAP 系统的证书 (SA1cert.crt) 与本地 PSE 相关联。 - 在 BASIS 团队的帮助下,在 SAP 系统上导入客户端证书,并将其与 X509 证书连接类型的用户进行映射。
EHP8_GCP_SA1.crt:这是用于建立从 SAP 系统到 Google Cloud 的可信连接的公共证书。它可确保通信服务账号的真实性。EHP8_GCP_SA1.pse:个人安全环境 (PSE) 文件用于存储在 SAP NetWeaver 环境中进行安全通信所需的私钥和证书信息。此文件对于基于 SSL/TLS 的连接至关重要。SA1cert.crt:一个额外的证书,可能用于中间 CA 或根 CA 验证,用于在证书验证期间完成信任链。这可确保 SAP 能够验证 GCP 服务账号或相关端点的真实性。libsapcrypto.so:SAP 加密库共享对象文件(Linux/Unix 环境)是启用 SAP 内安全通信 (SSL, SNC) 所必需的。它提供加密功能,例如加密和证书处理。libsapjco3.so:SAP Java 连接器 (JCo) 的原生库文件。这对于使基于 Java 的应用或中间件能够与 SAP 系统通信至关重要。sapgenpse:用于管理 PSE 文件、证书和加密操作的 SAP 命令行工具。此实用程序对于在 SAP 环境中生成和维护安全身份至关重要。sapjco3.jar:SAP Java 连接器的 Java 软件包 (JAR)文件。这使 Java 应用能够通过远程函数调用 (RFC) 来调用 SAP 函数。任何基于 Java 的 SAP 集成都需要此文件。- 登录 SAP GUI 并打开 t-code
STRUST。 - 转到
SNC (SAPCRYPTOLIB)。 - 在某些系统中,您可能需要切换到
Display Change模式。点击页面底部的导入按钮。 - 浏览并选择有效的客户端 PSE 名称。选择文件格式为二进制
- 点击添加到证书列表,然后点击“保存”。
- 登录 SAP GUI 并打开 t-code
SM30 - 按照以下步骤将证书映射到表
VSNCSYSACL:- 打开表
VSNCSYSACL以进行维护。 - 选择外部类型的工作区,即
E。 - 选择新建条目。
- 在相应字段中输入以下数据:
- 系统 ID:SAP 系统的名称。
- SNC 名称:与客户端证书关联的主题名称(在证书前添加
p:)
示例:p:CN=QAEHP8ER8, OU=IT, O=CSW, C=DE。
- 保存数据。
- 打开表
- 按照以下步骤将证书映射到表
VUSREXTID:- 打开表
VUSREXTID以进行维护。 - 选择工作领域
DN。 - 选择新建条目
- 在相应字段中输入数据,如下所述:
- 用户:输入需要映射证书的用户 ID。
- 序列号:输入 SAP 客户端编号。
- SNC 名称:输入与客户端证书关联的主题名称。
示例:CN=QAEHP8ER8, OU=IT, O=CSW, C=DE - 已激活:选择此选项
- 保存数据。
- 打开表
- 对 X 重复上述过程。
- 登录 SAP GUI 并打开事务代码
SU01 - 在用户字段中,输入您要授予执行 SNC 函数权限的 SAP 用户名。
- 点击“更改”图标。
- 点击“SNC”标签页。
- 在 SNC 名称字段中,输入以
p:为前缀的客户端 PSE 专有名称,如下例所示。
示例:p:CN=QAEHP8ER8, OU=IT, O=CSW, C=DE - 点击“确定”和“保存”。系统会显示一条消息,说明规范名称已确定。
为确保正常集成和数据访问,上一步中创建的文件名、上传到目标存储桶的文件名以及连接配置中指定的文件名必须完全相同。
Cloud Storage 存储桶中的必需文件
以下文件必须存储在 Cloud Storage 存储桶中,以便在 SAP 系统和 Google Cloud 服务之间实现安全通信。这些文件对于建立可信连接、启用加密以及支持 SAP 的加密和 Java 通信库至关重要:
SAP GUI 配置
请按照以下步骤导入客户端生成的证书:
X.509 的 SAP 设置
证书必须映射到以下表格:
用户映射配置
| 字段名称 | 示例值 |
|---|---|
| 区域 | us-central1 |
| 连接器 | SAP ERP |
| 连接器版本 | 1 |
| 连接器名称 | saperp-X509Certificate-conn |
| 说明 | 不适用 |
| 服务账号 | xxxxxxxx-compute@developer.gserviceaccount.com |
| 客户 | 800 |
| 系统编号 | 00 |
| 项目 ID | xxxx-gcp-project |
| 存储桶 | sap-erp-bucket |
| Jco Jar 对象 ID | sapjco3.jar |
| libsapjco3 对象 ID | libsapjco3.so |
| 表格模式 | TransparentApplication/TransparentCustomer/TransparentSystem/Pooled/Cluster/None |
| SNC_LIB 对象 ID | libsapcrypto.so |
| 用于创建 cred_v2 文件的 PSE 名称 | EHP8_GCP_SA1.pse |
| 读取表函数 | Z_CUSTOM_READ_TABLE |
| 连接方案 | ApplicationServer |
| 系统 ID | SA1 |
| SNC 密码 | xyz@gcp |
| SNC 模式 | 一个布尔值,用于确定您是否在使用 SNC。将此属性设置为 true 即可使用 SNC。 |
| SNC 名称 | p:CN=EHP8_GCP_SA1, OU=IT, O=CSW, C=DE |
| SNC Qop | 3 |
| SNC PartnerName | p:CN=SA1, OU=I0020070395, OU=SAP Web AS, O=SAP Trust Community, C=DE |
| 查询模式 | 不适用 |
| 可浏览的视图 | 不适用 |
| 详细程度 | 5 |
| 节点数下限 | 2 |
| 节点数上限 | 50 |
| 主机地址 | 10.30.X.XX 或外部 SAP 系统的路由器字符串。 |
| 身份验证 | 基于 X509 证书的身份验证 |
| X509Certificate | X509 证书可以通过文件路径指定,该文件路径指向包含 PEM 格式 X509 证书的文件、以“-----BEGIN ...”标头开头的 PEM blob 或不含“-----BEGIN ...”标头的 PEM blob。 |
| 版本 | 1 |
如果在完成所有步骤后,SNC 连接仍未变为有效状态,请执行以下操作:
- 确保将端点连接 IP 添加到 SAP 配置文件参数
gw/alternative_hostnames。 - 对于与本地 SAP 系统的 SNC 连接,SAP Gateway 通常会侦听端口
48XX,其中XX是实例编号。
在连接配置中指定 SNC Name 和 PartnerName 时,它们应以 p: 前缀开头。
X509Certificate Authentication(X509Certificate 身份验证):导入之前生成且已在 SAP 系统上提供的客户端证书。
系统限制
SAP ERP 连接器每秒可处理 7 个事务(每个节点),并且会限制超出此限额的任何事务。默认情况下,Integration Connectors 会为连接分配 2 个节点(以提高可用性)。
如需了解适用于 Integration Connectors 的限制,请参阅限制。
在集成中使用 SAP ERP 连接
创建连接后,该连接将在 Apigee Integration 和 Application Integration 中可用。您可以通过“连接器”任务在集成中使用该连接。
- 如需了解如何在 Apigee Integration 中创建和使用连接器任务,请参阅连接器任务。
- 如需了解如何在 Application Integration 中创建和使用连接器任务,请参阅连接器任务。
实体、操作和动作
所有集成连接器都会为所连接应用的对象提供抽象层。您只能通过此抽象访问应用的对象。抽象作为实体、操作和动作向您展示。
- 实体:实体可以被视为连接的应用或服务中的对象或属性集合。不同连接器的实体定义也会有所不同。例如,在数据库连接器中,表是实体;在文件服务器连接器中,文件夹是实体;在消息传递系统连接器中,队列是实体。
但可能的情况是,连接器不支持或不具有任何实体,在这种情况下,
Entities列表将为空。 - 操作:操作是指您可以对实体执行的操作。您可以对实体执行以下任一操作:
从可用列表中选择一个实体,系统会生成该实体可用的操作列表。如需了解操作的详细说明,请参阅连接器任务的实体操作。不过,如果连接器不支持任何实体操作,则不支持的操作不会列在
Operations列表中。 - 动作:动作是可通过连接器接口提供给集成的头等函数。动作可让您对一个或多个实体进行更改,并且动作因连接器而异。通常,操作会包含一些输入参数和一个输出参数。但可能的情况是,连接器不支持任何动作,在这种情况下,
Actions列表将为空。
操作
本部分提供有关 RFC 的信息,并列出连接器支持的操作。如需了解如何配置操作,请参阅操作示例。
使用 RFC
本部分提供有关所需 RFC 和使用 RFC 的信息。
必需的 RFC
如果任何必需的 RFC 不可用,则部分或全部功能可能无法正常运行。T-Code SE37 可用于查看 SAP 中可用的函数模块。
SAP ERP 连接器使用以下 RFC。
- DDIF_FIELDINFO_GET
- RFC_GET_FUNCTION_INTERFACE
- RFC_GET_STRUCTURE_DEFINITION
- RFC_GET_SYSTEM_INFO
- RFC_GET_UNICODE_STRUCTURE
- RFC_READ_TABLE
- SLDAG_CHECK_FOR_UNICODE
读取大型数据
本部分介绍了从 SAP 后端读取大型数据时需要遵循的方法。
SAP ERP 连接器使用 SAP RFC_READ_TABLE 函数从 SAP 表中获取数据,该函数的大小固定为 512 字节。它可以为每行数据进行缓冲,因此您选择的列数不能超过此缓冲区可容纳的数量。如果您选择的字节数超过 512,则在运行集成时会发生 DATA_BUFFER_EXCEEDED 异常;这表示您已超出每行允许的最大缓冲区空间,需要选择更少的列。
为了克服此问题,您可以添加 Custom RFC_READ_TABLE 的代码,该代码与 SAP RFC_READ_TABLE 类似,但具有更大的缓冲区来解决 DATA_BUFFER_EXCEEDED 问题。
使用自定义读取表函数
该连接器支持类似于 SAP RFC_READ_TABLE 的 Custom RFC_READ_TABLE,但具有更大的缓冲区,因此可以解决 DATA_BUFFER_EXCEEDED 问题。
在 SAP 后端中创建自定义 RFC_READ_TABLE
按照以下步骤使用 示例自定义 RFC_READ_TABLE。
- 使用
RFC_READ_TABLE函数作为新函数的模板:选择事务代码 SE37 和 SDTX 函数组,然后将RFC_READ_TABLE复制到新的函数组或您的工作函数组。 在此示例中,RFC_READ_TABLE会复制到Z_CUSTOM_RFC_TABLE。 - 在 SAP 页面的属性标签页中,选择远程启用模块。
- 在表格标签页中,将
DATA参数设置为CHAR8000(您可能需要右键点击,然后依次点击显示 -> 更改)。 - 在源代码标签页中,输入自定义的 read-table RFC 代码。如需参考,请参阅 sample Z_CUSTOM_RFC_TABLE_function.txt。
- 点击保存。
- 按照提供的自定义读取表中的说明定义导入、表和异常。
- 激活函数模块。
适用于 ABAP 7.52 的自定义 read-table
如果您使用的是 ABAP 7.52 或更高版本,请参阅示例 Z_CUSTOM_RFC_TABLE_function_ABAP752.txt。
此示例函数适用于 ABAP 7.52 版及更高版本。它类似于 Z_CUSTOM_RFC_TABLE 函数,但利用 ABAP 7.52 中新提供的关键字在数据库中执行分页,而不是在 ABAP 脚本本身中执行分页。这可大幅提高分页效率,并提升处理大型表时的性能。建议尽可能使用 Z_CUSTOM_RFC_TABLE_752 RFC。
对 RFC_READ_TABLE 函数的访问权限
本部分介绍了要分配给 SAP 用户以访问 RFC_READ_TABLE 函数的角色。此函数是一个支持远程调用的函数模块,允许对任意表进行通用读取访问。
如需在配置 SAP ERP 连接器任务时将表列在“实体”下,您必须在 SAP ERP 连接级别使用 RFC_READ_TABLE 函数,并获得访问 R/3 函数 RFC_READ_TABLE 的授权
为活动 03(显示)添加授权 S_TABU_DIS,并为函数 RFC_READ_TABLE 添加授权组“SC”。
以下是 RFC_READ_TABLE 的一些技术限制:
- 只能读取具有简单数据类型的表。不支持 STRING 或 XSTRING 字段。
- 最大行宽为 512 个字符。
- 返回的记录数量受内存阈值限制。
BAPI_MATERIAL_SAVEDATA 操作
此操作可让您执行特定任务。例如,您可以使用它在 SAP ERP 中创建或更改物料主数据。
BAPI_MATERIAL_SAVEDATA 操作的输入参数
| 参数名称 | 数据类型 | 必需 | 说明 |
|---|---|---|---|
| HEADDATA | 字符串 | 是 | 输入参数 HEADDATA。 |
| CLIENTDATA | 字符串 | 是 | 输入参数 CLIENTDATA。 |
| CLIENTDATAX | 字符串 | 是 | 输入参数 CLIENTDATAX。 |
| MATERIALDESCRIPTION | 字符串 | 是 | 表 MATERIALDESCRIPTION。 |
BAPI_MATERIAL_SAVEDATA 操作的输出参数
如果操作成功,此操作会返回状态 200 (OK)。
如需查看有关如何配置 BAPI_MATERIAL_SAVEDATA 操作的示例,请参阅操作示例。
ZFM_GCP_MULTIDATA_TAB 操作
此操作可让用户执行特定任务。例如,您可以在 SAP ERP 中创建多种数据类型的数据。
ZFM_GCP_MULTIDATA_TAB 操作的输入参数
| 参数名称 | 数据类型 | 必需 | 说明 |
|---|---|---|---|
| ReturnTables | 字符串 | 是 | 一个逗号分隔列表,用于指定应输出功能模块中的哪些表。 如果未指定,则会输出所有返回的表格。 |
| T_TABLE | 字符串 | 是 | 表 T_TABLE。 |
| IM_INPUT_1 | 字符串 | 是 | 输入参数 IM_INPUT_1。 |
| IM_INPUT_2 | 字符串 | 是 | 输入参数 IM_INPUT_2。 |
ZFM_GCP_MULTIDATA_TAB 操作的输出参数
如果操作成功,此操作会返回状态 200 (OK)。
如需查看有关如何配置 ZFM_GCP_MULTIDATA_TAB 操作的示例,请参阅操作示例。
PushIDoc 操作
此操作可让您执行特定任务。例如,您可以将数据从 SAP 传输到外部系统。
PushIDoc 操作的输入参数
| 参数名称 | 数据类型 | 必需 | 说明 |
|---|---|---|---|
| FileType | 字符串 | 是 | 文件类型。允许的值为 XML、IDoc。 |
| 模式 | 字符串 | 是 | 传输模式。允许的值为 Sync、ASync。 |
| 内容 | 字符串 | 是 | 文件的内容。 |
PushIDoc 操作的输出参数
如果操作成功,此操作会返回状态 200 (OK)。
如需查看有关如何配置 PushIDoc 操作的示例,请参阅操作示例。
ExecuteCustomQuery 操作
此操作可让您执行自定义查询。
如需创建自定义查询,请按照下列步骤操作:
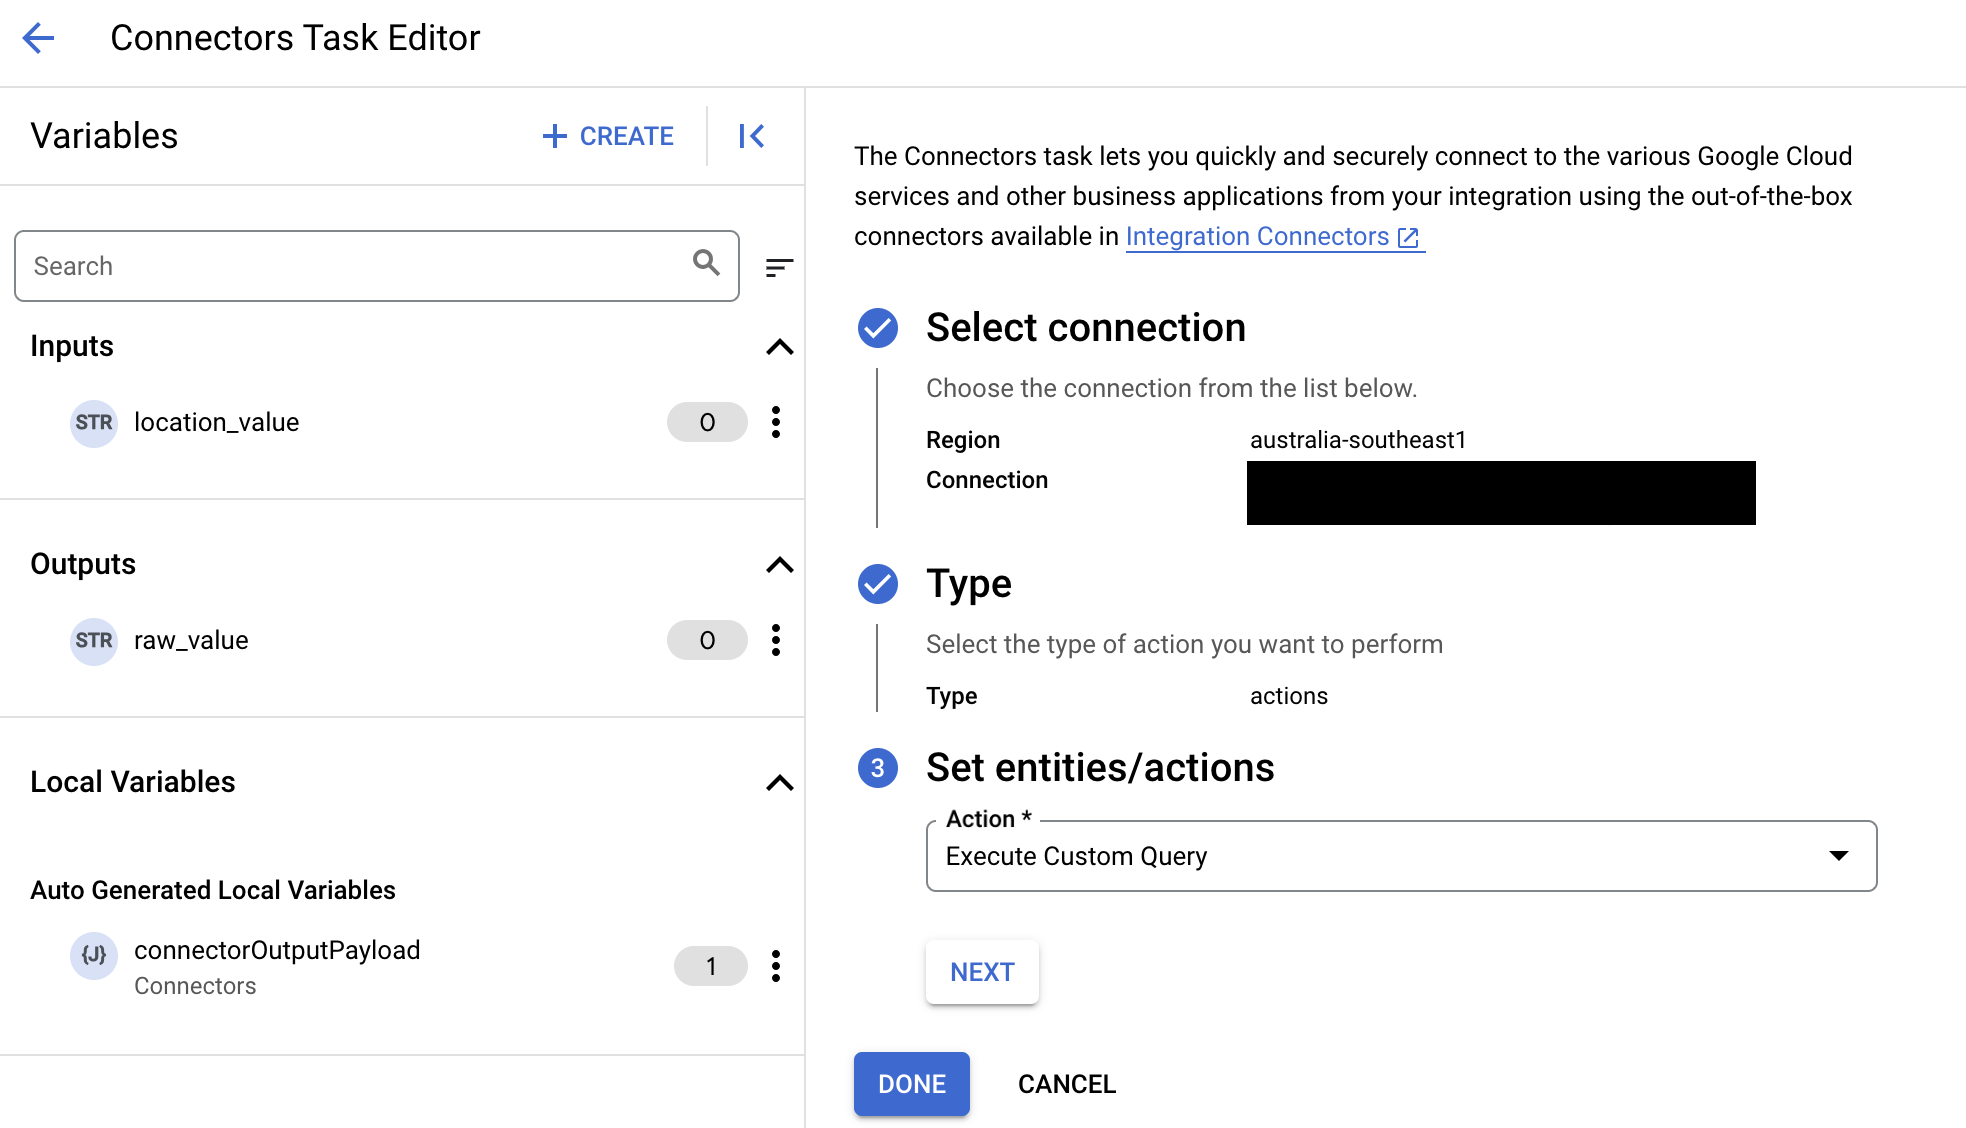
- 按照详细说明添加连接器任务。
- 配置连接器任务时,在要执行的动作类型中选择动作。
- 在动作列表中,选择执行自定义查询,然后点击完成。
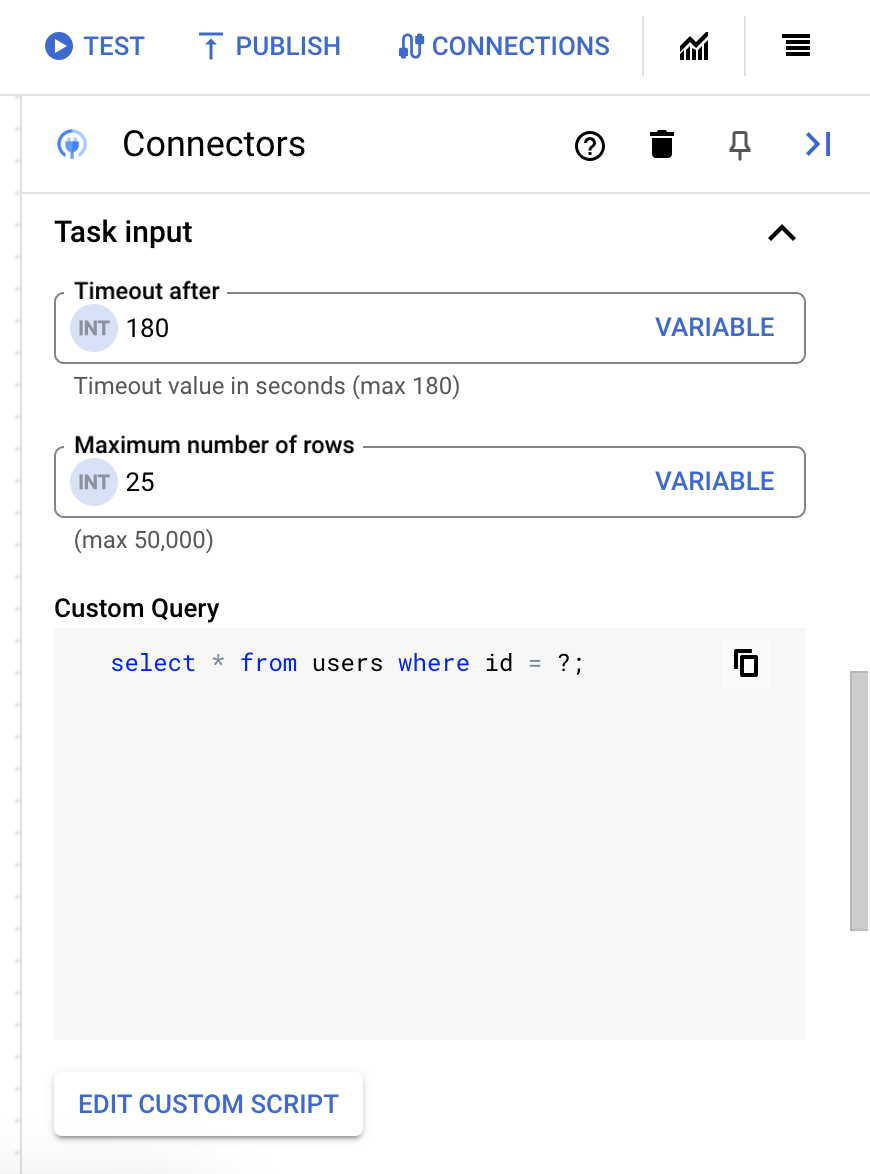
- 展开任务输入部分,然后执行以下操作:
- 在在以下时间后超时字段中,输入查询执行前要等待的秒数。
默认值:
180秒。 - 在最大行数字段中,输入要从数据库返回的最大行数。
默认值:
25。 - 要更新自定义查询,请点击修改自定义脚本。系统随即会打开脚本编辑器对话框。
- 在脚本编辑器对话框中,输入 SQL 查询,然后点击保存。
您可以在 SQL 语句中使用问号 (?) 表示必须在查询参数列表中指定的单个参数。例如,以下 SQL 查询会从
Employees表中选择与为LastName列指定的值匹配的所有行:SELECT * FROM Employees where LastName=?
- 如果您在 SQL 查询中使用了问号,则必须点击 + 添加参数名称,针对每个问号添加参数。执行集成时,这些参数按顺序替换 SQL 查询中的问号 (?)。例如,如果您添加了三个问号 (?),那么必须按顺序添加三个参数。

如需添加查询参数,请执行以下操作:
- 从类型列表中,选择参数的数据类型。
- 在值字段中,输入参数的值。
- 要添加多个参数,请点击 + 添加查询参数。
执行自定义查询操作不支持数组变量。
- 在在以下时间后超时字段中,输入查询执行前要等待的秒数。
成功执行后,此操作会返回状态 200 (OK),并附带包含查询结果的响应正文。
操作示例
示例 - 创建记录
此示例使用 BAPI_MATERIAL_SAVEDATA 操作创建物料记录。
- 在
Configure connector task对话框中,点击Actions。 - 选择
BAPI_MATERIAL_SAVEDATA操作,然后点击完成。 - 在连接器任务的任务输入部分中,点击
connectorInputPayload,然后在Default Value字段中输入类似于以下内容的值:{ "HEADDATA": "{\"MATERIAL\":\"000000000000009001\",\"IND_SECTOR\":\"M\",\"MATL_TYPE\":\"HALB\",\"BASIC_VIEW\":\"X\"}", "CLIENTDATA" : "{\"MATL_GROUP\":\"00107\",\"BASE_UOM\":\"KG\"}", "CLIENTDATAX" : "{\"MATL_GROUP\":\"X\",\"BASE_UOM\":\"X\"}", "MATERIALDESCRIPTION" : "{\"LANGU\":\"E\",\"MATL_DESC\":\"Classification Google\"}" }
如果操作成功,BAPI_MATERIAL_SAVEDATA 任务的 connectorOutputPayload 响应参数将具有类似于以下内容的值:
[{
"RETURN_TYPE": "S",
"RETURN_ID": "MM",
"RETURN_NUMBER": 356,
"RETURN_MESSAGE": "The material 9001 has been created or extended",
"RETURN_LOG_NO": "",
"RETURN_LOG_MSG_NO": 0,
"RETURN_MESSAGE_V1": "9001",
"RETURN_FIELD": "",
"RETURN_SYSTEM": "T90CLNT090",
"RESULT_TABLE": null
}]
示例 - 更新记录
此示例使用 BAPI_MATERIAL_SAVEDATA 操作更新物料记录。
- 在
Configure connector task对话框中,点击Actions。 - 选择
BAPI_MATERIAL_SAVEDATA操作,然后点击完成。 - 在连接器任务的任务输入部分中,点击
connectorInputPayload,然后在Default Value字段中输入类似于以下内容的值:{ "HEADDATA": "{\"MATERIAL\":\"000000000000009000\",\"IND_SECTOR\":\"A\",\"MATL_TYPE\":\"FHMI\",\"BASIC_VIEW\":\"X\"}", "CLIENTDATA": "{\"MATL_GROUP\":\"013\",\"BASE_UOM\":\"ST\"}", "CLIENTDATAX": "{\"MATL_GROUP\":\"X\",\"BASE_UOM\":\"X\"}", "MATERIALDESCRIPTION": "{\"LANGU\":\"E\",\"MATL_DESC\":\"Classification Googlecloud\"}" }
如果操作成功,BAPI_MATERIAL_SAVEDATA 任务的 connectorOutputPayload 响应形参将具有类似以下的值:
[{
"RETURN_TYPE": "S",
"RETURN_ID": "MM",
"RETURN_NUMBER": 356,
"RETURN_MESSAGE": "The material 9000 has been created or extended",
"RETURN_LOG_NO": "",
"RETURN_LOG_MSG_NO": 0,
"RETURN_MESSAGE_V1": "9000",
"RETURN_PARAMETER": "",
"RETURN_ROW": 0,
"RETURN_FIELD": "",
"RETURN_SYSTEM": "T90CLNT090",
"RESULT_TABLE": null
}]
示例 - 删除记录
此示例使用 BAPI_MATERIAL_SAVEDATA 操作删除物料记录。
- 在
Configure connector task对话框中,点击Actions。 - 选择
BAPI_MATERIAL_SAVEDATA操作,然后点击完成。 - 在连接器任务的任务输入部分中,点击
connectorInputPayload,然后在Default Value字段中输入类似于以下内容的值:{ "HEADDATA": "{\"MATERIAL\":\"000000000000009000\",\"BASIC_VIEW\":\"X\"}", "CLIENTDATA": "{\"DEL_FLAG\":\"X\"}", "CLIENTDATAX": "{\"DEL_FLAG\":\"X\"}" }
如果操作成功,BAPI_MATERIAL_SAVEDATA 任务的 connectorOutputPayload 响应形参将具有类似以下的值:
[{
"RETURN_TYPE": "S",
"RETURN_ID": "MM",
"RETURN_NUMBER": 356,
"RETURN_LOG_NO": "",
"RETURN_LOG_MSG_NO": 0,
"RETURN_MESSAGE_V1": "9000",
"RETURN_PARAMETER": "",
"RETURN_ROW": 0,
"RETURN_FIELD": "",
"RETURN_SYSTEM": "T90CLNT090",
"RESULT_TABLE": null
}]
示例 - 创建多数据类型数据
此示例使用 ZFM_GCP_MULTIDATA_TAB 操作创建多数据类型数据。
- 在
Configure connector task对话框中,点击Actions。 - 选择
ZFM_GCP_MULTIDATA_TAB操作,然后点击完成。 - 在连接器任务的任务输入部分中,点击
connectorInputPayload,然后在Default Value字段中输入类似于以下内容的值:{ "T_TABLE": "{\"ZACCP\":\"111\",\"ZCHAR\":\"CHARACTER1\",\"ZCLNT\":\"100\",\"ZCUKY\":\"INR\",\"ZCURR\": 200,\"ZDATS\": \"20231213\",\"ZINT1\": 45,\"ZINT2\":54,\"ZDEC\": 0.12,\"ZFLTP\": 1234,\"ZLANG\":\"E\",\"ZNUMC\":\"110\",\"ZPREC\": 3,\"ZQUAN\": 188.0,\"ZRAW\":\"01010008010101050401\",\"ZTIMS\": \"103056\",\"ZUNIT\":\"11\",\"ZINT4P\": 45,\"ZINT4\": 54,\"ZLRAW\":\"0101000801010105040100030101010300040000\"}", "IM_INPUT_1": "{\"ZACCP\":\"222\",\"ZCHAR\":\"CHARACTER1\",\"ZCLNT\":\"100\",\"ZCUKY\":\"INR\",\"ZCURR\": 200,\"ZDATS\": \"20231213\",\"ZINT1\": 45,\"ZINT2\":54,\"ZDEC\": 0.12,\"ZFLTP\": 1234,\"ZLANG\":\"E\",\"ZNUMC\":\"110\",\"ZPREC\": 3,\"ZQUAN\": 188.0,\"ZRAW\":\"01010008010101050401\",\"ZTIMS\": \"103056\",\"ZUNIT\":\"11\",\"ZINT4P\": 45,\"ZINT4\": 54,\"ZLRAW\":\"0101000801010105040100030101010300040000\"}", "IM_INPUT_2": "{\"ZSTRING\": \"HI Google\",\"ZSSTRING\": \"HI Google How are you\"}" }
如果操作成功,ZFM_GCP_MULTIDATA_TAB 任务的 connectorOutputPayload 响应形参将具有类似以下的值:
[{
"EX_OUTPUT_1_ZACCP": 222,
"EX_OUTPUT_1_ZCHAR": "CHARACTER1",
"EX_OUTPUT_1_ZCLNT": "100",
"EX_OUTPUT_1_ZCUKY": "INR",
"EX_OUTPUT_1_ZCURR": 200,
"EX_OUTPUT_1_ZDATS": "2023-12-13",
"EX_OUTPUT_1_ZRAW": "01010008010101050401",
"EX_OUTPUT_1_ZTIMS": "10:30:56",
"EX_OUTPUT_1_ZUNIT": "11",
"EX_OUTPUT_1_ZINT4P": 45,
"EX_OUTPUT_1_ZINT4": 54,
"EX_OUTPUT_1_ZLRAW": "0101000801010105040100030101010300040000\u0000",
"EX_OUTPUT_2_ZSTRING": null,
"EX_OUTPUT_2_ZSSTRING": null,
"RESULT_TABLE": null,
"T_TABLE_ZACCP": null,
"T_TABLE_ZCHAR": null,
"T_TABLE_ZCLNT": null,
"T_TABLE_ZQUAN": null,
"T_TABLE_ZRAW": null,
"T_TABLE_ZTIMS": null,
"T_TABLE_ZUNIT": null
},{
"EX_OUTPUT_1_ZACCP": null,
"EX_OUTPUT_1_ZCHAR": null,
"EX_OUTPUT_1_ZCLNT": null,
"EX_OUTPUT_1_ZCUKY": null,
"EX_OUTPUT_1_ZRAW": null,
"T_TABLE_ZLANG": null,
"T_TABLE_ZNUMC": null,
"T_TABLE_ZPREC": null,
"T_TABLE_ZQUAN": null,
"T_TABLE_ZRAW": null,
"T_TABLE_ZTIMS": null,
"T_TABLE_ZUNIT": null
},{
"EX_OUTPUT_1_ZACCP": null,
"EX_OUTPUT_1_ZCHAR": null,
"EX_OUTPUT_1_ZCLNT": null,
"EX_OUTPUT_1_ZCUKY": null,
"EX_OUTPUT_1_ZCURR": null,
"EX_OUTPUT_1_ZDATS": null,
"EX_OUTPUT_1_ZDEC": null,
"EX_OUTPUT_1_ZQUAN": null,
"T_TABLE_ZNUMC": 110,
"T_TABLE_ZPREC": 3,
"T_TABLE_ZQUAN": 188,
"T_TABLE_ZRAW": "01010008010101050401",
"T_TABLE_ZTIMS": "10:30:56",
"T_TABLE_ZUNIT": "11"
}]
示例 - 推送 IDoc
此示例将 IDoc 推送到 SAP ERP。
- 在
Configure connector task对话框中,点击Actions。 - 选择
PushIDoc操作,然后点击完成。 - 在连接器任务的任务输入部分中,点击
connectorInputPayload,然后在Default Value字段中输入类似于以下内容的值:{ "Content": "\n\n\n EDI_DC40\n 800\n 0000000008604824\n 740\n 53\n 2\n \n MATMAS05\n MATMAS\n ZLS_QA23\n LS\n ZLS_QA23\n SAPSA1\n LS\n SA1CLNT800\n 20230218\n 232556\n\n\n 005\n 000000000000000012\n 20170328\n 42039\n 20170727\n 42039\n KLVC\n FERT\n M\n 02\n BG\n 000\n 002\n 0.000\n 0.000\n KGM\n 0.000\n 0001\n 0.000\n 0.000\n 0.000\n 0.000\n 0.000\n", "FileType": "XML", "Mode": "ASync" }
。如果操作成功,PushIDoc 任务的 connectorOutputPayload 响应参数将具有类似以下的值:
[{
"Result": "Success",
"Message": "Push IDoc success"
}]
实体操作示例
本部分介绍如何在此连接器中执行一些实体操作。
示例 - 列出所有记录
此示例列出了 T001 实体中的所有记录。
- 在
Configure connector task对话框中,点击Entities。 - 从
Entity列表中选择T001。 - 选择
List操作,然后点击完成。 - (可选)在连接器任务的任务输入部分,您可以通过指定过滤条件子句来过滤结果集。 请务必使用英文单引号 (') 括起过滤条件子句值。
示例 - 从实体中获取记录
此示例从 T001 实体获取具有指定 ID 的记录。
- 在
Configure connector task对话框中,点击Entities。 - 从
Entity列表中选择T001。 - 选择
Get操作,然后点击完成。 - 在连接器任务的任务输入部分,点击 EntityId,然后在默认值字段中输入
0001。其中,
0001是T001实体的唯一记录 ID。
使用 Terraform 创建连接
您可以使用 Terraform 资源创建新连接。
如需了解如何应用或移除 Terraform 配置,请参阅基本 Terraform 命令。
如需查看用于创建连接的 Terraform 模板示例,请参阅模板示例。
使用 Terraform 创建此连接时,您必须在 Terraform 配置文件中设置以下变量:
| 参数名称 | 数据类型 | 必需 | 说明 |
|---|---|---|---|
| 客户端 | STRING | 正确 | 向 SAP 系统进行身份验证的客户端。 |
| 群组 | STRING | 错误 | 正在使用的登录组。通常,只有在连接到使用负载均衡的 SAP 系统时,才需要指定此参数。 |
| message_server | STRING | 错误 | 连接到使用负载均衡的 SAP 系统时,必须指定消息服务器。 |
| read_table_function | STRING | 错误 | 用于读取表格数据的函数。 |
| connection_scheme | ENUM | 错误 | 指定您是连接到具有消息服务器 (GroupServer) 的 SAP 系统,还是连接到没有消息服务器 (ApplicationServer) 的 SAP 系统。支持的值包括:ApplicationServer、GroupServer |
| system_id | STRING | 错误 | SAP 系统的系统 ID 或 R3Name 是一个字符串,最多包含三个字符。它通常用于负载均衡连接。 |
| system_number | STRING | 正确 | 用于定义目标系统的数字。用于设置主机连接属性。 |
| project_id | STRING | 正确 | 包含 SAP JCo JAR 的 Cloud Storage 存储桶所在的 Google Cloud 项目的 ID。 |
| 存储桶 | STRING | 正确 | 包含 sapjco3.jar 和 libsapjco3.so 文件的存储桶的名称 |
| sapjco3_jar | STRING | 正确 | sapjco3.jar 的对象 ID |
| libsapjco3_so | STRING | 正确 | libsapjco3.so 的对象 ID |
| snc_lib | STRING | 错误 | SNC 库的对象 ID |
| snc_mode | BOOLEAN | 错误 | 一个布尔值,用于确定您是否在使用 SNC。将此属性设置为 true 即可使用 SNC。 |
| snc_name | STRING | 错误 | 一个可选输入,用于指定 SNC 连接的名称。 |
| snc_qop | ENUM | 错误 | SNC 连接的保护质量。有效值为 1、2、3、8 或 9,分别对应于以下保护级别:1 仅应用身份验证。2 应用完整性保护(身份验证)。3 应用隐私保护(完整性和身份验证)。8 应用默认保护。9 应用最高防护级别。支持的值包括:1、2、3、8、9 |
| snc_partner_name | STRING | 错误 | 应用服务器的 SNC 名称。使用 SNC 时,此输入为必需输入。 |
| query_mode | ENUM | 错误 | 确定哪些 SAP 表将显示为视图(如果有)。支持的值包括:Global、Local、All、None |
| table_mode | ENUM | 错误 | 确定哪些 SAP 表将显示为视图(如果有)。支持的值包括:TransparentApplication、TransparentCustomer、TransparentSystem、Pooled、Cluster、All、None |
| 详细程度 | STRING | 错误 | 连接的详细程度,范围为 1-5。如果详细程度较高,系统会记录所有通信详情(请求、响应和 SSL 证书)。 |
排查 SAP 本地配置问题
如果您的 SAP 系统是本地系统,则必须创建具有混合 NEG 的代理负载均衡器。
- 在本地系统和 Google Cloud 之间创建具有允许的子网的 IPsec 隧道。
- 允许本地防火墙中的负载均衡子网和代理子网。
- 添加所有必需的端口,例如用于应用服务器连接的 33XX、用于消息服务器/LB 服务器连接的 36XX 和用于 SNC-X509 连接的 48XX。其中,XX 是 SAP 系统的系统编号或实例编号。在 Google Cloud 项目的入站流量许可名单中为防火墙添加所需的 IP,例如负载平衡器 IP 和端口、SAP 系统 IP 和端口。
- 使用混合 NEG 配置区域级内部代理网络负载平衡器。如需了解详情,请参阅具有混合 NEG 连接的区域级内部代理网络负载平衡器。
如果您在设置网络连接后遇到类似于以下内容的错误,请使用以下解决方法将端点连接 IP 列入许可名单。
Initialization of destination SAP--1910584855 failed: Connect from SAP gateway to RFC server failed
connection parameters: TYPE=A DESTINATION=SAP--1910584855 ASHOST=10.128.0.43 SYSNR=00 PCS=1
LOCATION    SAP-Gateway on host DELVM05S15.bcone.com / sapgw00
ERROR       timeout during allocate
TIME        Wed Apr  3 17:24:40 2024
RELEASE     754
COMPONENT   SAP-Gateway
VERSION     2
RC          242
MODULE      D:/depot/bas/754_REL/src/krn/si/gw/gwr3cpic.c
LINE        2208
DETAIL      no connect of TP sapdp00 from host 10.128.0.43 after 20 sec
COUNTER     2
SAP 词汇表
SAP:SAP 一词是所有受支持的 SAP 版本的统称。这通常表示 SAP ECC 版本 6 及更高版本。为了使 SAP ERP 连接器正常工作,它需要连接到支持 RFC SDK 的 SAP 版本。
函数模块:函数模块是 SAP 中的一种程序或函数,可用于执行几乎任何操作。这些模块可以通过 SE37 TCode 在 SAP 中进行测试和编写。
RFC:远程函数调用 (RFC) 是对给定 RFM/FM 的调用,可由外部应用执行。这包括使用 SAP 服务器上安装的 SAP 分发的库,这些库也可以从 sap.com 下载。特定的 RFM 可能会在 SAP 升级期间维护,也可能不会。SAP 提供了一些标准 RFM,因此这些 RFM 可能存在差异,或者可能在旧版中不存在。可以(并且经常会)构建自定义 RFM 来支持集成,但必须由 SAP 客户维护。按照惯例,自定义 RFM 以字母 Z 开头。
BAPI:业务 API (BAPI) 是一种业务对象的 API 方法,该对象本身是 SAP 启用了 RFC 的函数模块,用于提供对业务逻辑操作的访问权限。例如,仅与“客户”对象相关的 BAPI 就有大约 60 个。但在实践中,通常只使用少数几个。
SAP 表:SAP 表是指在 SAP 中存储数据的表。这些不是业务对象。例如,SAP 中没有“采购订单”表。相反,有许多表包含采购订单数据,例如 EBAN、EBKN、EINA、EKPO 等。按照惯例,自定义表以字母 Z 开头。
SAP 查询:SAP 查询是 SAP 中保存的对象,其中详细说明了要从一个或多个表中检索的信息。这些参数通常用于生成报告。