Cloud Tools for Eclipse 在 Eclipse 内提供了一个向导,用于在 App Engine 标准环境中创建新的 Java 应用。
准备工作
- Sign in to your Google Cloud account. If you're new to Google Cloud, create an account to evaluate how our products perform in real-world scenarios. New customers also get $300 in free credits to run, test, and deploy workloads.
-
In the Google Cloud console, on the project selector page, select or create a Google Cloud project.
-
Make sure that billing is enabled for your Google Cloud project.
-
Enable the Cloud Build API.
- Install the Google Cloud CLI.
-
To initialize the gcloud CLI, run the following command:
gcloud init -
In the Google Cloud console, on the project selector page, select or create a Google Cloud project.
-
Make sure that billing is enabled for your Google Cloud project.
-
Enable the Cloud Build API.
- Install the Google Cloud CLI.
-
To initialize the gcloud CLI, run the following command:
gcloud init 在 Google Cloud 控制台中为您的 Google Cloud 项目创建 App Engine 应用。
选择您希望应用的计算资源所位于的区域。
- 确保您拥有最新版本的 Cloud Tools for Eclipse。
在 App Engine 标准环境中创建新的 Java 项目
要在 Eclipse 中为 App Engine 标准环境创建新项目,请执行以下操作:
点击Google Cloud Platform工具栏按钮
 。
。选择创建新项目> Google App Engine标准Java项目。

输入项目名称和(可选)Java包。
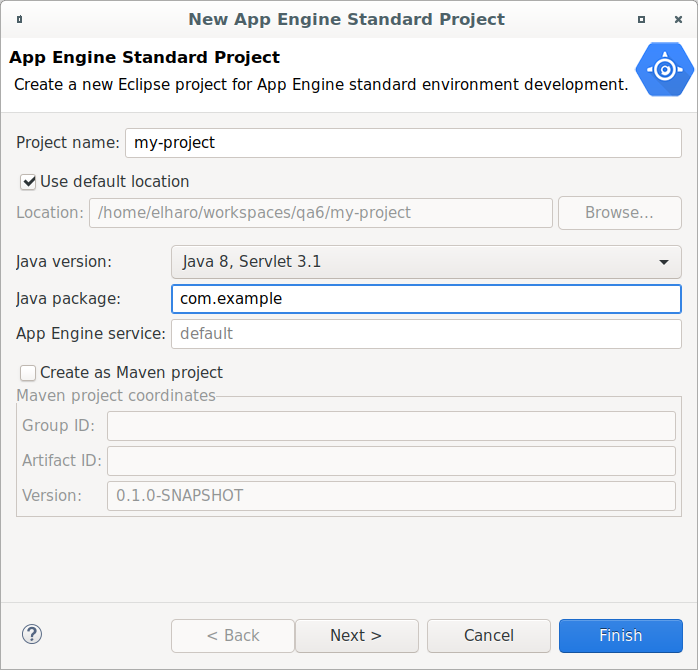
要创建基于Maven的App Engine项目,请选择“创建为Maven项目”,然后输入您选择的Maven组ID和工件ID来设置该项目的坐标。组ID通常与程序包名称相同,但不必相同。工件ID通常与项目名称相同或相似,但不必相同。
单击下一步。
选择项目中需要的任何库。
点击完成。
该向导将生成一个带有简单servlet的本地Eclipse项目,您可以从IDE中运行和部署该项目。
后续步骤
- 创建应用后,您便可以在本地工作站上运行和调试该应用。