Puedes usar Enterprise Document OCR como parte de Document AI para detectar y extraer texto e información de diseño de varios documentos. Con las funciones configurables, puede adaptar el sistema para que cumpla requisitos específicos de procesamiento de documentos.
Información general
Puedes usar Enterprise Document OCR para tareas como la introducción de datos basada en algoritmos o aprendizaje automático, así como para mejorar y verificar la precisión de los datos. También puedes usar Enterprise Document OCR para gestionar tareas como las siguientes:
- Digitalización de texto: extrae texto y datos de diseño de documentos para realizar búsquedas, crear flujos de trabajo de procesamiento de documentos basados en reglas o crear modelos personalizados.
- Usar aplicaciones de modelos de lenguaje extensos: aprovecha la comprensión contextual de los LLMs y las funciones de extracción de texto y diseño del reconocimiento óptico de caracteres para automatizar las preguntas y respuestas. Genera estadísticas a partir de los datos y optimiza los flujos de trabajo.
- Archivar: digitaliza documentos en papel para convertirlos en texto legible por máquina y mejorar la accesibilidad de los documentos.
Elegir el mejor OCR para tu caso práctico
| Solución | Producto | Descripción | Caso práctico |
|---|---|---|---|
| Document AI | Enterprise Document OCR | Modelo especializado para casos prácticos de documentos. Entre sus funciones avanzadas se incluyen la puntuación de calidad de imagen, las sugerencias de idioma y la corrección de la rotación. | Se recomienda cuando se extrae texto de documentos. Por ejemplo, PDFs, documentos escaneados como imágenes o archivos de Microsoft DocX. |
| Document AI | Complementos de OCR | Funciones premium para requisitos específicos. Solo es compatible con Enterprise Document OCR 2.0 y versiones posteriores. | Necesitas detectar y reconocer fórmulas matemáticas, recibir información sobre el estilo de fuente o habilitar la extracción de casillas. |
| API de Cloud Vision | Detección de texto | API REST disponible en todo el mundo basada en el Google Cloud modelo de OCR estándar. Cuota predeterminada de 1800 solicitudes por minuto. | Casos prácticos generales de extracción de textos que requieren una latencia baja y una gran capacidad. |
| Cloud Vision | OCR Google Distributed Cloud (obsoleto) | Aplicación de Google Cloud Marketplace que se puede desplegar como un contenedor en cualquier clúster de GKE mediante GKE Enterprise. | Para cumplir los requisitos de residencia de datos o de cumplimiento. |
Detección y extracción
Enterprise Document OCR puede detectar bloques, párrafos, líneas, palabras y símbolos de PDFs e imágenes, así como corregir la inclinación de los documentos para mejorar la precisión.
Atributos de detección y extracción de diseño admitidos:
| Texto impreso | Escritura a mano | Párrafo | Bloquear | Línea | Word | Nivel de símbolo | Número de página |
|---|---|---|---|---|---|---|---|
| Predeterminado | Predeterminado | Predeterminado | Predeterminado | Predeterminado | Predeterminado | Se pueden configurar. | Predeterminado |
Estas son algunas de las funciones de Enterprise Document OCR que puedes configurar:
Extraer texto insertado o nativo de PDFs digitales: esta función extrae texto y símbolos exactamente como aparecen en los documentos de origen, incluso en textos rotados, con tamaños o estilos de fuente extremos y con texto parcialmente oculto.
Corrección de la rotación: usa Enterprise Document OCR para preprocesar imágenes de documentos y corregir los problemas de rotación que pueden afectar a la calidad de la extracción o al procesamiento.
Puntuación de calidad de imagen: recibe métricas de calidad que pueden ayudarte a enrutar documentos. La puntuación de calidad de la imagen te proporciona métricas de calidad a nivel de página en ocho dimensiones, como la nitidez, la presencia de fuentes más pequeñas de lo habitual y el brillo.
Especificar intervalo de páginas: especifica el intervalo de páginas de un documento de entrada para el OCR. De esta forma, se ahorra tiempo de procesamiento y dinero en páginas innecesarias.
Detección de idioma: detecta los idiomas utilizados en los textos extraídos.
Sugerencias de idioma y escritura a mano: mejora la precisión proporcionando al modelo de OCR una sugerencia de idioma o escritura a mano basada en las características conocidas de tu conjunto de datos.
Para saber cómo habilitar las configuraciones de OCR, consulta Habilitar configuraciones de OCR.
Complementos de OCR
Enterprise Document OCR ofrece funciones de análisis opcionales que se pueden habilitar en solicitudes de procesamiento concretas según sea necesario.
Las siguientes funciones complementarias están disponibles en las versiones estable pretrained-ocr-v2.0-2023-06-02 y pretrained-ocr-v2.1-2024-08-07, así como en la versión candidata pretrained-ocr-v2.1.1-2025-01-31.
- Reconocimiento óptico de caracteres de expresiones matemáticas: identifica y extrae fórmulas de documentos en formato LaTeX.
- Extracción de casillas: detecta casillas y extrae su estado (marcadas o desmarcadas) en la respuesta de Enterprise Document OCR.
- Detección del estilo de fuente: identifica las propiedades de la fuente a nivel de palabra, como el tipo, el estilo, la escritura a mano, el grosor y el color.
Para saber cómo habilitar los complementos que se indican, consulta Habilitar complementos de OCR.
Formatos de archivo admitidos
El OCR de documentos de Enterprise admite los formatos de archivo PDF, GIF, TIFF, JPEG, PNG, BMP y WebP. Para obtener más información, consulta Archivos admitidos.
Enterprise Document OCR también admite archivos DocX de hasta 15 páginas en modo síncrono y 30 páginas en modo asíncrono. Para enviar una solicitud de aumento de cuota, sigue los pasos que se indican en el artículo Solicitar un ajuste de cuota. La compatibilidad con DocX está en versión preliminar privada. Para solicitar acceso, ponte en contacto con el equipo de tu cuenta de Google.
Gestión avanzada de versiones
La función de control de versiones avanzado está en versión preliminar. Las actualizaciones de los modelos de OCR de IA y aprendizaje automático subyacentes pueden provocar cambios en el comportamiento del OCR. Si necesitas una coherencia estricta, usa una versión de modelo inmutable para fijar el comportamiento de un modelo de OCR antiguo durante un máximo de 18 meses. De esta forma, se garantiza que la función OCR devuelva la misma imagen. Consulta la tabla sobre las versiones del procesador.
Versiones del procesador
Las siguientes versiones de procesador son compatibles con esta función. Para obtener más información, consulta Gestionar versiones del procesador.
| ID de versión | Canal de lanzamiento | Descripción |
|---|---|---|
pretrained-ocr-v1.2-2022-11-10 |
Estable | Versión del modelo inmovilizada de la versión 1.0: archivos de modelo, configuraciones y archivos binarios de una captura de versión inmovilizada en una imagen de contenedor durante un máximo de 18 meses. |
pretrained-ocr-v2.0-2023-06-02 |
Estable | Modelo listo para producción especializado en casos prácticos de documentos. Incluye acceso a todos los complementos de OCR. |
pretrained-ocr-v2.1-2024-08-07 |
Estable | Las principales áreas de mejora de la versión 2.1 son: mejor reconocimiento de texto impreso, detección más precisa de casillas de verificación y orden de lectura más preciso. |
pretrained-ocr-v2.1.1-2025-01-31 |
Versión candidata | La versión 2.1.1 es similar a la 2.1 y está disponible en todas las regiones, excepto en US, EU y asia-southeast1. |
Usar Enterprise Document OCR para procesar documentos
Esta guía de inicio rápido presenta Enterprise Document OCR. En este artículo se explica cómo optimizar los resultados del OCR de documentos para tu flujo de trabajo habilitando o inhabilitando cualquiera de las configuraciones de OCR disponibles.
- Sign in to your Google Cloud account. If you're new to Google Cloud, create an account to evaluate how our products perform in real-world scenarios. New customers also get $300 in free credits to run, test, and deploy workloads.
-
In the Google Cloud console, on the project selector page, select or create a Google Cloud project.
Roles required to select or create a project
- Select a project: Selecting a project doesn't require a specific IAM role—you can select any project that you've been granted a role on.
-
Create a project: To create a project, you need the Project Creator
(
roles/resourcemanager.projectCreator), which contains theresourcemanager.projects.createpermission. Learn how to grant roles.
-
Verify that billing is enabled for your Google Cloud project.
-
Enable the Document AI API.
Roles required to enable APIs
To enable APIs, you need the Service Usage Admin IAM role (
roles/serviceusage.serviceUsageAdmin), which contains theserviceusage.services.enablepermission. Learn how to grant roles. -
In the Google Cloud console, on the project selector page, select or create a Google Cloud project.
Roles required to select or create a project
- Select a project: Selecting a project doesn't require a specific IAM role—you can select any project that you've been granted a role on.
-
Create a project: To create a project, you need the Project Creator
(
roles/resourcemanager.projectCreator), which contains theresourcemanager.projects.createpermission. Learn how to grant roles.
-
Verify that billing is enabled for your Google Cloud project.
-
Enable the Document AI API.
Roles required to enable APIs
To enable APIs, you need the Service Usage Admin IAM role (
roles/serviceusage.serviceUsageAdmin), which contains theserviceusage.services.enablepermission. Learn how to grant roles. quality/defect_blurryquality/defect_noisyquality/defect_darkquality/defect_faintquality/defect_text_too_smallquality/defect_document_cutoffquality/defect_text_cutoffquality/defect_glare- Puede devolver detecciones de falsos positivos con documentos digitales que no tengan defectos. Esta función es más útil en documentos escaneados o fotografiados.
Los defectos de reflejo son locales. Su presencia no tiene por qué dificultar la legibilidad general del documento.
- Para procesar solo la segunda y la quinta página, sigue estos pasos:
- Para procesar solo las tres primeras páginas, sigue estos pasos:
- Para procesar solo las cuatro últimas páginas, sigue estos pasos:
Imagen detectada
Conversión a LaTeX

- Detección de escritura a mano
- Estilo de fuente
- Tamaño de fuente
- Tipo de fuente
- Color de fuente
- Grosor de fuente
- Espaciado de las letras
- Negrita
- Cursiva
- Subrayado
- Color del texto (RGBA)
Color de fondo (RGBA)
- La respuesta de la API Vision AI solo rellena
verticesen las solicitudes de imágenes y solo rellenanormalized_verticesen las solicitudes de PDF. La respuesta de Document AI y el convertidor rellenan tantoverticescomonormalized_vertices. - La respuesta de la API Vision AI rellena el
detected_breaken el último símbolo de la palabra. La respuesta de la API Document AI y el convertidor rellenandetected_breaken la palabra y el último símbolo de la palabra. - La respuesta de la API Vision AI siempre rellena los campos de símbolos. De forma predeterminada, la respuesta de Document AI no rellena los campos de símbolos. Para asegurarse de que la respuesta de Document AI y el convertidor rellenan los campos de símbolos, defina la función
enable_symbolcomo detallada. - LOCATION: la ubicación de tu procesador, por ejemplo:
us- Estados Unidoseu- Unión Europea
- PROJECT_ID: tu ID de proyecto Google Cloud .
- PROCESSOR_ID: el ID de tu procesador personalizado.
- PROCESSOR_VERSION: identificador de la versión del procesador. Consulta Seleccionar una versión del procesador para obtener más información. Por ejemplo:
pretrained-TYPE-vX.X-YYYY-MM-DDstablerc
- skipHumanReview: booleano para inhabilitar la revisión humana (solo admitido por los procesadores con intervención humana).
true- omite la revisión humanafalse: habilita la revisión humana (opción predeterminada).
- MIME_TYPE†: una de las opciones válidas de tipo MIME.
- IMAGE_CONTENT†: uno de los contenidos de documentos insertados válidos, representado como un flujo de bytes. En el caso de las representaciones JSON, la codificación base64 (cadena ASCII) de los datos de imagen binarios. Esta cadena debe ser similar a la siguiente:
/9j/4QAYRXhpZgAA...9tAVx/zDQDlGxn//2Q==
- FIELD_MASK: especifica los campos que se incluirán en el resultado de
Document. Se trata de una lista separada por comas de nombres completos de campos en formatoFieldMask.- Ejemplo:
text,entities,pages.pageNumber
- Ejemplo:
- Configuraciones de OCR
- ENABLE_NATIVE_PDF_PARSING: (booleano) extrae el texto insertado de los PDFs, si está disponible.
- ENABLE_IMAGE_QUALITY_SCORES: (booleano) habilita las puntuaciones de calidad de documentos inteligentes.
- ENABLE_SYMBOL: (booleano) incluye información de OCR de símbolos (letras).
- DISABLE_CHARACTER_BOXES_DETECTION: (booleano) desactiva el detector de recuadros de caracteres en el motor de OCR.
- LANGUAGE_HINTS: lista de códigos de idioma BCP-47 que se van a usar para el OCR.
- ADVANCED_OCR_OPTIONS: una lista de opciones avanzadas de OCR para ajustar aún más el comportamiento de OCR. Los valores válidos actuales son:
legacy_layout: un algoritmo de detección de diseño heurístico que sirve como alternativa al algoritmo de detección de diseño basado en aprendizaje automático actual.
- Complementos OCR premium
- ENABLE_SELECTION_MARK_DETECTION: (booleano) activa el detector de marcas de selección en el motor de OCR.
- COMPUTE_STYLE_INFO (booleano): activa el modelo de identificación de fuentes y devuelve información sobre el estilo de la fuente.
- ENABLE_MATH_OCR: (booleano) activa el modelo que puede extraer fórmulas matemáticas de LaTeX.
- INDIVIDUAL_PAGES: lista de páginas concretas que se van a procesar.
- Consulta la lista de procesadores.
- Separa los documentos en fragmentos legibles con Layout Parser.
- Crea un clasificador personalizado.
Crear un procesador de Enterprise Document OCR
Primero, crea un procesador de Enterprise Document OCR. Para obtener más información, consulta el artículo sobre cómo crear y gestionar procesadores.
Configuraciones de OCR
Todas las configuraciones de OCR se pueden habilitar definiendo los campos correspondientes en ProcessOptions.ocrConfig en ProcessDocumentRequest o BatchProcessDocumentsRequest.
Para obtener más información, consulta Enviar una solicitud de procesamiento.
Análisis de la calidad de la imagen
La analítica inteligente de la calidad de los documentos usa el aprendizaje automático para evaluar la calidad de un documento en función de la legibilidad de su contenido.
Esta evaluación de la calidad se devuelve como un nivel de calidad [0, 1], donde 1 significa que la calidad es perfecta.
Si la puntuación de calidad detectada es inferior a 0.5, también se devuelve una lista de motivos de calidad negativos (ordenados por probabilidad).
Si la probabilidad es superior a 0.5, se considera una detección positiva.
Si se considera que el documento está defectuoso, la API devuelve los ocho tipos de defectos de documentos siguientes:
El análisis de la calidad de los documentos tiene algunas limitaciones:
Entrada
Para habilitarlo, asigna el valor true a ProcessOptions.ocrConfig.enableImageQualityScores en la solicitud de procesamiento.
Esta función adicional añade una latencia comparable al procesamiento de OCR a la llamada de proceso.
  {
    "rawDocument": {
      "mimeType": "MIME_TYPE",
      "content": "IMAGE_CONTENT"
    },
    "processOptions": {
      "ocrConfig": {
        "enableImageQualityScores": true
      }
    }
  }
Salida
Los resultados de la detección de defectos aparecen en Document.pages[].imageQualityScores[].
  {
    "pages": [
      {
        "imageQualityScores": {
          "qualityScore": 0.7811847,
          "detectedDefects": [
            {
              "type": "quality/defect_document_cutoff",
              "confidence": 1.0
            },
            {
              "type": "quality/defect_glare",
              "confidence": 0.97849524
            },
            {
              "type": "quality/defect_text_cutoff",
              "confidence": 0.5
            }
          ]
        }
      }
    ]
  }
Consulta Ejemplo de salida de procesador para ver ejemplos de salida completos.
Sugerencias de idioma
El procesador de OCR admite sugerencias de idioma que puedes definir para mejorar el rendimiento del motor de OCR. Al aplicar una sugerencia de idioma, el OCR puede optimizarse para un idioma seleccionado en lugar de para un idioma inferido.
Entrada
Para habilitarlo, define ProcessOptions.ocrConfig.hints[].languageHints[] con una lista de códigos de idioma BCP-47.
  {
    "rawDocument": {
      "mimeType": "MIME_TYPE",
      "content": "IMAGE_CONTENT"
    },
    "processOptions": {
      "ocrConfig": {
        "hints": {
          "languageHints": ["en", "es"]
        }
      }
    }
  }
Consulta Ejemplo de salida de procesador para ver ejemplos de salida completos.
Detección de símbolos
Rellenar los datos a nivel de símbolo (o de letra individual) en la respuesta del documento.
Entrada
Para habilitarlo, asigna el valor true a ProcessOptions.ocrConfig.enableSymbol en la solicitud de procesamiento.
  {
    "rawDocument": {
      "mimeType": "MIME_TYPE",
      "content": "IMAGE_CONTENT"
    },
    "processOptions": {
      "ocrConfig": {
        "enableSymbol": true
      }
    }
  }
Salida
Si esta función está habilitada, se rellena el campo Document.pages[].symbols[].
Consulta Ejemplo de salida de procesador para ver ejemplos de salida completos.
Análisis de PDF integrado
Extrae el texto insertado de archivos PDF digitales. Si está habilitada y hay texto digital, se usará automáticamente el modelo de PDF digital integrado. Si hay texto no digital, se utiliza automáticamente el modelo de OCR óptico. El usuario recibe ambos resultados de texto combinados.
Entrada
Para habilitarlo, asigna el valor true a ProcessOptions.ocrConfig.enableNativePdfParsing en la solicitud de procesamiento.
  {
    "rawDocument": {
      "mimeType": "MIME_TYPE",
      "content": "IMAGE_CONTENT"
    },
    "processOptions": {
      "ocrConfig": {
        "enableNativePdfParsing": true
      }
    }
  }
Detección de personajes en un recuadro
De forma predeterminada, Enterprise Document OCR tiene habilitado un detector para mejorar la calidad de extracción de texto de los caracteres que se encuentran dentro de un cuadro. A continuación se muestra un ejemplo:
Si tienes problemas de calidad del OCR con los caracteres que están dentro de recuadros, puedes inhabilitarlo.
Entrada
Para inhabilitarlo, asigna el valor true a ProcessOptions.ocrConfig.disableCharacterBoxesDetection en la solicitud de procesamiento.
  {
    "rawDocument": {
      "mimeType": "MIME_TYPE",
      "content": "IMAGE_CONTENT"
    },
    "processOptions": {
      "ocrConfig": {
        "disableCharacterBoxesDetection": true
      }
    }
  }
Diseño antiguo
Si necesitas un algoritmo de detección de diseño heurístico, puedes habilitar el diseño antiguo, que sirve como alternativa al algoritmo de detección de diseño actual basado en aprendizaje automático. No es la configuración recomendada. Los clientes pueden elegir el algoritmo de diseño más adecuado en función de su flujo de trabajo de documentos.
Entrada
Para habilitarlo, asigna el valor ["legacy_layout"] a ProcessOptions.ocrConfig.advancedOcrOptions en la solicitud de procesamiento.
  {
    "rawDocument": {
      "mimeType": "MIME_TYPE",
      "content": "IMAGE_CONTENT"
    },
    "processOptions": {
      "ocrConfig": {
          "advancedOcrOptions": ["legacy_layout"]
      }
    }
  }
Especificar un intervalo de páginas
De forma predeterminada, el OCR extrae el texto y la información del diseño de todas las páginas de los documentos. Puedes seleccionar números de página o intervalos de páginas específicos y extraer texto solo de esas páginas.
Hay tres formas de configurar esta opción en ProcessOptions:
  {
    "individualPageSelector": {"pages": [2, 5]}
  }
  {
    "fromStart": 3
  }
  {
    "fromEnd": 4
  }
En la respuesta, cada Document.pages[].pageNumber corresponde a las mismas páginas especificadas en la solicitud.
Usos de los complementos de OCR
Estas funciones de análisis opcionales de Enterprise Document OCR se pueden habilitar en solicitudes de procesamiento concretas según sea necesario.
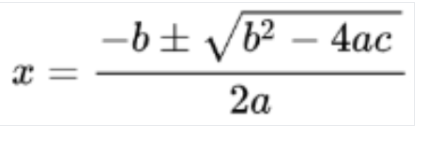
OCR matemático
El reconocimiento óptico de caracteres de matemáticas detecta, reconoce y extrae fórmulas, como ecuaciones matemáticas representadas como LaTeX, junto con las coordenadas del cuadro delimitador.
Aquí tienes un ejemplo de representación en LaTeX:
Entrada
Para habilitarlo, asigna el valor true a ProcessOptions.ocrConfig.premiumFeatures.enableMathOcr en la solicitud de procesamiento.
  {
    "rawDocument": {
      "mimeType": "MIME_TYPE",
      "content": "IMAGE_CONTENT"
    },
    "processOptions": {
      "ocrConfig": {
          "premiumFeatures": {
            "enableMathOcr": true
          }
      }
    }
  }
Salida
El resultado del reconocimiento óptico de caracteres de matemáticas aparece en Document.pages[].visualElements[] con "type": "math_formula".
"visualElements": [
  {
    "layout": {
      "textAnchor": {
        "textSegments": [
          {
            "endIndex": "46"
          }
        ]
      },
      "confidence": 1,
      "boundingPoly": {
        "normalizedVertices": [
          {
            "x": 0.14662756,
            "y": 0.27891156
          },
          {
            "x": 0.9032258,
            "y": 0.27891156
          },
          {
            "x": 0.9032258,
            "y": 0.8027211
          },
          {
            "x": 0.14662756,
            "y": 0.8027211
          }
        ]
      },
      "orientation": "PAGE_UP"
    },
    "type": "math_formula"
  }
]
Puedes consultar la salida JSON completa de Document en este enlace .
Extracción de marcas de selección
Si está habilitado, el modelo intenta extraer todas las casillas de verificación y los botones de selección del documento, junto con las coordenadas del cuadro delimitador.
Entrada
Para habilitarlo, asigna el valor true a ProcessOptions.ocrConfig.premiumFeatures.enableSelectionMarkDetection en la solicitud de procesamiento.
  {
    "rawDocument": {
      "mimeType": "MIME_TYPE",
      "content": "IMAGE_CONTENT"
    },
    "processOptions": {
      "ocrConfig": {
          "premiumFeatures": {
            "enableSelectionMarkDetection": true
          }
      }
    }
  }
Salida
El resultado de la casilla aparece en Document.pages[].visualElements[] con "type": "unfilled_checkbox" o "type": "filled_checkbox".

"visualElements": [
  {
    "layout": {
      "confidence": 0.89363575,
      "boundingPoly": {
        "vertices": [
          {
            "x": 11,
            "y": 24
          },
          {
            "x": 37,
            "y": 24
          },
          {
            "x": 37,
            "y": 56
          },
          {
            "x": 11,
            "y": 56
          }
        ],
        "normalizedVertices": [
          {
            "x": 0.017488075,
            "y": 0.38709676
          },
          {
            "x": 0.05882353,
            "y": 0.38709676
          },
          {
            "x": 0.05882353,
            "y": 0.9032258
          },
          {
            "x": 0.017488075,
            "y": 0.9032258
          }
        ]
      }
    },
    "type": "unfilled_checkbox"
  },
  {
    "layout": {
      "confidence": 0.9148201,
      "boundingPoly": ...
    },
    "type": "filled_checkbox"
  }
],
Puedes consultar la salida JSON completa de Document en este enlace .
Detección de estilo de fuente
Si la detección de estilo de fuente está habilitada, Enterprise Document OCR extrae los atributos de la fuente, que se pueden usar para mejorar el posprocesamiento.
A nivel de token (palabra), se detectan los siguientes atributos:
Entrada
Para habilitarlo, asigna el valor true a ProcessOptions.ocrConfig.premiumFeatures.computeStyleInfo en la solicitud de procesamiento.
  {
    "rawDocument": {
      "mimeType": "MIME_TYPE",
      "content": "IMAGE_CONTENT"
    },
    "processOptions": {
      "ocrConfig": {
          "premiumFeatures": {
            "computeStyleInfo": true
          }
      }
    }
  }
Salida
El resultado de font-style aparece en Document.pages[].tokens[].styleInfo con el tipo StyleInfo.

"tokens": [
  {
    "styleInfo": {
      "fontSize": 3,
      "pixelFontSize": 13,
      "fontType": "SANS_SERIF",
      "bold": true,
      "fontWeight": 564,
      "textColor": {
        "red": 0.16862746,
        "green": 0.16862746,
        "blue": 0.16862746
      },
      "backgroundColor": {
        "red": 0.98039216,
        "green": 0.9882353,
        "blue": 0.99215686
      }
    }
  },
  ...
]
Puedes consultar la salida JSON completa de Document en este enlace .
Convertir objetos de documento al formato de la API Vision AI
El conjunto de herramientas de Document AI incluye una herramienta que convierte el formato Document de la API de Document AI al formato AnnotateFileResponse de la API Vision AI, lo que permite a los usuarios comparar las respuestas entre el procesador de reconocimiento óptico de caracteres de documentos y la API Vision AI. Aquí tienes un fragmento de código de ejemplo.
Discrepancias conocidas entre la respuesta de la API Vision AI y la respuesta y el convertidor de la API Document AI:
Códigos de ejemplo
En los siguientes ejemplos de código se muestra cómo enviar una solicitud de procesamiento que habilite las configuraciones y los complementos de OCR, y cómo leer e imprimir los campos en la terminal:
REST
Antes de usar los datos de la solicitud, haz las siguientes sustituciones:
† Este contenido también se puede especificar mediante contenido codificado en base64 en el objeto inlineDocument.
Método HTTP y URL:
POST https://LOCATION-documentai.googleapis.com/v1/projects/PROJECT_ID/locations/LOCATION/processors/PROCESSOR_ID/processorVersions/PROCESSOR_VERSION:process
Cuerpo JSON de la solicitud:
{
  "skipHumanReview": skipHumanReview,
  "rawDocument": {
    "mimeType": "MIME_TYPE",
    "content": "IMAGE_CONTENT"
  },
  "fieldMask": "FIELD_MASK",
  "processOptions": {
    "ocrConfig": {
      "enableNativePdfParsing": ENABLE_NATIVE_PDF_PARSING,
      "enableImageQualityScores": ENABLE_IMAGE_QUALITY_SCORES,
      "enableSymbol": ENABLE_SYMBOL,
      "disableCharacterBoxesDetection": DISABLE_CHARACTER_BOXES_DETECTION,
      "hints": {
        "languageHints": [
          "LANGUAGE_HINTS"
        ]
      },
      "advancedOcrOptions": ["ADVANCED_OCR_OPTIONS"],
      "premiumFeatures": {
        "enableSelectionMarkDetection": ENABLE_SELECTION_MARK_DETECTION,
        "computeStyleInfo": COMPUTE_STYLE_INFO,
        "enableMathOcr": ENABLE_MATH_OCR,
      }
    },
    "individualPageSelector" {
      "pages": [INDIVIDUAL_PAGES]
    }
  }
}
Para enviar tu solicitud, elige una de estas opciones:
curl
Guarda el cuerpo de la solicitud en un archivo llamado request.json
y ejecuta el siguiente comando:
curl -X POST \
     -H "Authorization: Bearer $(gcloud auth print-access-token)" \
     -H "Content-Type: application/json; charset=utf-8" \
     -d @request.json \
     "https://LOCATION-documentai.googleapis.com/v1/projects/PROJECT_ID/locations/LOCATION/processors/PROCESSOR_ID/processorVersions/PROCESSOR_VERSION:process"
PowerShell
Guarda el cuerpo de la solicitud en un archivo llamado request.json
y ejecuta el siguiente comando:
$cred = gcloud auth print-access-token
$headers = @{ "Authorization" = "Bearer $cred" }

Invoke-WebRequest `
    -Method POST `
    -Headers $headers `
    -ContentType: "application/json; charset=utf-8" `
    -InFile request.json `
    -Uri "https://LOCATION-documentai.googleapis.com/v1/projects/PROJECT_ID/locations/LOCATION/processors/PROCESSOR_ID/processorVersions/PROCESSOR_VERSION:process" | Select-Object -Expand Content
Si la solicitud se realiza de forma correcta, el servidor devuelve un código de estado HTTP 200 OK y la respuesta en formato JSON. El cuerpo de la respuesta contiene una instancia de Document.
Python
Para obtener más información, consulta la documentación de referencia de la API Python de Document AI.
Para autenticarte en Document AI, configura las credenciales predeterminadas de la aplicación. Para obtener más información, consulta el artículo Configurar la autenticación en un entorno de desarrollo local.