Oculta datos sensibles de imágenes

Cloud Data Loss Prevention puede ocultar el texto sensible de una imagen. Con los detectores de Infotipos y Cloud Vision, Cloud DLP inspecciona una imagen en busca de texto, detecta datos sensibles dentro de él y, luego, muestra una imagen con los datos sensibles coincidentes ocultos por un rectángulo opaco.

Por ejemplo, considera las siguientes imágenes de antes y después del ocultamiento. La imagen original es un ejemplo de un archivo de imagen común generado a partir del escaneo de un documento en papel. En este ejemplo, Cloud DLP se configuró para ocultar las direcciones de correo electrónico, los números de teléfono y los números de identificación personal de EE.UU. mediante el uso de rectángulos que tienen diferentes colores en función del contenido.

Imagen antes y después del ocultamiento (haz clic para ampliar)
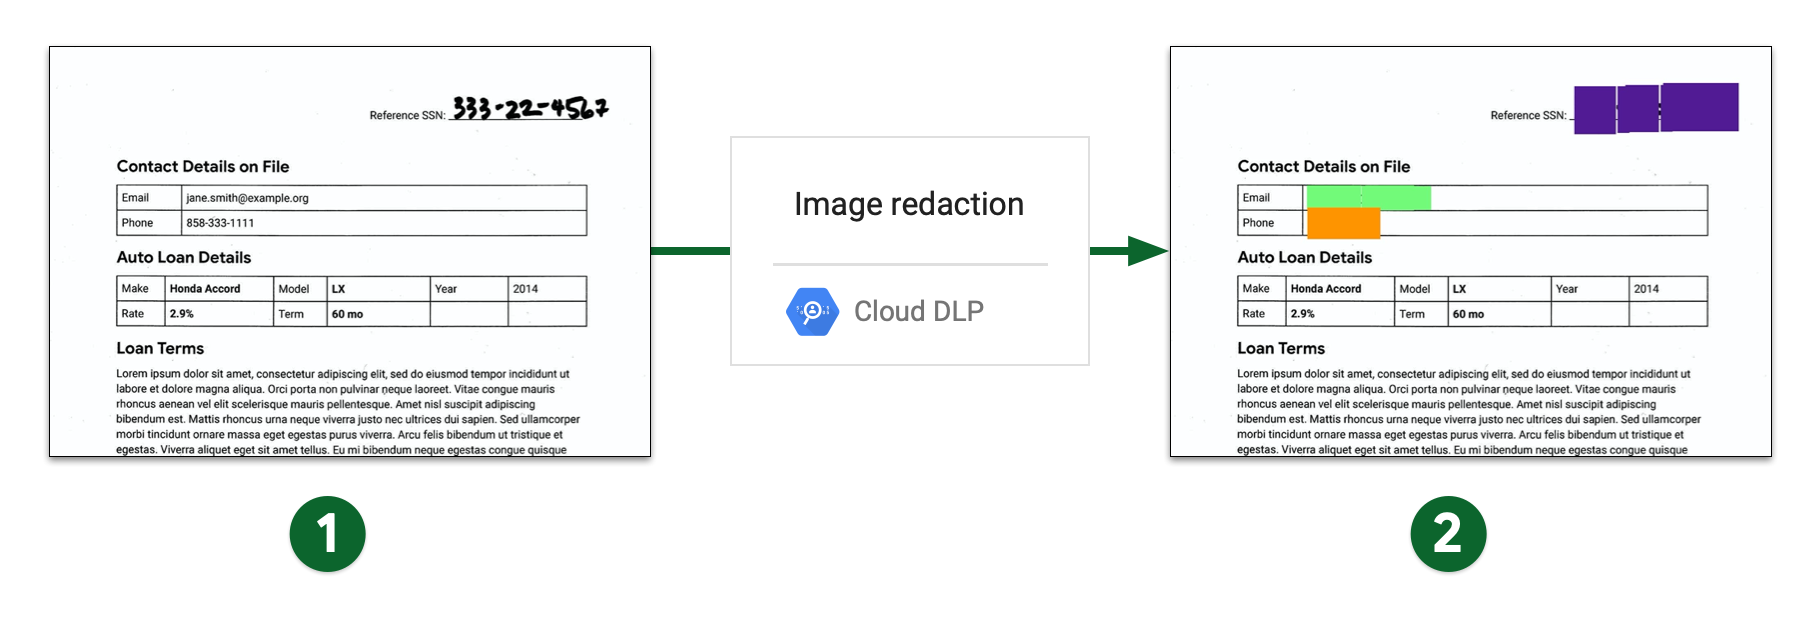
  1. Imagen escaneada antes del ocultamiento
  2. Imagen escaneada después del ocultamiento

Limitaciones y consideraciones

Ten en cuenta los siguientes puntos cuando ocultes contenido de las imágenes.

Tipos de archivos admitidos

Cloud DLP puede ocultar datos sensibles de muchos tipos de imágenes, incluidos JPEG, BMP y PNG. Para obtener más información, consulta Tipos de archivos compatibles.

No se admite el ocultamiento de contenido en archivos SVG, PDF, XLSX, PPTX ni DOCX.

Cómo encontrar límites

Cuando se ocultan los datos de las imágenes, no se aplican los límites de resultados. Pueden generar resultados inesperados o potencialmente incoherentes en los que solo se ocultan algunos datos. Si incluyes FindingLimits en tu solicitud, Cloud DLP generará un error.

Antes de comenzar

  1. Accede a tu cuenta de Google Cloud. Si eres nuevo en Google Cloud, crea una cuenta para evaluar el rendimiento de nuestros productos en situaciones reales. Los clientes nuevos también obtienen $300 en créditos gratuitos para ejecutar, probar y, además, implementar cargas de trabajo.
  2. En la página del selector de proyectos de la consola de Google Cloud, selecciona o crea un proyecto de Google Cloud.

    Ir al selector de proyectos

  3. Asegúrate de que la facturación esté habilitada para tu proyecto de Google Cloud. Obtén información sobre cómo verificar si la facturación está habilitada en un proyecto.

  4. Habilita la API de DLP.

    Habilita la API

  5. Crear una cuenta de servicio:

    1. En la consola de Google Cloud, ve a la página Crear cuenta de servicio.

      Ve a Crear cuenta de servicio
    2. Selecciona tu proyecto.
    3. Ingresa un nombre en el campo Nombre de cuenta de servicio. La consola de Google Cloud completa el campo ID de cuenta de servicio en función de este nombre.

      Opcional: en el campo Descripción de la cuenta de servicio, ingresa una descripción. Por ejemplo, Service account for quickstart.

    4. Haz clic en Crear y continuar.
    5. Para proporcionar acceso a tu proyecto, otorga el rol Project > Owner a tu cuenta de servicio.

      Para otorgar el rol, busca la lista Seleccionar un rol y, luego, selecciona Project > Owner.

    6. Haga clic en Continuar.
    7. Haz clic en Listo para terminar de crear la cuenta de servicio.

      No cierres la ventana del navegador. La usarás en la próxima tarea.

  6. Haz lo siguiente para crear una clave de cuenta de servicio:

    1. En la consola de Google Cloud, haz clic en la dirección de correo electrónico de la cuenta de servicio que creaste.
    2. Haga clic en Claves.
    3. Haz clic en Agregar clave y, luego, en Crear clave nueva.
    4. Haga clic en Crear. Se descargará un archivo de claves JSON en tu computadora.
    5. Haga clic en Cerrar.
  7. Configura la variable de entorno GOOGLE_APPLICATION_CREDENTIALS en la ruta del archivo JSON que contiene la clave de tu cuenta de servicio. Esta variable solo se aplica a la sesión actual de shell. Por lo tanto, si abres una sesión nueva, deberás volver a configurar la variable.

  8. Instala Google Cloud CLI.
  9. Para inicializar la CLI de gcloud, ejecuta el siguiente comando:

    gcloud init
  10. En la página del selector de proyectos de la consola de Google Cloud, selecciona o crea un proyecto de Google Cloud.

    Ir al selector de proyectos

  11. Asegúrate de que la facturación esté habilitada para tu proyecto de Google Cloud. Obtén información sobre cómo verificar si la facturación está habilitada en un proyecto.

  12. Habilita la API de DLP.

    Habilita la API

  13. Crear una cuenta de servicio:

    1. En la consola de Google Cloud, ve a la página Crear cuenta de servicio.

      Ve a Crear cuenta de servicio
    2. Selecciona tu proyecto.
    3. Ingresa un nombre en el campo Nombre de cuenta de servicio. La consola de Google Cloud completa el campo ID de cuenta de servicio en función de este nombre.

      Opcional: en el campo Descripción de la cuenta de servicio, ingresa una descripción. Por ejemplo, Service account for quickstart.

    4. Haz clic en Crear y continuar.
    5. Para proporcionar acceso a tu proyecto, otorga el rol Project > Owner a tu cuenta de servicio.

      Para otorgar el rol, busca la lista Seleccionar un rol y, luego, selecciona Project > Owner.

    6. Haga clic en Continuar.
    7. Haz clic en Listo para terminar de crear la cuenta de servicio.

      No cierres la ventana del navegador. La usarás en la próxima tarea.

  14. Haz lo siguiente para crear una clave de cuenta de servicio:

    1. En la consola de Google Cloud, haz clic en la dirección de correo electrónico de la cuenta de servicio que creaste.
    2. Haga clic en Claves.
    3. Haz clic en Agregar clave y, luego, en Crear clave nueva.
    4. Haga clic en Crear. Se descargará un archivo de claves JSON en tu computadora.
    5. Haga clic en Cerrar.
  15. Configura la variable de entorno GOOGLE_APPLICATION_CREDENTIALS en la ruta del archivo JSON que contiene la clave de tu cuenta de servicio. Esta variable solo se aplica a la sesión actual de shell. Por lo tanto, si abres una sesión nueva, deberás volver a configurar la variable.

  16. Instala Google Cloud CLI.
  17. Para inicializar la CLI de gcloud, ejecuta el siguiente comando:

    gcloud init

Oculta todos los Infotipos predeterminados de una imagen

Para ocultar datos sensibles de una imagen, envíala al método image.redact de la API de DLP. A menos que especifiques los tipos de información (Infotipos) específicos que se deben buscar, Cloud DLP busca los Infotipos más comunes.

Para ocultar los Infotipos predeterminados de una imagen, haz lo siguiente:

  1. Codifica la imagen como una string base64.

    Si planeas usar una de las bibliotecas cliente de Cloud DLP para realizar esta tarea, omite este paso.

  2. Envía una solicitud al método image.redact.

    Si deseas ocultar los Infotipos predeterminados, la solicitud solo requiere la imagen codificada en base64.

Por ejemplo, considera la siguiente imagen. Este es un ejemplo de un archivo de imagen común generado a partir del escaneo de un documento en papel.

Imagen original sin ocultamiento (haz clic para ampliar)

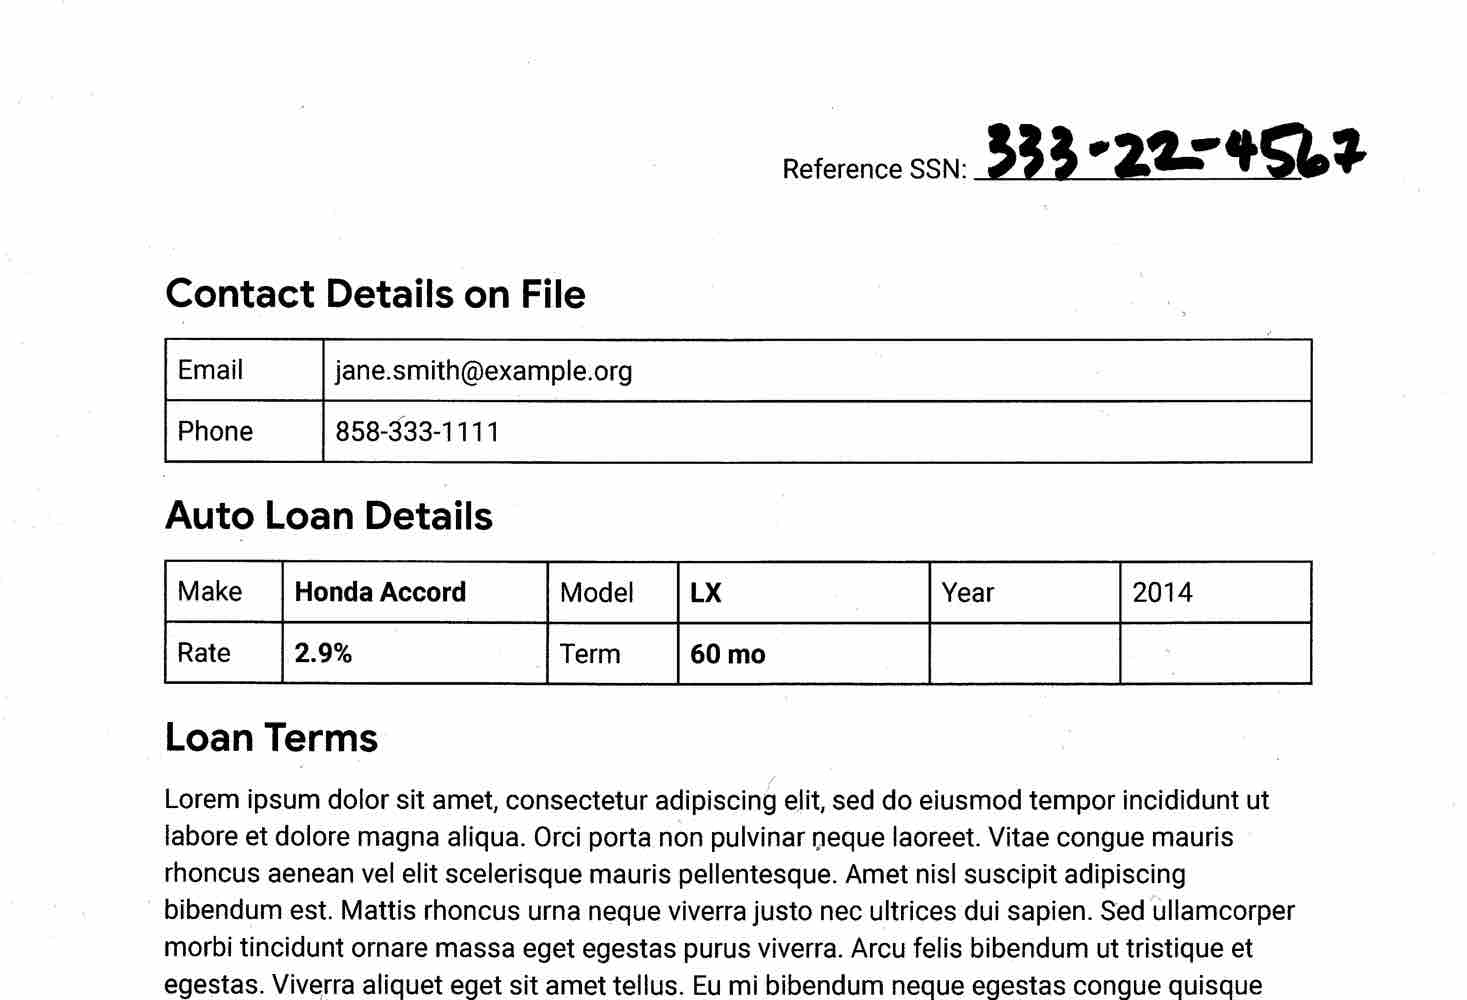
Para ocultar los Infotipos predeterminados de esta imagen, envía la siguiente solicitud al método image.redact de la API de DLP:

Protocolo

{
  "byteItem": {
    "data": "[BASE64-ENCODED-IMAGE]",
    "type": "IMAGE_JPEG"
  }
}

Cloud DLP muestra lo siguiente:

    {
      "redactedImage": "[BASE64-ENCODED-IMAGE]"
    }

Decodifica la imagen codificada en base64.

Java

Si deseas obtener información sobre cómo instalar y usar la biblioteca cliente de Cloud DLP, consulta Bibliotecas cliente de Cloud DLP.

Para autenticar en Cloud DLP, configura las credenciales predeterminadas de la aplicación. Si deseas obtener más información, consulta Configura la autenticación para un entorno de desarrollo local.


import com.google.cloud.dlp.v2.DlpServiceClient;
import com.google.privacy.dlp.v2.ByteContentItem;
import com.google.privacy.dlp.v2.ByteContentItem.BytesType;
import com.google.privacy.dlp.v2.LocationName;
import com.google.privacy.dlp.v2.RedactImageRequest;
import com.google.privacy.dlp.v2.RedactImageResponse;
import com.google.protobuf.ByteString;
import java.io.FileInputStream;
import java.io.FileOutputStream;
import java.io.IOException;

class RedactImageFileAllInfoTypes {

  public static void main(String[] args) throws IOException {
    // TODO(developer): Replace these variables before running the sample.
    String projectId = "my-project-id";
    String inputPath = "src/test/resources/sensitive-data-image.jpeg";
    String outputPath = "sensitive-data-image-redacted.jpeg";
    redactImageFileAllInfoTypes(projectId, inputPath, outputPath);
  }

  static void redactImageFileAllInfoTypes(String projectId, String inputPath, String outputPath)
      throws IOException {
    // Initialize client that will be used to send requests. This client only needs to be created
    // once, and can be reused for multiple requests. After completing all of your requests, call
    // the "close" method on the client to safely clean up any remaining background resources.
    try (DlpServiceClient dlp = DlpServiceClient.create()) {
      // Specify the content to be redacted.
      ByteString fileBytes = ByteString.readFrom(new FileInputStream(inputPath));
      ByteContentItem byteItem =
          ByteContentItem.newBuilder().setType(BytesType.IMAGE_JPEG).setData(fileBytes).build();

      // Construct the Redact request to be sent by the client.
      // Do not specify the type of info to redact.
      RedactImageRequest request =
          RedactImageRequest.newBuilder()
              .setParent(LocationName.of(projectId, "global").toString())
              .setByteItem(byteItem)
              .build();

      // Use the client to send the API request.
      RedactImageResponse response = dlp.redactImage(request);

      // Parse the response and process results.
      FileOutputStream redacted = new FileOutputStream(outputPath);
      redacted.write(response.getRedactedImage().toByteArray());
      redacted.close();
      System.out.println("Redacted image written to " + outputPath);
    }
  }
}

La imagen resultante se muestra de la siguiente manera:

Imagen con ocultamiento de todos los Infotipos (haz clic para ampliar)

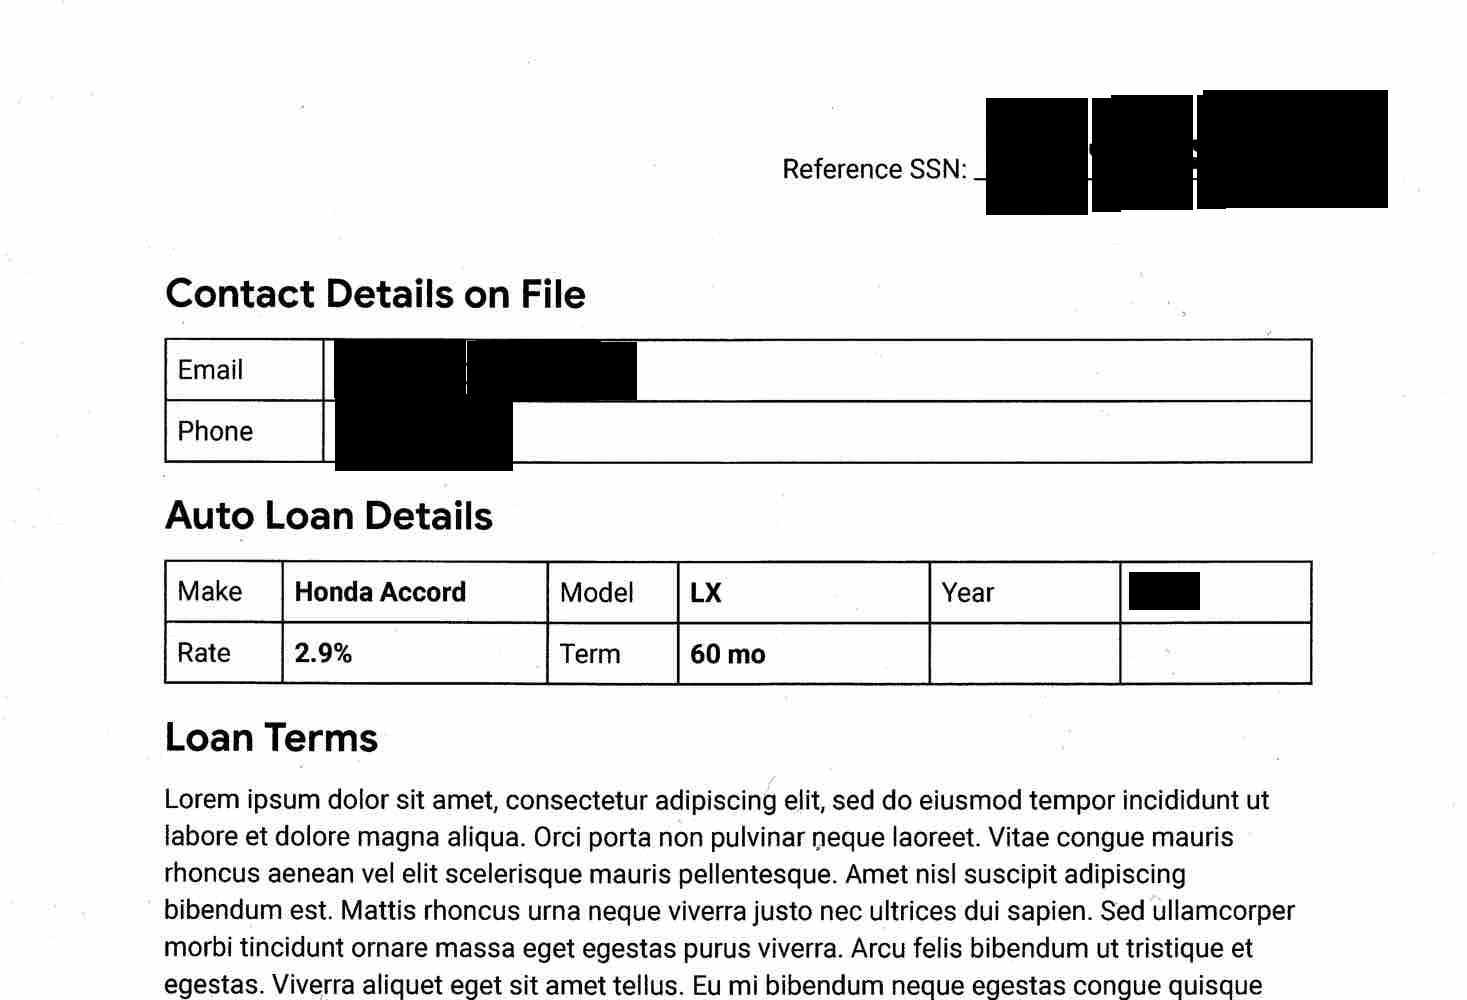
Ten en cuenta que, además de enmascarar el número de seguridad social escrito a mano, la dirección de correo electrónico y el número de teléfono, Cloud DLP también ocultó el año. En la siguiente sección, se muestra cómo ocultar solo algunos infotipos.

Oculta Infotipos específicos de una imagen

Si solo deseas ocultar ciertos datos sensibles de una imagen, especifica los Infotipos integrados correspondientes.

Para ocultar Infotipos específicos de una imagen, envía una solicitud al método image.redact de la API de DLP. La solicitud debe incluir lo siguiente: * La imagen. * Uno o más detectores de Infotipos.

Considera la imagen original de la sección anterior. Para ocultar solo las direcciones de correo electrónico, los números de teléfono y los números de identificación personal de EE.UU., envía el siguiente JSON al método image.redact de la API de DLP:

Protocolo

    {
      "byteItem": {
        "data": "[BASE64-ENCODED-IMAGE]",
        "type": "IMAGE_JPEG"
      },
      "imageRedactionConfigs": [
        {
          "infoType": {
            "name": "US_SOCIAL_SECURITY_NUMBER"
          }
        },
        {
          "infoType": {
            "name": "EMAIL_ADDRESS"
          }
        },
        {
          "infoType": {
            "name": "PHONE_NUMBER"
          }
        }
      ]
    }

Cloud DLP muestra lo siguiente:

    {
      "redactedImage": "[BASE64-ENCODED-IMAGE]"
    }

Decodifica la imagen codificada en base64.

Java

Si deseas obtener información sobre cómo instalar y usar la biblioteca cliente de Cloud DLP, consulta Bibliotecas cliente de Cloud DLP.

Para autenticar en Cloud DLP, configura las credenciales predeterminadas de la aplicación. Si deseas obtener más información, consulta Configura la autenticación para un entorno de desarrollo local.


import com.google.cloud.dlp.v2.DlpServiceClient;
import com.google.privacy.dlp.v2.ByteContentItem;
import com.google.privacy.dlp.v2.ByteContentItem.BytesType;
import com.google.privacy.dlp.v2.InfoType;
import com.google.privacy.dlp.v2.InspectConfig;
import com.google.privacy.dlp.v2.LocationName;
import com.google.privacy.dlp.v2.RedactImageRequest;
import com.google.privacy.dlp.v2.RedactImageRequest.ImageRedactionConfig;
import com.google.privacy.dlp.v2.RedactImageResponse;
import com.google.protobuf.ByteString;
import java.io.FileInputStream;
import java.io.FileOutputStream;
import java.io.IOException;
import java.util.ArrayList;
import java.util.List;
import java.util.stream.Collectors;

class RedactImageFileListedInfoTypes {

  public static void main(String[] args) throws IOException {
    // TODO(developer): Replace these variables before running the sample.
    String projectId = "my-project-id";
    String inputPath = "src/test/resources/sensitive-data-image.jpeg";
    String outputPath = "sensitive-data-image-redacted.jpeg";
    redactImageFileListedInfoTypes(projectId, inputPath, outputPath);
  }

  static void redactImageFileListedInfoTypes(String projectId, String inputPath, String outputPath)
      throws IOException {
    // Initialize client that will be used to send requests. This client only needs to be created
    // once, and can be reused for multiple requests. After completing all of your requests, call
    // the "close" method on the client to safely clean up any remaining background resources.
    try (DlpServiceClient dlp = DlpServiceClient.create()) {
      // Specify the content to be redacted.
      ByteString fileBytes = ByteString.readFrom(new FileInputStream(inputPath));
      ByteContentItem byteItem =
          ByteContentItem.newBuilder().setType(BytesType.IMAGE_JPEG).setData(fileBytes).build();

      // Specify the types of info necessary to redact.
      List<InfoType> infoTypes = new ArrayList<>();
      // See https://cloud.google.com/dlp/docs/infotypes-reference for complete list of info types
      for (String typeName :
          new String[] {"US_SOCIAL_SECURITY_NUMBER", "EMAIL_ADDRESS", "PHONE_NUMBER"}) {
        infoTypes.add(InfoType.newBuilder().setName(typeName).build());
      }
      InspectConfig inspectConfig = InspectConfig.newBuilder().addAllInfoTypes(infoTypes).build();

      // Prepare redaction configs.
      List<ImageRedactionConfig> imageRedactionConfigs =
          infoTypes.stream()
              .map(infoType -> ImageRedactionConfig.newBuilder().setInfoType(infoType).build())
              .collect(Collectors.toList());

      // Construct the Redact request to be sent by the client.
      RedactImageRequest request =
          RedactImageRequest.newBuilder()
              .setParent(LocationName.of(projectId, "global").toString())
              .setByteItem(byteItem)
              .addAllImageRedactionConfigs(imageRedactionConfigs)
              .setInspectConfig(inspectConfig)
              .build();

      // Use the client to send the API request.
      RedactImageResponse response = dlp.redactImage(request);

      // Parse the response and process results.
      FileOutputStream redacted = new FileOutputStream(outputPath);
      redacted.write(response.getRedactedImage().toByteArray());
      redacted.close();
      System.out.println("Redacted image written to " + outputPath);
    }
  }
}

C#

Si deseas obtener información sobre cómo instalar y usar la biblioteca cliente de Cloud DLP, consulta Bibliotecas cliente de Cloud DLP.

Para autenticar en Cloud DLP, configura las credenciales predeterminadas de la aplicación. Si deseas obtener más información, consulta Configura la autenticación para un entorno de desarrollo local.


using Google.Api.Gax.ResourceNames;
using Google.Cloud.Dlp.V2;
using Google.Protobuf;
using System;
using System.IO;

public class RedactImage
{
    public static RedactImageResponse Redact(string projectId, string originalImagePath, string redactedImagePath)
    {
        var request = new RedactImageRequest
        {
            Parent = new LocationName(projectId, "global").ToString(),
            InspectConfig = new InspectConfig
            {
                MinLikelihood = Likelihood.Likely,
                Limits = new InspectConfig.Types.FindingLimits() { MaxFindingsPerItem = 5 },
                IncludeQuote = true,
                InfoTypes =
                    {
                        new InfoType { Name = "PHONE_NUMBER" },
                        new InfoType { Name = "EMAIL_ADDRESS" }
                    }
            },
            ByteItem = new ByteContentItem
            {
                Type = ByteContentItem.Types.BytesType.ImagePng,
                Data = ByteString.FromStream(new FileStream(originalImagePath, FileMode.Open))
            },
        };

        var client = DlpServiceClient.Create();
        var response = client.RedactImage(request);

        Console.WriteLine($"Extracted text: {response.ExtractedText}");

        // Writes redacted image into file
        response.RedactedImage.WriteTo(new FileStream(redactedImagePath, FileMode.Create, FileAccess.Write));

        return response;
    }
}

La imagen resultante se muestra de la siguiente manera:

Imagen con ocultamiento de 3 Infotipos (haz clic para ampliar)

Puedes codificar por color la información oculta según el Infotipo si deseas distinguir con rapidez lo que se ocultó. Consulta la siguiente sección para obtener más información.

Oculta Infotipos de una imagen con codificación por colores

Para codificar por color la información oculta según el Infotipo, debes vincular los detectores de Infotipos con los valores del espacio de color RGB.

Para codificar por color los Infotipos ocultos de una imagen, envía una solicitud al método image.redact de la API de DLP. La solicitud debe incluir lo siguiente: * La imagen. * Uno o más detectores de Infotipos, a los que se les asigna un color mediante los valores del espacio de color RGB

Considera la imagen original de la primera sección. Para ocultar los números de identificación personal de Estados Unidos con un cuadro violeta, las direcciones de correo electrónico con un cuadro verde y los números de teléfono con un cuadro naranja, envía el siguiente JSON al método image.redact de la API de DLP:

Protocolo

    {
      "byteItem": {
        "data": "[BASE64-ENCODED-IMAGE]",
        "type": "IMAGE_JPEG"
      },
      "imageRedactionConfigs": [
        {
          "infoType": {
            "name": "US_SOCIAL_SECURITY_NUMBER"
          },
          "redactionColor": {
            "red": 0.3,
            "green": 0.1,
            "blue": 0.6
          }
        },
        {
          "infoType": {
            "name": "EMAIL_ADDRESS"
          },
          "redactionColor": {
            "red": 0.5,
            "blue": 0.5,
            "green": 1
          }
        },
        {
          "infoType": {
            "name": "PHONE_NUMBER"
          },
          "redactionColor": {
            "red": 1,
            "blue": 0,
            "green": 0.6
          }
        }
      ]
    }

Cloud DLP muestra lo siguiente:

    {
      "redactedImage": "[BASE64-ENCODED-IMAGE]"
    }

Decodifica la imagen codificada en base64.

Java

Si deseas obtener información sobre cómo instalar y usar la biblioteca cliente de Cloud DLP, consulta Bibliotecas cliente de Cloud DLP.

Para autenticar en Cloud DLP, configura las credenciales predeterminadas de la aplicación. Si deseas obtener más información, consulta Configura la autenticación para un entorno de desarrollo local.


import com.google.cloud.dlp.v2.DlpServiceClient;
import com.google.privacy.dlp.v2.ByteContentItem;
import com.google.privacy.dlp.v2.ByteContentItem.BytesType;
import com.google.privacy.dlp.v2.Color;
import com.google.privacy.dlp.v2.InfoType;
import com.google.privacy.dlp.v2.InspectConfig;
import com.google.privacy.dlp.v2.LocationName;
import com.google.privacy.dlp.v2.RedactImageRequest;
import com.google.privacy.dlp.v2.RedactImageRequest.ImageRedactionConfig;
import com.google.privacy.dlp.v2.RedactImageResponse;
import com.google.protobuf.ByteString;
import java.io.FileInputStream;
import java.io.FileOutputStream;
import java.io.IOException;
import java.util.Arrays;
import java.util.List;
import java.util.stream.Collectors;

class RedactImageFileColoredInfoTypes {

  public static void main(String[] args) throws IOException {
    // TODO(developer): Replace these variables before running the sample.
    String projectId = "my-project-id";
    String inputPath = "src/test/resources/test.png";
    String outputPath = "redacted.png";
    redactImageFileColoredInfoTypes(projectId, inputPath, outputPath);
  }

  static void redactImageFileColoredInfoTypes(String projectId, String inputPath, String outputPath)
      throws IOException {
    // Initialize client that will be used to send requests. This client only needs to be created
    // once, and can be reused for multiple requests. After completing all of your requests, call
    // the "close" method on the client to safely clean up any remaining background resources.
    try (DlpServiceClient dlp = DlpServiceClient.create()) {
      // Specify the content to be redacted.
      ByteString fileBytes = ByteString.readFrom(new FileInputStream(inputPath));
      ByteContentItem byteItem =
          ByteContentItem.newBuilder().setType(BytesType.IMAGE_JPEG).setData(fileBytes).build();

      // Define types of info to redact associate each one with a different color.
      // See https://cloud.google.com/dlp/docs/infotypes-reference for complete list of info types
      ImageRedactionConfig ssnRedactionConfig =
          ImageRedactionConfig.newBuilder()
              .setInfoType(InfoType.newBuilder().setName("US_SOCIAL_SECURITY_NUMBER").build())
              .setRedactionColor(Color.newBuilder().setRed(.3f).setGreen(.1f).setBlue(.6f).build())
              .build();
      ImageRedactionConfig emailRedactionConfig =
          ImageRedactionConfig.newBuilder()
              .setInfoType(InfoType.newBuilder().setName("EMAIL_ADDRESS").build())
              .setRedactionColor(Color.newBuilder().setRed(.5f).setGreen(.5f).setBlue(1).build())
              .build();
      ImageRedactionConfig phoneRedactionConfig =
          ImageRedactionConfig.newBuilder()
              .setInfoType(InfoType.newBuilder().setName("PHONE_NUMBER").build())
              .setRedactionColor(Color.newBuilder().setRed(1).setGreen(0).setBlue(.6f).build())
              .build();

      // Create collection of all redact configurations.
      List<ImageRedactionConfig> imageRedactionConfigs =
          Arrays.asList(ssnRedactionConfig, emailRedactionConfig, phoneRedactionConfig);

      // List types of info to search for.
      InspectConfig config =
          InspectConfig.newBuilder()
              .addAllInfoTypes(
                  imageRedactionConfigs.stream()
                      .map(ImageRedactionConfig::getInfoType)
                      .collect(Collectors.toList()))
              .build();

      // Construct the Redact request to be sent by the client.
      RedactImageRequest request =
          RedactImageRequest.newBuilder()
              .setParent(LocationName.of(projectId, "global").toString())
              .setByteItem(byteItem)
              .addAllImageRedactionConfigs(imageRedactionConfigs)
              .setInspectConfig(config)
              .build();

      // Use the client to send the API request.
      RedactImageResponse response = dlp.redactImage(request);

      // Parse the response and process results.
      FileOutputStream redacted = new FileOutputStream(outputPath);
      redacted.write(response.getRedactedImage().toByteArray());
      redacted.close();
      System.out.println("Redacted image written to " + outputPath);
    }
  }
}

La imagen resultante se muestra de la siguiente manera:

Imagen con ocultamiento de 3 Infotipos codificados por color (haz clic para ampliar)

Oculta todo el texto de una imagen

Cloud DLP también contiene una opción para ocultar todo el texto que se detecta en una imagen.

Para ocultar todo el texto de una imagen, envía una solicitud al método image.redact de la API de DLP. La solicitud debe incluir lo siguiente: * La imagen. * La opción redactAllText configurada como true.

Considera la imagen original de la primera sección. Para ocultar todo el texto, envía el siguiente JSON al método image.redact de la API de DLP:

Protocolo

    {
      "byteItem": {
        "data": "[BASE64-ENCODED-IMAGE]",
        "type": "IMAGE_JPEG"
      },
      "imageRedactionConfigs": [
        {
          "redactAllText": true
        }
      ]
    }

Cloud DLP muestra lo siguiente:

    {
      "redactedImage": "[BASE64-ENCODED-IMAGE]"
    }

Decodifica la imagen codificada en base64.

Python

Si deseas obtener información sobre cómo instalar y usar la biblioteca cliente de Cloud DLP, consulta Bibliotecas cliente de Cloud DLP.

Para autenticar en Cloud DLP, configura las credenciales predeterminadas de la aplicación. Si deseas obtener más información, consulta Configura la autenticación para un entorno de desarrollo local.

import google.cloud.dlp  # noqa: E402, F811

def redact_image_all_text(
    project: str,
    filename: str,
    output_filename: str,
) -> None:
    """Uses the Data Loss Prevention API to redact all text in an image.

    Args:
        project: The Google Cloud project id to use as a parent resource.
        filename: The path to the file to inspect.
        output_filename: The path to which the redacted image will be written.

    Returns:
        None; the response from the API is printed to the terminal.
    """

    # Instantiate a client.
    dlp = google.cloud.dlp_v2.DlpServiceClient()

    # Construct the image_redaction_configs, indicating to DLP that all text in
    # the input image should be redacted.
    image_redaction_configs = [{"redact_all_text": True}]

    # Construct the byte_item, containing the file's byte data.
    with open(filename, mode="rb") as f:
        byte_item = {"type_": google.cloud.dlp_v2.FileType.IMAGE, "data": f.read()}

    # Convert the project id into a full resource id.
    parent = f"projects/{project}"

    # Call the API.
    response = dlp.redact_image(
        request={
            "parent": parent,
            "image_redaction_configs": image_redaction_configs,
            "byte_item": byte_item,
        }
    )

    # Write out the results.
    with open(output_filename, mode="wb") as f:
        f.write(response.redacted_image)

    print(
        "Wrote {byte_count} to {filename}".format(
            byte_count=len(response.redacted_image), filename=output_filename
        )
    )

Java

Si deseas obtener información sobre cómo instalar y usar la biblioteca cliente de Cloud DLP, consulta Bibliotecas cliente de Cloud DLP.

Para autenticar en Cloud DLP, configura las credenciales predeterminadas de la aplicación. Si deseas obtener más información, consulta Configura la autenticación para un entorno de desarrollo local.


import com.google.cloud.dlp.v2.DlpServiceClient;
import com.google.privacy.dlp.v2.ByteContentItem;
import com.google.privacy.dlp.v2.ByteContentItem.BytesType;
import com.google.privacy.dlp.v2.LocationName;
import com.google.privacy.dlp.v2.RedactImageRequest;
import com.google.privacy.dlp.v2.RedactImageRequest.ImageRedactionConfig;
import com.google.privacy.dlp.v2.RedactImageResponse;
import com.google.protobuf.ByteString;
import java.io.FileInputStream;
import java.io.FileOutputStream;
import java.io.IOException;

class RedactImageFileAllText {

  public static void main(String[] args) throws IOException {
    // TODO(developer): Replace these variables before running the sample.
    String projectId = "my-project-id";
    String inputPath = "src/test/resources/sensitive-data-image.jpeg";
    String outputPath = "sensitive-data-image-redacted.jpeg";
    redactImageFileAllText(projectId, inputPath, outputPath);
  }

  static void redactImageFileAllText(String projectId, String inputPath, String outputPath)
      throws IOException {
    // Initialize client that will be used to send requests. This client only needs to be created
    // once, and can be reused for multiple requests. After completing all of your requests, call
    // the "close" method on the client to safely clean up any remaining background resources.
    try (DlpServiceClient dlp = DlpServiceClient.create()) {
      // Specify the content to be redacted.
      ByteString fileBytes = ByteString.readFrom(new FileInputStream(inputPath));
      ByteContentItem byteItem =
          ByteContentItem.newBuilder().setType(BytesType.IMAGE_JPEG).setData(fileBytes).build();

      // Enable redaction of all text.
      ImageRedactionConfig imageRedactionConfig =
          ImageRedactionConfig.newBuilder().setRedactAllText(true).build();

      // Construct the Redact request to be sent by the client.
      // Do not specify the type of info to redact.
      RedactImageRequest request =
          RedactImageRequest.newBuilder()
              .setParent(LocationName.of(projectId, "global").toString())
              .setByteItem(byteItem)
              .addImageRedactionConfigs(imageRedactionConfig)
              .build();

      // Use the client to send the API request.
      RedactImageResponse response = dlp.redactImage(request);

      // Parse the response and process results.
      FileOutputStream redacted = new FileOutputStream(outputPath);
      redacted.write(response.getRedactedImage().toByteArray());
      redacted.close();
      System.out.println("Redacted image written to " + outputPath);
    }
  }
}

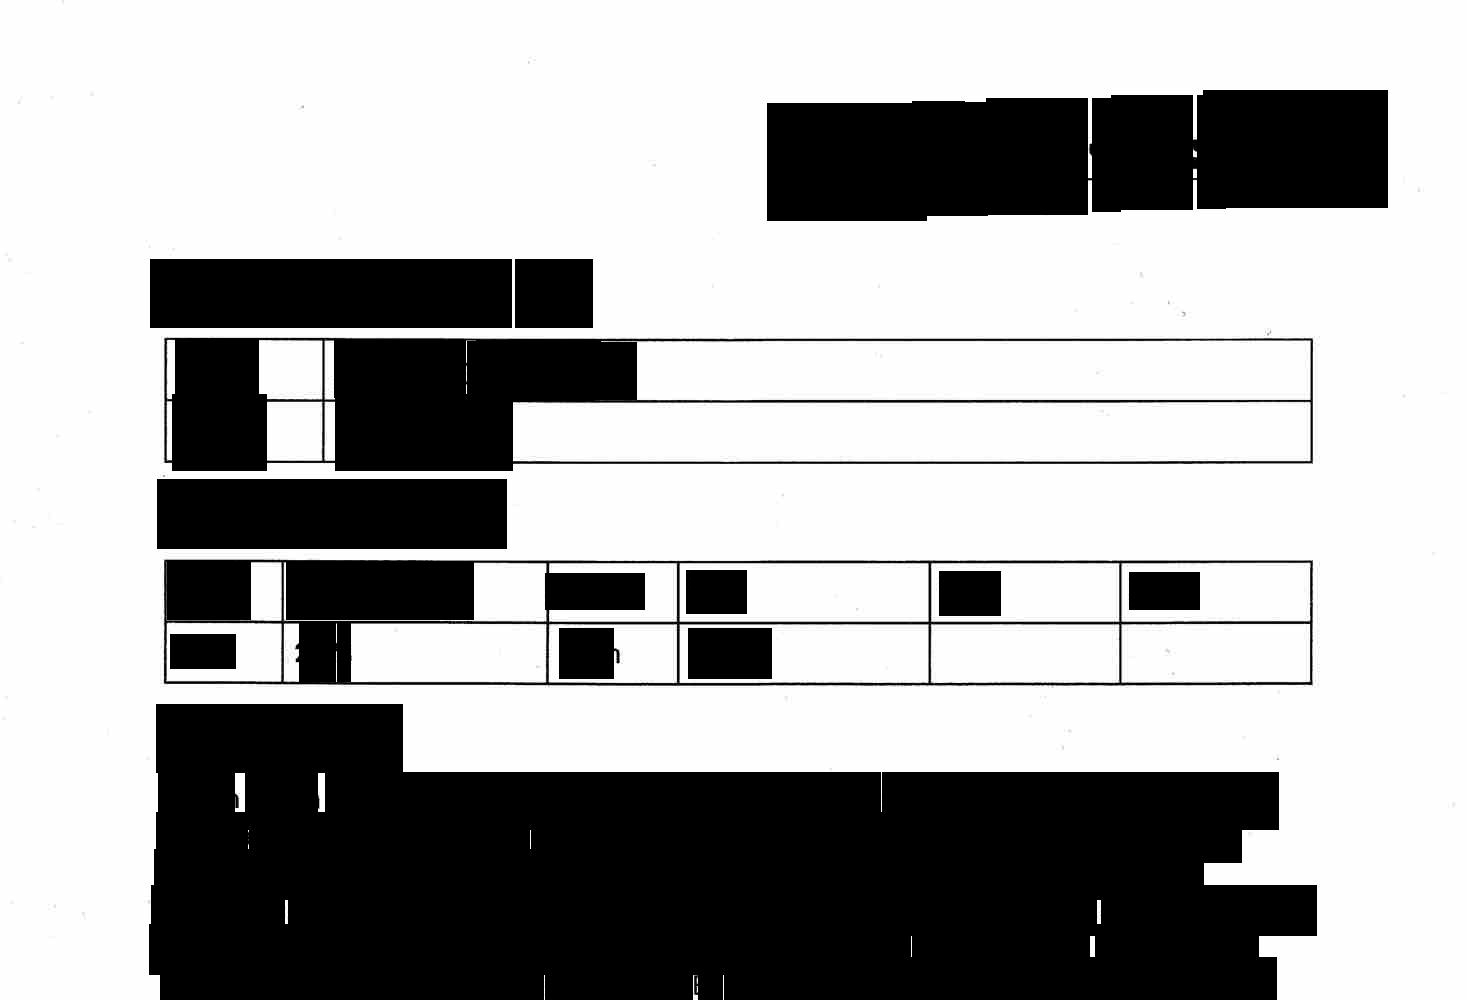
La API muestra las mismas imágenes que le enviaste, pero se oculta todo el texto identificado que contenga información sensible en función de tus criterios.

La imagen resultante se muestra de la siguiente manera:

Imagen con ocultamiento de todo el texto (haz clic para ampliar)

Ejemplos de código

A continuación, hay un código de muestra en varios lenguajes que demuestra cómo usar Cloud DLP para ocultar texto sensible de una imagen.

Node.js

Si deseas obtener información sobre cómo instalar y usar la biblioteca cliente de Cloud DLP, consulta Bibliotecas cliente de Cloud DLP.

Para autenticar en Cloud DLP, configura las credenciales predeterminadas de la aplicación. Si deseas obtener más información, consulta Configura la autenticación para un entorno de desarrollo local.

// Imports the Google Cloud Data Loss Prevention library
const DLP = require('@google-cloud/dlp');

// Imports required Node.js libraries
const mime = require('mime');
const fs = require('fs');

// Instantiates a client
const dlp = new DLP.DlpServiceClient();

// The project ID to run the API call under
// const projectId = 'my-project';

// The path to a local file to inspect. Can be a JPG or PNG image file.
// const filepath = 'path/to/image.png';

// The minimum likelihood required before redacting a match
// const minLikelihood = 'LIKELIHOOD_UNSPECIFIED';

// The infoTypes of information to redact
// const infoTypes = [{ name: 'EMAIL_ADDRESS' }, { name: 'PHONE_NUMBER' }];

// The local path to save the resulting image to.
// const outputPath = 'result.png';
async function redactImage() {
  const imageRedactionConfigs = infoTypes.map(infoType => {
    return {infoType: infoType};
  });

  // Load image
  const fileTypeConstant =
    ['image/jpeg', 'image/bmp', 'image/png', 'image/svg'].indexOf(
      mime.getType(filepath)
    ) + 1;
  const fileBytes = Buffer.from(fs.readFileSync(filepath)).toString('base64');

  // Construct image redaction request
  const request = {
    parent: `projects/${projectId}/locations/global`,
    byteItem: {
      type: fileTypeConstant,
      data: fileBytes,
    },
    inspectConfig: {
      minLikelihood: minLikelihood,
      infoTypes: infoTypes,
    },
    imageRedactionConfigs: imageRedactionConfigs,
  };

  // Run image redaction request
  const [response] = await dlp.redactImage(request);
  const image = response.redactedImage;
  fs.writeFileSync(outputPath, image);
  console.log(`Saved image redaction results to path: ${outputPath}`);
}
redactImage();

Python

Si deseas obtener información sobre cómo instalar y usar la biblioteca cliente de Cloud DLP, consulta Bibliotecas cliente de Cloud DLP.

Para autenticar en Cloud DLP, configura las credenciales predeterminadas de la aplicación. Si deseas obtener más información, consulta Configura la autenticación para un entorno de desarrollo local.

import mimetypes

import google.cloud.dlp

def redact_image(
    project: str,
    filename: str,
    output_filename: str,
    info_types: List[str],
    min_likelihood: str = None,
    mime_type: str = None,
) -> None:
    """Uses the Data Loss Prevention API to redact protected data in an image.
    Args:
        project: The Google Cloud project id to use as a parent resource.
        filename: The path to the file to inspect.
        output_filename: The path to which the redacted image will be written.
        info_types: A list of strings representing info types to look for.
            A full list of info type categories can be fetched from the API.
        min_likelihood: A string representing the minimum likelihood threshold
            that constitutes a match. One of: 'LIKELIHOOD_UNSPECIFIED',
            'VERY_UNLIKELY', 'UNLIKELY', 'POSSIBLE', 'LIKELY', 'VERY_LIKELY'.
        mime_type: The MIME type of the file. If not specified, the type is
            inferred via the Python standard library's mimetypes module.
    Returns:
        None; the response from the API is printed to the terminal.
    """

    # Instantiate a client.
    dlp = google.cloud.dlp_v2.DlpServiceClient()

    # Prepare info_types by converting the list of strings into a list of
    # dictionaries (protos are also accepted).
    info_types = [{"name": info_type} for info_type in info_types]

    # Prepare image_redaction_configs, a list of dictionaries. Each dictionary
    # contains an info_type and optionally the color used for the replacement.
    # The color is omitted in this sample, so the default (black) will be used.
    image_redaction_configs = []

    if info_types is not None:
        for info_type in info_types:
            image_redaction_configs.append({"info_type": info_type})

    # Construct the configuration dictionary. Keys which are None may
    # optionally be omitted entirely.
    inspect_config = {
        "min_likelihood": min_likelihood,
        "info_types": info_types,
    }

    # If mime_type is not specified, guess it from the filename.
    if mime_type is None:
        mime_guess = mimetypes.MimeTypes().guess_type(filename)
        mime_type = mime_guess[0] or "application/octet-stream"

    # Select the content type index from the list of supported types.
    supported_content_types = {
        None: 0,  # "Unspecified"
        "image/jpeg": 1,
        "image/bmp": 2,
        "image/png": 3,
        "image/svg": 4,
        "text/plain": 5,
    }
    content_type_index = supported_content_types.get(mime_type, 0)

    # Construct the byte_item, containing the file's byte data.
    with open(filename, mode="rb") as f:
        byte_item = {"type_": content_type_index, "data": f.read()}

    # Convert the project id into a full resource id.
    parent = f"projects/{project}"

    # Call the API.
    response = dlp.redact_image(
        request={
            "parent": parent,
            "inspect_config": inspect_config,
            "image_redaction_configs": image_redaction_configs,
            "byte_item": byte_item,
        }
    )

    # Write out the results.
    with open(output_filename, mode="wb") as f:
        f.write(response.redacted_image)
    print(
        "Wrote {byte_count} to {filename}".format(
            byte_count=len(response.redacted_image), filename=output_filename
        )
    )

Go

Si deseas obtener información sobre cómo instalar y usar la biblioteca cliente de Cloud DLP, consulta Bibliotecas cliente de Cloud DLP.

Para autenticar en Cloud DLP, configura las credenciales predeterminadas de la aplicación. Si deseas obtener más información, consulta Configura la autenticación para un entorno de desarrollo local.

import (
	"context"
	"fmt"
	"io"
	"io/ioutil"

	dlp "cloud.google.com/go/dlp/apiv2"
	"cloud.google.com/go/dlp/apiv2/dlppb"
)

// redactImage blacks out the identified portions of the input image (with type bytesType)
// and stores the result in outputPath.
func redactImage(w io.Writer, projectID string, infoTypeNames []string, bytesType dlppb.ByteContentItem_BytesType, inputPath, outputPath string) error {
	// projectID := "my-project-id"
	// infoTypeNames := []string{"US_SOCIAL_SECURITY_NUMBER"}
	// bytesType := dlppb.ByteContentItem_IMAGE_PNG
	// inputPath := /tmp/input
	// outputPath := /tmp/output

	ctx := context.Background()

	client, err := dlp.NewClient(ctx)
	if err != nil {
		return fmt.Errorf("dlp.NewClient: %w", err)
	}
	defer client.Close()

	// Convert the info type strings to a list of InfoTypes.
	var infoTypes []*dlppb.InfoType
	for _, it := range infoTypeNames {
		infoTypes = append(infoTypes, &dlppb.InfoType{Name: it})
	}

	// Convert the info type strings to a list of types to redact in the image.
	var redactInfoTypes []*dlppb.RedactImageRequest_ImageRedactionConfig
	for _, it := range infoTypeNames {
		redactInfoTypes = append(redactInfoTypes, &dlppb.RedactImageRequest_ImageRedactionConfig{
			Target: &dlppb.RedactImageRequest_ImageRedactionConfig_InfoType{
				InfoType: &dlppb.InfoType{Name: it},
			},
		})
	}

	// Read the input file.
	b, err := ioutil.ReadFile(inputPath)
	if err != nil {
		return fmt.Errorf("ioutil.ReadFile: %w", err)
	}

	// Create a configured request.
	req := &dlppb.RedactImageRequest{
		Parent: fmt.Sprintf("projects/%s/locations/global", projectID),
		InspectConfig: &dlppb.InspectConfig{
			InfoTypes:     infoTypes,
			MinLikelihood: dlppb.Likelihood_POSSIBLE,
		},
		// The item to analyze.
		ByteItem: &dlppb.ByteContentItem{
			Type: bytesType,
			Data: b,
		},
		ImageRedactionConfigs: redactInfoTypes,
	}
	// Send the request.
	resp, err := client.RedactImage(ctx, req)
	if err != nil {
		return fmt.Errorf("RedactImage: %w", err)
	}
	// Write the output file.
	if err := ioutil.WriteFile(outputPath, resp.GetRedactedImage(), 0644); err != nil {
		return fmt.Errorf("ioutil.WriteFile: %w", err)
	}
	fmt.Fprintf(w, "Wrote output to %s", outputPath)
	return nil
}

PHP

Si deseas obtener información sobre cómo instalar y usar la biblioteca cliente de Cloud DLP, consulta Bibliotecas cliente de Cloud DLP.

Para autenticar en Cloud DLP, configura las credenciales predeterminadas de la aplicación. Si deseas obtener más información, consulta Configura la autenticación para un entorno de desarrollo local.

use Google\Cloud\Dlp\V2\DlpServiceClient;
use Google\Cloud\Dlp\V2\InfoType;
use Google\Cloud\Dlp\V2\InspectConfig;
use Google\Cloud\Dlp\V2\RedactImageRequest\ImageRedactionConfig;
use Google\Cloud\Dlp\V2\Likelihood;
use Google\Cloud\Dlp\V2\ByteContentItem;

/**
 * Redact sensitive data from an image.
 *
 * @param string $callingProjectId    The project ID to run the API call under
 * @param string $imagePath           The local filepath of the image to inspect
 * @param string $outputPath          The local filepath to save the resulting image to
 */
function redact_image(
    string $callingProjectId,
    string $imagePath,
    string $outputPath
): void {
    // Instantiate a client.
    $dlp = new DlpServiceClient();

    // The infoTypes of information to match
    $phoneNumberInfoType = (new InfoType())
        ->setName('PHONE_NUMBER');
    $infoTypes = [$phoneNumberInfoType];

    // The minimum likelihood required before returning a match
    $minLikelihood = likelihood::LIKELIHOOD_UNSPECIFIED;

    // Whether to include the matching string in the response
    $includeQuote = true;

    // Create the configuration object
    $inspectConfig = (new InspectConfig())
        ->setMinLikelihood($minLikelihood)
        ->setInfoTypes($infoTypes);

    // Read image file into a buffer
    $imageRef = fopen($imagePath, 'rb');
    $imageBytes = fread($imageRef, filesize($imagePath));
    fclose($imageRef);

    // Get the image's content type
    $typeConstant = (int) array_search(
        mime_content_type($imagePath),
        [false, 'image/jpeg', 'image/bmp', 'image/png', 'image/svg']
    );

    // Create the byte-storing object
    $byteContent = (new ByteContentItem())
        ->setType($typeConstant)
        ->setData($imageBytes);

    // Create the image redaction config objects
    $imageRedactionConfigs = [];
    foreach ($infoTypes as $infoType) {
        $config = (new ImageRedactionConfig())
            ->setInfoType($infoType);
        $imageRedactionConfigs[] = $config;
    }

    $parent = "projects/$callingProjectId/locations/global";

    // Run request
    $response = $dlp->redactImage([
        'parent' => $parent,
        'inspectConfig' => $inspectConfig,
        'byteItem' => $byteContent,
        'imageRedactionConfigs' => $imageRedactionConfigs
    ]);

    // Save result to file
    file_put_contents($outputPath, $response->getRedactedImage());

    // Print completion message
    print('Redacted image saved to ' . $outputPath . PHP_EOL);
}

C#

Si deseas obtener información sobre cómo instalar y usar la biblioteca cliente de Cloud DLP, consulta Bibliotecas cliente de Cloud DLP.

Para autenticar en Cloud DLP, configura las credenciales predeterminadas de la aplicación. Si deseas obtener más información, consulta Configura la autenticación para un entorno de desarrollo local.


using Google.Api.Gax.ResourceNames;
using Google.Cloud.Dlp.V2;
using Google.Protobuf;
using System;
using System.IO;

public class RedactImage
{
    public static RedactImageResponse Redact(string projectId, string originalImagePath, string redactedImagePath)
    {
        var request = new RedactImageRequest
        {
            Parent = new LocationName(projectId, "global").ToString(),
            InspectConfig = new InspectConfig
            {
                MinLikelihood = Likelihood.Likely,
                Limits = new InspectConfig.Types.FindingLimits() { MaxFindingsPerItem = 5 },
                IncludeQuote = true,
                InfoTypes =
                    {
                        new InfoType { Name = "PHONE_NUMBER" },
                        new InfoType { Name = "EMAIL_ADDRESS" }
                    }
            },
            ByteItem = new ByteContentItem
            {
                Type = ByteContentItem.Types.BytesType.ImagePng,
                Data = ByteString.FromStream(new FileStream(originalImagePath, FileMode.Open))
            },
        };

        var client = DlpServiceClient.Create();
        var response = client.RedactImage(request);

        Console.WriteLine($"Extracted text: {response.ExtractedText}");

        // Writes redacted image into file
        response.RedactedImage.WriteTo(new FileStream(redactedImagePath, FileMode.Create, FileAccess.Write));

        return response;
    }
}

Probarlo

Puedes probar cada uno de los ejemplos de esta página por tu cuenta (o experimentar con tus propias imágenes) en el Explorador de API en la página de referencia de image.redact:

Ir al Explorador de API

¿Qué sigue?