本文將說明如何執行 Serverless for Apache Spark SQL 和 PySpark 批次工作負載,建立 Apache Iceberg 資料表,並將中繼資料儲存在 BigLake metastore 中。如要瞭解執行 Spark 程式碼的其他方式,請參閱「在 BigQuery 筆記本中執行 PySpark 程式碼」和「執行 Apache Spark 工作負載」一文。
事前準備
請建立 Google Cloud 專案和 Cloud Storage bucket。
設定專案
- Sign in to your Google Cloud account. If you're new to Google Cloud, create an account to evaluate how our products perform in real-world scenarios. New customers also get $300 in free credits to run, test, and deploy workloads.
-
In the Google Cloud console, on the project selector page, select or create a Google Cloud project.
Roles required to select or create a project
- Select a project: Selecting a project doesn't require a specific IAM role—you can select any project that you've been granted a role on.
-
Create a project: To create a project, you need the Project Creator
(
roles/resourcemanager.projectCreator), which contains theresourcemanager.projects.createpermission. Learn how to grant roles.
-
Enable the Dataproc, BigQuery, and Cloud Storage APIs.
Roles required to enable APIs
To enable APIs, you need the Service Usage Admin IAM role (
roles/serviceusage.serviceUsageAdmin), which contains theserviceusage.services.enablepermission. Learn how to grant roles. -
In the Google Cloud console, on the project selector page, select or create a Google Cloud project.
Roles required to select or create a project
- Select a project: Selecting a project doesn't require a specific IAM role—you can select any project that you've been granted a role on.
-
Create a project: To create a project, you need the Project Creator
(
roles/resourcemanager.projectCreator), which contains theresourcemanager.projects.createpermission. Learn how to grant roles.
-
Enable the Dataproc, BigQuery, and Cloud Storage APIs.
Roles required to enable APIs
To enable APIs, you need the Service Usage Admin IAM role (
roles/serviceusage.serviceUsageAdmin), which contains theserviceusage.services.enablepermission. Learn how to grant roles. 在專案中建立 Cloud Storage bucket。
- In the Google Cloud console, go to the Cloud Storage Buckets page.
- Click Create.
- On the Create a bucket page, enter your bucket information. To go to the next
step, click Continue.
-
In the Get started section, do the following:
- Enter a globally unique name that meets the bucket naming requirements.
- To add a
bucket label,
expand the Labels section (),
click add_box
Add label, and specify a
keyand avaluefor your label.
-
In the Choose where to store your data section, do the following:
- Select a Location type.
- Choose a location where your bucket's data is permanently stored from the Location type drop-down menu.
- If you select the dual-region location type, you can also choose to enable turbo replication by using the relevant checkbox.
- To set up cross-bucket replication, select
Add cross-bucket replication via Storage Transfer Service and
follow these steps:
Set up cross-bucket replication
- In the Bucket menu, select a bucket.
In the Replication settings section, click Configure to configure settings for the replication job.
The Configure cross-bucket replication pane appears.
- To filter objects to replicate by object name prefix, enter a prefix that you want to include or exclude objects from, then click Add a prefix.
- To set a storage class for the replicated objects, select a storage class from the Storage class menu. If you skip this step, the replicated objects will use the destination bucket's storage class by default.
- Click Done.
-
In the Choose how to store your data section, do the following:
- Select a default storage class for the bucket or Autoclass for automatic storage class management of your bucket's data.
- To enable hierarchical namespace, in the Optimize storage for data-intensive workloads section, select Enable hierarchical namespace on this bucket.
- In the Choose how to control access to objects section, select whether or not your bucket enforces public access prevention, and select an access control method for your bucket's objects.
-
In the Choose how to protect object data section, do the
following:
- Select any of the options under Data protection that you
want to set for your bucket.
- To enable soft delete, click the Soft delete policy (For data recovery) checkbox, and specify the number of days you want to retain objects after deletion.
- To set Object Versioning, click the Object versioning (For version control) checkbox, and specify the maximum number of versions per object and the number of days after which the noncurrent versions expire.
- To enable the retention policy on objects and buckets, click the Retention (For compliance) checkbox, and then do the following:
- To enable Object Retention Lock, click the Enable object retention checkbox.
- To enable Bucket Lock, click the Set bucket retention policy checkbox, and choose a unit of time and a length of time for your retention period.
- To choose how your object data will be encrypted, expand the Data encryption section (), and select a Data encryption method.
- Select any of the options under Data protection that you
want to set for your bucket.
-
In the Get started section, do the following:
- Click Create.
將 BigQuery 資料編輯者 (
roles/bigquery.dataEditor) 角色授予 Compute Engine 預設服務帳戶PROJECT_NUMBER-compute@developer.gserviceaccount.com。如需操作說明,請參閱「授予單一角色」。Google Cloud CLI 範例:
gcloud projects add-iam-policy-binding PROJECT_ID \
    --member PROJECT_NUMBER-compute@developer.gserviceaccount.com \
--role roles/bigquery.dataEditor
注意:
- PROJECT_ID 和 PROJECT_NUMBER 會列在 Google Cloud 控制台資訊主頁的「專案資訊」部分。
在本機或 Cloud Shell 中,將下列 Spark SQL 指令複製到
iceberg-table.sql檔案。USE CATALOG_NAME; CREATE NAMESPACE IF NOT EXISTS example_namespace; DROP TABLE IF EXISTS example_table; CREATE TABLE example_table (id int, data string) USING ICEBERG LOCATION 'gs://BUCKET/WAREHOUSE_FOLDER'; INSERT INTO example_table VALUES (1, 'first row'); ALTER TABLE example_table ADD COLUMNS (newDoubleCol double); DESCRIBE TABLE example_table;
更改下列內容:
- CATALOG_NAME:Iceberg 目錄名稱。
- BUCKET 和 WAREHOUSE_FOLDER:做為 Iceberg 倉庫目錄的 Cloud Storage bucket 和資料夾。
在含有
iceberg-table.sql的目錄中,於本機或 Cloud Shell 執行下列指令,提交 Spark SQL 工作負載。gcloud dataproc batches submit spark-sql iceberg-table.sql \ --project=PROJECT_ID \ --region=REGION \ --deps-bucket=BUCKET_NAME \ --version=2.2 \ --subnet=SUBNET_NAME \ --properties="spark.sql.catalog.CATALOG_NAME=org.apache.iceberg.spark.SparkCatalog,spark.sql.catalog.CATALOG_NAME.catalog-impl=org.apache.iceberg.gcp.bigquery.BigQueryMetastoreCatalog,spark.sql.catalog.CATALOG_NAME.gcp_project=PROJECT_ID,spark.sql.catalog.CATALOG_NAME.gcp_location=LOCATION,spark.sql.catalog.CATALOG_NAME.warehouse=gs://BUCKET/WAREHOUSE_FOLDER"
注意:
- PROJECT_ID:您的 Google Cloud 專案 ID。 專案 ID 會列在 Google Cloud 控制台資訊主頁的「專案資訊」部分。
- REGION:可執行工作負載的 Compute Engine 區域。
- BUCKET_NAME:Cloud Storage bucket 的名稱。Spark 會先將工作負載依附元件上傳至這個值區的
/dependencies資料夾,再執行批次工作負載。WAREHOUSE_FOLDER 位於這個值區中。 --version:Serverless for Apache Spark 執行階段 2.2 以上版本。- SUBNET_NAME:
REGION中的虛擬私有雲子網路名稱。如果省略這個旗標,Serverless for Apache Spark 會在工作階段區域中選取default子網路。Serverless for Apache Spark 會在子網路上啟用私人 Google 存取權 (PGA)。如要瞭解網路連線需求,請參閱「Google Cloud Serverless for Apache Spark 網路設定」。 - LOCATION:支援的 BigQuery 位置。預設位置為「美國」。
--properties目錄資源。
在 BigQuery 中查看資料表的中繼資料
前往 Google Cloud 控制台的「BigQuery」頁面。
查看 Iceberg 資料表中繼資料。

- 在本地或
Cloud Shell
中,將下列 PySpark 程式碼複製到
iceberg-table.py檔案。from pyspark.sql import SparkSession spark = SparkSession.builder.appName("iceberg-table-example").getOrCreate() catalog = "CATALOG_NAME" namespace = "NAMESPACE" spark.sql(f"USE `{catalog}`;") spark.sql(f"CREATE NAMESPACE IF NOT EXISTS `{namespace}`;") spark.sql(f"USE `{namespace}`;") # Create table and display schema spark.sql("DROP TABLE IF EXISTS example_iceberg_table") spark.sql("CREATE TABLE example_iceberg_table (id int, data string) USING ICEBERG") spark.sql("DESCRIBE example_iceberg_table;") # Insert table data. spark.sql("INSERT INTO example_iceberg_table VALUES (1, 'first row');") # Alter table, then display schema. spark.sql("ALTER TABLE example_iceberg_table ADD COLUMNS (newDoubleCol double);") spark.sql("DESCRIBE example_iceberg_table;")
更改下列內容:
- CATALOG_NAME 和 NAMESPACE:Iceberg 目錄名稱和命名空間會合併,以識別 Iceberg 資料表 (
catalog.namespace.table_name)。
- CATALOG_NAME 和 NAMESPACE:Iceberg 目錄名稱和命名空間會合併,以識別 Iceberg 資料表 (
-
在本機或 Cloud Shell 中,從含有
iceberg-table.py的目錄執行下列指令,提交 PySpark 工作負載。gcloud dataproc batches submit pyspark iceberg-table.py \ --project=PROJECT_ID \ --region=REGION \ --deps-bucket=BUCKET_NAME \ --version=2.2 \ --subnet=SUBNET_NAME \ --properties="spark.sql.catalog.CATALOG_NAME=org.apache.iceberg.spark.SparkCatalog,spark.sql.catalog.CATALOG_NAME.catalog-impl=org.apache.iceberg.gcp.bigquery.BigQueryMetastoreCatalog,spark.sql.catalog.CATALOG_NAME.gcp_project=PROJECT_ID,spark.sql.catalog.CATALOG_NAME.gcp_location=LOCATION,spark.sql.catalog.CATALOG_NAME.warehouse=gs://BUCKET/WAREHOUSE_FOLDER"注意:
- PROJECT_ID:您的 Google Cloud 專案 ID。 專案 ID 會列在 Google Cloud 控制台資訊主頁的「專案資訊」部分。
- REGION:可執行工作負載的 Compute Engine 區域。
- BUCKET_NAME:Cloud Storage bucket 的名稱。Spark 會先將工作負載依附元件上傳至這個值區的
/dependencies資料夾,再執行批次工作負載。 --version:Serverless for Apache Spark 執行階段 2.2 以上版本。- SUBNET_NAME:虛擬私有雲子網路的名稱,位於
REGION。如果省略這個旗標,Serverless for Apache Spark 會在工作階段區域中選取default子網路。Serverless for Apache Spark 會在子網路上啟用私人 Google 存取權 (PGA)。如需網路連線需求,請參閱「Google Cloud Serverless for Apache Spark 網路設定」。 - LOCATION: 支援的 BigQuery 位置。 預設位置為「美國」。
- BUCKET 和 WAREHOUSE_FOLDER:做為 Iceberg 倉庫目錄的 Cloud Storage bucket 和資料夾。
--properties:目錄屬性。
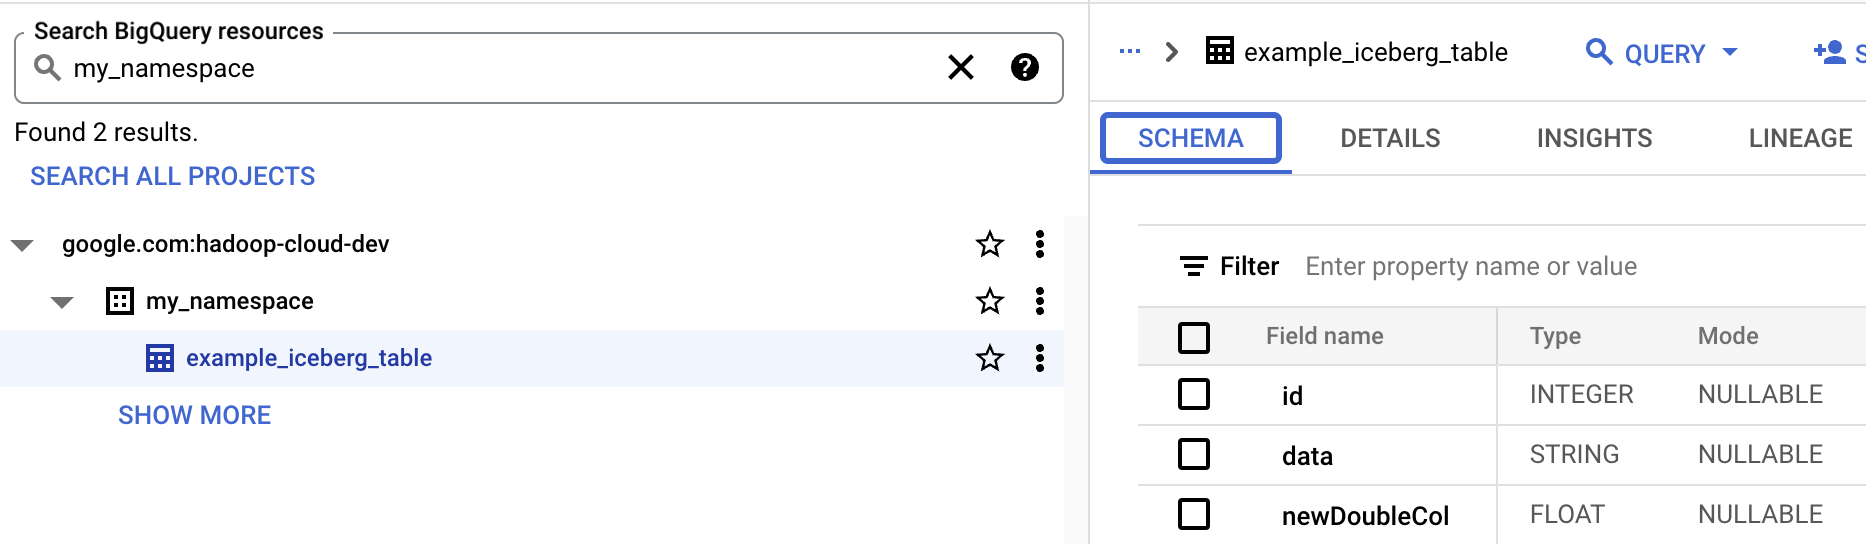
- 在 BigQuery 中查看資料表結構定義。
- 前往 Google Cloud 控制台的「BigQuery」頁面。BigQuery前往 BigQuery Studio
- 查看 Iceberg 資料表中繼資料。
OSS 資源到 BigQuery 資源的對應關係
請注意開放原始碼資源與 BigQuery 資源字詞之間的對應關係:
OSS 資源 BigQuery 資源 命名空間、資料庫 資料集 分區或未分區資料表 資料表 查看 查看 建立 Iceberg 資料表
本節說明如何使用 Serverless for Apache Spark Spark SQL 和 PySpark 批次工作負載,在 BigLake 中繼資料存放區建立含有中繼資料的 Iceberg 資料表。
Spark SQL
執行 Spark SQL 工作負載來建立 Iceberg 資料表
下列步驟說明如何執行 Serverless for Apache Spark Spark SQL 批次工作負載,建立 Iceberg 資料表,並將資料表的中繼資料儲存在 BigLake Metastore 中。
PySpark
以下步驟說明如何執行 Serverless for Apache Spark PySpark 批次工作負載,建立 Iceberg 資料表,並將資料表的中繼資料儲存在 BigLake Metastore 中。