Restez organisé à l'aide des collections
Enregistrez et classez les contenus selon vos préférences.
Déployer une application Kubernetes avec Cloud Code pour IntelliJ
Cette page explique comment faire vos premiers pas avec Cloud Code.
Dans ce guide de démarrage rapide, vous allez configurer une nouvelle application Kubernetes à l'aide d'un modèle "Hello World" de démarrage, exécuter votre application sur un cluster de votre choix, démarrer la recompilation continue pour développer votre application de manière itérative, puis déboguer votre code en cours d'exécution, puis suivre et afficher les journaux en streaming depuis votre application en ligne.
Vous pouvez également utiliser un cluster hébergé sur une autre plate-forme cloud ou un cluster Kubernetes local avec des outils tels que Minikube ou Docker Desktop.
Installez Git pour que Cloud Code puisse effectuer des opérations Git, comme cloner un exemple.
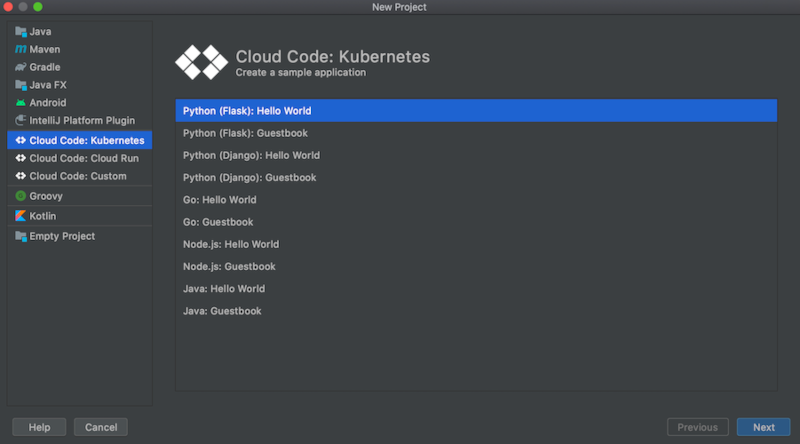
Cloud Code est fourni avec un ensemble de modèles d'exemples de code pour vous aider à démarrer rapidement. Pour créer une application à l'aide d'un exemple existant:
Dans votre IDE, ouvrez File (Fichier) / New Project (Nouveau projet) et sélectionnez Cloud Code: Kubernetes.
Sélectionnez un modèle Hello World dans la liste d'applications de démarrage.
Indiquez un nom pour votre projet.
Une fois que vous avez cliqué sur Finish (Terminer), Cloud Code clone le modèle choisi et ouvre le projet que vous venez de créer.
Pour les modèles Java, vous êtes invité à importer les projets Maven requis pour synchroniser votre fichier pom.xml. Cliquez sur Add as Maven project (Ajouter en tant que projet Maven), puis sur Import Changes (Importer les modifications).
Choisir un cluster
Pour développer votre application, vous aurez besoin d'un cluster Kubernetes associé (hébergé localement avec Minikube ou à l'aide d'une plate-forme cloud, telle qu'un cluster Google Kubernetes Engine).
Cluster local
Si vous n'avez pas encore de cluster à utiliser pour ce démarrage rapide, vous pouvez choisir d'exécuter votre application avec un cluster Minikube local géré par Cloud Code.
Cloud Code démarre un cluster Minikube pour exécuter votre application, puis l'arrête lorsque le déploiement s'arrête. Si un cluster Minikube est déjà en cours d'exécution, Cloud Code utilise le cluster Minikube existant pour le déploiement.
Vous pouvez choisir d'utiliser ce cluster Minikube géré par Cloud Code à l'étape suivante, Développer votre application, en le définissant comme préférence de déploiement.
Cluster basé sur Cloud Platform
Si vous avez déjà configuré un cluster pour qu'il fonctionne avec des outils Kubernetes (tels que kubectl) que vous pouvez utiliser pour ce guide de démarrage rapide, Cloud Code se déploie automatiquement. Vous pouvez passer au développement de votre application afin de vérifier que votre cluster préféré est défini comme contexte actif.
Si ce n'est pas le cas, vous pouvez en créer un à l'aide des instructions spécifiques à votre plate-forme cloud. Pour GKE, vous pouvez suivre le guide Créer un cluster.
Développer votre application
Pour lancer le développement de votre application sur Kubernetes :
Si vous êtes connecté à Google Cloud dans votre IDE et qu'un projet par défaut est défini, Cloud Code utilise automatiquement votre dépôt d'images de conteneurs par défaut (gcr.io/{project_id}, où {project_id} fait référence à votre projet par défaut).
Assurez-vous que le contexte Kubernetes préféré est défini. Vous pouvez le spécifier dans votre configuration de développement sur Kubernetes (accessible via Exécuter > Modifier des configurations > Développer sur Kubernetes) dans l'onglet "Exécuter" de la section "Préférences de déploiement".
Vous pouvez choisir de déployer dans un contexte actif (par défaut), en local dans un cluster Minikube ou dans un autre contexte disponible.
Par défaut, votre application Kubernetes s'exécute en Mode à la demande avec l'option À la demande sélectionnée. Si vous le souhaitez, vous pouvez au lieu de cela sélectionner l'option Enregistrer sur le fichier.
Choisissez la cible d'exécution Develop on Kubernetes dans le sélecteur de configuration d'exécution/de débogage de la barre de navigation.
Cela garantit que toutes les modifications de code seront automatiquement créées, transférées et déployées vers une nouvelle version de votre application.
Pour démarrer le cycle de développement sur votre cluster Kubernetes, cliquez sur l'action d'exécution pour Develop on Kubernetes.
Dans la fenêtre de sortie, dans l'onglet Logs (Journaux), affichez les journaux d'applications entrants.
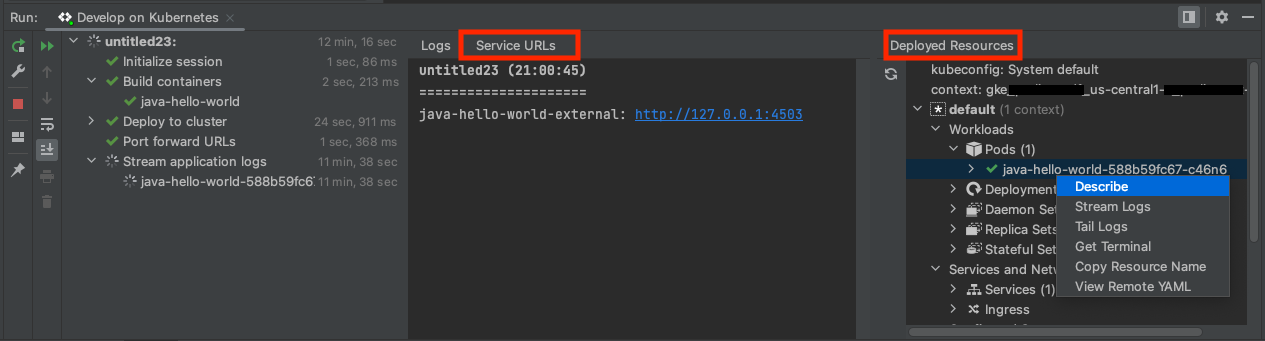
Une fois le déploiement démarré, la liste des ports transférés pour l'application déployée s'affiche.
Une fois le déploiement effectué, vous êtes informé que de nouvelles URL de service sont disponibles. Cliquez sur l'onglet URL des services pour afficher les URL, puis cliquez sur le lien URL pour ouvrir votre navigateur avec votre application en cours d'exécution.
Vous pouvez également ouvrir le journal des événements, puis cliquer sur le lien pour ouvrir votre navigateur avec l'application en cours d'exécution.
Le volet Ressources déployées affiche ce que vous avez déployé pendant la session de développement.
Pour déboguer votre application, procédez comme suit :
Cliquez sur l'action de débogage pour Develop on Kubernetes (Développer sur Kubernetes) afin de démarrer le cycle de développement en mode débogage sur votre cluster Kubernetes.
Cloud Code rattache alors une session de débogage. En cas de réussite, la fenêtre "Debug Tool" (Outil de débogage) s'ouvre, confirmant la connexion (dans l'onglet "Console").
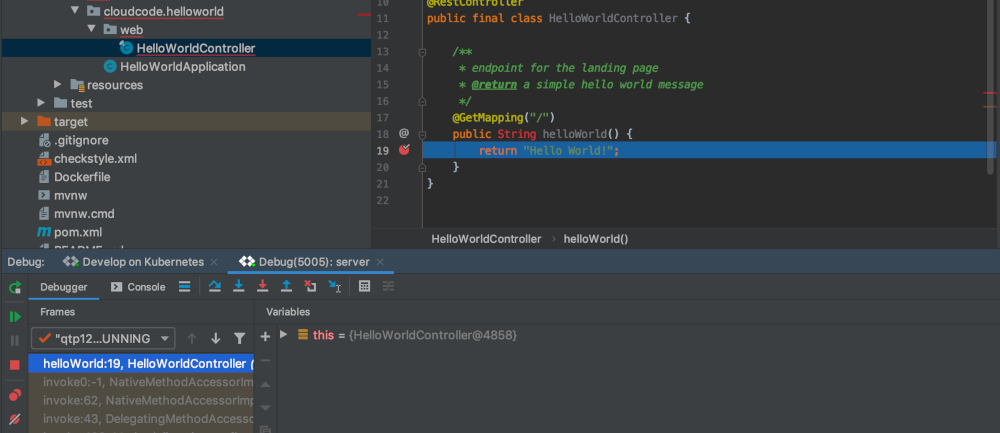
Cliquez sur la marge de la ligne exécutable du code auquel vous souhaitez ajouter un point d'arrêt.
Les cercles pleins rouges indiquent les points d'arrêt actifs, tandis que les cercles vides rouges indiquent les points d'arrêt désactivés.
Lorsque vous envoyez une nouvelle requête à l'application, celle-ci s'interrompt sur la ligne souhaitée.
Pour mettre fin à la session de débogage, cliquez sur l'icône d'arrêt dans la configuration d'exécution Develop on Kubernetes.
Afficher les journaux
En plus d'afficher les journaux des pods en cours d'exécution diffusés en streaming dans la sortie du terminal lorsque vous développez et exécutez votre application, vous pouvez afficher les journaux d'un pod spécifique en accédant à l'explorateur Kubernetes.
Pour afficher les journaux d'un pod spécifique, procédez comme suit :
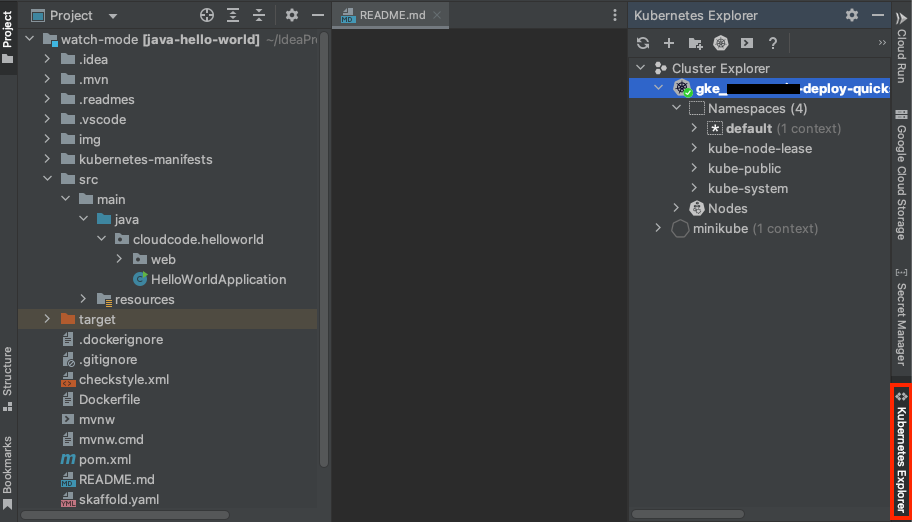
Accédez à l'explorateur Kubernetes. Vous pouvez y accéder depuis le panneau latéral de droite ou en suivant le menu Tools > Cloud Code > Kubernetes > View Cluster Explorer (Outils > Cloud Code > Kubernetes > Afficher l'explorateur de cluster).
Sélectionnez le pod pour lequel vous souhaitez consulter les journaux.
Effectuez un clic droit sur le pod, puis sélectionnez Stream Logs (Diffuser des journaux). Vous pouvez également diffuser des journaux pour des conteneurs individuels exécutés dans des pods.
Les journaux sont alors envoyés à la console de l'explorateur Kubernetes.
Effectuer un nettoyage
Pour éviter que les ressources utilisées sur cette page soient facturées sur votre compte Google Cloud , procédez comme suit :
Accédez à la page "Projets" de la console Google Cloud :
Sauf indication contraire, le contenu de cette page est régi par une licence Creative Commons Attribution 4.0, et les échantillons de code sont régis par une licence Apache 2.0. Pour en savoir plus, consultez les Règles du site Google Developers. Java est une marque déposée d'Oracle et/ou de ses sociétés affiliées.
Dernière mise à jour le 2025/09/04 (UTC).
[[["Facile à comprendre","easyToUnderstand","thumb-up"],["J'ai pu résoudre mon problème","solvedMyProblem","thumb-up"],["Autre","otherUp","thumb-up"]],[["Difficile à comprendre","hardToUnderstand","thumb-down"],["Informations ou exemple de code incorrects","incorrectInformationOrSampleCode","thumb-down"],["Il n'y a pas l'information/les exemples dont j'ai besoin","missingTheInformationSamplesINeed","thumb-down"],["Problème de traduction","translationIssue","thumb-down"],["Autre","otherDown","thumb-down"]],["Dernière mise à jour le 2025/09/04 (UTC)."],[[["\u003cp\u003eThis guide provides instructions on how to deploy a Kubernetes application using Cloud Code for IntelliJ, covering setup, creating a new application, choosing a cluster, and developing.\u003c/p\u003e\n"],["\u003cp\u003eYou can use either a local minikube cluster managed by Cloud Code or a cluster hosted on a cloud platform like Google Kubernetes Engine (GKE) to deploy and run your application.\u003c/p\u003e\n"],["\u003cp\u003eCloud Code facilitates iterative development with continuous rebuilding, allowing you to automatically build, push, and deploy code changes to your Kubernetes cluster.\u003c/p\u003e\n"],["\u003cp\u003eThe guide demonstrates how to debug your application directly on your Kubernetes cluster using Cloud Code's debugging features, including setting breakpoints and viewing logs.\u003c/p\u003e\n"],["\u003cp\u003eYou can monitor your application's performance by streaming logs from individual pods via the Kubernetes Explorer, and can clean up the resources that are used to avoid incurring any charges.\u003c/p\u003e\n"]]],[],null,["# Quickstart: Deploy a Kubernetes app with Cloud Code for IntelliJ\n\nDeploy a Kubernetes app with Cloud Code for IntelliJ\n====================================================\n\nThis page shows you how to get started with Cloud Code.\n\nIn this quickstart, you'll set up a new Kubernetes application using a starter\nHello World template, run your app on a cluster of your choosing, kickstart\ncontinuous rebuilding to iteratively develop your app, debug your\nrunning code, and sit back and view logs streaming from your live application.\n\nBefore you begin\n----------------\n\n1. If you'd like to use Google Cloud, you'll need to\n [create or select a Google Cloud project](https://console.cloud.google.com/projectcreate)\n and [enable billing on your project](/billing/docs/how-to/modify-project).\n\n | **Note:** To get the most out of this quickstart, creating a Google Cloud project is recommended. This will allow you to easily create and work with a live GKE cluster, leverage Cloud Code's continuous delivery offering, and utilize its live debugging capabilities.\n\n Alternatively, you can use a cluster hosted on any other cloud platform or a\n local Kubernetes cluster with tools such as\n [minikube](https://kubernetes.io/docs/tasks/tools/install-minikube) and\n [Docker Desktop](https://www.docker.com/products/docker-desktop).\n2. Install [Git](https://git-scm.com/downloads) so that Cloud Code\n can perform Git operations, like cloning a sample.\n\n3. Install the [Cloud Code plugin](/code/docs/intellij/install#installing)\n if you haven't already.\n\nCreating an application\n-----------------------\n\nCloud Code comes with a collection of\n[code sample](https://github.com/GoogleCloudPlatform/cloud-code-samples#readme)\ntemplates to get you started quickly. To create a new application using an\nexisting sample:\n\n1. In your IDE, open **File** \\\u003e **New Project** and select\n **Cloud Code: Kubernetes**.\n\n2. Select a **Hello World** template from the list of starter applications.\n\n3. Pick a name for your project.\n\n After you click **Finish**, Cloud Code clones your chosen\n template and opens your newly created project for use.\n\n For **Java** templates, you're prompted to import required Maven projects to\n sync your pom.xml. Click **Add as Maven project** and then click **Import\n Changes**.\n\nChoosing a cluster\n------------------\n\nIn order to develop your application, you'll need an associated Kubernetes cluster\n(hosted either locally with minikube or using a cloud platform, like a\nGoogle Kubernetes Engine cluster).\n\n### Local cluster\n\nIf you don't already have a cluster to use for this quickstart, you can choose\nto run your application with a Cloud Code-managed local minikube cluster.\nCloud Code starts a minikube cluster to run your application and\nstops the cluster when deployment stops. If a minikube cluster is already\nrunning, Cloud Code reuses the existing minikube cluster for deployment.\n\nYou can choose to use this Cloud Code-managed minikube cluster in the\nnext step, [developing your application](#developing_your_application), by\nsetting it as your deployment preference.\n\n### Cloud platform-based cluster\n\nIf you already have a cluster configured to work with Kubernetes tools (like\nkubectl) that you can use for this quickstart, Cloud Code deploys\nto it automatically. You can move on to [developing your application](#developing_your_application)\nwhere you can confirm your preferred cluster is set as your current context.\n\nIf you don't, you can create one using your cloud platform-specific\ninstructions. For GKE, you can follow the\n[Creating a cluster](https://cloud.google.com/kubernetes-engine/docs/how-to/creating-a-cluster) guide.\n\nDeveloping your application\n---------------------------\n\nTo initiate development of your application on Kubernetes:\n\n1. If you're running on a cluster hosted on a cloud platform, ensure you have\n [defined where your container images are stored](/code/docs/intellij/configuring-container-image-settings#specifying_where_container_images_are_stored)\n for **Develop on Kubernetes**.\n\n If you're logged into Google Cloud in your IDE and you have a\n default project defined, Cloud Code automatically uses your\n default container image repository (gcr.io/{project_id} where {project_id}\n references your default project).\n2. Ensure your preferred Kubernetes context is set. This can be specified in\n your Develop on Kubernetes configuration (accessible through\n **Run** \\\u003e **Edit Configurations** \\\u003e **Develop on Kubernetes**), on the Run\n tab and in the Deployment preferences section.\n\n You can choose to deploy to a current context (default), locally to a\n minikube cluster, or to another available context.\n\n By default, your Kubernetes application will run in [On-demand mode](/code/docs/intellij/watch-modes)\n with **On demand** selected. If preferred, you can select the **On file save** option instead.\n3. Choose the **Develop on Kubernetes** run target from the Run/Debug\n configuration selector in the Navigation bar.\n\n This ensures any code changes to be automatically built, pushed, and deployed\n to a new version of your application.\n4. To start the development cycle on your Kubernetes cluster, click the run\n action for **Develop on Kubernetes**.\n\n5. In the **output window** , on the **Logs** tab, view incoming application\n logs.\n\n After the deployment has started, you'll see the list of forwarded ports for\n the deployed application.\n6. When the deployment is successful, you're notified that new service URLs are\n available. Click the **Service URLs** tab to view the URL(s), then click the\n URL link to open your browser with your running application.\n\n Alternatively, you can open the **Event Log** and then click the link to open\n your browser with your running application.\n\n The **Deployed Resources** pane shows what you deployed during the\n development session.\n\nDebugging your application\n--------------------------\n\n| **Note:** Debugging support is available for Java, Kotlin, Node.js, Go, and Python.\n\nCloud Code supports [applying changes while debugging](/code/docs/intellij/watch-modes#applying-changes-while-debugging).\n\nTo debug your application:\n\n1. Click the debug action\n for **Develop on Kubernetes** to start the development cycle in debug mode\n on your Kubernetes cluster.\n\n | **Note:** For Node.js apps, you will be prompted to help the debugger map your local sources to the remote sources in the container for each artifact you are debugging. This enables the Node debugger to correctly process your breakpoints. For more on how to configure this setting, refer to the [Debugging an app guide](/static/code/docs/intellij/debug#node.js).\n2. Cloud Code will attach a debug session. When successful, the\n Debug Tool window opens, confirming connection (on the Console tab).\n\n You can now debug against your live Kubernetes cluster.\n3. Click the gutter at the executable line of the code where you want to add\n a breakpoint.\n\n Red filled circles denote active breakpoints, while red-outlined hollow\n circles signify disabled breakpoints.\n4. When you send a new request to your application, it will pause at that\n desired line.\n\n5. To end the debugging session, click the stop icon on the\n `Develop on Kubernetes` run configuration.\n\nViewing logs\n------------\n\nIn addition to seeing a livestream of the logs from running pods in the terminal\noutput as you're developing and running your application, you can view logs from\na specific pod by navigating to the Kubernetes Explorer.\n\nTo view logs from a specific pod, follow these steps:\n\n1. Navigate to the Kubernetes Explorer. It can be\n accessed either from the side panel on the right or\n using **Tools** \\\u003e **Cloud Code** \\\u003e **Kubernetes** \\\u003e **View Cluster Explorer**.\n\n2. Select the pod you'd like to see logs from.\n\n3. Right-click the pod and then select **Stream Logs**. Alternatively, you can stream logs for individual containers running in pods.\n\n This outputs logs to the Kubernetes Explorer Console.\n\nClean up\n--------\n\n\nTo avoid incurring charges to your Google Cloud account for\nthe resources used on this page, follow these steps.\n\n1. Go to the Projects page in the Google Cloud console:\n\n [Go to the Projects page](https://console.cloud.google.com/project)\n2. Select the project you created for this Quickstart and click the trash can\n icon next to delete it.\n\n This shuts down the project and schedules it for deletion.\n\nWhat's next\n-----------\n\n- Consider importing an existing application, either a [Kubernetes](/code/docs/intellij/use-k8s-existing-app) or [App Engine](/code/docs/intellij/migrate) app, into your IDE and getting set up with Cloud Code.\n- Dive deeper into developing Kubernetes applications:\n - Tackle more advanced Google Cloud and Kubernetes configuration with Cloud Code's [YAML editing support](/code/docs/intellij/yaml-editing).\n - For better insight into and management of your Kubernetes resources, use [the Kubernetes Explorer](/code/docs/intellij/use-kubernetes-explorer).\n - [Deploy your applications to ARM64, AMD64, or mixed-architecture GKE clusters](/code/docs/intellij/deploy-to-arm-amd-mixed-arch).\n- Create, run, debug, and deploy an [App Engine app with Cloud Code](/code/docs/intellij/create-standard).\n- [Manage Cloud APIs and client libraries](/code/docs/intellij/client-libraries) from the comfort of your IDE.\n- [Explore your Cloud Storage content](/code/docs/intellij/gcs) within your IDE.\n- Add new projects to and check out existing ones from [Cloud Source Repositories\n with Cloud Code](/code/docs/intellij/vcs)."]]

 pour Develop on Kubernetes (Développer sur Kubernetes) afin de démarrer le cycle de développement en mode débogage sur votre cluster Kubernetes.