With Cloud Code's Compute Engine integration, you can view the Compute Engine VMs running your applications, establish connections to your VMs using SSH, view application logs, and upload files to a VM.
This document shows you how to access Compute Engine with Cloud Code in your IDE and manage your VM instances.
View VMs
To view VMs in your Google Cloud project and the VM instance details in the Google Cloud console, follow these steps:
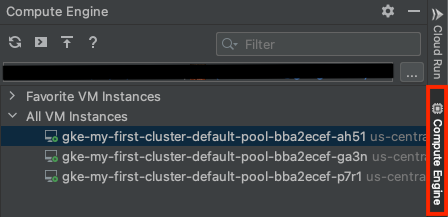
Click the Compute Engine tab or select View > Tool Windows > Compute Engine.
If you haven't selected a Google Cloud project, click Select a Google Cloud Project, select a project, and then click OK.
To view your VM instances, expand the All VM Instances snippet.
To view the VM instance details in the Google Cloud console, right-click the VM instance and select Open in Cloud Console.
Add and view favorite VMs
IntelliJ supports favorite VM instances per Google Cloud project, which are retained between VM restarts. To add VMs to your favorites list and to view the list, follow these steps:
In the Compute Engine tab, under the All VM Instances snippet, right-click a VM instance and select Add to Favorites.
To view your favorites list, expand the Favorite VM Instances snippet.
To remove a VM from your favorites list, right-click the VM and select Remove from Favorites.
Connect to a VM
To connect to the VM instance in your IDE with Cloud Code using the built-in IDE terminal and SSH, follow these steps:
To connect to a VM instance, right-click the VM instance and select Open SSH connection.
A terminal appears, displaying information about the remote instance.
If the connection to the VM instance fails, an error message dialog appears. To view information in the terminal about the issue and potential resolutions, click Troubleshoot in terminal. Or, to view Troubleshooting SSH errors documentation, click View troubleshooting guide.
View application logs on a VM
To view the application logs of a VM instance in your IDE, right-click the VM instance and select View Logs Explorer. This takes you to the Logs Explorer in the Google Cloud console.
Upload a file to a VM
To copy application files from your local IDE to your remote VM instance, follow these steps:
To upload a file to a VM, select a VM instance and at the top of the Compute Engine pane, click cloud_upload Upload, or right-click the VM instance and select Upload a file/directory.
Navigate to the file that you want to upload and click Open. A terminal opens with the list of files and progress of the upload.
If the upload fails, the SSH Connectivity Troubleshooting dialog appears. Choose an option to click:
- View file transfer guide: Opens Transferring files to Linux VMs for more information on transferring files to Compute Engine VM instances.
- Troubleshoot in terminal: Displays information in the terminal about the issue and potential resolutions.
- View troubleshooting guide: Opens Troubleshooting SSH errors for more information about common errors that you might run into when connecting to a VM using SSH, ways to resolve errors, and methods for diagnosing failed SSH connections.