Mithilfe von Cloud APIs können Sie direkt aus Ihrem Code auf Google Cloud Produkte und -Dienste zugreifen. Diese Cloud APIs bieten eine einfache JSON-REST-Schnittstelle, die Sie über Clientbibliotheken aufrufen können.
In diesem Dokument wird erläutert, wie Sie die verfügbaren APIs durchsuchen, Cloud APIs aktivieren und Ihrem Projekt Cloud-Clientbibliotheken hinzufügen sowie die Authentifizierung abhängig von Ihren Entwicklungsanforderungen einrichten.
Cloud APIs finden
So finden Sie alle verfügbaren Google Cloud APIs in Ihrer IDE:
- Wählen Sie Tools > Cloud Code > Cloud-Bibliotheken hinzufügen und Cloud APIs verwalten aus.
- Maximieren Sie den Explorer-Baum der Google Cloud APIs, um alle verfügbaren APIs ansehen zu können. Der Explorer gruppiert Cloud APIs nach Kategorie. Über die Suchleiste "Search APIs" können Sie auch nach einer bestimmten API suchen.
- Klicken Sie auf eine API, um weitere Details wie Status, sprachspezifische Installationshinweise für die entsprechenden Clientbibliotheken und die zugehörige Dokumentation anzeigen zu lassen.

Cloud APIs aktivieren
So aktivieren Sie Cloud APIs für ein Projekt schnell mit den API-Details:
- Wählen Sie in der Detailansicht der Cloud API das Google Cloud-Projekt aus, für das Sie die Cloud API aktivieren möchten.
- Klicken Sie auf API aktivieren.
Sobald die API aktiviert ist, wird eine Meldung zur Bestätigung dieser Änderung angezeigt.
Cloud-Clientbibliotheken hinzufügen
So fügen Sie Bibliotheken zu Ihrem Projekt in IntelliJ hinzu:
Für Java Maven-Projekte
- Wählen Sie Tools > Cloud Code > Cloud APIs aus.
- Wählen Sie den gewünschten Bibliothekstyp aus der Google Cloud-Clientbibliothek (empfohlen) oder der Java Spring Google Cloud-Bibliothek aus.
- Wählen Sie im Drop-down-Menü Modul das Modul aus, dem Sie die Bibliothek hinzufügen möchten.
- Klicken Sie auf Maven-Abhängigkeit hinzufügen, um Ihrem Projekt die BOM und eine Clientbibliothek hinzuzufügen.
Die unterstützten Bibliotheken werden im Dialogfeld Manage Google Cloud APIs (Google Cloud APIs verwalten) angezeigt.

Für alle anderen Projekte
- Wählen Sie Tools > Cloud Code > Cloud-Bibliotheken hinzufügen und Cloud APIs verwalten aus.
- Installieren Sie die API gemäß der Installationsanleitung auf der Seite der API-Details für Ihre bevorzugte Sprache.
Im Dialogfeld Add Google Cloud libraries werden die unterstützten Bibliotheken angezeigt.
Authentifizierung einrichten
Nachdem Sie die erforderlichen APIs aktiviert und die erforderlichen Clientbibliotheken hinzugefügt haben, müssen Sie Ihre Anwendung für die Authentifizierung konfigurieren. Ihre Konfiguration hängt von Ihrer Art der Entwicklung und der Plattform ab, auf der Sie arbeiten.
Nachdem Sie die erforderlichen Authentifizierungsschritte abgeschlossen haben, kann sich Ihre Anwendung authentifizieren und bereitgestellt werden.
Lokale Entwicklung
minikube
- Führen Sie
gcloud auth application-default loginaus, um Standardanmeldedaten für Anwendungen (ADC) festzulegen. Damit kann minikube Ihre ADC finden, um sich zu authentifizieren.
minikube
- Führen Sie
gcloud auth application-default loginaus, um Standardanmeldedaten für Anwendungen (ADC) festzulegen. Damit kann minikube Ihre ADC finden, um sich zu authentifizieren. - Starten Sie minikube mit
minikube start --addons gcp-auth. Dadurch werden Ihre ADC in Ihren Pods bereitgestellt. Eine detaillierte minikube-Authentifizierungsanleitung für Google Cloud finden Sie in der minikube gcp-auth-Dokumentation.
Lokaler Kubernetes-Cluster
- Führen Sie
gcloud auth application-default loginaus, um Standardanmeldedaten für Anwendungen (ADC) festzulegen. - Stellen Sie Ihr lokales Verzeichnis
gcloudin Ihren Kubernetes-Pods bereit, indem Sie die Bereitstellungsmanifeste bearbeiten, damit die Google Cloud-Clientbibliotheken Ihre Anmeldedaten finden können. Beispiel für eine Kubernetes-Pod-Konfiguration:apiVersion: v1 kind: Pod metadata: name: my-app labels: name: my-app spec: containers: - name: my-app image: gcr.io/google-containers/busybox ports: - containerPort: 8080 volumeMounts: - mountPath: /root/.config/gcloud name: gcloud-volume volumes: - name: gcloud-volume hostPath: path: /path/to/home/.config/gcloud
Cloud Run
- Führen Sie
gcloud auth application-default loginaus, um Standardanmeldedaten für Anwendungen (ADC) festzulegen. Dadurch kann die lokale simulierte Cloud Run-Umgebung Ihren ADC finden, um sich zu authentifizieren.
Remote-Entwicklung
Google Kubernetes Engine
- Konfigurieren Sie Ihren GKE-Cluster und Ihre Anwendung mit Workload Identity, um Google Cloud-Dienste in GKE zu authentifizieren. Dadurch wird Ihr Kubernetes-Dienstkonto mit Ihrem Google-Dienstkonto verknüpft.
- Wenn der Google Cloud-Dienst, auf den Sie zugreifen möchten, zusätzliche Rollen benötigt, gewähren Sie diese für das Google-Dienstkonto, das Sie zur Entwicklung Ihrer Anwendung verwenden.
Eine Liste der IAM-Rollen Informationen zu Typen und vordefinierten Rollen, die Sie Identitäten zuweisen können, finden Sie in der Anleitung zu Rollen. Die Schritte zum Zuweisen der Rollen finden Sie unter Zugriff auf Ressourcen erteilen, ändern und entziehen. - Konfigurieren Sie Ihre Kubernetes-Bereitstellung so, dass sie auf das Kubernetes-Dienstkonto verweist. Legen Sie dazu das Feld
.spec.serviceAccountNamein der YAML-Datei Ihrer Kubernetes-Bereitstellung fest.
Wenn Sie an einer Anwendung arbeiten, die mit einer Cloud Code-Vorlage erstellt wurde, befindet sich diese Datei im Ordner „kubernetes-manifests“.
Cloud Run
- Wenn Sie ein neues eindeutiges Dienstkonto für die Bereitstellung Ihrer Cloud Run-Anwendung erstellen möchten, wählen Sie auf der Seite "Dienstkonten" das Projekt aus, in dem Ihr Secret gespeichert ist.
- Klicken Sie auf Dienstkonto erstellen.
- Geben Sie in das Dialogfeld Dienstkonto erstellen einen aussagekräftigen Namen für das Dienstkonto ein.
- Ändern Sie die Dienstkonto-ID in einen eindeutigen, erkennbaren Wert und klicken Sie dann auf Erstellen.
- Wenn der Google Cloud-Dienst, auf den Sie zugreifen möchten, zusätzliche Rollen benötigt, gewähren Sie diese. Klicken Sie auf Weiter und dann auf Fertig.
- Rufen Sie die folgende Tabelle auf, um das Dienstkonto Ihrer Bereitstellungskonfiguration hinzuzufügen:Cloud Run: Bereitstellen Konfiguration ausführen, erweitern SieErweiterte Überarbeitungseinstellungen und geben Sie dann Ihr Dienstkonto im Dienstkonto ein.

Cloud Run
- Konfigurieren Sie Ihren GKE-Cluster und Ihre Anwendung mit Workload Identity, um Google Cloud-Dienste in GKE zu authentifizieren. Dadurch wird Ihr Kubernetes-Dienstkonto mit Ihrem Google-Dienstkonto verknüpft.
- Wenn der Google Cloud-Dienst, auf den Sie zugreifen möchten, zusätzliche Rollen benötigt, weisen Sie ihm das Google-Dienstkonto zu, mit dem Sie Ihre Anwendung entwickeln.
Die Anleitung Weitere Informationen zu Rollen beschreibt die IAM-Rollentypen und listet die verfügbaren vordefinierten Rollen auf, denen Sie Identitäten zuweisen können. - Rufen Sie die Ausführungskonfiguration für Cloud Run: Deploy auf, erweitern Sie den Abschnitt Erweiterte Überarbeitungseinstellungen und fügen Sie das Kubernetes-Dienstkonto Ihrer Bereitstellungskonfiguration hinzu. Geben Sie Ihr Kubernetes-Dienstkonto im Feld Dienstkonto an.

Remote-Entwicklung mit aktiviertem Secret Manager
Wenn Sie Remote-Entwicklungen ausführen und ein Dienstkonto für die Authentifizierung verwenden und Ihre Anwendung Secrets verwendet, müssen Sie noch ein paar Schritte ausführen, um Ihrem Google-Dienstkonto die Rolle, die für den Zugriff auf ein bestimmtes Secret Manager-Secret erforderlich ist, zuzuweisen:
Öffnen Sie das Feld „Secret Manager“ und wählen Sie das Secret aus, auf das Sie im Code zugreifen möchten.
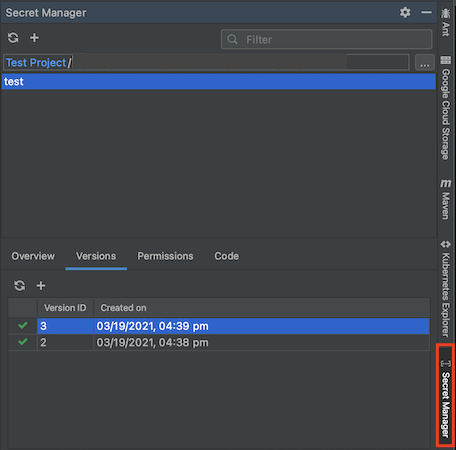
Wechseln Sie zum Tab „Berechtigungen“ und konfigurieren Sie dann die Berechtigungen Ihres Secrets, indem Sie auf Bearbeiten Berechtigung bearbeiten klicken. Die Konfigurationsseite von Secret Manager für das Secret wird in Ihrem Webbrowser geöffnet.

Klicken Sie in der Google Cloud Console auf Infofeld ansehen und dann auf Hauptkonto hinzufügen.
Weisen Sie Ihrem Dienstkonto die Rolle Secret Manager Secret Accessor zu.
Ihr Dienstkonto hat die Berechtigung, auf dieses Secret zuzugreifen.