Brick by brick: Learn GCP by setting up a Minecraft server

Kyle Moschetto
Solutions Architect
Learning a new cloud can be intimidating. In the past six years as a solution architect, I’ve had to learn AWS, Azure, and most recently Google Cloud Platform (GCP), and the incredible array of technologies, products, and vendors can make it seem like an impossible mountain to climb. Even moving between major cloud providers can be difficult due to subtle, but meaningful, differences in products, acronyms, and company cultures.
Each time I want to learn a new cloud platform, I do it the same way: by hyper-over-engineering a Minecraft server for my kids. As a parent of two kids who are crazy about the block building game, I do my fair share of playing along with them, building castles, gathering resources, and defending my home from zombies. Behind the scenes, I also help my kids run servers, install mods, and generally tweak the game to their liking. And sometimes, a real-life creeper explodes, something happens to their laptop or to the game files, and we have to start all over. If you’ve ever experienced the pain of losing a Minecraft world with diamond armor, a house in the clouds, and a functional roller coaster…well then, you know true sadness!
The concepts I use tie directly to what you see in the business world. Your Site Reliability Engineering team will maintain system uptime, create systems that can auto-recover, and monitor them efficiently. And while disaster recovery plans might not account for creepers and zombies, they sure care about servers crashing, recovering data, and restoring services quickly. By building a game server, you can learn a lot—in a risk-free way!
In this post, I’m going to show you how I used GCP to build a cloud-ready Minecraft server—one that’s easy to set up and begin playing with friends, and automatically backs itself up. Best of all, it’s 100% controllable by serverless functions you can share with friends and family, so that inviting friends to use the server isn’t a burden.
Spoiler Alert: the final product is awesome, and it was surprisingly easy to build! Needless to say, I’ve played a lot more Minecraft with my kids since building this solution.
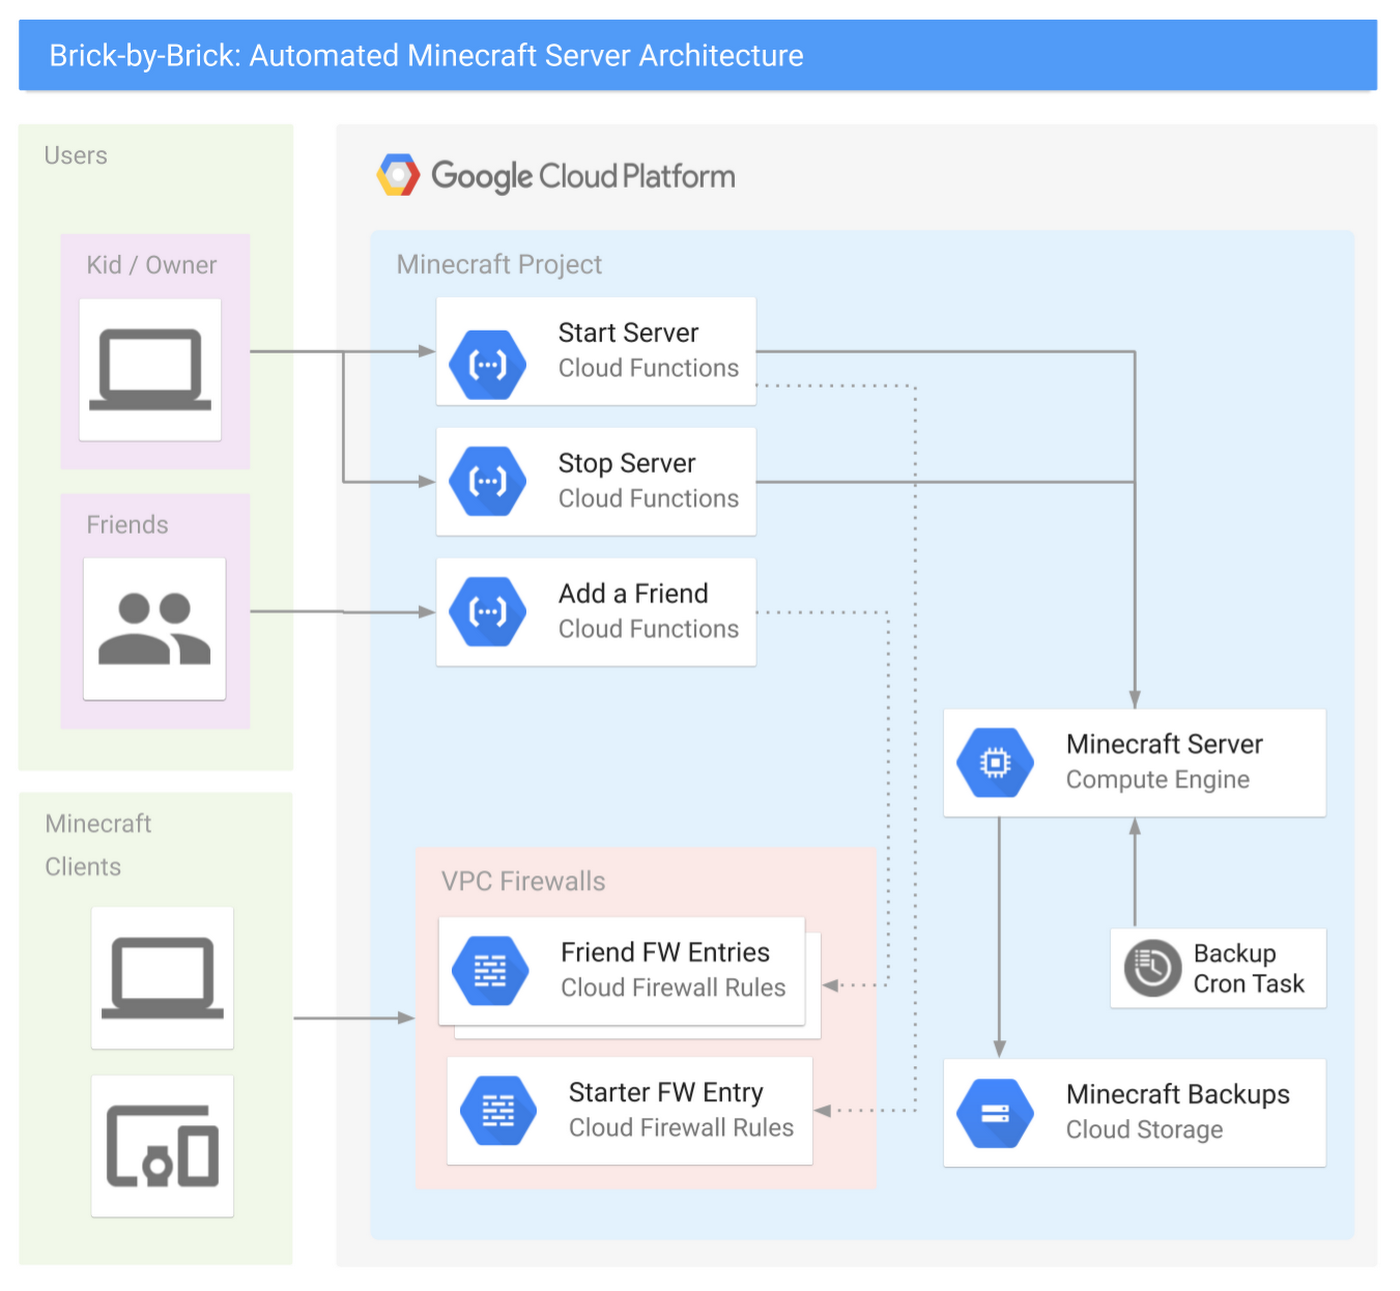
The final architecture looked something like this:
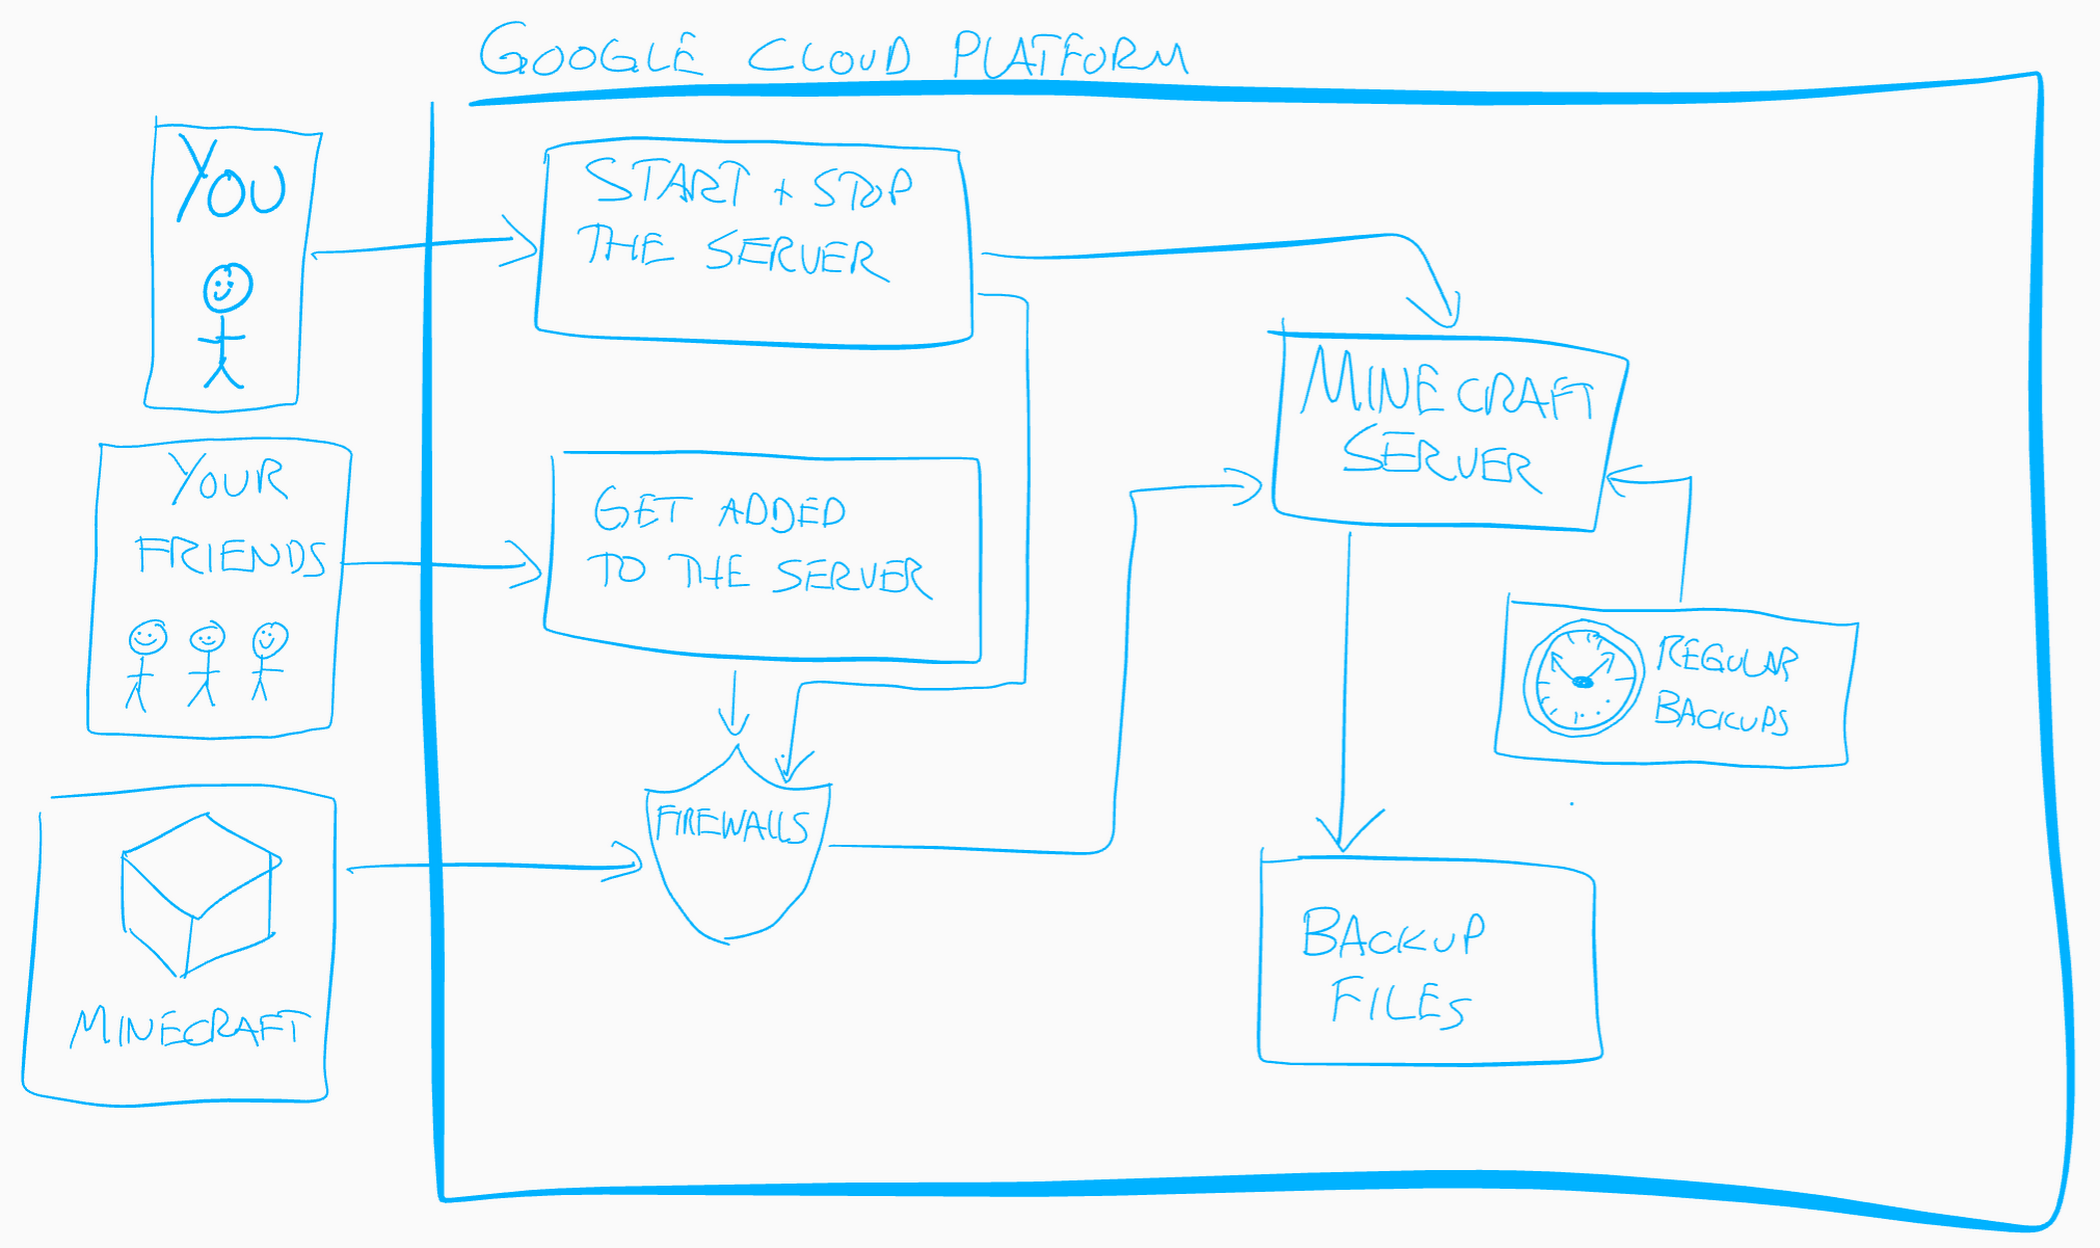
Don’t be intimidated by all of those lines—in fact, here’s a simplified one you can show your kids:
The plan to survive your first night, and hitting your requirements
Creating a basic Minecraft server on GCP is actually pretty straightforward:
You create a virtual machine
Install the Minecraft server software
Configure some Minecraft software start-up scripts.
The GCP Solutions Architects have published an awesome guide, Setting Up a Minecraft Server on Google Compute Engine, and built a Qwiklab that will walk you through the basic setup. Please make sure you have read and completed this solution before you continue, as this post will expand upon it further. **
If you want to control your Minecraft server from the cloud, there are three additional requirements that your server needs to meet:
Automation: It should be easy to turn the server on and off.
Security: It should be easy to invite friends and family to play, without the server being open to everyone.
Disaster recovery: The system should automatically back up game files.
Let’s look at these one by one.
Requirement #1: Automation
As a parent, you have enough distractions. If your kids must find you to turn on the server, that’s a problem. They don’t have to do that for smartphone apps, and they don’t have to do that for console games. You want them to be able to simply push the power button. You also don’t want to give them access to the Google Cloud Console, as getting them to understand IAM roles or on-demand billing would be a lot of work. Ideally, you want an event-driven action that executes code in a secure way. This sounds like a job for Google Cloud Functions!
With Cloud Functions you can create two serverless functions: start-minecraft-server and stop-minecraft-server. Both of these functions can use HTTP triggers, so you can run them simply by opening a URL! Just bookmark the URLs on your kids’ browser, and they can run the function instantly—without being able to change the code.
For example, the following node.js code, run via an HTTP trigger in Cloud Function, will start a server named “my-minecraft-server” in the us-west2-a zone. Under the hood, these functions have code blocks written in Node.js, although you could also rewrite them to use Python or Go.
NOTE: To build the stop function, simply swap the startInstance() function with the stopInstance() function, and change the status.send response text. This code is intentionally very basic and designed to keep this example simple. Feel free to experiment and add features; that’s the entire point of this series!
To break down the functionality:start-minecraft-server begins by starting the Minecraft server’s VM. Next, it records the requestor’s IPv4 address, and automatically creates a VPC Firewall rule to allow external access to the Minecraft server from there. This means that the person who starts the server automatically has access to connect to it.
Then, it displays a few messages back to the browser window. Specifically, it gives a message that the server started successfully and that you’re spending real money to run it. It also returns the exact IP address and port of the Minecraft server. This lets your kids know what to type into their Minecraft client to join and play on the server.
stop-minecraft-server is more straightforward. It simply tells the virtual machine to stop. Since the VM’s shutdown-script logic backs up the game files on shutdown, this is all you need to cleanly stop the server. You can also have it send a message back to the browser, letting the kids know that the server is now shutting down.
Requirement #2: Security
Playing Minecraft is just more fun with friends. Ideally, it should be easy to let other players join the game, without granting access to the public. Whether it’s hackers, griefers, denial of service (DoS) attacks, or malicious code in general, there’s just too much risk involved in running a publicly accessible server. Firewalls exist for a reason, and we want to take advantage of them on GCP.
The basic “add a friend” functionality is easy to build and use. First, you need to build a cloud function called add-a-friend, which is triggered by clicking on a URL. When this happens, it captures the user’s IPv4 address and creates a firewall rule in the VPC to allow access to the Minecraft server from that user’s IP. It then displays the IP address and port of the server back to the browser that friends can use to connect. Now, when your kids want to play with friends, they can simply start the server, share the add-a-friend URL with their friends, and start playing!
The following gcloud commands will create the cloud function to add friends to the firewall.
Requirement #3: Disaster recovery
Following the above tutorial not only gets the server up and running, but also sets up regular backups of the game-world files so you can recover from a crashed server. This works by configuring the server’s VM permissions to allow it to write to Cloud Storage, writing a simple bash script that executes the backup, and setting up crontab to run it regularly.
As the parent, though, you are the CTO and CFO of your household, so you’ll want to lower costs and improve this backup solution with a few enhancements.
To start, know that these backups are relatively small—just a few dozen megabytes for a medium-sized world—so it won’t be expensive to store them on Cloud Storage. However, you still want to be smart with your spending. Since you’ll only need these files in the event of a crash or emergency, they require very infrequent access. This is a perfect condition for two Cloud Storage features: Coldline storage and object lifecycle management.
With coldline storage, you pay less to store data, but more to retrieve it, making it a perfect fit for our use case, disaster recovery. When setting up your Minecraft server, make the default storage class on your bucket “coldline” to lower your cost-per-GB.
Cloud Storage lifecycle rules also allow you to set a limit on how long to keep data in a storage bucket. Since you’ll perform regular backups, and older backups have limited use, you don’t need a long retention period. In Cloud Storage, build a lifecycle rule to delete any files older than 90 days. 90 days adds another safety net: in the event you have to have a long-term “product outage” (i.e., your kid gets grounded or goes away to summer camp), you can still restore from a disaster.
The following gcloud commands will create a new minecraft storage bucket named “my-project-minecraft-backup” using coldline storage and establishing a lifecycle policy to delete any files older than 90 days.
What’s all this going to cost?
GCP offers a wonderful suite of Always-Free products, and since you are the CTO and CFO of your household, you’ve taken advantage of many Always-Free products already, including GCS and Cloud Functions to control your spending. At the scale you’ve set up with this guide, your costs should end up like the following:
Compute Engine
- The n1-standard-1 costs just under $0.05 /hour to run.
- Having a static IP address costs just over $7 /month.
Cloud Storage
- Your Google Cloud Storage is covered by the GCP Free Tier.
Cloud Functions
- Your Google Cloud Functions are covered by the GCP Free Tier.
Thus, if your kids play Minecraft for an average of two hours per day, hosting your own Minecraft server will cost about $10/month. Whether you pay or they do depends on how generous you are feeling, and if the chores are getting done.
What to build next
At this point you’ve got all of the requirements met—awesome work! The server runs and automatically backs up the game data, can be turned on and off by a URL, and makes it easy to add friends to the game. But this barely scratches the surface of what you can do with GCP! Here is a not-so-short list of things you could do to increase the capability and lower the cost of your Minecraft server.
Make it easier to connect
Register a domain with Google Cloud DNS and convert all IP connection information to DNS. Have the server register itself with the CNAME record as part of the startup script so you have a consistent URL for connecting to the game. See if you can expand this idea to the URLs for controlling the server and adding friends.
Get smarter with your spending
Switch your server to a Preemptible VM, create a custom machine image, and expand the startup script to grab the latest backup when the server turns on. Now you’ve cut your hourly server costs by about 80%.
Change the startup scripts to use an ephemeral IP address on the server, thus eliminating any cost for using a static IP address.
Automatically clean up friends’ firewall entries
Use Google Cloud Pub/Sub and modify your serverless function to put all add-a-friend firewall entries into a Pub/Sub topic, and create another function that cleans them up every night.
Make sure your kids don’t stay up playing!
Set up a “curfew” script that automatically shuts off the server at a certain time, and prevents it from being started during those “you should be asleep” hours.
Learn about monitoring, alerting, and logging upgrades
Use Stackdriver logging to export the Minecraft server logs so you can troubleshoot any in-game problems in real-time.
Use Stackdriver monitoring and alerting to:
Send a text message when the server turns on or off.
Monitor system CPU or server connections to tell when the server is idle, and automatically power it down. Your “users” WILL forget to shut this server off.
Bonus: have the server text your kids first, and only involve you after a certain amount of time.
Explore some data science upgrades
Analyze the server logs to identify how often each of your friends and family play, and develop a chargeback report mapped to household chores!
Export your logging data to BigQuery and generate reports on how much time the server runs, how many users are online and other basic metrics.
Want more data? Install a server mod that exports detailed game data to a local log file, then export that to BigQuery and see if you can query how many blocks have been mined in the server by day.
Go even farther and create a dashboard with Google Cloud DataLab that takes that information in real time and creates intelligence around the players.
Play with containers
Move the Minecraft Server to a Docker container running on Google Kubernetes Engine (GKE). Use persistent storage, or autoloading scripts to manage and launch the game. Discover what changes are needed to make all of the previous functionality work in the same way when using containers.
Wrapping up
You are now on your way to becoming the coolest parent ever—not to mention a professional GCP rockstar! Have fun with this project and see how many other tools and products you can link to your architecture to make your users, er, kids, happy. Plus, gain insight into your data, and maximize uptime while lowering costs.
Now it's time to go build!