本教學課程說明如何在 Cloud Build 管道中建立二進位授權認證。這項設定可確保只有在 Cloud Build 建構程序中建構及簽署的容器映像檔,才能自動獲得授權在部署環境中執行。
Cloud Build 總覽
Cloud Build (總覽) 會擷取儲存在 Cloud Source Repositories 或其他代管存放區中的原始碼,執行建構和測試作業,然後將產生的軟體輸出內容儲存在 Container Registry 或 Google Cloud Platform 上的其他儲存服務中。
二進位授權總覽
二進位授權 (總覽) 是一項Google Cloud 產品,可對應用程式強制執行部署時間限制。透過與 Google Kubernetes Engine (GKE) 整合,使用者可以強制規定部署至 Kubernetes 叢集的容器必須由可信機構以密碼編譯方式簽署,並由二進位授權認證者驗證。
您可以設定二進位授權,根據原始碼位置要求認證,防止系統部署從未經授權來源建構的容器映像檔。
詳情請見:
架構
下圖顯示 Binary Authorization/Cloud Build 設定中的元件:
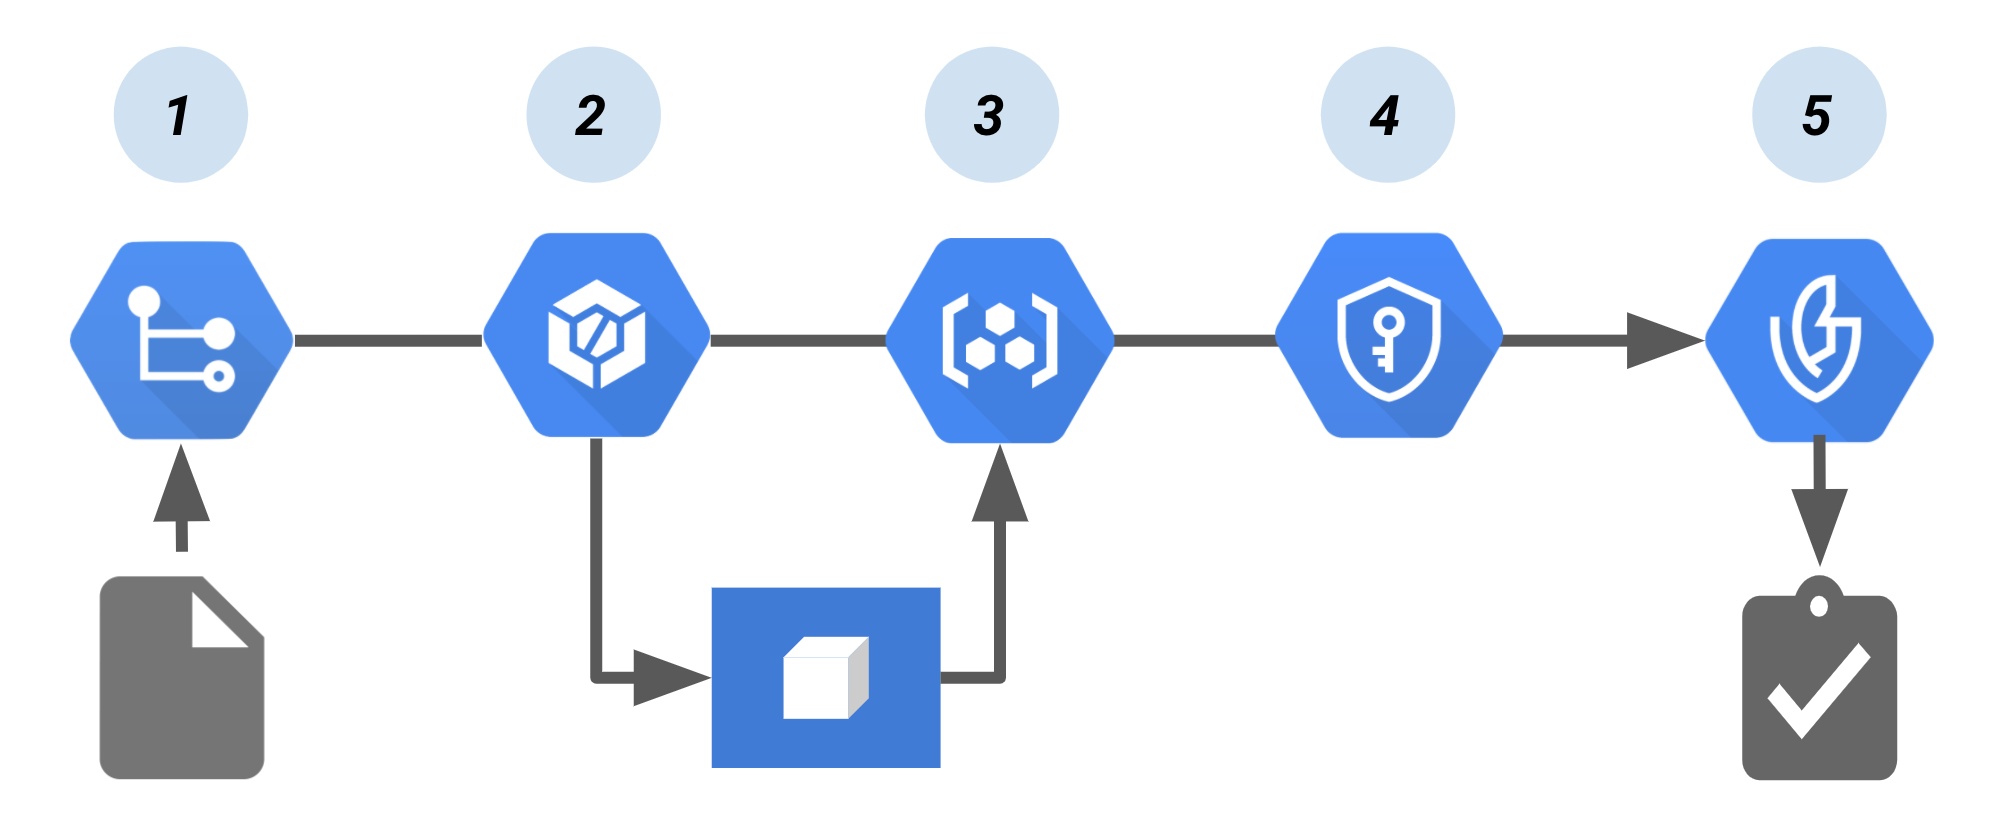
在這個管道中:
建構容器映像檔的程式碼會推送至來源存放區,例如 Cloud Source Repositories。
持續整合 (CI) 工具 Cloud Build 會建構及測試容器。
建構作業會將容器映像檔推送至 Container Registry 或其他儲存建構映像檔的登錄檔。
Cloud Key Management Service 會為加密編譯金鑰配對提供金鑰管理服務,並簽署容器映像檔。產生的簽章會儲存在新建立的認證中。
使用 Cloud Build 和 Cloud Key Management Service 建立認證
本節說明如何實作上述架構。這項功能會使用 Cloud Build 社群提供的開放原始碼自訂建構步驟。自訂建構步驟會簽署容器映像檔、建立認證,並上傳至 Binary Authorization。
設定身分與存取權管理
如要使用這個建構步驟,Cloud Build 服務帳戶必須具備下列 IAM 角色:
- 二進位授權驗證者檢視者
roles/binaryauthorization.attestorsViewer
- Cloud KMS CryptoKey 簽署者/驗證者 (如果使用 KMS 中的金鑰簽署認證)
roles/cloudkms.signerVerifier
- 構件分析註記附加者
roles/containeranalysis.notes.attacher
您可以使用下列指令,將角色新增至專案的 Cloud Build 服務帳戶:
啟用 Cloud Build:
在目標 Google Cloud 專案中啟用 Cloud Build API。
將專案 ID 儲存至環境變數:
PROJECT_ID=PROJECT_ID
其中 PROJECT_ID 是您的 Google Cloud 專案 ID。
設定專案 Google Cloud CLI:
gcloud config set project ${PROJECT_ID}取得專案編號:
PROJECT_NUMBER=$(gcloud projects list --filter="${PROJECT_ID}" --format="value(PROJECT_NUMBER)")將二進位授權驗證者檢視者角色新增至 Cloud Build 服務帳戶:
gcloud projects add-iam-policy-binding ${PROJECT_ID} \
  --member serviceAccount:${PROJECT_NUMBER}@cloudbuild.gserviceaccount.com \
  --role roles/binaryauthorization.attestorsViewer
將 Cloud KMS CryptoKey Signer/Verifier 角色新增至 Cloud Build 服務帳戶 (以 KMS 為基礎的簽署):
gcloud projects add-iam-policy-binding ${PROJECT_ID} \
  --member serviceAccount:${PROJECT_NUMBER}@cloudbuild.gserviceaccount.com \
  --role roles/cloudkms.signerVerifier
將 Artifact Analysis Notes Attacher 角色新增至 Cloud Build 服務帳戶:
gcloud projects add-iam-policy-binding ${PROJECT_ID} \
  --member serviceAccount:${PROJECT_NUMBER}@cloudbuild.gserviceaccount.com \
  --role roles/containeranalysis.notes.attacher
使用 Cloud Build 建構及註冊自訂建構步驟
複製 Google Cloud 建構社群存放區:
git clone https://github.com/GoogleCloudPlatform/cloud-builders-community.git
為 Cloud Build 設定二進位授權簽署者:
使用前,自訂建構步驟的程式碼必須建構到容器中,並推送至 Cloud Build。如要這麼做,請執行下列指令:
cd cloud-builders-community/binauthz-attestation
gcloud builds submit . --config cloudbuild.yaml
自訂建構步驟已推送至目前專案的 Google Container Registry,現在可以開始使用。
在二進位授權中建立驗證者
建立驗證者,二進位授權會在部署時使用該驗證者驗證認證。
在 Binary Authorization 中設定驗證者和 Cloud Key Management Service 金鑰組:
請參閱「使用 CLI 建立驗證者」一節。
確認驗證者已建立
gcloud --project="${ATTESTOR_PROJECT_ID}" container binauthz attestors list
在 cloudbuild.yaml 中新增「create-attestation」步驟
如要使用 binauthz-attestation 步驟,您必須更新 cloudbuild.yaml,加入會簽署已推送至 Container Registry 的建構作業的步驟。
以下提供兩種方法:
手動更新
cloudbuild.yaml。使用先前設定的環境變數執行範例管道。
手動更新 cloudbuild.yaml
在容器上傳至 Container Registry 的步驟後,新增下列建構步驟,即可手動更新
cloudbuild.yaml。注意:您必須手動將 ATTESTOR_NAME、KMS_KEY_LOCATION、KMS_KEYRING_NAME、KMS_KEY_NAME 和 KMS_KEY_VERSION 替換為自己的值:- id: 'create-attestation' name: 'gcr.io/${PROJECT_ID}/binauthz-attestation:latest' args: - '--artifact-url' - 'gcr.io/${PROJECT_ID}/helloworld:latest' - '--attestor' - 'projects/${PROJECT_ID}/attestors/ATTESTOR_NAME' - '--keyversion' - 'projects/${PROJECT_ID}/locations/KMS_KEY_LOCATION/keyRings/KMS_KEYRING_NAME/cryptoKeys/KMS_KEY_NAME/cryptoKeyVersions/KMS_KEY_VERSION'以下也是有效做法:
- id: 'create-attestation'
  name: 'gcr.io/${PROJECT_ID}/binauthz-attestation:latest'
  args:
    - '--artifact-url'
    - 'gcr.io/${PROJECT_ID}/helloworld:latest'
    - '--attestor'
    - 'ATTESTOR_NAME'
    - '--attestor-project'
    - '${PROJECT_ID}'
    - '--keyversion'
    - 'KEY_VERSION'
    - '--keyversion-project'
    - '${PROJECT_ID}'
    - '--keyversion-location'
    - 'KEY_LOCATION'
    - '--keyversion-keyring'
    - 'KEYRING_NAME'
    - '--keyversion-key'
    - 'KEY_NAME'
選用:測試管道
如要測試範例 Cloud Build 認證管道,請執行下列步驟:
建立
cloudbuild.yaml檔案,其中包含您先前設定的環境變數:cd example cat <<EOM > cloudbuild_example.yaml steps: - id: 'build' name: 'gcr.io/cloud-builders/docker' args: - 'build' - '-t' - 'gcr.io/$PROJECT_ID/helloworld:latest' - '.' - id: 'publish' name: 'gcr.io/cloud-builders/docker' args: - 'push' - 'gcr.io/$PROJECT_ID/helloworld:latest' - id: 'create-attestation' name: 'gcr.io/$PROJECT_ID/binauthz-attestation:latest' args: - '--artifact-url' - 'gcr.io/$PROJECT_ID/helloworld:latest' - '--attestor' - 'projects/$PROJECT_ID/attestors/${ATTESTOR_NAME}' - '--keyversion' - 'projects/${PROJECT_ID}/locations/${KMS_KEY_LOCATION}/keyRings/${KMS_KEYRING_NAME}/cryptoKeys/${KMS_KEY_NAME}/cryptoKeyVersions/${KMS_KEY_VERSION}' tags: ['cloud-builders-community'] EOM使用範例執行 Cloud Build
cloudbuild_example.yaml:從
cloud-builders-community/binauthz-attestation/example目錄執行下列指令:gcloud builds submit . --config cloudbuild_example.yaml