Application Integration でサポートされているコネクタをご覧ください。

公開 API への REST 呼び出しを行う

REST エンドポイントの呼び出しタスクを使用して https://mocktarget.apigee.net/json を呼び出し、レスポンスを JSON 変数に保存します。

コードサンプル

{
  "triggerConfigs": [{
    "label": "API Trigger",
    "startTasks": [{
      "taskId": "1"
    }],
    "properties": {
      "Trigger name": "CallRestEndpointDemo_API_1"
    },
    "triggerType": "API",
    "triggerNumber": "1",
    "triggerId": "api_trigger/CallRestEndpointDemo_API_1"
  }],
  "taskConfigs": [{
    "task": "GenericRestV2Task",
    "taskId": "1",
    "parameters": {
      "throwError": {
        "key": "throwError",
        "value": {
          "booleanValue": true
        }
      },
      "responseBody": {
        "key": "responseBody",
        "value": {
          "stringArray": {
            "stringValues": ["$`Task_1_responseBody`$"]
          }
        }
      },
      "disableSSLValidation": {
        "key": "disableSSLValidation",
        "value": {
          "booleanValue": false
        }
      },
      "httpParams": {
        "key": "httpParams"
      },
      "responseHeader": {
        "key": "responseHeader",
        "value": {
          "stringArray": {
            "stringValues": ["$`Task_1_responseHeader`$"]
          }
        }
      },
      "userAgent": {
        "key": "userAgent",
        "value": {
          "stringValue": ""
        }
      },
      "httpMethod": {
        "key": "httpMethod",
        "value": {
          "stringValue": "GET"
        }
      },
      "responseStatus": {
        "key": "responseStatus",
        "value": {
          "stringArray": {
            "stringValues": ["$`Task_1_responseStatus`$"]
          }
        }
      },
      "url": {
        "key": "url",
        "value": {
          "stringValue": "https://mocktarget.apigee.net/json"
        }
      },
      "urlFetchingService": {
        "key": "urlFetchingService",
        "value": {
          "stringValue": "HARPOON"
        }
      },
      "useSSL": {
        "key": "useSSL",
        "value": {
          "booleanValue": false
        }
      },
      "requestorId": {
        "key": "requestorId",
        "value": {
          "stringValue": ""
        }
      },
      "urlQueryStrings": {
        "key": "urlQueryStrings"
      },
      "requestBody": {
        "key": "requestBody",
        "value": {
          "stringValue": ""
        }
      },
      "followRedirects": {
        "key": "followRedirects",
        "value": {
          "booleanValue": true
        }
      },
      "additionalHeaders": {
        "key": "additionalHeaders"
      }
    },
    "nextTasks": [{
      "taskId": "2"
    }],
    "taskExecutionStrategy": "WHEN_ALL_SUCCEED",
    "displayName": "Call REST Endpoint"
  }, {
    "task": "FieldMappingTask",
    "taskId": "2",
    "parameters": {
      "FieldMappingConfigTaskParameterKey": {
        "key": "FieldMappingConfigTaskParameterKey",
        "value": {
          "jsonValue": "{\n  \"@type\": \"type.googleapis.com/enterprise.crm.eventbus.proto.FieldMappingConfig\",\n  \"mappedFields\": [{\n    \"inputField\": {\n      \"fieldType\": \"JSON_VALUE\",\n      \"transformExpression\": {\n        \"initialValue\": {\n          \"referenceValue\": \"$`Task_1_responseBody`$\"\n        },\n        \"transformationFunctions\": [{\n          \"functionType\": {\n            \"stringFunction\": {\n              \"functionName\": \"TO_JSON\"\n            }\n          }\n        }]\n      }\n    },\n    \"outputField\": {\n      \"referenceKey\": \"$OutputJson$\",\n      \"fieldType\": \"JSON_VALUE\",\n      \"cardinality\": \"OPTIONAL\"\n    }\n  }]\n}"
        }
      }
    },
    "taskExecutionStrategy": "WHEN_ALL_SUCCEED",
    "displayName": "Data Mapping"
  }],
  "integrationParameters": [{
    "key": "`Task_1_responseHeader`",
    "dataType": "STRING_VALUE",
    "displayName": "`Task_1_responseHeader`",
    "isTransient": true,
    "producer": "1_1"
  }, {
    "key": "`Task_1_responseBody`",
    "dataType": "STRING_VALUE",
    "displayName": "`Task_1_responseBody`",
    "isTransient": true,
    "producer": "1_1"
  }, {
    "key": "`Task_1_responseStatus`",
    "dataType": "STRING_VALUE",
    "displayName": "`Task_1_responseStatus`",
    "isTransient": true,
    "producer": "1_1"
  }, {
    "key": "OutputJson",
    "dataType": "JSON_VALUE",
    "displayName": "OutputJson",
    "inputOutputType": "OUT"
  }]
}

統合フローのサンプル

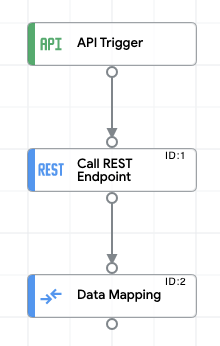
次の図は、この統合コードサンプルの統合エディタのサンプル レイアウトを示しています。

統合フローのサンプルを示す画像 統合フローのサンプルを示す画像

サンプル統合をアップロードして実行する

サンプル統合をアップロードして実行するには、次の手順に従います。

  1. 統合サンプルを .json ファイルとしてシステムに保存します。
  2. Google Cloud コンソールで [Application Integration] ページに移動します。

    Application Integration に移動

  3. ナビゲーション メニューで [統合] をクリックします。[統合リスト] ページが表示されます。
  4. 既存の統合を選択するか、[統合を作成] をクリックして新しい統合を作成します。

    新しい統合を作成する場合:

    1. [統合の作成] ダイアログで名前と説明を入力します。
    2. 統合のリージョンを選択します。
    3. 統合用のサービス アカウントを選択します。統合のサービス アカウントの詳細は、統合ツールバーの [統合の概要] ペインでいつでも変更または更新できます。
    4. [作成] をクリックします。

    統合エディタで統合が開きます。

  5. 統合エディタで、 [アップロード / ダウンロード メニュー] をクリックし、[統合をアップロード] を選択します。
  6. ファイル ブラウザ ダイアログで、ステップ 1 で保存したファイルを選択し、[開く] をクリックします。

    統合の新しいバージョンは、アップロードされたファイルを使用して作成されます。

  7. 統合エディタで [テスト] をクリックします。
  8. [テスト統合] をクリックします。統合が実行され、[テスト統合] ペインに実行結果が表示されます。