Google Distributed Cloud supports using OpenStack as a private cloud platform. This support allows you to use the following OpenStack services:
- Infrastructure as a Service (IaaS)
- Load balancing as a Service (LBaaS)
- Storage
You can deploy Google Distributed Cloud running in OpenStack virtual machines (VMs) with supported operating systems. Google Distributed Cloud doesn't provision the VMs automatically, and provisioning the VMs is outside the scope of this guide. To learn the VM requirements and review an example deployment, see the Terraform example to create OpenStack VMs.
You can use the OpenStack LBaaS and the Kubernetes OpenStack Cloud Provider in Google Distributed Cloud to expose the Kubernetes services outside of the OpenStack cluster.
The guide consists of the following sections:
- Deploy Google Distributed Cloud
- Configure the OpenStack Cloud Provider for Kubernetes in Google Distributed Cloud to integrate with the Octavia load balancers
- Validate the OpenStack Cloud Provider for Kubernetes integration
This guide uses OpenStack Ussuri, but it could work with older versions of OpenStack. Older OpenStack versions haven't been tested. The guide uses OpenStack VMs to provide you with a two-node Google Distributed Cloud proof of concept environment running on OpenStack. For information about creating a production environment with a high-availability control plane, see the Google Distributed Cloud documentation for production environment requirements.
Example deployment
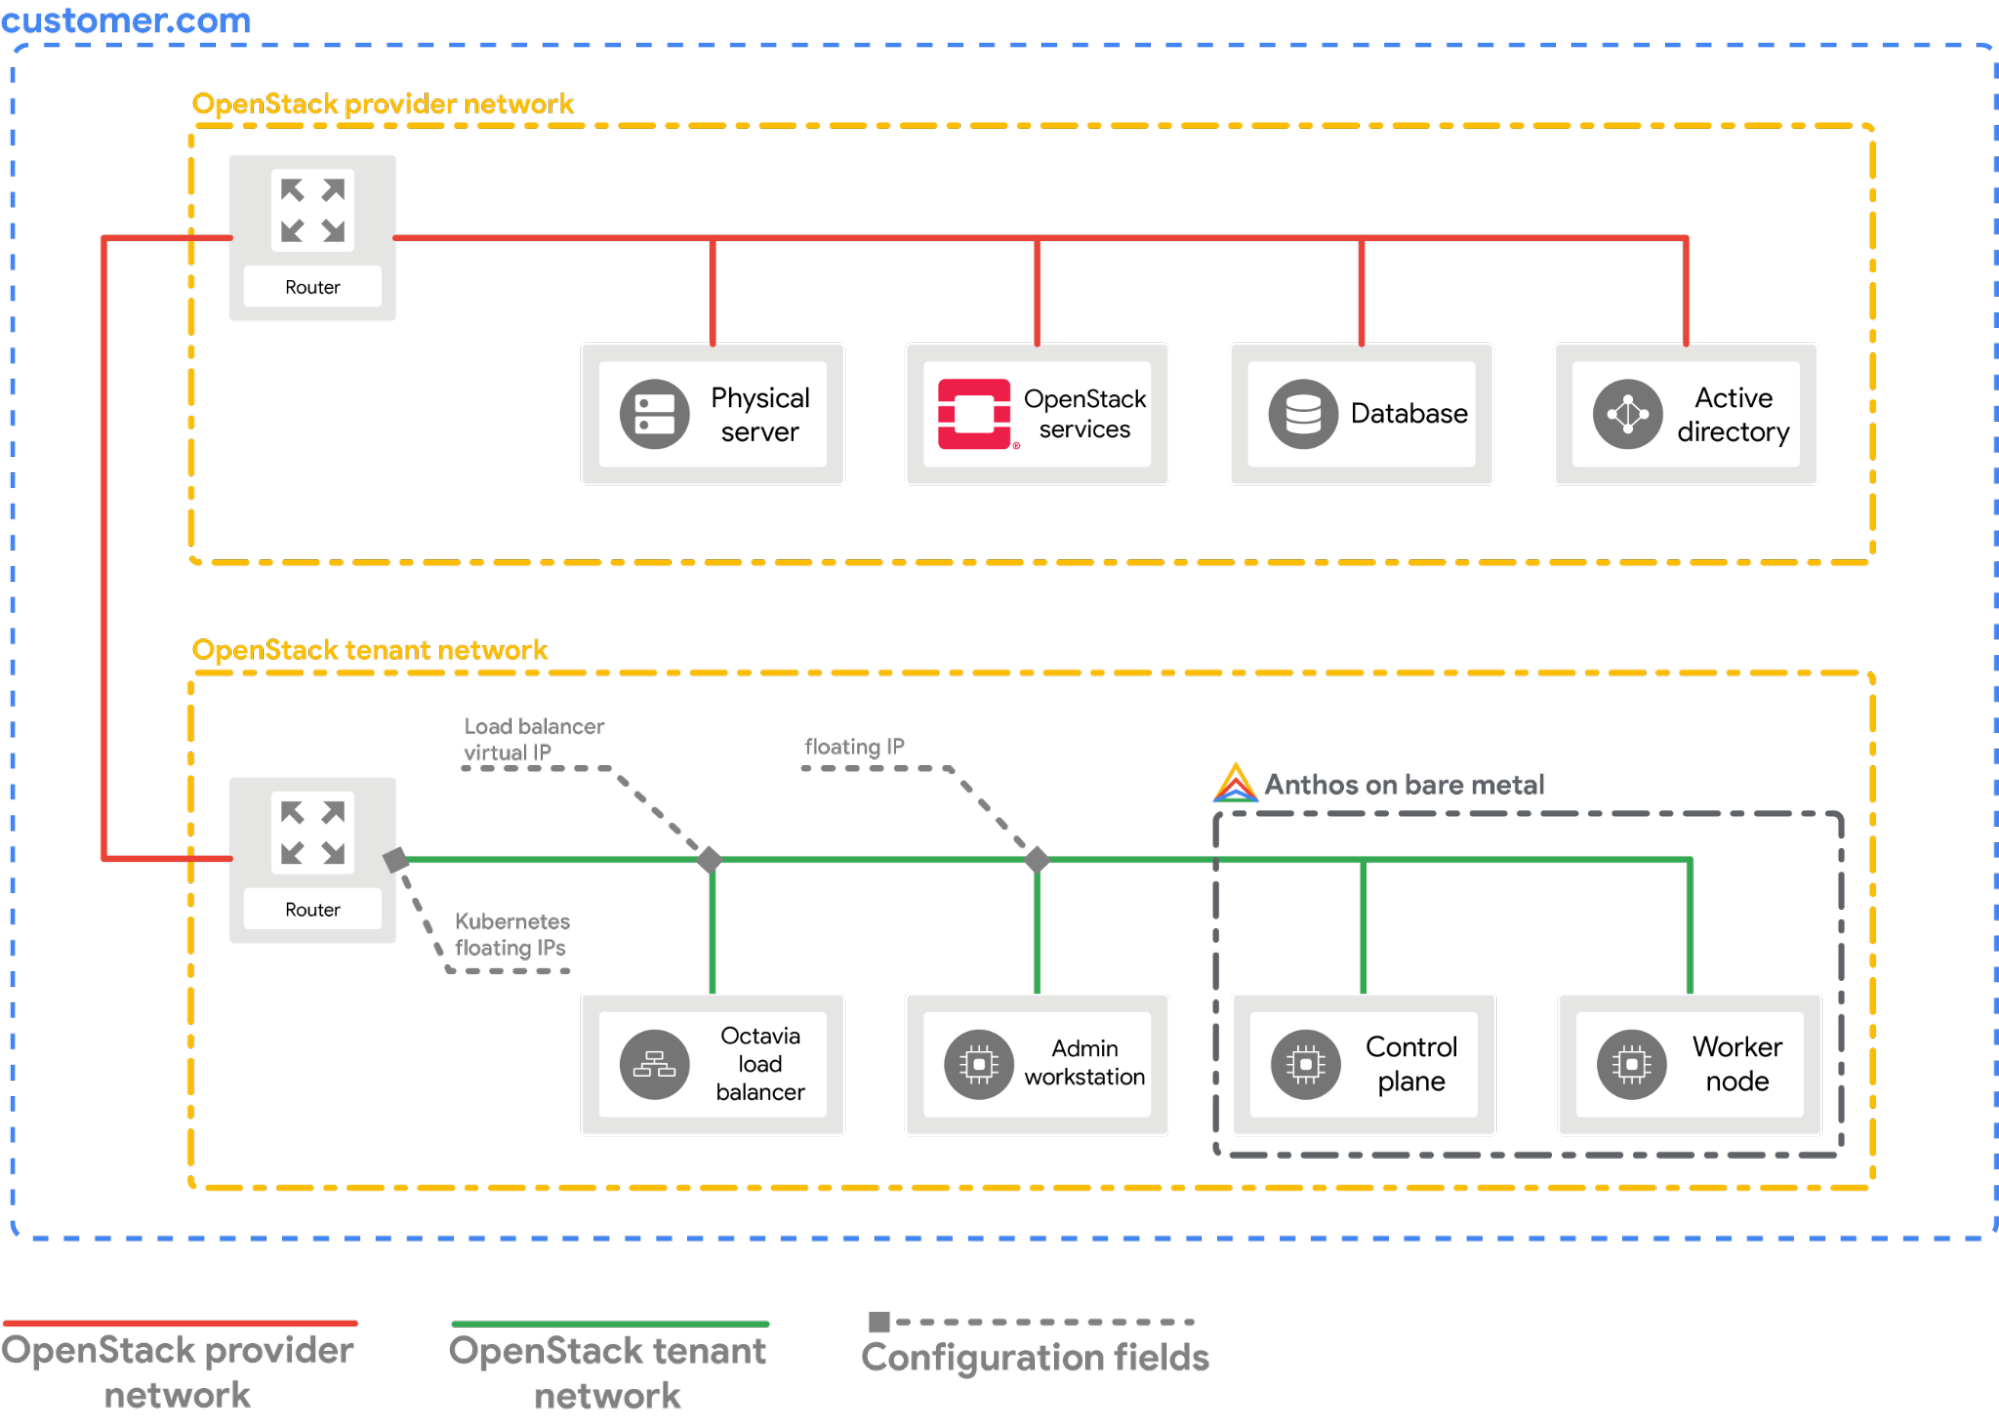
This guide provides you with an example deployment of Google Distributed Cloud on OpenStack that integrates with OpenStack's LBaaS. You must understand and adjust the commands and configuration values to suit your OpenStack environment. The following diagram shows the resulting deployment:
Prerequisites
- OpenStack Ussuri with LBaaS v2 deployed and functional
- Service account for downloading the bmctl tool
- Configure your OpenStack VMs and network as shown in the example deployment.
To provision a similar setup in your OpenStack environment, you have the
following options:
- Use this Terraform script to provision the resources automatically.
- Provision the resources manually.
- The following OpenStack VMs must be ready and available through SSH:
| Name | Usage | IP address |
|---|---|---|
| abm-ws | 10.200.0.10 (private IP) floating_ip (public IP) | Acts as the admin workstation It is used to deploy Anthos on bare metal to the other machines. |
| abm-cp1 | 10.200.0.11 | Anthos cluster control plane: This host runs the Kubernetes control plane and load balancer. |
| abm-w1 | 10.200.0.12 | Anthos cluster worker node: This host runs the Kubernetes workloads. |
Deploy Google Distributed Cloud
This section shows you how to complete the following tasks:
- Install the tools you need on the
abm-wsadmin workstation VM. - Configure the project ID and service account needed to securely complete the deployment
- Create a cluster configuration file
- Deploy Google Distributed Cloud
Install the tools you need
Fetch the public floating IP address of the
abm-wsVM.export OPENSTACK_IPS=$(openstack floating ip list --tags=abm_ws_floatingip -f json) export FLOATING_IP=$(jq -c '.[]."Floating IP Address"' <<< $OPENSTACK_IPS | tr -d '"')Ensure you can connect securely into the
abm-wsVM via SSH and log in as arootuser. Therootuser as configured by the Terraform scripts isabm.ssh ubuntu@$FLOATING_IP sudo -u abm -iVerify that you can SSH into the other nodes.
ssh abm@10.200.0.11 'echo SSH to $HOSTNAME succeeded'
ssh abm@10.200.0.12 'echo SSH to $HOSTNAME succeeded'
The expected output for the above commands are:
SSH to abm-cp1 succeeded
SSH to abm-w1 succeeded
Download the
kubectlcommand line utility on theabm-wsVM.curl -LO "https://storage.googleapis.com/kubernetes-release/release/$(curl -s https://storage.googleapis.com/kubernetes-release/release/stable.txt)/bin/linux/amd64/kubectl" chmod +x kubectl sudo mv kubectl /usr/local/sbin/Install Docker on the
abm-wsVM.curl -fsSL https://get.docker.com -o get-docker.sh sh get-docker.sh sudo usermod -aG docker abm newgrp docker
Configure the Google Cloud project and service account
Obtain Google Cloud CLI access credentials for your user account. This will be used when using the
gcloudcommands that follow.gcloud auth loginMake sure the Google Cloud CLI is configured to use the Google Cloud project in which you want your Google Distributed Cloud to be registered.
gcloud config set project PROJECT_IDSet the Application Default Credentials (ADC) for your user account in the admin workstation. This will be used when the
bmctltool is used for cluster creation.gcloud auth application-default loginCreate the
bm-gcrservice account. You use this service account to authenticate from the Google Distributed Cloud cluster.gcloud iam service-accounts create bm-gcr gcloud iam service-accounts keys create bm-gcr.json \ --iam-account=bm-gcr@PROJECT_ID.iam.gserviceaccount.comEnable the necessary APIs.
gcloud services enable \
  anthos.googleapis.com \
  anthosgke.googleapis.com \
  cloudresourcemanager.googleapis.com \
  container.googleapis.com \
  gkeconnect.googleapis.com \
  gkehub.googleapis.com \
  serviceusage.googleapis.com \
  stackdriver.googleapis.com \
  monitoring.googleapis.com \
  logging.googleapis.com \
  opsconfigmonitoring.googleapis.com \
  anthosaudit.googleapis.com
Give additional permissions to the
bm-gcrservice account. Adding the permissions means you don't need to create multiple service accounts for individual services.gcloud projects add-iam-policy-binding PROJECT_ID \ --member="serviceAccount:bm-gcr@PROJECT_ID.iam.gserviceaccount.com" \ --role="roles/gkehub.connect" gcloud projects add-iam-policy-binding PROJECT_ID \ --member="serviceAccount:bm-gcr@PROJECT_ID.iam.gserviceaccount.com" \ --role="roles/gkehub.admin" gcloud projects add-iam-policy-binding PROJECT_ID \ --member="serviceAccount:bm-gcr@PROJECT_ID.iam.gserviceaccount.com" \ --role="roles/logging.logWriter" gcloud projects add-iam-policy-binding PROJECT_ID \ --member="serviceAccount:bm-gcr@PROJECT_ID.iam.gserviceaccount.com" \ --role="roles/monitoring.metricWriter" gcloud projects add-iam-policy-binding PROJECT_ID \ --member="serviceAccount:bm-gcr@PROJECT_ID.iam.gserviceaccount.com" \ --role="roles/monitoring.dashboardEditor" gcloud projects add-iam-policy-binding PROJECT_ID \ --member="serviceAccount:bm-gcr@PROJECT_ID.iam.gserviceaccount.com" \ --role="roles/stackdriver.resourceMetadata.writer" gcloud projects add-iam-policy-binding PROJECT_ID \ --member="serviceAccount:bm-gcr@PROJECT_ID.iam.gserviceaccount.com" \ --role="roles/opsconfigmonitoring.resourceMetadata.writer"
Create a cluster configuration file
Download the
bmctlcommand line utility.mkdir baremetal && cd baremetal gcloud storage cp gs://anthos-baremetal-release/bmctl/1.8.9/linux-amd64/bmctl . chmod a+x bmctl sudo mv bmctl /usr/local/sbin/Create an Google Distributed Cloud workspace for your cluster.
bmctl create config -c CLUSTER_NAMECreate the configuration file for your Google Distributed Cloud cluster.
cat > bmctl-workspace/CLUSTER_NAME/CLUSTER_NAME.yaml << EOB
---
gcrKeyPath: /home/abm/bm-gcr.json
sshPrivateKeyPath: /home/abm/.ssh/id_rsa
gkeConnectAgentServiceAccountKeyPath: /home/abm/bm-gcr.json
gkeConnectRegisterServiceAccountKeyPath: /home/abm/bm-gcr.json
cloudOperationsServiceAccountKeyPath: /home/abm/bm-gcr.json
---
apiVersion: v1
kind: Namespace
metadata:
  name: openstack-cluster-ns
---
apiVersion: baremetal.cluster.gke.io/v1
kind: Cluster
metadata:
  name: CLUSTER_NAME
  namespace: openstack-cluster-ns
  annotations:
    baremetal.cluster.gke.io/external-cloud-provider: "true"
spec:
  type: hybrid
  anthosBareMetalVersion: 1.8.9
  gkeConnect:
    projectID: PROJECT_ID
  controlPlane:
    nodePoolSpec:
      clusterName: CLUSTER_NAME
      nodes:
      - address: 10.200.0.11
  clusterNetwork:
    pods:
      cidrBlocks:
      - 10.202.0.0/16
    services:
      cidrBlocks:
      - 10.203.0.0/16
  loadBalancer:
    mode: manual
    ports:
      controlPlaneLBPort: 443
    vips:
      controlPlaneVIP: 10.200.0.101
      ingressVIP: 10.200.0.102
  clusterOperations:
    location: us-central1
    projectID: PROJECT_ID
  storage:
    lvpNodeMounts:
      path: /mnt/localpv-disk
      storageClassName: node-disk
    lvpShare:
      numPVUnderSharedPath: 5
      path: /mnt/localpv-share
      storageClassName: standard
  nodeAccess:
    loginUser: abm

---
apiVersion: baremetal.cluster.gke.io/v1
kind: NodePool
metadata:
  name: node-pool-1
  namespace: openstack-cluster-ns
spec:
  clusterName: CLUSTER_NAME
  nodes:
  - address: 10.200.0.12
EOB
Deploy
Deploy the cluster.
bmctl create cluster -c CLUSTER_NAME
Running the bmctl command starts setting up a new hybrid cluster. This
includes doing preflight checks on the nodes, creating the admin and user
clusters and also registering the cluster with Google Cloud using Connect.
The whole setup can take up to 15 minutes. You see the following output as the
cluster is being created:
Please check the logs at bmctl-workspace/CLUSTER_NAME/log/create-cluster-20210926-020741/create-cluster.log
[2021-09-26 02:07:59+0000] Creating bootstrap cluster... ⠦ kind get kubeconfig --name bmctl > ~/.kube/config && k get pods --all-namespaces
[2021-09-26 02:07:59+0000] Creating bootstrap cluster... OK
[2021-09-26 02:10:48+0000] Installing dependency components... OK
[2021-09-26 02:13:42+0000] Waiting for preflight check job to finish... OK
[2021-09-26 02:15:22+0000] - Validation Category: machines and network
[2021-09-26 02:15:22+0000]  - [PASSED] gcp
[2021-09-26 02:15:22+0000]  - [PASSED] node-network
[2021-09-26 02:15:22+0000]  - [PASSED] 10.200.0.11
[2021-09-26 02:15:22+0000]  - [PASSED] 10.200.0.11-gcp
[2021-09-26 02:15:22+0000]  - [PASSED] 10.200.0.12
[2021-09-26 02:15:22+0000]  - [PASSED] 10.200.0.12-gcp
[2021-09-26 02:15:22+0000] Flushing logs... OK
[2021-09-26 02:15:23+0000] Applying resources for new cluster
[2021-09-26 02:15:24+0000] Waiting for cluster to become ready OK
[2021-09-26 02:25:04+0000] Writing kubeconfig file
[2021-09-26 02:25:04+0000] kubeconfig of created cluster is at bmctl-workspace/CLUSTER_NAME/CLUSTER_NAME-kubeconfig, please run
[2021-09-26 02:25:04+0000] kubectl --kubeconfig bmctl-workspace/CLUSTER_NAME/CLUSTER_NAME-kubeconfig get nodes
[2021-09-26 02:25:04+0000] to get cluster node status.
[2021-09-26 02:25:04+0000] Please restrict access to this file as it contains authentication credentials of your cluster.
[2021-09-26 02:25:04+0000] Waiting for node pools to become ready OK
[2021-09-26 02:25:24+0000] Moving admin cluster resources to the created admin cluster
[2021-09-26 02:25:53+0000] Flushing logs... OK
[2021-09-26 02:25:53+0000] Deleting bootstrap cluster...
Verify and interact with the cluster
You can find your cluster's kubeconfig file on the abm-ws VM inside the
bmctl-workspace directory. To verify your deployment, complete the following
steps.
Set the
KUBECONFIGenvironment variable with the path to the cluster's configuration file to runkubectlcommands on the cluster:export KUBECONFIG=$HOME/bmctl-workspace/CLUSTER_NAME/CLUSTER_NAME-kubeconfig kubectl get nodesYou should see the nodes of the cluster printed, similar to the following output:
NAME      STATUS   ROLES                  AGE     VERSION
abm-cp1   Ready    control-plane,master   5m24s   v1.20.5-gke.1301
abm-w1    Ready    <none>                 2m17s   v1.20.5-gke.1301
Log in to your cluster from Google Cloud console
To observe your workloads in the Google Cloud console, you must log in to the cluster. For instructions and more information about logging into your cluster, see Logging in to a cluster from Google Cloud console.
Clean up
You can clean up the cluster by issuing the following command in your admin
workstation (abm-ws) VM.
export KUBECONFIG=$HOME/bmctl-workspace/CLUSTER_NAME/CLUSTER_NAME-kubeconfig
bmctl reset --cluster CLUSTER_NAME
What's next?
You can now install the OpenStack Cloud Provider on the newly created
Google Distributed Cloud cluster by following the
Configure the OpenStack Cloud Provider for Kubernetes
guide. This enables you to expose your applications using a LoadBalancer type
service, leveraging
OpenStack's LBaaS.