Initial model deployment
After you have created (trained) a model, you must deploy the model before you can make online (or synchronous) call to the model.
You can now also update model deployment if you need additional online prediction capacity.
Web UI
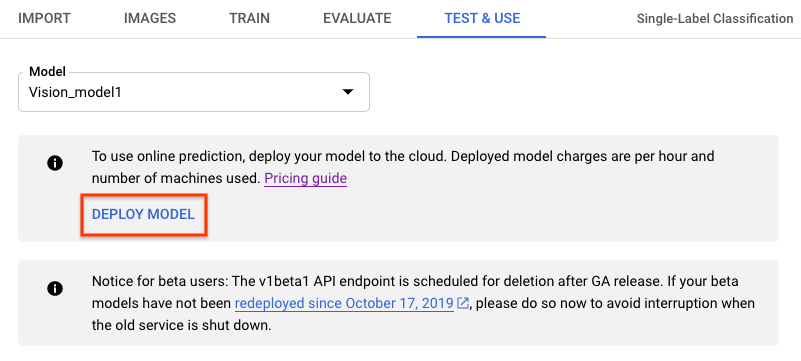
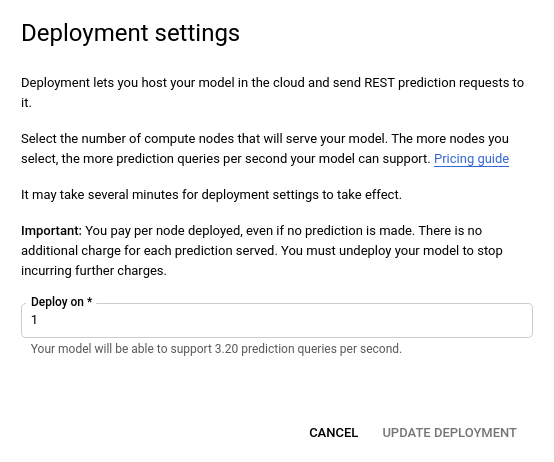
- Navigate to the Test & Use tab below the title bar.
- Select the Deploy Model button. This opens a new deployment option window.
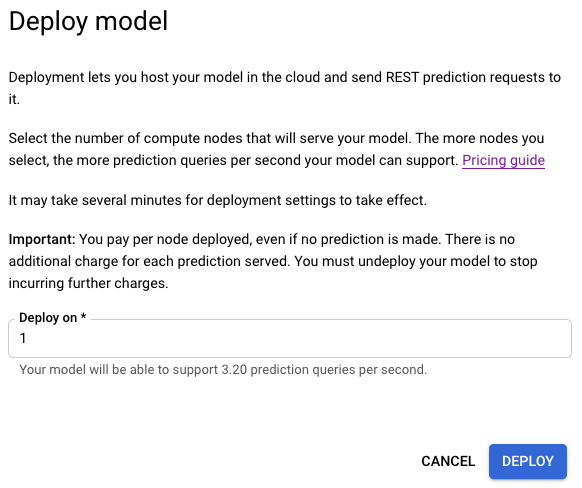
- In the newly opened deployment option window, specify the number of nodes to deploy with.
Each node supports a certain number of prediction queries per second (QPS).
One node is usually sufficient for most experimental traffic.
-
Select Deploy to begin model deployment.
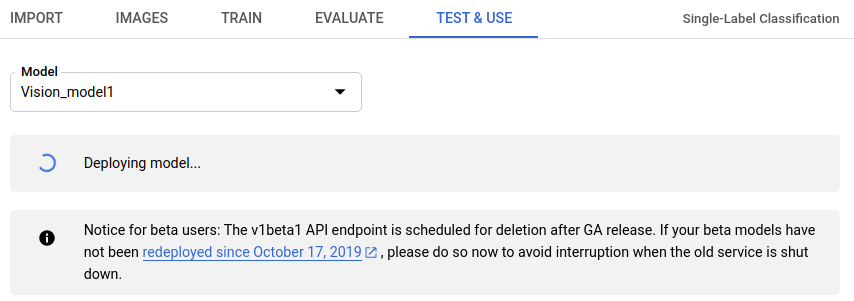
- You will receive an email after the model deployment operation finishes.
REST
Before using any of the request data, make the following replacements:
- project-id: your GCP project ID.
- model-id: the ID of your model, from the
response when you created the model. The ID is the last element of the name of your model.
For example:
- model name:
projects/project-id/locations/location-id/models/IOD4412217016962778756 - model id:
IOD4412217016962778756
- model name:
Field considerations:
nodeCount- The number of nodes to deploy the model on. The value must be between 1 and 100, inclusive on both ends. A node is an abstraction of a machine resource, which can handle online prediction queries per second (QPS) as given in the model'sqps_per_node.
HTTP method and URL:
POST https://automl.googleapis.com/v1/projects/PROJECT_ID/locations/us-central1/models/MODEL_ID:deploy
Request JSON body:
{
  "imageClassificationModelDeploymentMetadata": {
    "nodeCount": 2
  }
}
To send your request, choose one of these options:
curl
Save the request body in a file named request.json,
and execute the following command:
curl -X POST \
     -H "Authorization: Bearer $(gcloud auth print-access-token)" \
     -H "x-goog-user-project: project-id" \
     -H "Content-Type: application/json; charset=utf-8" \
     -d @request.json \
     "https://automl.googleapis.com/v1/projects/PROJECT_ID/locations/us-central1/models/MODEL_ID:deploy"
PowerShell
Save the request body in a file named request.json,
and execute the following command:
$cred = gcloud auth print-access-token
$headers = @{ "Authorization" = "Bearer $cred"; "x-goog-user-project" = "project-id" }

Invoke-WebRequest `
    -Method POST `
    -Headers $headers `
    -ContentType: "application/json; charset=utf-8" `
    -InFile request.json `
    -Uri "https://automl.googleapis.com/v1/projects/PROJECT_ID/locations/us-central1/models/MODEL_ID:deploy" | Select-Object -Expand Content
You should see output similar to the following. You can use the operation ID to get the status of the task. For an example, see Working with long-running operations
{
  "name": "projects/PROJECT_ID/locations/us-central1/operations/OPERATION_ID",
  "metadata": {
    "@type": "type.googleapis.com/google.cloud.automl.v1.OperationMetadata",
    "createTime": "2019-08-07T22:00:20.692109Z",
    "updateTime": "2019-08-07T22:00:20.692109Z",
    "deployModelDetails": {}
  }
}
You can get the status of an operation with the following HTTP method and URL:
GET https://automl.googleapis.com/v1/projects/PROJECT_ID/locations/us-central1/operations/OPERATION_ID
The status of a finished operation will look similar to the following:
{
  "name": "projects/PROJECT_ID/locations/us-central1/operations/OPERATION_ID",
  "metadata": {
    "@type": "type.googleapis.com/google.cloud.automl.v1.OperationMetadata",
    "createTime": "2019-06-21T16:47:21.704674Z",
    "updateTime": "2019-06-21T17:01:00.802505Z",
    "deployModelDetails": {}
  },
  "done": true,
  "response": {
    "@type": "type.googleapis.com/google.protobuf.Empty"
  }
}
Go
Before trying this sample, follow the setup instructions for this language on the Client Libraries page.
Java
Before trying this sample, follow the setup instructions for this language on the Client Libraries page.
Node.js
Before trying this sample, follow the setup instructions for this language on the Client Libraries page.
Python
Before trying this sample, follow the setup instructions for this language on the Client Libraries page.
Additional languages
C#: Please follow the C# setup instructions on the client libraries page and then visit the AutoML Vision reference documentation for .NET.
PHP: Please follow the PHP setup instructions on the client libraries page and then visit the AutoML Vision reference documentation for PHP.
Ruby: Please follow the Ruby setup instructions on the client libraries page and then visit the AutoML Vision reference documentation for Ruby.
Update a model's node number
Once you have a trained deployed model you can update the number of nodes the model is deployed on to respond to your specific amount of traffic. For example, if you experience a higher amount of queries per second (QPS) than expected you can adjust the deployed node number to handle this traffic.
You can change this node number without first having to undeploy the model. Updating deployment changes the node number without interrupting your served prediction traffic.
Web UI
In the Vision Dashboard select the Models tab in the left navigation bar to display the available models.
To view the models for a different project, select the project from the drop-down list in the upper right of the title bar.
- Select your trained model that you have deployed.
- Select the Test & Use tab just below the title bar.
-
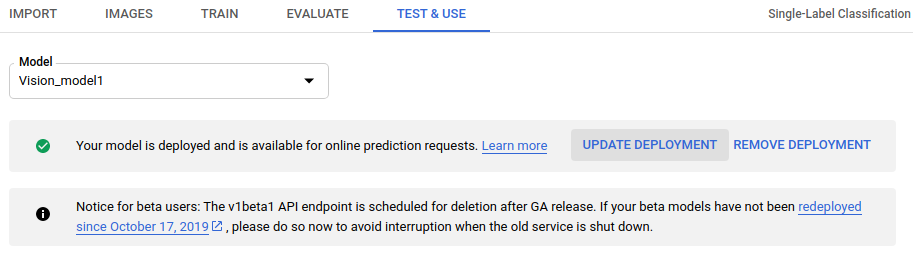
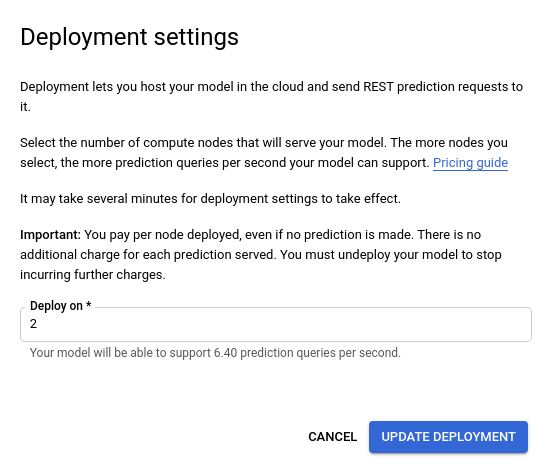
A message is displayed in a box at the top of the page that says "Your model is deployed and is available for online prediction requests". Select the Update deployment option to the side of this text.
- In the Update deployment window that opens select the new node number
to deploy your model on from the list. Node numbers display their estimated
prediction queries per second (QPS).
After selecting a new node number from the list select Update deployment to update the node number the model is deployed on.
- You will be returned to the Test & Use window where you see the text
box now displaying "Deploying model...".
After your model has successfully deployed on the new node number you will receive an email at the address associated with your project.
REST
The same method you use to deploy a model initially is also used to change the deployed model's node number.Before using any of the request data, make the following replacements:
- project-id: your GCP project ID.
- model-id: the ID of your model, from the
response when you created the model. The ID is the last element of the name of your model.
For example:
- model name:
projects/project-id/locations/location-id/models/IOD4412217016962778756 - model id:
IOD4412217016962778756
- model name:
Field considerations:
nodeCount- The number of nodes to deploy the model on. The value must be between 1 and 100, inclusive on both ends. A node is an abstraction of a machine resource, which can handle online prediction queries per second (QPS) as given in the model'sqps_per_node.
HTTP method and URL:
POST https://automl.googleapis.com/v1/projects/PROJECT_ID/locations/us-central1/models/MODEL_ID:deploy
Request JSON body:
{
  "imageClassificationModelDeploymentMetadata": {
    "nodeCount": 2
  }
}
To send your request, choose one of these options:
curl
Save the request body in a file named request.json,
and execute the following command:
curl -X POST \
     -H "Authorization: Bearer $(gcloud auth print-access-token)" \
     -H "x-goog-user-project: project-id" \
     -H "Content-Type: application/json; charset=utf-8" \
     -d @request.json \
     "https://automl.googleapis.com/v1/projects/PROJECT_ID/locations/us-central1/models/MODEL_ID:deploy"
PowerShell
Save the request body in a file named request.json,
and execute the following command:
$cred = gcloud auth print-access-token
$headers = @{ "Authorization" = "Bearer $cred"; "x-goog-user-project" = "project-id" }

Invoke-WebRequest `
    -Method POST `
    -Headers $headers `
    -ContentType: "application/json; charset=utf-8" `
    -InFile request.json `
    -Uri "https://automl.googleapis.com/v1/projects/PROJECT_ID/locations/us-central1/models/MODEL_ID:deploy" | Select-Object -Expand Content
You should see output similar to the following. You can use the operation ID to get the status of the task. For an example, see Working with long-running operations
{
  "name": "projects/PROJECT_ID/locations/us-central1/operations/OPERATION_ID",
  "metadata": {
    "@type": "type.googleapis.com/google.cloud.automl.v1.OperationMetadata",
    "createTime": "2019-08-07T22:00:20.692109Z",
    "updateTime": "2019-08-07T22:00:20.692109Z",
    "deployModelDetails": {}
  }
}
You can get the status of an operation with the following HTTP method and URL:
GET https://automl.googleapis.com/v1/projects/PROJECT_ID/locations/us-central1/operations/OPERATION_ID
The status of a finished operation will look similar to the following:
{
  "name": "projects/PROJECT_ID/locations/us-central1/operations/OPERATION_ID",
  "metadata": {
    "@type": "type.googleapis.com/google.cloud.automl.v1.OperationMetadata",
    "createTime": "2019-06-21T16:47:21.704674Z",
    "updateTime": "2019-06-21T17:01:00.802505Z",
    "deployModelDetails": {}
  },
  "done": true,
  "response": {
    "@type": "type.googleapis.com/google.protobuf.Empty"
  }
}
Go
Before trying this sample, follow the setup instructions for this language on the Client Libraries page.
Java
Before trying this sample, follow the setup instructions for this language on the Client Libraries page.
Node.js
Before trying this sample, follow the setup instructions for this language on the Client Libraries page.
Python
Before trying this sample, follow the setup instructions for this language on the Client Libraries page.
Additional languages
C#: Please follow the C# setup instructions on the client libraries page and then visit the AutoML Vision reference documentation for .NET.
PHP: Please follow the PHP setup instructions on the client libraries page and then visit the AutoML Vision reference documentation for PHP.
Ruby: Please follow the Ruby setup instructions on the client libraries page and then visit the AutoML Vision reference documentation for Ruby.