En esta página, se muestra cómo crear una app y combinar componentes, como flujos de entrada, modelos de análisis y almacenes de datos, para usarlos en la plataforma de apps de Vertex AI Vision.
Para compilar una app, debes tener en cuenta tus fuentes de datos, el análisis que deseas realizar y cómo quieres almacenar los resultados. Una app integral puede tener diferentes formas según tu caso de uso. Por lo tanto, la forma en que compiles una app dependerá de tu objetivo.
Antes de comenzar, evalúa tu caso de uso y tu objetivo desde una perspectiva de la IA responsable, y considera el impacto que tus modelos y aplicaciones podrían tener en tus usuarios finales si las cosas salen mal. Obtén más información sobre los primeros pasos para evaluar tu caso de uso en cuanto a la equidad. También asegúrate de que tu uso de Vertex AI Vision cumpla con las Condiciones del Servicio o una variante sin conexión de Google Cloud, y con las Condiciones de URL incorporadas, como la Política de Uso Aceptable de Google Cloud.
A medida que creas tu aplicación, ten en cuenta que las tecnologías de visión por IA pueden reforzar o introducir sesgos injustos, y afectar los derechos humanos fundamentales. El desarrollo de tu aplicación debe incluir una reflexión ética basada en los valores de tu empresa y una diligencia debida legal para tu caso de uso particular, incluidos los casos de uso de alto riesgo. Al igual que con todas las tecnologías, debes tener en cuenta todas las leyes y reglamentaciones aplicables que rigen el uso de las tecnologías de IA/AA en la región en la que implementas la tecnología. Los clientes son responsables de la diligencia debida necesaria para implementar casos de uso que se consideran de alto riesgo en una región en particular.
Crear una nueva aplicación
Antes de agregar componentes, como un flujo o modelos, a una app, debes crear la app. Todas las apps deben contener lo siguiente para poder implementarse:
- Es un nodo de entrada de transmisión (fuente de datos).
- Al menos otro nodo de componente, como un modelo o un almacén de datos
Crea una nueva aplicación personalizada
Console
Crea una app en la consola de Google Cloud .
Abre la pestaña Aplicaciones del panel de Vertex AI Vision.
Haz clic en el botón Crear.
Ingresa el nombre de una app y elige tu región. Regiones admitidas.
Haz clic en Crear.
Crea una aplicación con una plantilla
Console
Crea una app en la consola de Google Cloud .
Abre la pestaña Aplicaciones del panel de Vertex AI Vision.
Haz clic en el botón Crear.
Ingresa el nombre de una app y elige tu región. Regiones admitidas.
Haz clic en Crear.
En la página del compilador de aplicaciones, haz clic en el nodo Plantilla de aplicación.
En el panel de configuración lateral, haz clic en el botón Seleccionar modelo.
Selecciona un modelo en el menú desplegable.
Cómo agregar una entrada de transmisión
Una aplicación debe contener un nodo de transmisión de video por Internet. No podrás implementar la aplicación si no agregas un nodo de Streams.
Si tu aplicación no está implementada, la actualización de la entrada de transmisión se aplicará automáticamente a la aplicación. Si tu app ya está implementada, debes anular su implementación y actualizarla para que se apliquen los cambios. Consulta la sección actualiza una app para obtener más detalles.
Console
Agrega una transmisión a una app en la consola de Google Cloud .
Abre la pestaña Aplicaciones del panel de Vertex AI Vision.
Haz clic en Ver app para ver tu app.
En la lista lateral de componentes, elige Transmisiones de video en la lista de Conectores. El nodo de transmisión se agrega al gráfico de la app y se abre un menú lateral de transmisiones de video.
Selecciona Agregar transmisiones de video.
Si eliges Seleccionar de transmisiones existentes, selecciona la transmisión existente y, luego, Agregar transmisiones.
Si eliges Registrar transmisiones nuevas, agrega un nombre para la transmisión nueva y selecciona Agregar transmisiones.
REST
Para agregar una transmisión a una app, envía una solicitud POST con el método projects.locations.applications.addStreamInput.
Antes de usar cualquiera de los datos de solicitud a continuación, realiza los siguientes reemplazos:
- PROJECT: Tu Google Cloud ID del proyecto o número de proyecto.
- LOCATION_ID: La región en la que usas Vertex AI Vision. Por ejemplo:
us-central1,europe-west4. Consulta las regiones disponibles. - APPLICATION_ID: Es el ID de tu aplicación de destino.
- STREAM_ID: Es el ID de la transmisión de destino.
Método HTTP y URL:
POST https://visionai.googleapis.com/v1/projects/PROJECT/locations/LOCATION_ID/applications/APPLICATION_ID:addStreamInput
Cuerpo JSON de la solicitud:
{
  "applicationStreamInputs": [
     {
       "streamWithAnnotation": {
         "stream": "projects/PROJECT/locations/LOCATION_ID/clusters/application-cluster-0/streams/STREAM_ID"
       }
     },
     {
       "streamWithAnnotation": {
         "stream": "projects/PROJECT/locations/LOCATION_ID/clusters/application-cluster-0/streams/STREAM_ID"
       }
     }
   ]
}
Para enviar tu solicitud, elige una de estas opciones:
curl
Guarda el cuerpo de la solicitud en un archivo llamado request.json y ejecuta el siguiente comando:
curl -X POST \
     -H "Authorization: Bearer $(gcloud auth print-access-token)" \
     -H "Content-Type: application/json; charset=utf-8" \
     -d @request.json \
     "https://visionai.googleapis.com/v1/projects/PROJECT/locations/LOCATION_ID/applications/APPLICATION_ID:addStreamInput"
PowerShell
Guarda el cuerpo de la solicitud en un archivo llamado request.json y ejecuta el siguiente comando:
$cred = gcloud auth print-access-token
$headers = @{ "Authorization" = "Bearer $cred" }

Invoke-WebRequest `
    -Method POST `
    -Headers $headers `
    -ContentType: "application/json; charset=utf-8" `
    -InFile request.json `
    -Uri "https://visionai.googleapis.com/v1/projects/PROJECT/locations/LOCATION_ID/applications/APPLICATION_ID:addStreamInput" | Select-Object -Expand Content
Deberías recibir un código de estado exitoso (2xx) y una respuesta vacía.
Cómo agregar entrada de transmisión con anotaciones de nodos
Cuando creas un flujo de entrada de la aplicación, puedes agregar anotaciones al flujo con la API de Vertex AI Vision. También puedes agregar anotaciones a un nodo en la consola deGoogle Cloud .
Console
En el siguiente ejemplo, se agregan anotaciones disponibles (STREAM_ANNOTATION_TYPE_ACTIVE_ZONE y STREAM_ANNOTATION_TYPE_CROSSING_LINE) a un modelo de recuento de ocupación.
Abre la pestaña Aplicaciones del panel de Vertex AI Vision.
Selecciona Ver app junto al nombre de tu aplicación en la lista.
En la página del creador de aplicaciones, selecciona el modelo con entrada de transmisión al que deseas agregar anotaciones.
En el panel lateral de configuración del modelo, expande la sección "Configuración avanzada". Después de expandir la sección, haz clic en el botón Crear zonas o líneas activas.
En la vista de galería de transmisiones, selecciona una transmisión de entrada para dibujar zonas o líneas activas.
En la vista del editor, elige add multi-point lines o add simple polygon para agregar anotaciones. Usa el panel lateral para cambiar el nombre de la zona o la línea, borrar zonas o líneas existentes, o cambiar la dirección de la línea.
LÍNEA DE REST Y CMD
El siguiente código agrega anotaciones de transmisión.
Antes de usar cualquiera de los datos de solicitud a continuación, realiza los siguientes reemplazos:
- PROJECT: Tu Google Cloud ID del proyecto o número de proyecto.
- LOCATION_ID: La región en la que usas Vertex AI Vision. Por ejemplo:
us-central1,europe-west4. Consulta las regiones disponibles. - APPLICATION_ID: Es el ID de tu aplicación de destino.
- STREAM_ID: Es el ID de la transmisión de destino.
- NODE_NAME: Es el nombre del nodo de destino del gráfico de la app. Por ejemplo:
builtin-occupancy-count - ANNOTATION_ID: Es el ID de la anotación de destino.
- ANNOTATION_DISPLAYNAME: Es el nombre visible especificado por el usuario de la anotación de destino.
- ANNOTATION_TYPE: Uno de los valores de enumeración disponibles. Este tipo debe coincidir con el objeto
annotation_payload, ya seaactiveZoneocrossingLine. Los valores disponibles son los siguientes:STREAM_ANNOTATION_TYPE_UNSPECIFIEDSTREAM_ANNOTATION_TYPE_ACTIVE_ZONESTREAM_ANNOTATION_TYPE_CROSSING_LINE
normalizedVertices: Cada vértice se especifica mediante valores de coordenadas X e Y. Las coordenadas son valores de punto flotante normalizados [0,1] en relación con la imagen original; 0.0 es X_MIN o Y_MIN, 1.0 es X_MAX o Y_MAX.
Método HTTP y URL:
POST https://visionai.googleapis.com/v1/projects/PROJECT/locations/LOCATION_ID/applications/APPLICATION_ID:addStreamInput
Cuerpo JSON de la solicitud:
{
  "applicationStreamInputs": [
    {
      "streamWithAnnotation": {
        "stream": "projects/PROJECT/locations/LOCATION_ID/clusters/application-cluster-0/streams/STREAM_ID",
        "nodeAnnotations": [
          {
            "node": "NODE_NAME",
            "annotations": [
              {
                "id": "ANNOTATION_ID",
                "displayName": "ANNOTATION_DISPLAYNAME",
                "sourceStream": "projects/PROJECT/locations/LOCATION_ID/clusters/application-cluster-0/streams/STREAM_ID",
                "type": ANNOTATION_TYPE,
                "activeZone": {
                  "normalizedVertices": {
                    "x": 0.07434944,
                    "y": 0.18061674
                  },
                  "normalizedVertices": {
                    "x": 0.64684016,
                    "y": 0.16079295
                  },
                  "normalizedVertices": {
                    "x": 0.6047088,
                    "y": 0.92070484
                  },
                  "normalizedVertices": {
                    "x": 0.1251549,
                    "y": 0.76651984
                  }
                }
              }
            ]
          }
        ]
      }
    }
  ]
}
Para enviar tu solicitud, elige una de estas opciones:
curl
Guarda el cuerpo de la solicitud en un archivo llamado request.json y ejecuta el siguiente comando:
curl -X POST \
     -H "Authorization: Bearer $(gcloud auth print-access-token)" \
     -H "Content-Type: application/json; charset=utf-8" \
     -d @request.json \
     "https://visionai.googleapis.com/v1/projects/PROJECT/locations/LOCATION_ID/applications/APPLICATION_ID:addStreamInput"
PowerShell
Guarda el cuerpo de la solicitud en un archivo llamado request.json y ejecuta el siguiente comando:
$cred = gcloud auth print-access-token
$headers = @{ "Authorization" = "Bearer $cred" }

Invoke-WebRequest `
    -Method POST `
    -Headers $headers `
    -ContentType: "application/json; charset=utf-8" `
    -InFile request.json `
    -Uri "https://visionai.googleapis.com/v1/projects/PROJECT/locations/LOCATION_ID/applications/APPLICATION_ID:addStreamInput" | Select-Object -Expand Content
Deberías recibir un código de estado exitoso (2xx) y una respuesta vacía.
Cómo quitar la entrada de la transmisión
REST
Para quitar una transmisión de una app, envía una solicitud POST con el método projects.locations.applications.removeStreamInput.
Antes de usar cualquiera de los datos de solicitud a continuación, realiza los siguientes reemplazos:
- PROJECT: Tu Google Cloud ID del proyecto o número de proyecto.
- LOCATION_ID: La región en la que usas Vertex AI Vision. Por ejemplo:
us-central1,europe-west4. Consulta las regiones disponibles. - APPLICATION_ID: Es el ID de tu aplicación de destino.
- STREAM_ID: Es el ID de la transmisión de destino.
Método HTTP y URL:
POST https://visionai.googleapis.com/v1/projects/PROJECT/locations/LOCATION_ID/applications/APPLICATION_ID:removeStreamInput
Cuerpo JSON de la solicitud:
{
  "targetStreamInputs": [
     {
       "stream": "projects/PROJECT/locations/LOCATION_ID/clusters/application-cluster-0/streams/STREAM_ID"
     },
     {
       "stream": "projects/PROJECT/locations/LOCATION_ID/clusters/application-cluster-0/streams/STREAM_ID"
     }
   ]
}
Para enviar tu solicitud, elige una de estas opciones:
curl
Guarda el cuerpo de la solicitud en un archivo llamado request.json y ejecuta el siguiente comando:
curl -X POST \
     -H "Authorization: Bearer $(gcloud auth print-access-token)" \
     -H "Content-Type: application/json; charset=utf-8" \
     -d @request.json \
     "https://visionai.googleapis.com/v1/projects/PROJECT/locations/LOCATION_ID/applications/APPLICATION_ID:removeStreamInput"
PowerShell
Guarda el cuerpo de la solicitud en un archivo llamado request.json y ejecuta el siguiente comando:
$cred = gcloud auth print-access-token
$headers = @{ "Authorization" = "Bearer $cred" }

Invoke-WebRequest `
    -Method POST `
    -Headers $headers `
    -ContentType: "application/json; charset=utf-8" `
    -InFile request.json `
    -Uri "https://visionai.googleapis.com/v1/projects/PROJECT/locations/LOCATION_ID/applications/APPLICATION_ID:removeStreamInput" | Select-Object -Expand Content
Deberías recibir un código de estado exitoso (2xx) y una respuesta vacía.
Agrega un modelo previamente entrenado de Vertex AI Vision
Después de crear una app, puedes agregar un modelo y conectarlo a transmisiones, otros modelos o un almacén de contenido multimedia.
Existen dos tipos de modelos: modelos previamente entrenados y modelos entrenados por el usuario. Del mismo modo, los modelos entrenados por el usuario también pueden ser de dos tipos: AutoML o entrenamiento personalizado:
- Los modelos previamente entrenados cumplen un objetivo específico, se entrenan con datos generalizados y están listos para usarse.
- Los modelos de AutoML entrenados por el usuario o los modelos entrenados de forma personalizada requieren que identifiques y proporciones datos de muestra, y, luego, que entrenes modelos más adecuados para tu caso de uso único. Estos modelos se entrenan con Vertex AI, un producto que ofrece dos opciones de entrenamiento: modelos entrenados con AutoML y modelos entrenados de forma personalizada. Consulta Elige un método de entrenamiento para obtener más información.
Sigue estas instrucciones para agregar un modelo previamente entrenado de Vertex AI Vision a tu gráfico de la app.
Console
Abre la pestaña Aplicaciones del panel de Vertex AI Vision.
Selecciona Ver app junto al nombre de tu aplicación en la lista.
En la página del creador de aplicaciones, selecciona el modelo que deseas agregar de la lista Modelos de IA. Cada modelo tiene parámetros de configuración individuales.
Para conectar este modelo a un nodo de fuente de entrada, selecciona el nodo de fuente y, luego, Agregar salida.
Selecciona el nodo del modelo de IA recién creado en la lista de Nodos disponibles.
Agrega un modelo de Vertex AI entrenado por el usuario
Después de crear una app, puedes agregar un modelo y conectarlo a transmisiones, otros modelos o un almacén de contenido multimedia.
Existen dos tipos de modelos: modelos previamente entrenados y modelos entrenados por el usuario. Del mismo modo, los modelos entrenados por el usuario también pueden ser de dos tipos: AutoML o entrenamiento personalizado:
- Los modelos previamente entrenados cumplen un objetivo específico, se entrenan con datos generalizados y están listos para usarse.
- Los modelos de AutoML entrenados por el usuario o los modelos entrenados de forma personalizada requieren que identifiques y proporciones datos de muestra, y, luego, que entrenes modelos más adecuados para tu caso de uso único. Estos modelos se entrenan con Vertex AI, un producto que ofrece dos opciones de entrenamiento: modelos entrenados con AutoML y modelos entrenados de forma personalizada. Consulta Elige un método de entrenamiento para obtener más información.
Agrega un modelo de transmisión de detección de objetos de AutoML de Vertex AI
Sigue estas instrucciones para agregar a tu gráfico de la app un modelo de transmisión de detección de objetos de AutoML de Vertex AI que entrenes.
Antes de entrenar un modelo de AutoML de Vertex AI, debes preparar tus datos de detección de objetos y crear un conjunto de datos.
Entrena un modelo para usarlo en Vertex AI Vision
Después de crear un conjunto de datos con una colección representativa de datos en Vertex AI, puedes entrenar un modelo para usarlo en Vertex AI Vision.
Console
En la consola de Google Cloud , en el panel de Vertex AI, ve a la página Conjuntos de datos.
Haz clic en el nombre del conjunto de datos que deseas usar para entrenar tu modelo a fin de abrir su página de detalles.
Si tu tipo de datos usa conjuntos de anotaciones, selecciona el conjunto de anotaciones que deseas usar para este modelo.
Haga clic en Entrenar un modelo nuevo.
En la página Entrena un modelo nuevo, completa los siguientes pasos para tu modelo de detección de objetos en imágenes de AutoML:
En la sección Método de entrenamiento del modelo, elige AutoML.
En la sección Elige dónde usar el modelo, selecciona Vertex AI Vision.
Haz clic en Continuar.
Completa los valores de las secciones Detalles del modelo, Opciones de entrenamiento y Procesamiento y precios. Consulta Entrena un modelo de AutoML (consola deGoogle Cloud ) para obtener información más detallada.
Haz clic en Comenzar entrenamiento.
El entrenamiento de modelos puede tardar muchas horas, según el tamaño y la complejidad de tus datos y tu presupuesto de entrenamiento, si especificaste uno. Puedes cerrar esta pestaña y regresar a ella más tarde. Recibirás un correo electrónico cuando tu modelo haya finalizado el entrenamiento.
Agrega el modelo entrenado a tu app
Una vez que finalice el entrenamiento del modelo, podrás agregarlo a tu app de Vertex AI Vision.
Console
Abre la pestaña Aplicaciones del panel de Vertex AI Vision.
Selecciona Ver app junto al nombre de tu aplicación en la lista.
En la página del compilador de aplicaciones, selecciona Agregar modelo de Vertex AI en la lista de componentes laterales. Si seleccionas esta opción, se abrirá un menú lateral.
En el menú Add Vertex AI Model, deja seleccionada la opción Import a trained model from Vertex AI y, luego, elige el modelo de la lista de modelos existentes de AutoML de Vertex AI.
Después de elegir el modelo que deseas importar, selecciona Agregar modelo.
Después de hacer clic en el botón Agregar modelo, aparecerá un modelo pendiente en el costado de la página del generador de gráficos. Después de unos segundos, el modelo estará listo para usarse.
Agrega un modelo personalizado de Vertex AI
También puedes importar modelos entrenados personalizados de Vertex AI en Vertex AI Vision para usarlos en el análisis de datos. Estos modelos entrenados de forma personalizada deben tener las siguientes propiedades:
- El modelo debe ser sin estado, ya que la entrada del modelo son las imágenes que provienen de diferentes instancias de la aplicación (transmisiones) y podrían estar desordenadas. Si necesitas un procesamiento de transmisión con estado, es posible que debas mantener los estados dentro de tu propio contenedor.
- El tamaño de entrada de tu modelo se limita a 1.5 MB. Por lo tanto, Vertex AI Vision debe comprimir la imagen RGB original en un formato con pérdida, como JPG.
Usa las siguientes instrucciones para agregar a tu gráfico de la app un modelo de video existente entrenado de forma personalizada con Vertex AI.
Para obtener información sobre cómo crear un modelo entrenado de forma personalizada con un contenedor personalizado de Vertex AI, consulta Usa un contenedor personalizado para la predicción.
Cómo especificar un archivo YAML de instancias
Cuando agregas un modelo entrenado de forma personalizada de Vertex AI, debes especificar un archivo YAML de instancias (instances.yaml) almacenado en Cloud Storage. Este archivo especifica la entrada esperada para el contenedor del modelo.
Vertex AI envía la solicitud de predicción en un formato:
{
  "instances": [
    <value>|<simple/nested list>|<object>,
    ...
  ]
}
Aquí, instances.yaml define el esquema de la carga útil. Para obtener más información, consulta Obtén predicciones en línea de los modelos con entrenamiento personalizado.
Vertex AI Vision solo admite modelos personalizados con entrenamiento que tengan exactamente una entrada de predicción con nombre. Este tipo de entrada debe ser una cadena JPEG codificada. El esquema de la entrada de predicción se debe especificar con el archivo YAML del esquema de instancias. Este archivo YAML de esquema debe tener el formato de un objeto de esquema de OpenAPI.
Por ejemplo, el siguiente esquema recibirá la solicitud con la imagen codificada en un campo llamado image_bytes:
properties:
  image_bytes:
    type: string
Tu modelo personalizado recibe la entrada de predicción en el siguiente formato:
{
  "instances": [
    {
      "image_bytes" : {
        "b64": "BASE64_ENCODED_IMAGE_BYTES"
      }
    }
  ]
}
Antes de importar el modelo a Vertex AI Vision, verifica que funcione correctamente con esta entrada.
Cómo especificar un archivo YAML de predicciones
Cuando agregas un modelo entrenado de forma personalizada de Vertex AI, puedes especificar un archivo YAML de predicciones (predictions.yaml) almacenado en Cloud Storage. Este archivo especifica la salida del contenedor del modelo.
Este archivo es opcional, pero se recomienda para informar a Vertex AI Vision sobre la estructura de salida de tu modelo. Por ejemplo, el siguiente archivo classification_1.0.0.yaml describe la información de salida del modelo para un modelo de clasificación de imágenes:
title: Classification
type: object
description: >
  The predicted AnnotationSpecs.
properties:
  ids:
    type: array
    description: >
      The resource IDs of the AnnotationSpecs that had been identified.
    items:
      type: integer
      format: int64
      enum: [0]  # As values of this enum all AnnotationSpec IDs the Model
      # was trained on will be populated.
  displayNames:
    type: array
    description: >
      The display names of the AnnotationSpecs that had been identified,
      order matches the IDs.
    items:
      type: string
      enum: [""]  # As values of this enum all AnnotationSpec display_names
      # the Model was trained on will be populated.
  confidences:
    type: array
    description: >
      The Model's confidences in correctness of the predicted IDs, higher
      value means higher confidence. Order matches the Ids.
    items:
      type: number
      format: float
      minimum: 0.0
      maximum: 1.0
Agrega el modelo entrenado de forma personalizada
Usa el siguiente ejemplo para agregar el modelo entrenado de forma personalizada de Vertex AI a tu app.
Console
Abre la pestaña Aplicaciones del panel de Vertex AI Vision.
Selecciona Ver app junto al nombre de tu aplicación en la lista.
En la página del compilador de aplicaciones, selecciona Agregar modelo de Vertex AI en la lista de componentes laterales. Si seleccionas esta opción, se abrirá un menú lateral.
En el menú Add Vertex AI Model, deja seleccionada la opción Import a trained model from Vertex AI y, luego, elige el modelo de la lista de modelos existentes de AutoML de Vertex AI.
Proporciona un nombre para el modelo.
Especifica el archivo YAML de instancias en Cloud Storage que define el formato de una sola instancia que se usa en las solicitudes de predicción y explicación.
Opcional: Especifica el archivo YAML del esquema de predicciones en Cloud Storage que define el formato de una sola predicción o explicación.
Después de proporcionar el nombre del modelo, las instancias y la información de las predicciones, selecciona Agregar modelo.
Después de hacer clic en el botón Agregar modelo, aparecerá un modelo pendiente en el costado de la página del generador de gráficos. Después de unos segundos, el modelo estará listo para usarse.
Opcional. Adjunta metadatos de la aplicación
Además de los bytes de la imagen, tienes la opción de configurar attach_application_metadata para pedirle a la plataforma de apps de Vertex AI Vision que incluya los metadatos de la aplicación que se enviarán al contenedor personalizado.
Los metadatos tienen el siguiente esquema:
'appPlatformMetadata': {
     'application': STRING;
     'instanceId': STRING;
     'node': STRING;
     'processor': STRING;
   }
Opcional. Agrega un tema de Pub/Sub de configuración dinámica
Para controlar de forma dinámica la frecuencia de fotogramas con la que el operador personalizado de Vertex envía fotogramas de video a los contenedores personalizados de Vertex, puedes crear un tema de Pub/Sub. Agrégalo a la sección Dynamic Configuration de la configuración del nodo.

Si el tema de Pub/Sub está configurado, la velocidad de fotogramas inicial es 0. Durante el procesamiento de video, puedes enviar mensajes de Pub/Sub al tema de Pub/Sub en el siguiente formato en tiempo real para cambiar la velocidad de fotogramas:
{
  "stream_id": "input-stream-id",
  "fps": 5,
}
El campo stream_id debe coincidir con el ID de la transmisión de entrada de la aplicación.
Cuenta de servicio y permisos
La credencial de servicio predeterminada del contenedor personalizado se configuró en la cuenta de servicio propiedad de Google de la plataforma de la app de Vertex AI Vision.
Para acceder a otros servicios de Google Clouddesde el contenedor, otorga el permiso adecuado a los siguientes elementos:
service-<var>PROJECT_NUMBER</var>@gcp-sa-visionai.iam.gserviceaccount.com
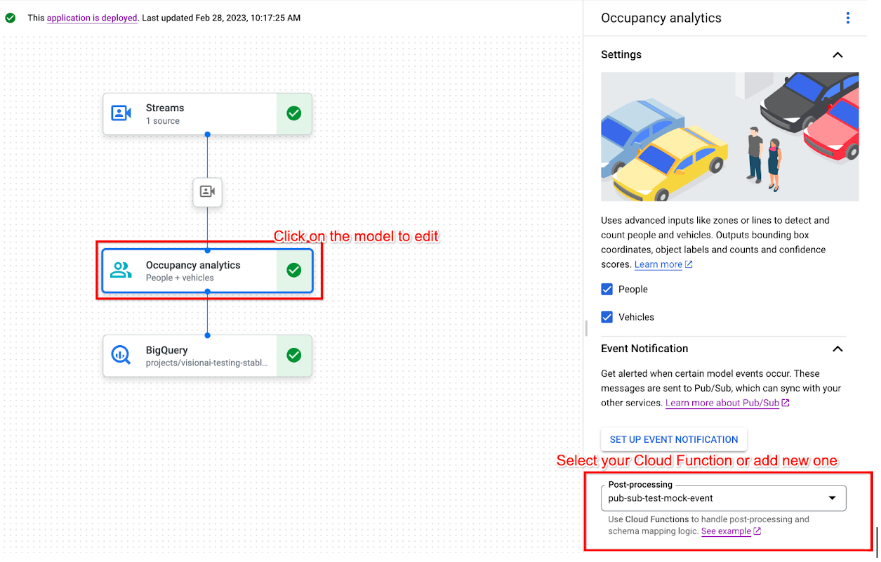
Opcional. Notificación de eventos del modelo con Cloud Run Functions y Pub/Sub
En Vertex AI Vision, los modelos reciben datos multimedia de dispositivos como cámaras, ejecutan predicciones de IA sobre los datos y producen anotaciones de forma continua. Con frecuencia, envías esos datos procesados a un destino de datos ("receptor de datos"), como un almacén de medios o BigQuery, para realizar más trabajos de análisis. Sin embargo, es posible que tengas un caso en el que algunas anotaciones deban controlarse de manera diferente o en el que las necesidades de anotación sean urgentes. Las integraciones con Cloud Run Functions y Pub/Sub te ayudan a satisfacer estas necesidades.
Modelos compatibles
Los siguientes modelos ofrecen integraciones de generación de eventos de Cloud Run Functions y notificaciones de eventos de Pub/Sub:
- Modelo de análisis de ocupación
- Modelos de entrenamiento personalizado de Vertex AI
Configura funciones de Cloud Run para procesar el resultado del modelo
Para activar notificaciones basadas en eventos, primero debes configurar Cloud Run Functions para procesar el resultado del modelo y generar eventos.
Tu función de Cloud Run se conecta al modelo y escucha su salida como acción de procesamiento posterior. La función de Cloud Run Functions debe devolver un AppPlatformCloudFunctionResponse. Los eventos (appplatformeventbody) se envían al tema de Pub/Sub que configures en el siguiente paso.
Para ver una muestra de Cloud Run Function, consulta Habilita la notificación de eventos del modelo con Cloud Functions y Pub/Sub.
Sigue estas instrucciones para enviar el flujo de salida del modelo a tu función de Cloud Run:
Console
Abre la pestaña Aplicaciones del panel de Vertex AI Vision.
Selecciona Ver app junto al nombre de tu aplicación en la lista.
Haz clic en el modelo compatible para abrir el panel lateral de detalles del modelo.
En la lista post-processing de la sección Event notification, selecciona tu función de Cloud Run existente o crea una nueva.
Habilita las notificaciones de eventos del modelo con Pub/Sub
Después de configurar las funciones de Cloud Run para procesar el resultado del modelo y generar eventos, puedes configurar la notificación de eventos con Pub/Sub. Para leer mensajes de un tema, también debes elegir y crear una suscripción a Pub/Sub.
Console
Abre la pestaña Aplicaciones del panel de Vertex AI Vision.
Selecciona Ver app junto al nombre de tu aplicación en la lista.
Haz clic en el modelo compatible para abrir el panel lateral de detalles del modelo.
En la sección Notificación de eventos, selecciona Configurar la notificación de eventos.
En la ventana de opciones Configura Pub/Sub para las notificaciones de eventos que se abre, elige tu tema de Pub/Sub existente o crea uno nuevo.
En el campo Frecuencia, establece un valor entero para la frecuencia en segundos con la que se puede enviar una notificación para el mismo tipo de evento.
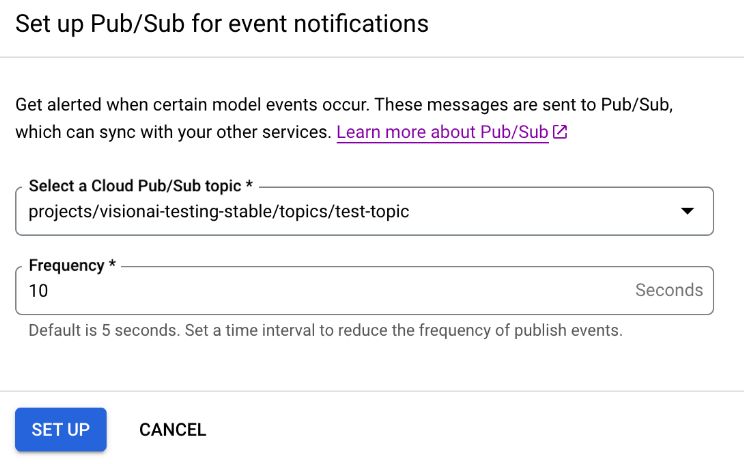
Haz clic en Configurar.
Conecta el resultado del modelo con un nodo posterior
Después de crear un nodo de modelo, puedes conectar su salida a otro nodo.
Console
Abre la pestaña Aplicaciones del panel de Vertex AI Vision.
Selecciona Ver app junto al nombre de tu aplicación en la lista.
Haz clic en un nodo del modelo que genere datos en el compilador de gráficos de la aplicación (por ejemplo, el nodo del modelo Recuento de ocupación).
En el panel de configuración lateral, haz clic en el botón Agregar salida.
Agrega una salida nueva y elige un nuevo nodo de salida para agregar, o bien selecciona un Nodo disponible existente para enviar la salida.
Conecta la salida a un destino de datos
Después de crear el flujo de transferencia de datos y agregar los nodos de procesamiento a tu app, debes elegir dónde enviar los datos procesados. Este destino de datos es el punto final del gráfico de tu app que acepta datos de transmisión sin producir ningún dato de transmisión. El destino que elijas dependerá de cómo uses los datos de salida de la app.
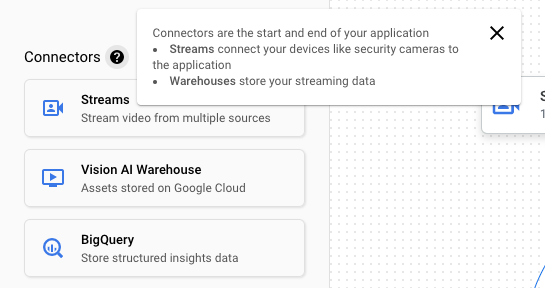
Puedes conectar los datos de salida de la app a los siguientes destinos de datos:
Vision Warehouse: Almacena datos de video originales o analizados que puedes ver y consultar.
Para obtener más información sobre cómo enviar datos de salida de la app a un almacén de Vision, consulta Conecta y almacena datos en un almacén.
BigQuery: Almacena datos en BigQuery para usar sus capacidades de análisis sin conexión.
Para obtener más información sobre cómo enviar datos de salida de la app a BigQuery, consulta Conecta y almacena datos en BigQuery.
Datos de la transmisión en vivo: Si deseas tener un control más detallado para actuar en función de las estadísticas en tiempo real, puedes recibir el resultado en vivo de tu app.
Para obtener más información sobre la transmisión directa de datos de salida de la app, consulta Cómo habilitar la salida de transmisión en vivo.
Actualiza una app
Apps sin implementar
Realiza las modificaciones que desees en la app (por ejemplo, agregar o quitar nodos de componentes). Vertex AI Vision almacenará los cambios automáticamente.
¿Qué sigue?
- Aprende a implementar tu app para transferir y analizar datos en Implementa una aplicación.
- Lee las instrucciones sobre cómo comenzar la transferencia de datos desde el flujo de entrada de una app en Crea y administra flujos.
- Obtén información para enumerar apps y ver las instancias de una app implementada en Administración de aplicaciones.
- Obtén información para leer los datos de entrada de la app desde un flujo de transferencia o los datos de salida del modelo analizado en Cómo leer datos de transmisión.