管理模型

使用您提供的准备好的数据集训练模型。AutoML Video Intelligence 分类使用您数据集中的训练项来训练、测试和评估模型的性能。evaluate接着,您可以查看结果、根据需要调整训练数据集,并使用改进的数据集训练新模型。

训练模型可能需要几个小时才能完成。借助 AutoML API,您可以检查训练的状态。

您每次开始训练时,AutoML Video Intelligence 分类都会创建新模型,因此您的项目可能包含很多模型。您可以获取项目中模型的列表,也可以删除不再需要的模型

模型的最长使用期限为两年。该时间期限过后,您必须创建并训练新模型,才能继续对内容进行分类。

使用 curl 或 PowerShell

为了更方便地在本主题中运行 curl(或 PowerShell)示例,请设置以下环境变量。将 project-id 替换为您的 Google Cloud 项目的名称。

export PROJECT_ID="project-id"

训练模型

如果您拥有一个包含一组固定训练项的数据集,您就可以创建并训练模型了。

网页界面

  1. 打开 AutoML Video 界面,导航到数据集页面。
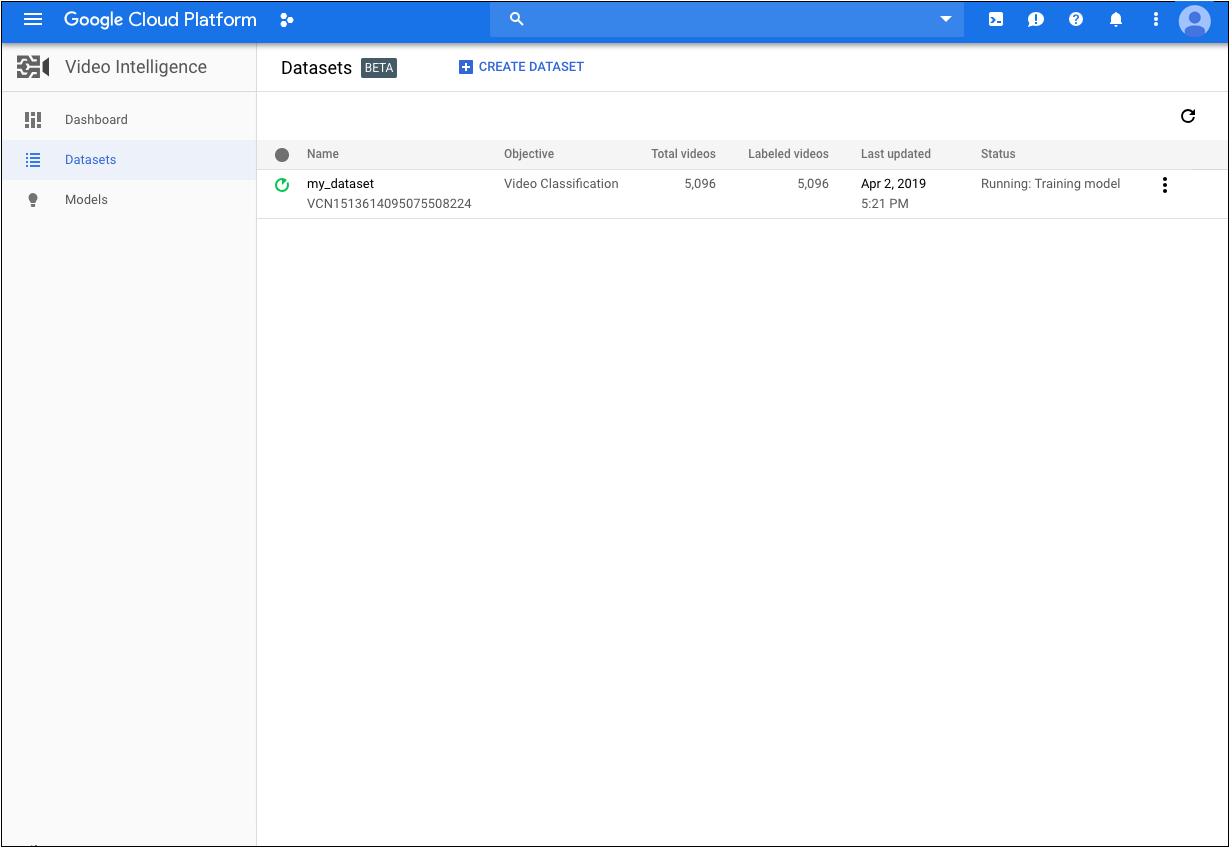
    Google Cloud 控制台中的“数据集”页面
  2. 选择要用于训练模型的数据集。

    所选数据集的显示名会显示在标题栏中,该页面还会列出数据集中的各个训练项及其标签。

    显示两个视频的“视频”标签
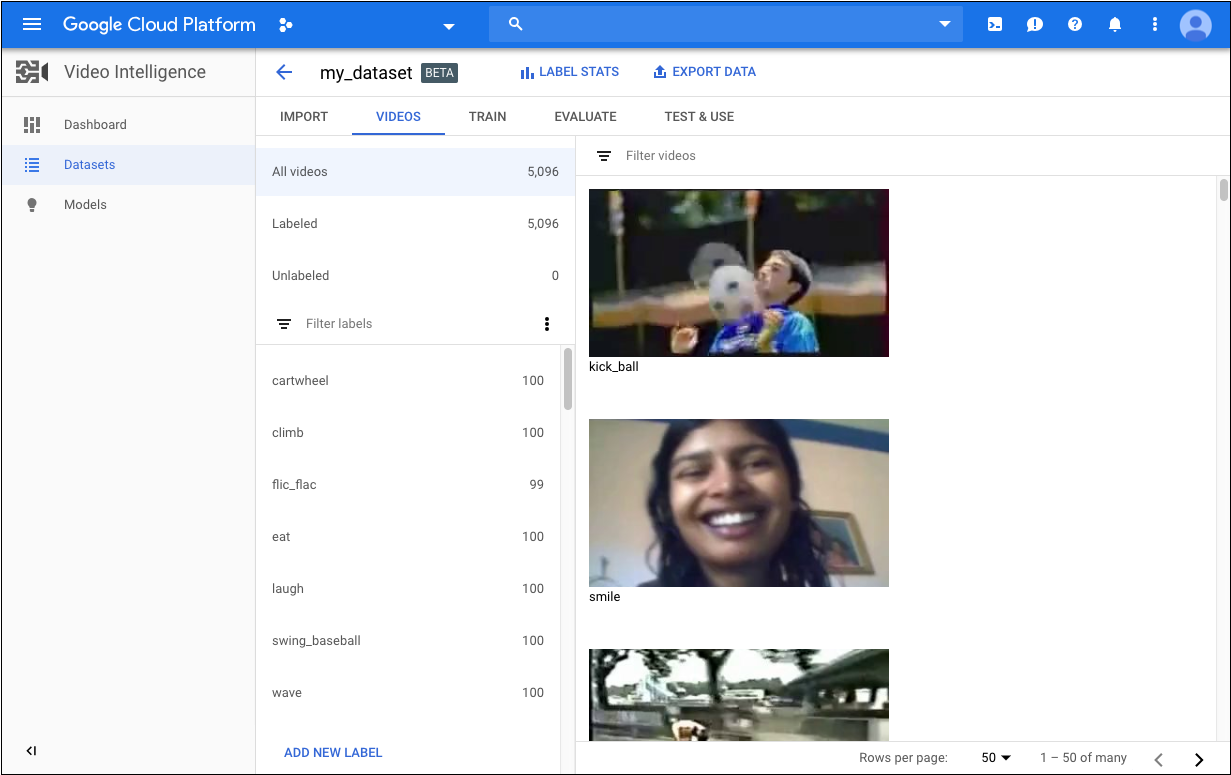
  3. 查看完数据集后,点击标题栏正下方的训练标签页。

    训练页面会提供对数据集的基本分析,并就其是否适合训练为您提供相关建议。如果 AutoML Video 建议更改,请考虑返回视频页面,添加内容或标签。

  4. 准备好数据集后,请点击开始训练以创建新模型,如果要创建其他模型,则可以点击训练新模型

REST

在使用任何请求数据之前,请先进行以下替换:

  • dataset-id:此 ID 是数据集名称的最后一个元素。例如,如果数据集的名称为 projects/434039606874/locations/us-central1/datasets/VCN3104518874390609379,则数据集 ID 为 VCN3104518874390609379
  • 注意:
    • project-number:您的项目编号
    • location-id:在其中添加注解的 Cloud 区域。支持的云区域为:us-east1us-west1europe-west1asia-east1。如果未指定区域,系统将根据视频文件位置确定区域。

HTTP 方法和网址:

POST https://automl.googleapis.com/v1beta1/projects/project-number/locations/location-id/models

请求 JSON 正文:

{
  "displayName": "test_model",
  "dataset_id": "dataset-id",
  "videoClassificationModelMetadata": {}
}

如需发送请求,请选择以下方式之一:

curl

将请求正文保存在名为 request.json 的文件中,然后执行以下命令:

curl -X POST \
-H "Authorization: Bearer $(gcloud auth print-access-token)" \
-H "x-goog-user-project: project-number" \
-H "Content-Type: application/json; charset=utf-8" \
-d @request.json \
"https://automl.googleapis.com/v1beta1/projects/project-number/locations/location-id/models"

PowerShell

将请求正文保存在名为 request.json 的文件中,然后执行以下命令:

$cred = gcloud auth print-access-token
$headers = @{ "Authorization" = "Bearer $cred"; "x-goog-user-project" = "project-number" }

Invoke-WebRequest `
-Method POST `
-Headers $headers `
-ContentType: "application/json; charset=utf-8" `
-InFile request.json `
-Uri "https://automl.googleapis.com/v1beta1/projects/project-number/locations/location-id/models" | Select-Object -Expand Content
执行操作时,响应中会提供 operation-id,例如 VCN123...。
{
  "name": "projects/project-number/locations/location-id/operations/operation-id",
  "metadata": {
    "@type": "type.googleapis.com/google.cloud.automl.v1beta1.OperationMetadata",
    "progressPercentage": 100,
    "createTime": "2020-02-27T01:56:28.395640Z",
    "updateTime": "2020-02-27T02:04:12.336070Z"
  },
  "done": true,
  "response": {
    "@type": "type.googleapis.com/google.cloud.automl.v1beta1.Model",
    "name": "projects/project-number/locations/location-id/models/operation-id",
    "createTime": "2020-02-27T02:00:22.329970Z",
    "videoClassificationModelMetadata": {
      "trainBudget": "1",
      "trainCost": "1",
      "stopReason": "BUDGET_REACHED"
    },
    "displayName": "a_98487760535e48319dd204e6394670"
  }
}

Java

如需向 AutoML Video 进行身份验证,请设置应用默认凭据。如需了解详情,请参阅为本地开发环境设置身份验证

import com.google.api.gax.longrunning.OperationFuture;
import com.google.cloud.automl.v1beta1.AutoMlClient;
import com.google.cloud.automl.v1beta1.LocationName;
import com.google.cloud.automl.v1beta1.Model;
import com.google.cloud.automl.v1beta1.OperationMetadata;
import com.google.cloud.automl.v1beta1.VideoClassificationModelMetadata;
import java.io.IOException;
import java.util.concurrent.ExecutionException;

class VideoClassificationCreateModel {

  public static void main(String[] args)
      throws IOException, ExecutionException, InterruptedException {
    // TODO(developer): Replace these variables before running the sample.
    String projectId = "YOUR_PROJECT_ID";
    String datasetId = "YOUR_DATASET_ID";
    String displayName = "YOUR_DATASET_NAME";
    createModel(projectId, datasetId, displayName);
  }

  // Create a model
  static void createModel(String projectId, String datasetId, String displayName)
      throws IOException, ExecutionException, InterruptedException {
    // Initialize client that will be used to send requests. This client only needs to be created
    // once, and can be reused for multiple requests. After completing all of your requests, call
    // the "close" method on the client to safely clean up any remaining background resources.
    try (AutoMlClient client = AutoMlClient.create()) {
      // A resource that represents Google Cloud Platform location.
      LocationName projectLocation = LocationName.of(projectId, "us-central1");
      // Set model metadata.
      VideoClassificationModelMetadata metadata =
          VideoClassificationModelMetadata.newBuilder().build();
      Model model =
          Model.newBuilder()
              .setDisplayName(displayName)
              .setDatasetId(datasetId)
              .setVideoClassificationModelMetadata(metadata)
              .build();

      // Create a model with the model metadata in the region.
      OperationFuture<Model, OperationMetadata> future =
          client.createModelAsync(projectLocation, model);
      // OperationFuture.get() will block until the model is created, which may take several hours.
      // You can use OperationFuture.getInitialFuture to get a future representing the initial
      // response to the request, which contains information while the operation is in progress.
      System.out.format("Training operation name: %s%n", future.getInitialFuture().get().getName());
      System.out.println("Training started...");
    }
  }
}

Node.js

如需向 AutoML Video 进行身份验证,请设置应用默认凭据。如需了解详情,请参阅为本地开发环境设置身份验证

/**
 * TODO(developer): Uncomment these variables before running the sample.
 */
// const projectId = 'YOUR_PROJECT_ID';
// const location = 'us-central1';
// const dataset_id = 'YOUR_DATASET_ID';
// const displayName = 'YOUR_DISPLAY_NAME';

// Imports the Google Cloud AutoML library
const {AutoMlClient} = require('@google-cloud/automl').v1beta1;

// Instantiates a client
const client = new AutoMlClient();

async function createModel() {
  // Construct request
  const request = {
    parent: client.locationPath(projectId, location),
    model: {
      displayName: displayName,
      datasetId: datasetId,
      videoClassificationModelMetadata: {},
    },
  };

  // Don't wait for the LRO
  const [operation] = await client.createModel(request);
  console.log(`Training started... ${operation}`);
  console.log(`Training operation name: ${operation.name}`);
}

createModel();

Python

如需向 AutoML Video 进行身份验证,请设置应用默认凭据。如需了解详情,请参阅为本地开发环境设置身份验证

from google.cloud import automl_v1beta1 as automl

def create_model(
    project_id="YOUR_PROJECT_ID",
    dataset_id="YOUR_DATASET_ID",
    display_name="your_models_display_name",
):
    """Create a automl video classification model."""
    client = automl.AutoMlClient()

    # A resource that represents Google Cloud Platform location.
    project_location = f"projects/{project_id}/locations/us-central1"
    # Leave model unset to use the default base model provided by Google
    metadata = automl.VideoClassificationModelMetadata()
    model = automl.Model(
        display_name=display_name,
        dataset_id=dataset_id,
        video_classification_model_metadata=metadata,
    )

    # Create a model with the model metadata in the region.
    response = client.create_model(parent=project_location, model=model)

    print(f"Training operation name: {response.operation.name}")
    print("Training started...")

获取模型的相关信息

训练完成后,您可以获取有关新创建的模型的信息。

本部分中的示例返回模型的基本元数据。要获取有关模型准确率和就绪情况的详细信息,请参阅评估模型

网页界面

  1. 前往 AutoML Video 界面中的模型页面。
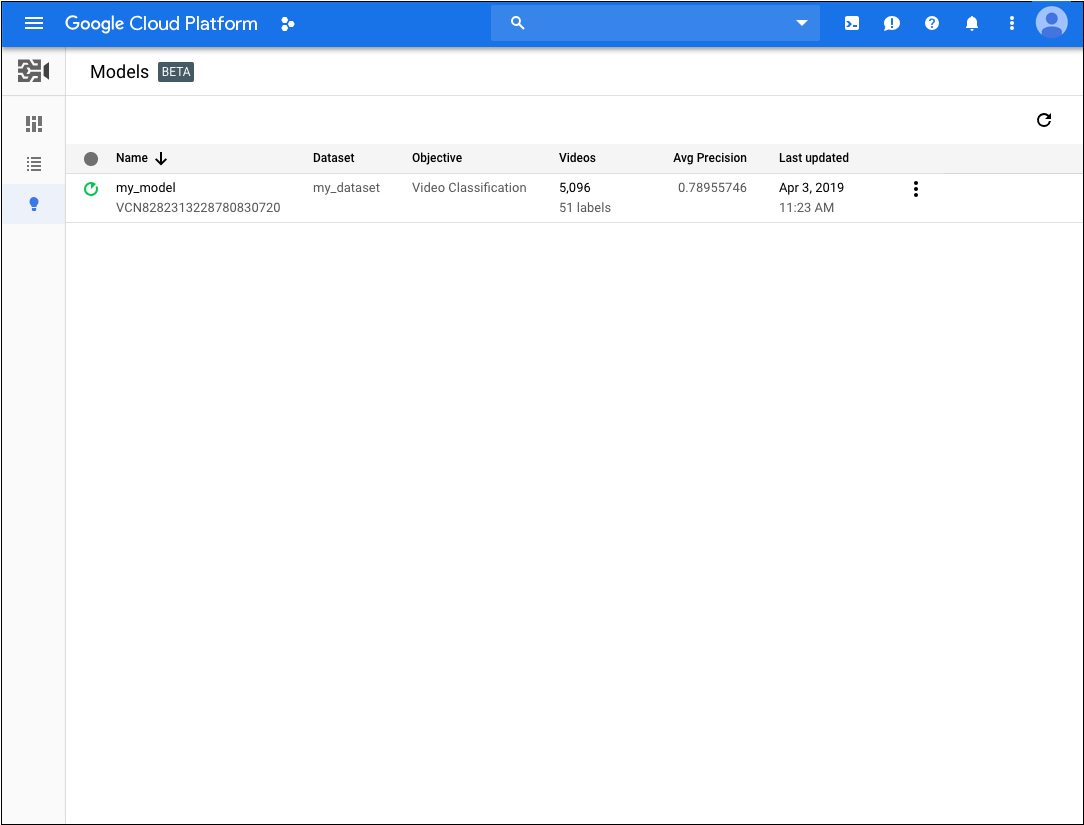
    显示一个模型的“模型”页面
  2. 点击要查看的模型的名称。

REST

在使用任何请求数据之前,请先进行以下替换:

  • model-name:创建模型时的响应提供的模型全名。全名的格式如下:projects/project-number/locations/location-id/models/model-id
  • dataset-id:替换为数据集的数据集标识符(而不是显示名)。例如 VCN3940649673949184000
  • project-number:您项目的编号

HTTP 方法和网址:

GET https://automl.googleapis.com/v1beta1/model-name/modelEvaluations

请求 JSON 正文:

{
  "displayName": "test_model",
  "dataset_id": "dataset-id",
  "videoClassificationModelMetadata": {}
}

如需发送您的请求,请展开以下选项之一:

您应该收到类似以下内容的 JSON 响应:

Java

如需向 AutoML Video 进行身份验证,请设置应用默认凭据。如需了解详情,请参阅为本地开发环境设置身份验证

import com.google.cloud.automl.v1beta1.AutoMlClient;
import com.google.cloud.automl.v1beta1.Model;
import com.google.cloud.automl.v1beta1.ModelName;
import io.grpc.StatusRuntimeException;
import java.io.IOException;

class GetModel {

  static void getModel() throws IOException, StatusRuntimeException {
    // TODO(developer): Replace these variables before running the sample.
    String projectId = "YOUR_PROJECT_ID";
    String modelId = "YOUR_MODEL_ID";
    getModel(projectId, modelId);
  }

  // Get a model
  static void getModel(String projectId, String modelId)
      throws IOException, StatusRuntimeException {
    // Initialize client that will be used to send requests. This client only needs to be created
    // once, and can be reused for multiple requests. After completing all of your requests, call
    // the "close" method on the client to safely clean up any remaining background resources.
    try (AutoMlClient client = AutoMlClient.create()) {
      // Get the full path of the model.
      ModelName modelFullId = ModelName.of(projectId, "us-central1", modelId);
      Model model = client.getModel(modelFullId);

      // Display the model information.
      System.out.format("Model name: %s%n", model.getName());
      // To get the model id, you have to parse it out of the `name` field. As models Ids are
      // required for other methods.
      // Name Format: `projects/{project_id}/locations/{location_id}/models/{model_id}`
      String[] names = model.getName().split("/");
      String retrievedModelId = names[names.length - 1];
      System.out.format("Model id: %s%n", retrievedModelId);
      System.out.format("Model display name: %s%n", model.getDisplayName());
      System.out.println("Model create time:");
      System.out.format("\tseconds: %s%n", model.getCreateTime().getSeconds());
      System.out.format("\tnanos: %s%n", model.getCreateTime().getNanos());
      System.out.format("Model deployment state: %s%n", model.getDeploymentState());
    }
  }
}

Node.js

如需向 AutoML Video 进行身份验证,请设置应用默认凭据。如需了解详情,请参阅为本地开发环境设置身份验证

/**
 * TODO(developer): Uncomment these variables before running the sample.
 */
// const projectId = 'YOUR_PROJECT_ID';
// const location = 'us-central1';
// const modelId = 'YOUR_MODEL_ID';

// Imports the Google Cloud AutoML library
const {AutoMlClient} = require('@google-cloud/automl').v1beta1;

// Instantiates a client
const client = new AutoMlClient();

async function getModel() {
  // Construct request
  const request = {
    name: client.modelPath(projectId, location, modelId),
  };

  const [response] = await client.getModel(request);

  console.log(`Model name: ${response.name}`);
  console.log(
    `Model id: ${
      response.name.split('/')[response.name.split('/').length - 1]
    }`
  );
  console.log(`Model display name: ${response.displayName}`);
  console.log('Model create time');
  console.log(`\tseconds ${response.createTime.seconds}`);
  console.log(`\tnanos ${response.createTime.nanos / 1e9}`);
  console.log(`Model deployment state: ${response.deploymentState}`);
}

getModel();

Python

如需向 AutoML Video 进行身份验证,请设置应用默认凭据。如需了解详情,请参阅为本地开发环境设置身份验证

from google.cloud import automl_v1beta1 as automl

# TODO(developer): Uncomment and set the following variables
# project_id = "YOUR_PROJECT_ID"
# model_id = "YOUR_MODEL_ID"

client = automl.AutoMlClient()
# Get the full path of the model.
model_full_id = client.model_path(project_id, "us-central1", model_id)
model = client.get_model(name=model_full_id)

# Retrieve deployment state.
if model.deployment_state == automl.Model.DeploymentState.DEPLOYED:
    deployment_state = "deployed"
else:
    deployment_state = "undeployed"

# Display the model information.
print(f"Model name: {model.name}")
print("Model id: {}".format(model.name.split("/")[-1]))
print(f"Model display name: {model.display_name}")
print(f"Model create time: {model.create_time}")
print(f"Model deployment state: {deployment_state}")

列出模型

一个项目可以包含许多模型。本部分介绍如何检索项目的可用模型列表。

网页界面

前往 AutoML Video 界面中的模型页面,查看项目中的模型。

列表中含有一个模型的“模型”页面

如需查看其他项目的模型,请从标题栏右上角的下拉列表中选择该项目。

REST

在使用任何请求数据之前,请先进行以下替换:

  • model-name:创建模型时的响应提供的模型全名。全名的格式如下:projects/project-number/locations/location-id/models
  • 注意:
    • project-number:您的项目编号
    • location-id:在其中添加注解的 Cloud 区域。支持的云区域为:us-east1us-west1europe-west1asia-east1。如果未指定区域,系统将根据视频文件位置确定区域。

HTTP 方法和网址:

GET https://automl.googleapis.com/v1beta1/projects/project-number/locations/location-id/models

如需发送您的请求,请展开以下选项之一:

您应该收到类似以下内容的 JSON 响应:

Java

如需向 AutoML Video 进行身份验证,请设置应用默认凭据。如需了解详情,请参阅为本地开发环境设置身份验证

import com.google.cloud.automl.v1beta1.AutoMlClient;
import com.google.cloud.automl.v1beta1.ListModelsRequest;
import com.google.cloud.automl.v1beta1.LocationName;
import com.google.cloud.automl.v1beta1.Model;
import java.io.IOException;

class ListModels {

  static void listModels() throws IOException {
    // TODO(developer): Replace these variables before running the sample.
    String projectId = "YOUR_PROJECT_ID";
    listModels(projectId);
  }

  // List the models available in the specified location
  static void listModels(String projectId) throws IOException {
    // Initialize client that will be used to send requests. This client only needs to be created
    // once, and can be reused for multiple requests. After completing all of your requests, call
    // the "close" method on the client to safely clean up any remaining background resources.
    try (AutoMlClient client = AutoMlClient.create()) {
      // A resource that represents Google Cloud Platform location.
      LocationName projectLocation = LocationName.of(projectId, "us-central1");

      // Create list models request.
      ListModelsRequest listModelsRequest =
          ListModelsRequest.newBuilder()
              .setParent(projectLocation.toString())
              .setFilter("")
              .build();

      // List all the models available in the region by applying filter.
      System.out.println("List of models:");
      for (Model model : client.listModels(listModelsRequest).iterateAll()) {
        // Display the model information.
        System.out.format("Model name: %s%n", model.getName());
        // To get the model id, you have to parse it out of the `name` field. As models Ids are
        // required for other methods.
        // Name Format: `projects/{project_id}/locations/{location_id}/models/{model_id}`
        String[] names = model.getName().split("/");
        String retrievedModelId = names[names.length - 1];
        System.out.format("Model id: %s%n", retrievedModelId);
        System.out.format("Model display name: %s%n", model.getDisplayName());
        System.out.println("Model create time:");
        System.out.format("\tseconds: %s%n", model.getCreateTime().getSeconds());
        System.out.format("\tnanos: %s%n", model.getCreateTime().getNanos());
        System.out.format("Model deployment state: %s%n", model.getDeploymentState());
      }
    }
  }
}

Node.js

如需向 AutoML Video 进行身份验证,请设置应用默认凭据。如需了解详情,请参阅为本地开发环境设置身份验证

/**
 * TODO(developer): Uncomment these variables before running the sample.
 */
// const projectId = 'YOUR_PROJECT_ID';
// const location = 'us-central1';

// Imports the Google Cloud AutoML library
const {AutoMlClient} = require('@google-cloud/automl').v1beta1;

// Instantiates a client
const client = new AutoMlClient();

async function listModels() {
  // Construct request
  const request = {
    parent: client.locationPath(projectId, location),
    filter: 'translation_model_metadata:*',
  };

  const [response] = await client.listModels(request);

  console.log('List of models:');
  for (const model of response) {
    console.log(`Model name: ${model.name}`);
    console.log(`
      Model id: ${model.name.split('/')[model.name.split('/').length - 1]}`);
    console.log(`Model display name: ${model.displayName}`);
    console.log('Model create time');
    console.log(`\tseconds ${model.createTime.seconds}`);
    console.log(`\tnanos ${model.createTime.nanos / 1e9}`);
    console.log(`Model deployment state: ${model.deploymentState}`);
  }
}

listModels();

Python

如需向 AutoML Video 进行身份验证,请设置应用默认凭据。如需了解详情,请参阅为本地开发环境设置身份验证

from google.cloud import automl_v1beta1 as automl

# TODO(developer): Uncomment and set the following variables
# project_id = "YOUR_PROJECT_ID"

client = automl.AutoMlClient()
# A resource that represents Google Cloud Platform location.
project_location = f"projects/{project_id}/locations/us-central1"
request = automl.ListModelsRequest(parent=project_location, filter="")
response = client.list_models(request=request)

print("List of models:")
for model in response:
    # Display the model information.
    if model.deployment_state == automl.Model.DeploymentState.DEPLOYED:
        deployment_state = "deployed"
    else:
        deployment_state = "undeployed"

    print(f"Model name: {model.name}")
    print("Model id: {}".format(model.name.split("/")[-1]))
    print(f"Model display name: {model.display_name}")
    print(f"Model create time: {model.create_time}")
    print(f"Model deployment state: {deployment_state}")

删除模型

以下示例演示了如何删除模型。

网页界面

  1. AutoML Video 界面中,导航到模型页面。显示一个模型的“模型”页面
  2. 点击要删除的行最右侧的三点状菜单,然后选择删除
  3. 在确认对话框中点击确认

REST

在使用任何请求数据之前,请先进行以下替换:

  • model-id:将替换为模型的标识符
  • 注意:
    • project-number:您的项目编号
    • location-id:在其中添加注解的 Cloud 区域。支持的云区域为:us-east1us-west1europe-west1asia-east1。如果未指定区域,系统将根据视频文件位置确定区域。

HTTP 方法和网址:

DELETE https://automl.googleapis.com/v1beta1/projects/project-number/locations/test/models/model-id

如需发送您的请求,请展开以下选项之一:

您应该收到类似以下内容的 JSON 响应:

Java

如需向 AutoML Video 进行身份验证,请设置应用默认凭据。如需了解详情,请参阅为本地开发环境设置身份验证

import com.google.cloud.automl.v1beta1.AutoMlClient;
import com.google.cloud.automl.v1beta1.ModelName;
import com.google.protobuf.Empty;
import java.io.IOException;
import java.util.concurrent.ExecutionException;

class DeleteModel {

  public static void main(String[] args)
      throws IOException, ExecutionException, InterruptedException {
    // TODO(developer): Replace these variables before running the sample.
    String projectId = "YOUR_PROJECT_ID";
    String modelId = "YOUR_MODEL_ID";
    deleteModel(projectId, modelId);
  }

  // Delete a model
  static void deleteModel(String projectId, String modelId)
      throws IOException, ExecutionException, InterruptedException {
    // Initialize client that will be used to send requests. This client only needs to be created
    // once, and can be reused for multiple requests. After completing all of your requests, call
    // the "close" method on the client to safely clean up any remaining background resources.
    try (AutoMlClient client = AutoMlClient.create()) {
      // Get the full path of the model.
      ModelName modelFullId = ModelName.of(projectId, "us-central1", modelId);

      // Delete a model.
      Empty response = client.deleteModelAsync(modelFullId).get();

      System.out.println("Model deletion started...");
      System.out.println(String.format("Model deleted. %s", response));
    }
  }
}

Node.js

如需向 AutoML Video 进行身份验证,请设置应用默认凭据。如需了解详情,请参阅为本地开发环境设置身份验证

/**
 * TODO(developer): Uncomment these variables before running the sample.
 */
// const projectId = 'YOUR_PROJECT_ID';
// const location = 'us-central1';
// const modelId = 'YOUR_MODEL_ID';

// Imports the Google Cloud AutoML library
const {AutoMlClient} = require('@google-cloud/automl').v1beta1;

// Instantiates a client
const client = new AutoMlClient();

async function deleteModel() {
  // Construct request
  const request = {
    name: client.modelPath(projectId, location, modelId),
  };

  const [response] = await client.deleteModel(request);
  console.log(`Model deleted: ${response}`);
}

deleteModel();

Python

如需向 AutoML Video 进行身份验证,请设置应用默认凭据。如需了解详情,请参阅为本地开发环境设置身份验证

from google.cloud import automl_v1beta1 as automl

# TODO(developer): Uncomment and set the following variables
# project_id = "YOUR_PROJECT_ID"
# model_id = "YOUR_MODEL_ID"

client = automl.AutoMlClient()
# Get the full path of the model.
model_full_id = client.model_path(project_id, "us-central1", model_id)
response = client.delete_model(name=model_full_id)

print(f"Model deleted. {response.result()}")