このドキュメントでは、 Google Cloud コンソールと Vertex AI API を使用して、Google 提供の Code Interpreter 拡張機能を登録し、使用する方法について説明します。この拡張機能を使用すると、Python コードを生成して実行し、次の処理を行うことができます。
- データセットの分析、クリーニング、変換、再形成を行う
- チャートとグラフでデータを可視化する
- 計算を実行する
Code Interpreter 拡張機能は、code_interpreter_tool を使用して、自然言語の説明から Python コードを生成し、実行します。code_interpreter_tool は、OpenAPI 仕様の code_interpreter.yaml ファイルで定義されます。
openapi: "3.0.0"
info:
  version: 1.0.0
  title: code_interpreter_tool
  description: >
    This tool supports the following operations based on user input:

    1. **Generates and Executes Code:** Accepts a user query in natural language, generates corresponding code, and executes it to produce results for the user query.


    Supported AuthTypes:

    - `GOOGLE_SERVICE_ACCOUNT_AUTH`: (Vertex AI Extension Service Agent is supported).
paths:
  /generate_and_execute:
    post:
      operationId: generate_and_execute
      description: >
        Get the results of a natural language query by generating and executing a code snippet.
        Example queries: "Find the max in [1, 2, 5]" or "Plot average sales by year (from data.csv)".
      requestBody:
        required: true
        content:
          application/json:
            schema:
              type: object
              required:
              - query
              properties:
                query:
                  type: string
                  description: >
                    Required. The Natural language query to get the results for.
                    The query string can optionally contain data to use for the code generated.
                    For example: "I have a list of numbers: [1, 2, 3, 4]. Find the largest number in the provided data."
                timeout:
                  type: number
                  description: >
                    Optional. Timeout in miliseconds for the code execution. Default value: 30000.
                files:
                  type: array
                  description: >
                    Optional. Input files to use when executing the generated code.
                    If specified, the file contents are expected be base64-encoded.
                    For example: [{"name": "data.csv", "contents": "aXRlbTEsaXRlbTI="}]
                  items:
                    $ref: "#/components/schemas/File"
                file_gcs_uris:
                  type: array
                  description: >
                    Optional. GCS URIs of input files to use when executing the generated code.
                    For example: ["gs://input-bucket/data.csv"]
                    This option is only applicable when `file_input_gcs_bucket` is specified in `Extension.CodeInterpreterRuntimeConfig`.
                  items:
                    type: string
      responses:
        '200':
          description: >
            The results of generating and executing code based on the natual language query.
            The result contains the generated code, and the STDOUT, STDERR, and output files from code execution.
          content:
            application/json:
              schema:
                $ref: "#/components/schemas/GenerationAndExecutionResult"
components:
  schemas:
    File:
      description: >
        File used as inputs and outputs of code execution. The `contents` string should be base64-encoded bytes.
        For example: [{"name": "data.csv", "contents": "aXRlbTEsaXRlbTI="}]
      type: object
      properties:
        name:
          type: string
        contents:
          type: string
          format: byte
    GenerationAndExecutionResult:
      description: >
        The results of generating and executing code based on the natual language query.
      properties:
        generated_code:
          type: string
          description: >
            The generated code in markdown format.
            For example: "```python\nprint(\"Hello World\")\n```"
        execution_result:
          type: string
          description: >
            The code execution result string from STDOUT.
        execution_error:
          type: string
          description: >
            The code execution error string from STDERR.
        output_files:
          type: array
          description: >
            The output files generated from code execution.
            If present, the file contents are required be base64-encoded.
            For example: [{"name": "data.csv", "contents": "aXRlbTEsaXRlbTI="}]
          items:
            $ref: "#/components/schemas/File"
        output_gcs_uris:
          type: array
          description: >
            The output GCS URIs of files generated from code execution.
            For example: ["gs://output-bucket/subfolder/output.csv"]

            This field is only applicable when `file_output_gcs_bucket` is specified in `Extension.CodeInterpreterRuntimeConfig`.
          items:
            type: string
始める前に
- Sign in to your Google Cloud account. If you're new to Google Cloud, create an account to evaluate how our products perform in real-world scenarios. New customers also get $300 in free credits to run, test, and deploy workloads.
-
In the Google Cloud console, on the project selector page, select or create a Google Cloud project.
Roles required to select or create a project
- Select a project: Selecting a project doesn't require a specific IAM role—you can select any project that you've been granted a role on.
-
Create a project: To create a project, you need the Project Creator
(
roles/resourcemanager.projectCreator), which contains theresourcemanager.projects.createpermission. Learn how to grant roles.
-
Verify that billing is enabled for your Google Cloud project.
-
Enable the Vertex AI API.
Roles required to enable APIs
To enable APIs, you need the Service Usage Admin IAM role (
roles/serviceusage.serviceUsageAdmin), which contains theserviceusage.services.enablepermission. Learn how to grant roles. -
In the Google Cloud console, on the project selector page, select or create a Google Cloud project.
Roles required to select or create a project
- Select a project: Selecting a project doesn't require a specific IAM role—you can select any project that you've been granted a role on.
-
Create a project: To create a project, you need the Project Creator
(
roles/resourcemanager.projectCreator), which contains theresourcemanager.projects.createpermission. Learn how to grant roles.
-
Verify that billing is enabled for your Google Cloud project.
-
Enable the Vertex AI API.
Roles required to enable APIs
To enable APIs, you need the Service Usage Admin IAM role (
roles/serviceusage.serviceUsageAdmin), which contains theserviceusage.services.enablepermission. Learn how to grant roles. Google Cloud コンソールで、Vertex AI [拡張機能] ページに移動します。
[拡張機能を作成] をクリックします。
[新しい拡張機能の作成] ダイアログで、次の操作を行います。
- 拡張機能名: 拡張機能の名前を入力します(例: code_interpreter_extension)。
- 説明:(省略可)拡張機能の説明を入力します(例: コード インタープリタ拡張機能)。
- 拡張機能の種類:
Code interpreterを選択します。
表示された [OpenAPI 仕様ファイル] セクションで、次のフィールドが正しく設定されていることを確認します。
- API 名:
code_interpreter_tool - API の説明:
Tool to generate and run valid Python code from a natural language description, or to run custom Python code... - ソース:
Cloud Storage - OpenAPI 仕様:
vertex-extension-public/code_interpreter.yaml - 認証:
Google service account.
- API 名:
(省略可)[ランタイム構成] セクションで、入力バケットと出力バケットを指定します。
- 入力バケットは、拡張機能が入力ファイルの読み取りに使用する Cloud Storage バケットです。
gs://接頭辞を含みます(例:gs://sample-bucket-name)。指定する場合は、このバケットのroles/storage.objectViewerロールを Vertex Extension カスタム コード サービス エージェント サービス アカウントに割り当てる必要があります。 - 出力バケットは、拡張機能が出力ファイルの書き込みに使用する Cloud Storage バケットです。
gs://接頭辞が含まれます(例:gs://sample-bucket-name)。指定する場合は、このバケットのroles/storage.objectUserロールを Vertex Extension カスタム コード サービス エージェント サービス アカウントに割り当てる必要があります。
- 入力バケットは、拡張機能が入力ファイルの読み取りに使用する Cloud Storage バケットです。
[拡張機能を作成] をクリックします。
Google Cloud コンソールで、Vertex AI [拡張機能] ページに移動します。
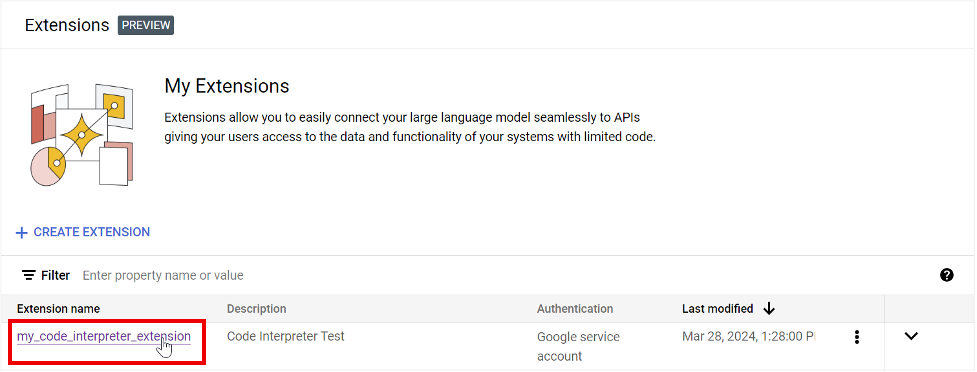
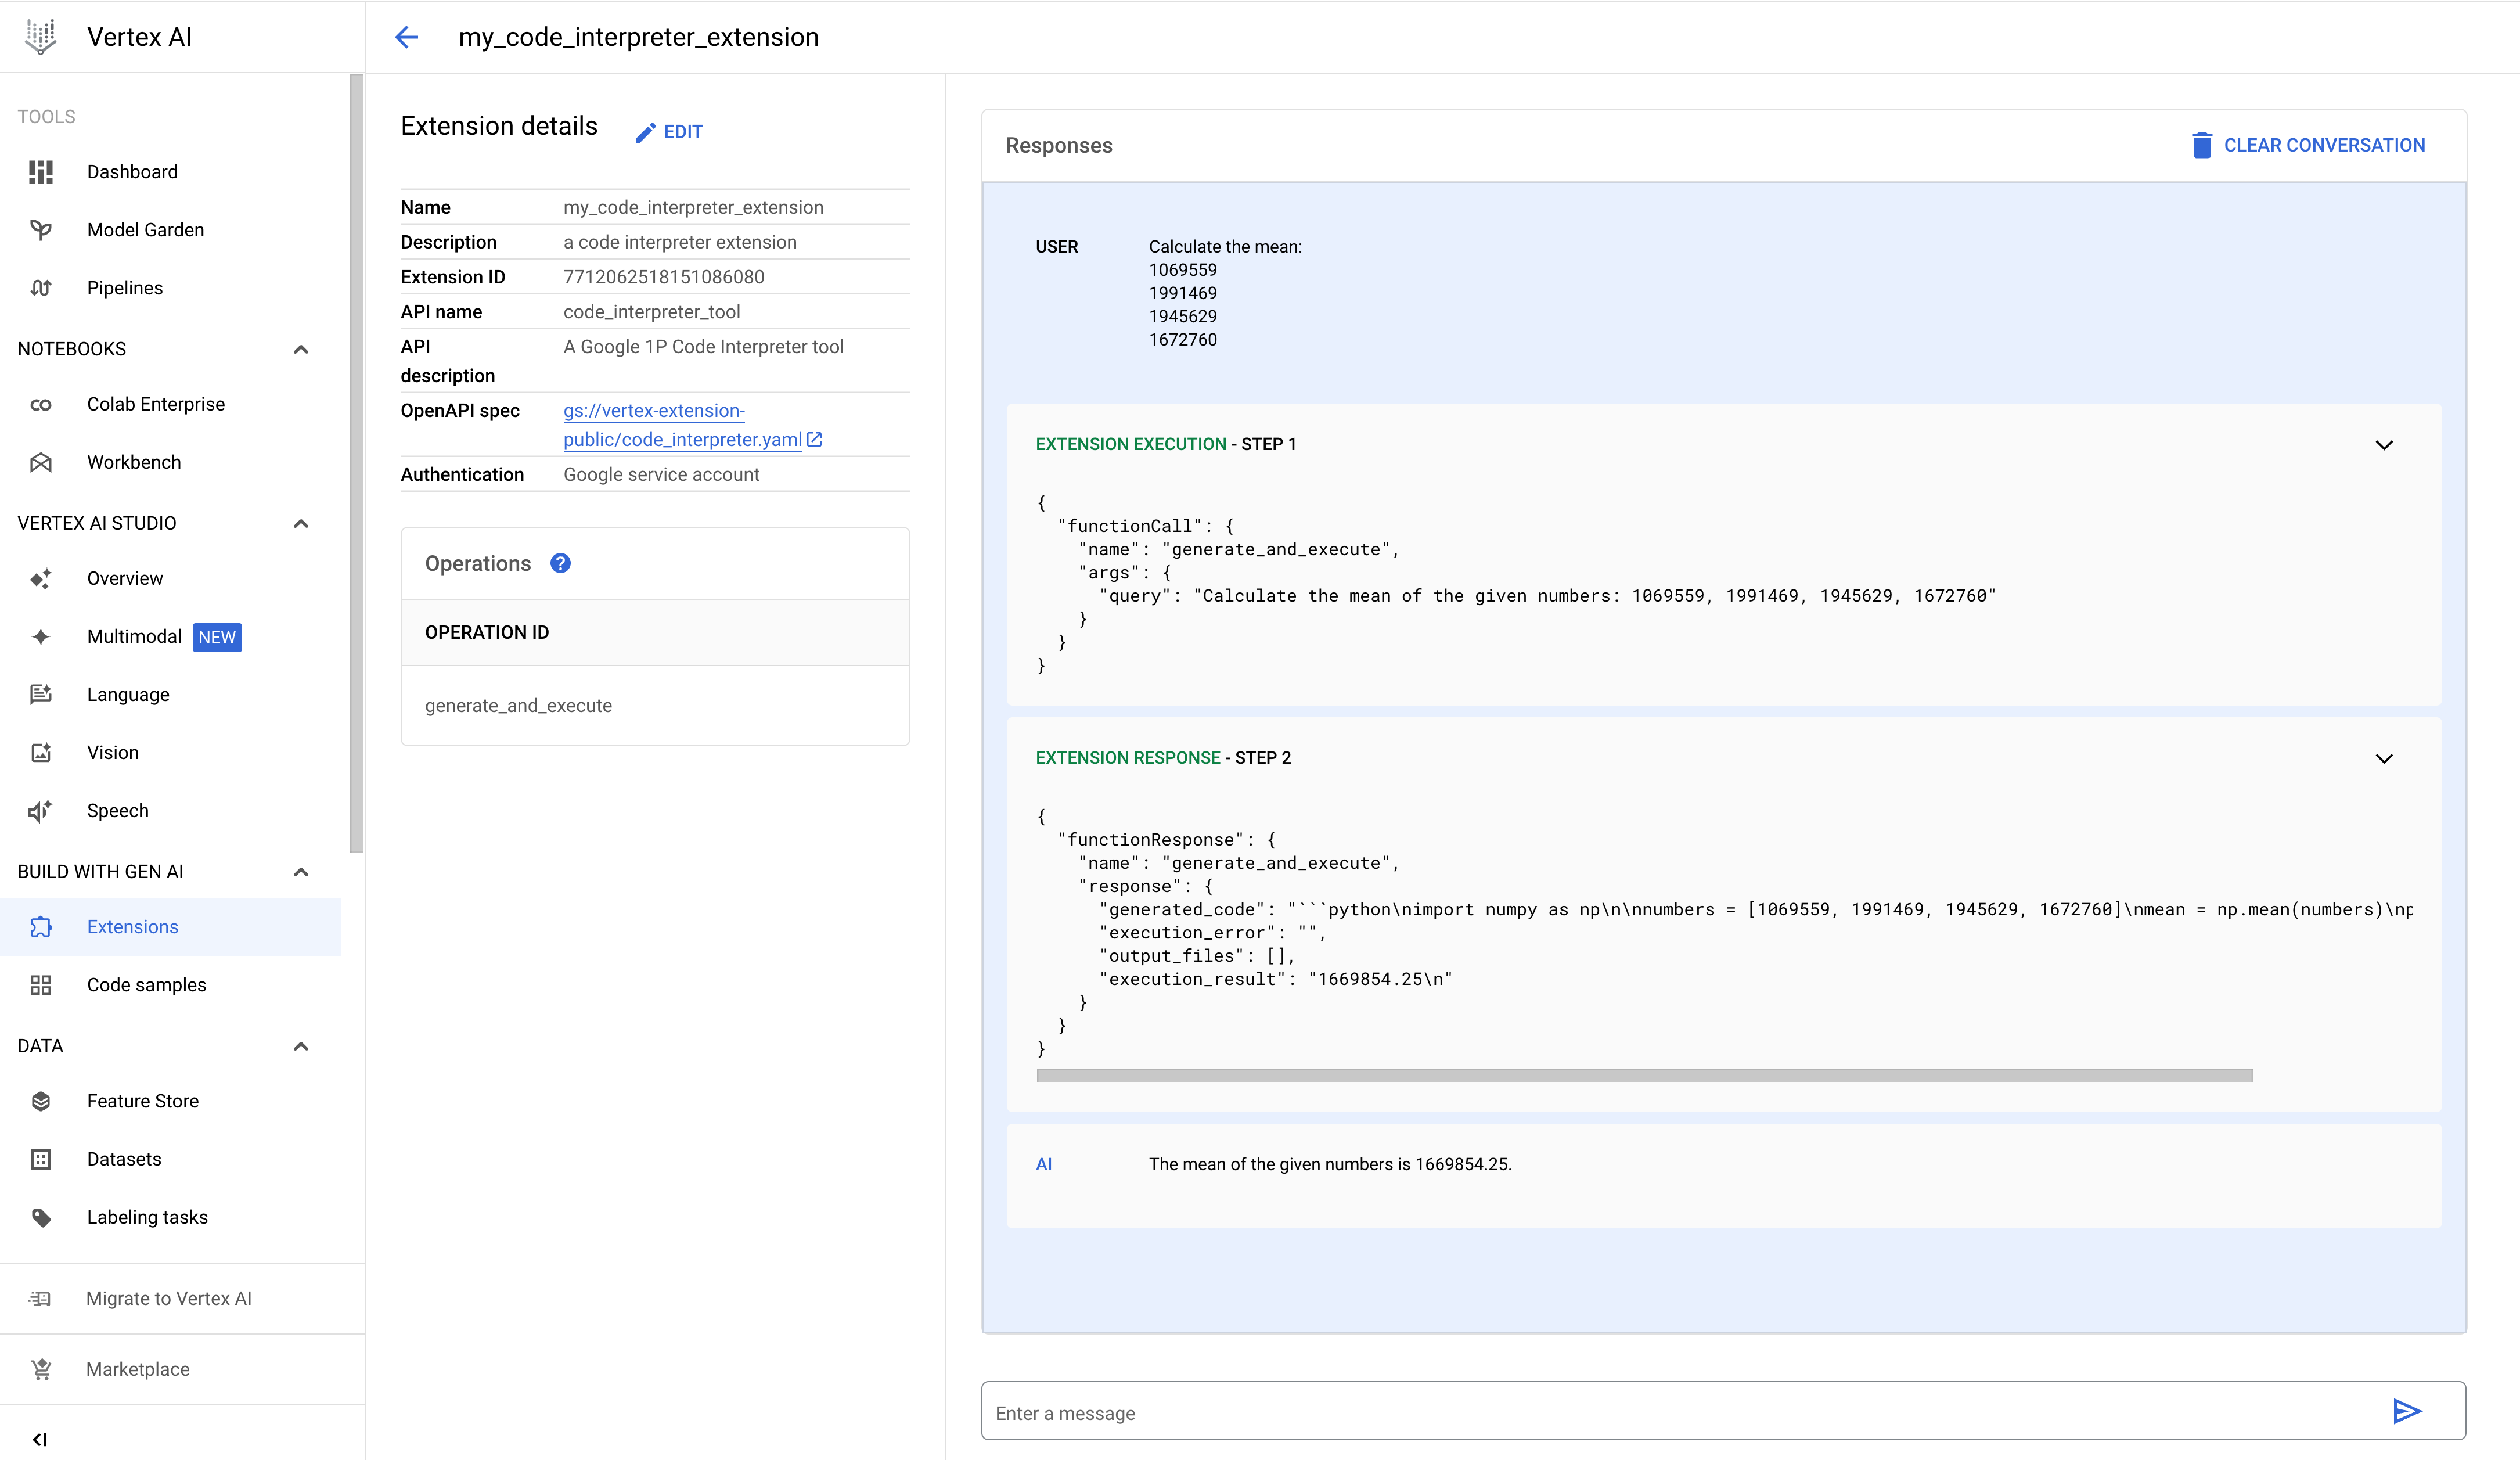
コード インタープリタ拡張機能の名前をクリックして、[Extensions details] ページを開きます。
[メッセージを入力] ボックスにクエリを入力して、レスポンスを確認します。[拡張機能のレスポンス] セクションを開くと、拡張機能が生成して実行したコードを確認できます。
次の例は、ユーザーが入力した数値リストの平均値を計算したクエリの結果を示しています。
- PROJECT_ID: 実際の Google Cloud プロジェクト ID
- REGION: Compute Engine のリージョン。
- DISPLAY_NAME: ユーザーに表示される拡張機能の名前(例: my_code_interpreter_extension)。
- DESCRIPTION: (省略可)ユーザーに表示される拡張機能の説明(例: コード インタープリタ拡張機能)。
- SERVICE_ACCOUNT: (省略可)コード インタープリタ拡張機能は、サンプルのリクエスト本文にあるように GOOGLE_SERVICE_ACCOUNT_AUTH を使用します。サービス アカウントを指定しない場合、拡張機能はデフォルトの Vertex AI Extension サービス エージェント サービス アカウントを使用します。別のサービス アカウントを指定する場合は、指定したサービス アカウントの Vertex AI Extension Service エージェント サービス アカウントに
iam.serviceAccounts.getAccessToken権限を付与します。 - INPUT_BUCKET: (省略可)拡張機能が入力ファイルの読み取りに使用する Cloud Storage バケット。
gs://接頭辞を含みます(例:gs://sample-bucket-name)。指定する場合は、このバケットのroles/storage.objectViewerロールを Vertex Extension カスタム コード サービス エージェント サービス アカウントに割り当てる必要があります。 - OUTPUT_BUCKET: (省略可)拡張機能が出力ファイルの書き込みに使用する Cloud Storage バケット。
gs://接頭辞を含みます(例:gs://sample-bucket-name)。指定する場合は、このバケットのroles/storage.objectUserロールを Vertex Extension カスタム コード サービス エージェント サービス アカウントに割り当てる必要があります。 - 単純なクエリ: 数値リストの最大値を見つけます。
- インライン データをクエリ: クエリするデータはリクエスト本文で指定します。
- ファイルデータでクエリ: ファイルデータを出力します。
- Cloud Storage データでクエリ: Cloud Storage データを読み取ります。
- PROJECT_ID: 実際の Google Cloud プロジェクト ID
- REGION: Compute Engine のリージョン。
- EXTENSION_ID: Google Cloud コンソールの [拡張機能の詳細] に表示される Code Interpreter 拡張機能の ID。
- PROJECT_ID: 実際の Google Cloud プロジェクト ID
- REGION: Compute Engine のリージョン。
- EXTENSION_ID: Google Cloud コンソールの [拡張機能の詳細] に表示される Code Interpreter 拡張機能の ID。
- PROJECT_ID: 実際の Google Cloud プロジェクト ID
- REGION: Compute Engine のリージョン。
- EXTENSION_ID: Google Cloud コンソールの [拡張機能の詳細] に表示される Code Interpreter 拡張機能の ID。
- FILE_NAME: リクエスト本文の CSV ファイルデータは、作業ディレクトリのこのファイルに書き込まれます。
- BASE64_ENCODED_FILE_BYTES: リクエスト本文内のファイルバイトは base64 でエンコードする必要があります。
- PROJECT_ID: 実際の Google Cloud プロジェクト ID
- REGION: Compute Engine のリージョン。
- EXTENSION_ID: Google Cloud コンソールの [拡張機能の詳細] に表示される Code Interpreter 拡張機能の ID。
- BUCKET_NAME: 出力する CSV ファイルを含む Cloud Storage バケット。コード インタープリタ拡張機能を登録するときに、この入力バケットを指定する必要があります。
- FILE_NAME: 出力する BUCKET_NAME の CSV ファイルデータ。
Code Interpreter 拡張機能の登録、クエリ、実行
以降のセクションでは、 Google Cloud コンソールと Vertex AI API を使用して Code Interpreter 拡張機能を登録する方法について説明します。拡張機能を登録すると、 Google Cloud コンソールを使用してクエリを実行することや、Vertex AI API を使用して実行することが可能です。
コンソール
拡張機能を登録する
Google Cloud コンソールを使用して Code Interpreter 拡張機能を登録する手順は次のとおりです。
(省略可)拡張機能をクエリする
Google Cloud コンソールを使用して、Code Interpreter 拡張機能を試すことが可能です。自然言語のプロンプトで拡張機能を呼び出すには、次の操作を行います。
REST
拡張機能を登録する
Vertex AI API extensions.import リクエストを送信して、コード インタープリタ拡張機能を登録します。
リクエストのデータを使用する前に、次のように置き換えます。
HTTP メソッドと URL:
POST https://REGION-aiplatform.googleapis.com/v1beta1/projects/PROJECT_ID/locations/REGION/extensions:import
リクエストの本文(JSON):
{
  "displayName":"DISPLAY_NAME",
  "description":"DESCRIPTION",
  "manifest":{
    "name":"code_interpreter_tool",
    "description":"A Google Code Interpreter tool",
    "apiSpec":{
      "openApiGcsUri":"gs://vertex-extension-public/code_interpreter.yaml"
    },
    "authConfig":{
      "authType":"GOOGLE_SERVICE_ACCOUNT_AUTH",
      "googleServiceAccountConfig":{
        "serviceAccount":"SERVICE_ACCOUNT"
      }
    }
  }
  "runtimeConfig": {
     "codeInterpreterRuntimeConfig": {
        "fileInputGcsBucket": "INPUT_BUCKET",
        "fileOutputGcsBucket": "OUTPUT_BUCKET"
     }
  }
}
リクエストを送信するには、次のいずれかのオプションを選択します。
curl
リクエスト本文を request.json という名前のファイルに保存して、次のコマンドを実行します。
curl -X POST \
     -H "Authorization: Bearer $(gcloud auth print-access-token)" \
     -H "Content-Type: application/json; charset=utf-8" \
     -d @request.json \
     "https://REGION-aiplatform.googleapis.com/v1beta1/projects/PROJECT_ID/locations/REGION/extensions:import"
PowerShell
リクエスト本文を request.json という名前のファイルに保存して、次のコマンドを実行します。
$cred = gcloud auth print-access-token
$headers = @{ "Authorization" = "Bearer $cred" }

Invoke-WebRequest `
    -Method POST `
    -Headers $headers `
    -ContentType: "application/json; charset=utf-8" `
    -InFile request.json `
    -Uri "https://REGION-aiplatform.googleapis.com/v1beta1/projects/PROJECT_ID/locations/REGION/extensions:import" | Select-Object -Expand Content
拡張機能を実行する
Vertex AI API に execute オペレーションを送信して、自然言語クエリに基づいて Python コードを生成し、実行できます。
クエリの例:
単純なクエリ
リクエストのデータを使用する前に、次のように置き換えます。
HTTP メソッドと URL:
POST https://REGION-aiplatform.googleapis.com/v1beta1/projects/PROJECT_ID/locations/REGION/extensions/EXTENSION_ID:execute
リクエストの本文(JSON):
{
  "operation_id":"generate_and_execute",
  "operation_params":{
    "query":"find the max value in the list: [1,2,3,4,-5]"
  }
}
リクエストを送信するには、次のいずれかのオプションを選択します。
curl
リクエスト本文を request.json という名前のファイルに保存して、次のコマンドを実行します。
curl -X POST \
     -H "Authorization: Bearer $(gcloud auth print-access-token)" \
     -H "Content-Type: application/json; charset=utf-8" \
     -d @request.json \
     "https://REGION-aiplatform.googleapis.com/v1beta1/projects/PROJECT_ID/locations/REGION/extensions/EXTENSION_ID:execute"
PowerShell
リクエスト本文を request.json という名前のファイルに保存して、次のコマンドを実行します。
$cred = gcloud auth print-access-token
$headers = @{ "Authorization" = "Bearer $cred" }

Invoke-WebRequest `
    -Method POST `
    -Headers $headers `
    -ContentType: "application/json; charset=utf-8" `
    -InFile request.json `
    -Uri "https://REGION-aiplatform.googleapis.com/v1beta1/projects/PROJECT_ID/locations/REGION/extensions/EXTENSION_ID:execute" | Select-Object -Expand Content
インライン データ
リクエストのデータを使用する前に、次のように置き換えます。
HTTP メソッドと URL:
POST https://REGION-aiplatform.googleapis.com/v1beta1/projects/PROJECT_ID/locations/REGION/extensions/EXTENSION_ID:execute
リクエストの本文(JSON):
{
  "operation_id":"generate_and_execute",
  "operation_params":{
    "query":"Calculate the total values of each column(mobile_subscribers, percent_internet_users, total_internet_users, fixed_broadband_subscribers) from the below dataset.\n\n\ncountry_name        country_code        year        mobile_subscribers        percent_internet_users        total_internet_users        fixed_broadband_subscribers\nUnited States        US        2023        333.4        90.5        303.1        200.3\nChina        CN        2023        1.613        70.2        1131.4        512.2\nIndia        IN        2023        1.165        50.7        688.5        557.2\nJapan        JP        2023        124.3        88.2        109.5        114.8\nGermany        DE        2023        102.1        90.5        92.1        100\nUnited Kingdom        UK        2023        67.1        92.7        62.2        65\nFrance        FR        2023        66.7        89        63        69.7\nBrazil        BR        2023        213.5        68        144.1        69.4\nRussia        RU        2023        203.8        74.9        152.7        51.1"
  }
}
リクエストを送信するには、次のいずれかのオプションを選択します。
curl
リクエスト本文を request.json という名前のファイルに保存して、次のコマンドを実行します。
curl -X POST \
     -H "Authorization: Bearer $(gcloud auth print-access-token)" \
     -H "Content-Type: application/json; charset=utf-8" \
     -d @request.json \
     "https://REGION-aiplatform.googleapis.com/v1beta1/projects/PROJECT_ID/locations/REGION/extensions/EXTENSION_ID:execute"
PowerShell
リクエスト本文を request.json という名前のファイルに保存して、次のコマンドを実行します。
$cred = gcloud auth print-access-token
$headers = @{ "Authorization" = "Bearer $cred" }

Invoke-WebRequest `
    -Method POST `
    -Headers $headers `
    -ContentType: "application/json; charset=utf-8" `
    -InFile request.json `
    -Uri "https://REGION-aiplatform.googleapis.com/v1beta1/projects/PROJECT_ID/locations/REGION/extensions/EXTENSION_ID:execute" | Select-Object -Expand Content
ファイル出力
リクエストのデータを使用する前に、次のように置き換えます。
HTTP メソッドと URL:
POST https://REGION-aiplatform.googleapis.com/v1beta1/projects/PROJECT_ID/locations/REGION/extensions/EXTENSION_ID:execute
リクエストの本文(JSON):
{
  "operation_id":"generate_and_execute",
  "operation_params":{
    "query":"print the csv file",
    "files":[
      {
        "name":"FILE_NAME",
        "contents":"BASE64_ENCODED_FILE_BYTES"
      }
    ]
  }
}
リクエストを送信するには、次のいずれかのオプションを選択します。
curl
リクエスト本文を request.json という名前のファイルに保存して、次のコマンドを実行します。
curl -X POST \
     -H "Authorization: Bearer $(gcloud auth print-access-token)" \
     -H "Content-Type: application/json; charset=utf-8" \
     -d @request.json \
     "https://REGION-aiplatform.googleapis.com/v1beta1/projects/PROJECT_ID/locations/REGION/extensions/EXTENSION_ID:execute"
PowerShell
リクエスト本文を request.json という名前のファイルに保存して、次のコマンドを実行します。
$cred = gcloud auth print-access-token
$headers = @{ "Authorization" = "Bearer $cred" }

Invoke-WebRequest `
    -Method POST `
    -Headers $headers `
    -ContentType: "application/json; charset=utf-8" `
    -InFile request.json `
    -Uri "https://REGION-aiplatform.googleapis.com/v1beta1/projects/PROJECT_ID/locations/REGION/extensions/EXTENSION_ID:execute" | Select-Object -Expand Content
Cloud Storage の読み取り
リクエストのデータを使用する前に、次のように置き換えます。
HTTP メソッドと URL:
POST https://REGION-aiplatform.googleapis.com/v1beta1/projects/PROJECT_ID/locations/REGION/extensions/EXTENSION_ID:execute
リクエストの本文(JSON):
{
  "operation_id":"generate_and_execute",
  "operation_params":{
    "query":"print the csv file",
    "file_gcs_uris": ["gs://BUCKET_NAME/FILE_NAME"]
  }
}
リクエストを送信するには、次のいずれかのオプションを選択します。
curl
リクエスト本文を request.json という名前のファイルに保存して、次のコマンドを実行します。
curl -X POST \
     -H "Authorization: Bearer $(gcloud auth print-access-token)" \
     -H "Content-Type: application/json; charset=utf-8" \
     -d @request.json \
     "https://REGION-aiplatform.googleapis.com/v1beta1/projects/PROJECT_ID/locations/REGION/extensions/EXTENSION_ID:execute"
PowerShell
リクエスト本文を request.json という名前のファイルに保存して、次のコマンドを実行します。
$cred = gcloud auth print-access-token
$headers = @{ "Authorization" = "Bearer $cred" }

Invoke-WebRequest `
    -Method POST `
    -Headers $headers `
    -ContentType: "application/json; charset=utf-8" `
    -InFile request.json `
    -Uri "https://REGION-aiplatform.googleapis.com/v1beta1/projects/PROJECT_ID/locations/REGION/extensions/EXTENSION_ID:execute" | Select-Object -Expand Content