您可以通过使用 Cloud Scheduler 和 HTTP 触发器,通过 Cloud Scheduler 安排预编译流水线的执行。
构建和编译简单的流水线
使用 Kubeflow Pipelines SDK 构建计划流水线并将其编译为 YAML 文件。
示例 hello-world-scheduled-pipeline:
from kfp import compiler
from kfp import dsl

# A simple component that prints and returns a greeting string
@dsl.component
def hello_world(message: str) -> str:
    greeting_str = f'Hello, {message}'
    print(greeting_str)
    return greeting_str

# A simple pipeline that contains a single hello_world task
@dsl.pipeline(
    name='hello-world-scheduled-pipeline')
def hello_world_scheduled_pipeline(greet_name: str):
    hello_world_task = hello_world(greet_name)

# Compile the pipeline and generate a YAML file
compiler.Compiler().compile(pipeline_func=hello_world_scheduled_pipeline,
                            package_path='hello_world_scheduled_pipeline.yaml')
将已编译的流水线 YAML 上传到 Cloud Storage 存储桶
在 Google Cloud 控制台中打开 Cloud Storage 浏览器。
点击您在配置项目时创建的 Cloud Storage 存储分区。
使用现有文件夹或新文件夹,将已编译的流水线 YAML(在此示例中为
hello_world_scheduled_pipeline.yaml)上传到所选文件夹。点击上传的 YAML 文件以访问详细信息。复制 gsutil URI 以备后用。
使用 HTTP 触发器创建 Cloud Functions 函数
访问控制台中的 Cloud Functions 页面。
点击创建函数按钮。
在基础知识部分中,为您的函数命名(例如
hello-world-scheduled-pipeline-function)。在触发器部分中,选择HTTP 作为触发器类型。
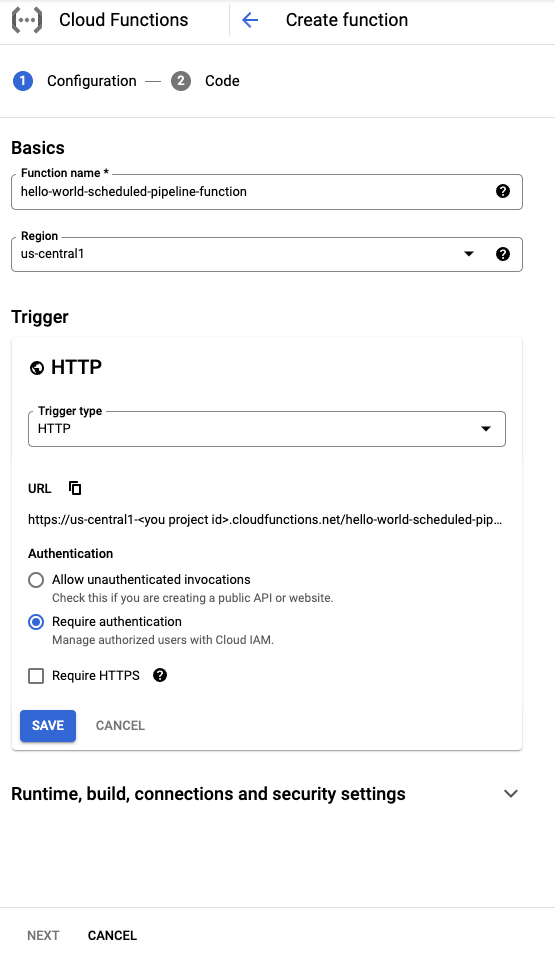
请记下此触发器生成的网址,并将其保存以供下一部分使用。
将所有其他字段保留为默认值,然后点击保存以保存“触发器”部分配置。
将其他所有字段保留为默认值,然后点击下一步以继续转到“代码”部分。
在运行时下,选择 Python 3.7。
在入口点中输入 process_request(示例代码入口点函数名称)。
在源代码下,选择内嵌编辑器(如果尚未选择)。
在
main.py文件中,添加以下代码:import json from google.cloud import aiplatform PROJECT_ID = 'your-project-id' # <---CHANGE THIS REGION = 'your-region' # <---CHANGE THIS PIPELINE_ROOT = 'your-cloud-storage-pipeline-root' # <---CHANGE THIS def process_request(request): """Processes the incoming HTTP request. Args: request (flask.Request): HTTP request object. Returns: The response text or any set of values that can be turned into a Response object using `make_response <http://flask.pocoo.org/docs/1.0/api/#flask.Flask.make_response>`. """ # decode http request payload and translate into JSON object request_str = request.data.decode('utf-8') request_json = json.loads(request_str) pipeline_spec_uri = request_json['pipeline_spec_uri'] parameter_values = request_json['parameter_values'] aiplatform.init( project=PROJECT_ID, location=REGION, ) job = aiplatform.PipelineJob( display_name=f'hello-world-cloud-function-pipeline', template_path=pipeline_spec_uri, pipeline_root=PIPELINE_ROOT, enable_caching=False, parameter_values=parameter_values ) job.submit() return "Job submitted"替换以下内容:
- PROJECT_ID:在其中运行此流水线的 Google Cloud 项目。
- REGION:此流水线运行所在的区域。
- PIPELINE_ROOT:指定流水线服务帐号可以访问的 Cloud Storage URI。流水线运行的工件存储在流水线根目录中。
在
requirements.txt文件中,将内容替换为以下软件包要求:google-api-python-client>=1.7.8,<2 google-cloud-aiplatform点击部署以部署该函数。
创建 Cloud Scheduler 作业
访问控制台中的 Cloud Scheduler 页面:
点击创建作业按钮。
为您的作业命名(例如
my-hello-world-schedule),并视需要添加说明。使用 unix-cron 格式指定作业的频率。例如:
0 9 * * 1此示例 cron 时间表每周一上午 9:00 运行。如需了解详情,请参阅配置 Cron 作业时间表。
选择您所在的时区。
点击继续以配置执行。
从“目标类型”菜单中选择 HTTP。
在网址字段中,输入您在上一部分保存的触发器网址。
选择 POST 作为 HTTP 方法(如果尚未选择)。
在正文框中,按照代码中定义的格式输入 JSON 字符串。使用上一部分中的示例:
 {
   "pipeline_spec_uri": "<path-to-your-compiled-pipeline>",
   "parameter_values": {
     "greet_name": "<any-greet-string>"
   }
 }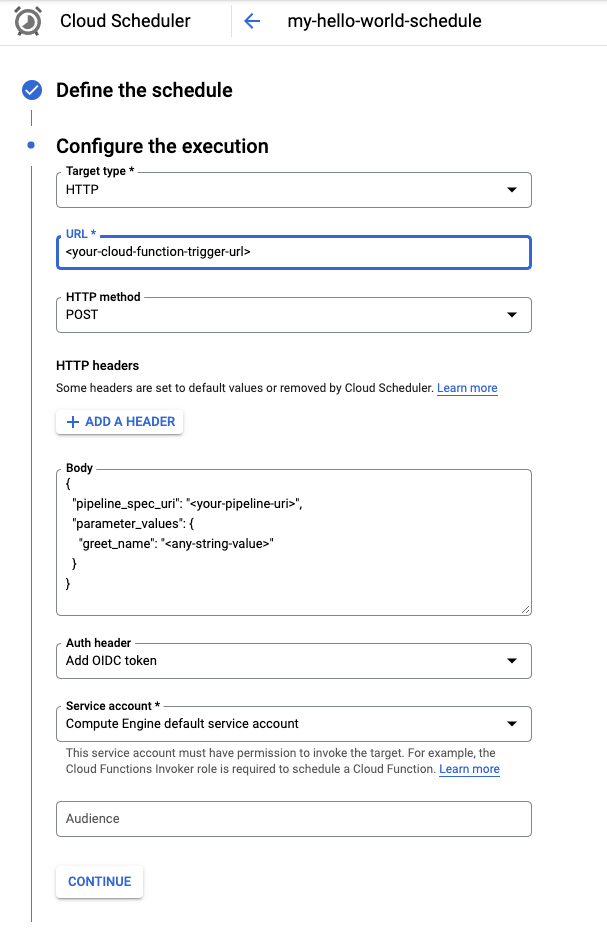
在身份验证标头下拉列表中,选择添加 OIDC 令牌。
在“服务帐号”下拉列表中,选择有权调用 Cloud Functions 函数的服务帐号。在本教程中,您可以使用 Compute Engine 默认服务帐号。
将其他所有字段保留为默认值,然后点击 Create。
手动运行作业(可选)
您可以选择运行刚刚创建的作业,以验证其功能。
打开 Cloud Scheduler 控制台页面:
点击作业名称旁边的立即运行按钮。
由于进行相关必要配置,在项目中创建的第一个作业可能需要几分钟才能在第一次调用时运行。
您可以在结果列中查看作业的状态。