Training models
When you have a dataset with a solid set of training sentence pairs, you are ready to create and train the custom model.
Web UI
Open the AutoML Translation UI.
The Datasets page shows the available datasets for the current project.
Select the dataset you want to use to train the custom model.
The display name of the selected dataset appears in the title bar, and the page lists the individual items in the dataset along with their respective "Training," "Validation," or "Testing" labels.
When you are done reviewing the dataset, click the Train tab just below the title bar.
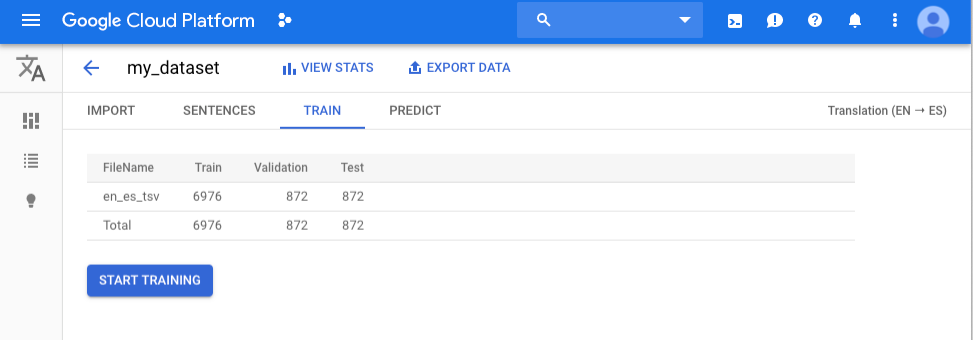
Click Start Training.
A Train new model dialog box appears.
Specify a name for the model.
Click Start Training to begin training your custom model.
Training a model can take several hours to complete. After the model is successfully trained, you will receive a message at the email address you used to sign up for the program.
Go
To learn how to install and use the client library for AutoML Translation, see AutoML Translation client libraries. For more information, see the AutoML Translation Go API reference documentation.
To authenticate to AutoML Translation, set up Application Default Credentials. For more information, see Set up authentication for a local development environment.
Java
To learn how to install and use the client library for AutoML Translation, see AutoML Translation client libraries. For more information, see the AutoML Translation Java API reference documentation.
To authenticate to AutoML Translation, set up Application Default Credentials. For more information, see Set up authentication for a local development environment.
Node.js
To learn how to install and use the client library for AutoML Translation, see AutoML Translation client libraries. For more information, see the AutoML Translation Node.js API reference documentation.
To authenticate to AutoML Translation, set up Application Default Credentials. For more information, see Set up authentication for a local development environment.
Python
To learn how to install and use the client library for AutoML Translation, see AutoML Translation client libraries. For more information, see the AutoML Translation Python API reference documentation.
To authenticate to AutoML Translation, set up Application Default Credentials. For more information, see Set up authentication for a local development environment.
Additional languages
C#: Please follow the C# setup instructions on the client libraries page and then visit the AutoML Translation reference documentation for .NET.
PHP: Please follow the PHP setup instructions on the client libraries page and then visit the AutoML Translation reference documentation for PHP.
Ruby: Please follow the Ruby setup instructions on the client libraries page and then visit the AutoML Translation reference documentation for Ruby.
Getting the status of an operation
You can check the status of a long-running task (importing items into a dataset or training a model) using the operation ID from the response when you started the task.
You can only check the status of operations using the AutoML API.
To get the status of your training operation, you must send a GET request to
the operations resource. The following shows how to send such a
request.
Canceling an Operation
You can cancel an import or training task using the operation ID.
Managing models
Getting information about a model
When training is complete, you can get information about the newly created model.
The examples in this section return the basic metadata about a model. To get details about a model's accuracy and readiness, see Evaluating models.
Go
To learn how to install and use the client library for AutoML Translation, see AutoML Translation client libraries. For more information, see the AutoML Translation Go API reference documentation.
To authenticate to AutoML Translation, set up Application Default Credentials. For more information, see Set up authentication for a local development environment.
Java
To learn how to install and use the client library for AutoML Translation, see AutoML Translation client libraries. For more information, see the AutoML Translation Java API reference documentation.
To authenticate to AutoML Translation, set up Application Default Credentials. For more information, see Set up authentication for a local development environment.
Node.js
To learn how to install and use the client library for AutoML Translation, see AutoML Translation client libraries. For more information, see the AutoML Translation Node.js API reference documentation.
To authenticate to AutoML Translation, set up Application Default Credentials. For more information, see Set up authentication for a local development environment.
Python
To learn how to install and use the client library for AutoML Translation, see AutoML Translation client libraries. For more information, see the AutoML Translation Python API reference documentation.
To authenticate to AutoML Translation, set up Application Default Credentials. For more information, see Set up authentication for a local development environment.
Additional languages
C#: Please follow the C# setup instructions on the client libraries page and then visit the AutoML Translation reference documentation for .NET.
PHP: Please follow the PHP setup instructions on the client libraries page and then visit the AutoML Translation reference documentation for PHP.
Ruby: Please follow the Ruby setup instructions on the client libraries page and then visit the AutoML Translation reference documentation for Ruby.
Listing models
A project can include numerous models. This section describes how to retrieve a list of the available models for a project.
Web UI
To see a list of the available models using the AutoML Translation UI click the lightbulb icon in the left navigation bar.
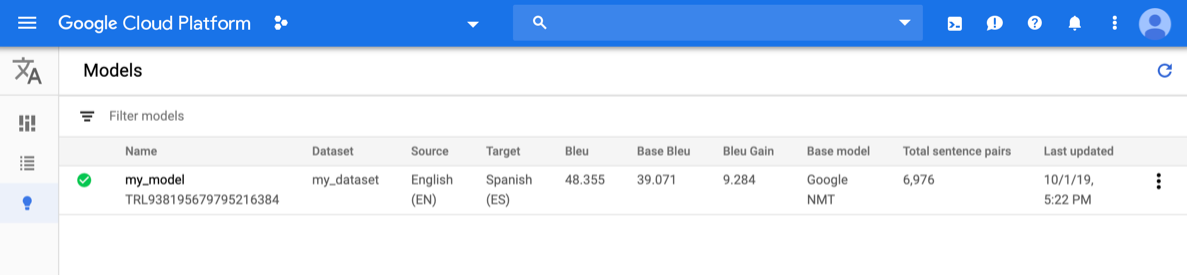
To see the models for a different project, select the project from the drop-down list in the upper right of the title bar.
Go
To learn how to install and use the client library for AutoML Translation, see AutoML Translation client libraries. For more information, see the AutoML Translation Go API reference documentation.
To authenticate to AutoML Translation, set up Application Default Credentials. For more information, see Set up authentication for a local development environment.
Java
To learn how to install and use the client library for AutoML Translation, see AutoML Translation client libraries. For more information, see the AutoML Translation Java API reference documentation.
To authenticate to AutoML Translation, set up Application Default Credentials. For more information, see Set up authentication for a local development environment.
Node.js
To learn how to install and use the client library for AutoML Translation, see AutoML Translation client libraries. For more information, see the AutoML Translation Node.js API reference documentation.
To authenticate to AutoML Translation, set up Application Default Credentials. For more information, see Set up authentication for a local development environment.
Python
To learn how to install and use the client library for AutoML Translation, see AutoML Translation client libraries. For more information, see the AutoML Translation Python API reference documentation.
To authenticate to AutoML Translation, set up Application Default Credentials. For more information, see Set up authentication for a local development environment.
Additional languages
C#: Please follow the C# setup instructions on the client libraries page and then visit the AutoML Translation reference documentation for .NET.
PHP: Please follow the PHP setup instructions on the client libraries page and then visit the AutoML Translation reference documentation for PHP.
Ruby: Please follow the Ruby setup instructions on the client libraries page and then visit the AutoML Translation reference documentation for Ruby.
Deleting a model
The following example deletes a model.
Web UI
In the AutoML Translation UI, click the light bulb icon in the left navigation menu to display the list of available models.
Click the three-dot menu at the far right of the row you want to delete and select Delete model.
Click Delete in the confirmation dialog box.
Go
To learn how to install and use the client library for AutoML Translation, see AutoML Translation client libraries. For more information, see the AutoML Translation Go API reference documentation.
To authenticate to AutoML Translation, set up Application Default Credentials. For more information, see Set up authentication for a local development environment.
Java
To learn how to install and use the client library for AutoML Translation, see AutoML Translation client libraries. For more information, see the AutoML Translation Java API reference documentation.
To authenticate to AutoML Translation, set up Application Default Credentials. For more information, see Set up authentication for a local development environment.
Node.js
To learn how to install and use the client library for AutoML Translation, see AutoML Translation client libraries. For more information, see the AutoML Translation Node.js API reference documentation.
To authenticate to AutoML Translation, set up Application Default Credentials. For more information, see Set up authentication for a local development environment.
Python
To learn how to install and use the client library for AutoML Translation, see AutoML Translation client libraries. For more information, see the AutoML Translation Python API reference documentation.
To authenticate to AutoML Translation, set up Application Default Credentials. For more information, see Set up authentication for a local development environment.
Additional languages
C#: Please follow the C# setup instructions on the client libraries page and then visit the AutoML Translation reference documentation for .NET.
PHP: Please follow the PHP setup instructions on the client libraries page and then visit the AutoML Translation reference documentation for PHP.
Ruby: Please follow the Ruby setup instructions on the client libraries page and then visit the AutoML Translation reference documentation for Ruby.