모델 만들기 및 관리

준비된 데이터세트로 학습시켜 커스텀 모델을 만듭니다. AutoML Translation에서는 데이터세트의 항목을 사용해 모델을 학습시키고 테스트하며 평가합니다. 결과를 검토하고 필요하면 학습 데이터세트를 조정하며 향상된 데이터세트를 사용하여 새 모델을 학습시킵니다.

모델 학습이 완료되기까지 몇 시간 정도 걸릴 수 있습니다. AutoML API를 사용하면 학습의 상태를 확인할 수 있습니다.

학습을 시작할 때마다 AutoML Translation에서 새 모델을 생성하므로 프로젝트에 수많은 모델이 포함될 수 있습니다. 프로젝트의 모델 목록을 가져와 더 이상 필요 없는 모델을 삭제할 수 있습니다.

모델 학습

견고한 학습 문장 쌍 세트를 포함하는 데이터세트가 있다면 커스텀 모델을 만들고 학습할 준비가 된 것입니다.

웹 UI

  1. AutoML Translation UI를 엽니다.

    데이터세트 페이지에는 현재 프로젝트에 사용 가능한 데이터세트가 표시됩니다.

  2. 커스텀 모델 학습에 사용할 데이터 세트를 선택합니다.

    선택한 데이터 세트의 표시 이름이 제목 표시줄에 나타나고 페이지에는 데이터 세트의 개별 항목이 '학습', '유효성 검사' 또는 '테스트'라는 라벨과 함께 나열됩니다.

  3. 데이터 세트 검토가 끝났으면 제목 표시줄 바로 아래에 있는 학습 탭을 클릭합니다.
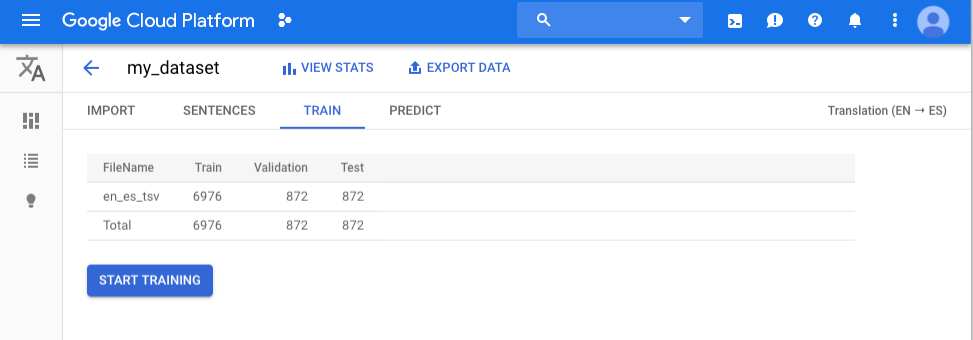
    my_dataset 데이터 세트의 학습 탭

  4. 학습 시작을 클릭합니다.

    새 모델 학습 대화상자가 나타납니다.

  5. 모델의 이름을 지정합니다.

  6. 학습 시작을 클릭하여 커스텀 모델 학습을 시작합니다.

모델 학습이 완료되기까지 몇 시간 정도 걸릴 수 있습니다. 모델 학습이 정상적으로 끝나면 프로그램에 가입할 때 사용한 이메일 주소로 메시지가 발송됩니다.

REST

요청 데이터를 사용하기 전에 다음을 바꿉니다.

  • project-id: Google Cloud Platform 프로젝트 ID
  • model-name: 새 모델의 이름입니다.
  • dataset-id: 데이터 세트의 ID입니다. ID는 데이터 세트 이름의 마지막 요소입니다. 예를 들어 데이터 세트 이름이 projects/434039606874/locations/us-central1/datasets/3104518874390609379이면 데이터 세트의 ID는 3104518874390609379가 됩니다.

HTTP 메서드 및 URL:

POST https://automl.googleapis.com/v1/projects/project-id/locations/us-central1/models

JSON 요청 본문:

{
    "displayName": "model-name",
    "dataset_id": "dataset-id",
    "translationModelMetadata": {
        "base_model" : ""
    }
}

요청을 보내려면 다음 옵션 중 하나를 펼칩니다.

다음과 비슷한 JSON 응답이 표시됩니다.

{
  "name": "projects/project-number/locations/us-central1/operations/operation-id",
  "metadata": {
    "@type": "type.googleapis.com/google.cloud.automl.v1.OperationMetadata",
    "createTime": "2019-10-02T18:40:04.010343Z",
    "updateTime": "2019-10-02T18:40:04.010343Z",
    "createModelDetails": {}
  }
}

Go

AutoML Translation용 클라이언트 라이브러리를 설치하고 사용하는 방법은 AutoML Translation 클라이언트 라이브러리를 참조하세요. 자세한 내용은 AutoML Translation Go API 참조 문서를 확인하세요.

AutoML Translation에 인증하려면 애플리케이션 기본 사용자 인증 정보를 설정합니다. 자세한 내용은 로컬 개발 환경의 인증 설정을 참조하세요.

import (
	"context"
	"fmt"
	"io"

	automl "cloud.google.com/go/automl/apiv1"
	"cloud.google.com/go/automl/apiv1/automlpb"
)

// translateCreateModel creates a model for translate.
func translateCreateModel(w io.Writer, projectID string, location string, datasetID string, modelName string) error {
	// projectID := "my-project-id"
	// location := "us-central1"
	// datasetID := "TRL123456789..."
	// modelName := "model_display_name"

	ctx := context.Background()
	client, err := automl.NewClient(ctx)
	if err != nil {
		return fmt.Errorf("NewClient: %w", err)
	}
	defer client.Close()

	req := &automlpb.CreateModelRequest{
		Parent: fmt.Sprintf("projects/%s/locations/%s", projectID, location),
		Model: &automlpb.Model{
			DisplayName: modelName,
			DatasetId:   datasetID,
			ModelMetadata: &automlpb.Model_TranslationModelMetadata{
				TranslationModelMetadata: &automlpb.TranslationModelMetadata{},
			},
		},
	}

	op, err := client.CreateModel(ctx, req)
	if err != nil {
		return fmt.Errorf("CreateModel: %w", err)
	}
	fmt.Fprintf(w, "Processing operation name: %q\n", op.Name())
	fmt.Fprintf(w, "Training started...\n")

	return nil
}

Java

AutoML Translation용 클라이언트 라이브러리를 설치하고 사용하는 방법은 AutoML Translation 클라이언트 라이브러리를 참조하세요. 자세한 내용은 AutoML Translation Java API 참조 문서를 확인하세요.

AutoML Translation에 인증하려면 애플리케이션 기본 사용자 인증 정보를 설정합니다. 자세한 내용은 로컬 개발 환경의 인증 설정을 참조하세요.

import com.google.api.gax.longrunning.OperationFuture;
import com.google.cloud.automl.v1.AutoMlClient;
import com.google.cloud.automl.v1.LocationName;
import com.google.cloud.automl.v1.Model;
import com.google.cloud.automl.v1.OperationMetadata;
import com.google.cloud.automl.v1.TranslationModelMetadata;
import java.io.IOException;
import java.util.concurrent.ExecutionException;

class TranslateCreateModel {

  public static void main(String[] args)
      throws IOException, ExecutionException, InterruptedException {
    // TODO(developer): Replace these variables before running the sample.
    String projectId = "YOUR_PROJECT_ID";
    String datasetId = "YOUR_DATASET_ID";
    String displayName = "YOUR_DATASET_NAME";
    createModel(projectId, datasetId, displayName);
  }

  // Create a model
  static void createModel(String projectId, String datasetId, String displayName)
      throws IOException, ExecutionException, InterruptedException {
    // Initialize client that will be used to send requests. This client only needs to be created
    // once, and can be reused for multiple requests. After completing all of your requests, call
    // the "close" method on the client to safely clean up any remaining background resources.
    try (AutoMlClient client = AutoMlClient.create()) {
      // A resource that represents Google Cloud Platform location.
      LocationName projectLocation = LocationName.of(projectId, "us-central1");
      TranslationModelMetadata translationModelMetadata =
          TranslationModelMetadata.newBuilder().build();
      Model model =
          Model.newBuilder()
              .setDisplayName(displayName)
              .setDatasetId(datasetId)
              .setTranslationModelMetadata(translationModelMetadata)
              .build();

      // Create a model with the model metadata in the region.
      OperationFuture<Model, OperationMetadata> future =
          client.createModelAsync(projectLocation, model);
      // OperationFuture.get() will block until the model is created, which may take several hours.
      // You can use OperationFuture.getInitialFuture to get a future representing the initial
      // response to the request, which contains information while the operation is in progress.
      System.out.format("Training operation name: %s\n", future.getInitialFuture().get().getName());
      System.out.println("Training started...");
    }
  }
}

Node.js

AutoML Translation용 클라이언트 라이브러리를 설치하고 사용하는 방법은 AutoML Translation 클라이언트 라이브러리를 참조하세요. 자세한 내용은 AutoML Translation Node.js API 참조 문서를 확인하세요.

AutoML Translation에 인증하려면 애플리케이션 기본 사용자 인증 정보를 설정합니다. 자세한 내용은 로컬 개발 환경의 인증 설정을 참조하세요.

/**
 * TODO(developer): Uncomment these variables before running the sample.
 */
// const projectId = 'YOUR_PROJECT_ID';
// const location = 'us-central1';
// const dataset_id = 'YOUR_DATASET_ID';
// const displayName = 'YOUR_DISPLAY_NAME';

// Imports the Google Cloud AutoML library
const {AutoMlClient} = require('@google-cloud/automl').v1;

// Instantiates a client
const client = new AutoMlClient();

async function createModel() {
  // Construct request
  const request = {
    parent: client.locationPath(projectId, location),
    model: {
      displayName: displayName,
      datasetId: datasetId,
      translationModelMetadata: {},
    },
  };

  // Don't wait for the LRO
  const [operation] = await client.createModel(request);
  console.log('Training started...');
  console.log(`Training operation name: ${operation.name}`);
}

createModel();

Python

AutoML Translation용 클라이언트 라이브러리를 설치하고 사용하는 방법은 AutoML Translation 클라이언트 라이브러리를 참조하세요. 자세한 내용은 AutoML Translation Python API 참조 문서를 확인하세요.

AutoML Translation에 인증하려면 애플리케이션 기본 사용자 인증 정보를 설정합니다. 자세한 내용은 로컬 개발 환경의 인증 설정을 참조하세요.

from google.cloud import automl

# TODO(developer): Uncomment and set the following variables
# project_id = "YOUR_PROJECT_ID"
# dataset_id = "YOUR_DATASET_ID"
# display_name = "YOUR_MODEL_NAME"

client = automl.AutoMlClient()

# A resource that represents Google Cloud Platform location.
project_location = f"projects/{project_id}/locations/us-central1"
translation_model_metadata = automl.TranslationModelMetadata()
model = automl.Model(
    display_name=display_name,
    dataset_id=dataset_id,
    translation_model_metadata=translation_model_metadata,
)

# Create a model with the model metadata in the region.
response = client.create_model(parent=project_location, model=model)

print(f"Training operation name: {response.operation.name}")
print("Training started...")

추가 언어

C#: 클라이언트 라이브러리 페이지의 C# 설정 안내를 따른 후 .NET용 AutoML 번역 참조 문서를 참조하세요.

PHP: 클라이언트 라이브러리 페이지의 PHP 설정 안내를 따른 후 PHP용 AutoML 번역 참조 문서를 참조하세요.

Ruby: 클라이언트 라이브러리 페이지의 Ruby 설정 안내를 따른 다음 Ruby용 AutoML 번역 참조 문서를 참조하세요.

작업 상태 가져오기

작업을 시작할 때 응답의 작업 ID를 사용하여 장기 실행 작업(항목을 데이터 세트로 가져오기 또는 모델 학습) 상태를 확인할 수 있습니다.

AutoML API를 사용해 작업 상태만 확인할 수 있습니다.

학습 작업의 상태를 가져오려면 operations 리소스에 GET 요청을 보내야 합니다. 아래에 이러한 요청을 보내는 방법이 나와 있습니다.

요청 데이터를 사용하기 전에 다음을 바꿉니다.

  • operation-name: API에 대한 원래 호출의 응답으로 반환되는 작업의 이름
  • project-id: Google Cloud Platform 프로젝트 ID

HTTP 메서드 및 URL:

GET https://automl.googleapis.com/v1/operation-name

요청을 보내려면 다음 옵션 중 하나를 펼칩니다.

다음과 비슷한 JSON 응답이 표시됩니다.

{
  "metadata": {
    "@type": "type.googleapis.com/google.cloud.automl.v1.OperationMetadata",
    "createTime": "2019-10-01T22:13:48.155710Z",
    "updateTime": "2019-10-01T22:13:52.321072Z",
    ...
  },
  "done": true,
  "response": {
    "@type": "resource-type",
    "name": "resource-name"
  }
}

작업 취소

작업 ID를 사용해 가져오기 또는 학습 작업을 취소할 수 있습니다.

요청 데이터를 사용하기 전에 다음을 바꿉니다.

  • operation-name: 작업의 전체 이름입니다. 전체 이름은 projects/project-id/locations/us-central1/operations/operation-id 형식입니다.
  • project-id: Google Cloud Platform 프로젝트 ID

HTTP 메서드 및 URL:

POST https://automl.googleapis.com/v1/operation-name:cancel

요청을 보내려면 다음 옵션 중 하나를 펼칩니다.

성공 상태 코드(2xx)와 빈 응답을 받게 됩니다.

모델 관리

모델 정보 가져오기

학습이 완료되면 새로 생성된 모델에 대한 정보를 얻을 수 있습니다.

이 섹션의 예시에서는 모델에 대한 기본 메타데이터를 반환합니다. 모델의 정확성 및 준비 상태에 대한 자세한 내용은 모델 평가를 참조하세요.

REST

요청 데이터를 사용하기 전에 다음을 바꿉니다.

  • model-name: 모델의 전체 이름입니다. 프로젝트 이름과 위치가 포함됩니다. 모델 이름의 예를 들면 projects/project-id/locations/us-central1/models/model-id입니다.
  • project-id: Google Cloud Platform 프로젝트 ID

HTTP 메서드 및 URL:

GET https://automl.googleapis.com/v1/model-name

요청을 보내려면 다음 옵션 중 하나를 펼칩니다.

다음과 비슷한 JSON 응답이 표시됩니다.

{
  "name": "projects/project-number/locations/us-central1/models/model-id",
  "displayName": "model-display-name",
  "datasetId": "dataset-id",
  "createTime": "2019-10-01T21:51:44.115634Z",
  "deploymentState": "DEPLOYED",
  "updateTime": "2019-10-02T00:22:36.330849Z",
  "translationModelMetadata": {
    "sourceLanguageCode": "source-language",
    "targetLanguageCode": "target-language"
  }
}

Go

AutoML Translation용 클라이언트 라이브러리를 설치하고 사용하는 방법은 AutoML Translation 클라이언트 라이브러리를 참조하세요. 자세한 내용은 AutoML Translation Go API 참조 문서를 확인하세요.

AutoML Translation에 인증하려면 애플리케이션 기본 사용자 인증 정보를 설정합니다. 자세한 내용은 로컬 개발 환경의 인증 설정을 참조하세요.

import (
	"context"
	"fmt"
	"io"

	automl "cloud.google.com/go/automl/apiv1"
	"cloud.google.com/go/automl/apiv1/automlpb"
)

// getModel gets a model.
func getModel(w io.Writer, projectID string, location string, modelID string) error {
	// projectID := "my-project-id"
	// location := "us-central1"
	// modelID := "TRL123456789..."

	ctx := context.Background()
	client, err := automl.NewClient(ctx)
	if err != nil {
		return fmt.Errorf("NewClient: %w", err)
	}
	defer client.Close()

	req := &automlpb.GetModelRequest{
		Name: fmt.Sprintf("projects/%s/locations/%s/models/%s", projectID, location, modelID),
	}

	model, err := client.GetModel(ctx, req)
	if err != nil {
		return fmt.Errorf("GetModel: %w", err)
	}

	// Retrieve deployment state.
	deploymentState := "undeployed"
	if model.GetDeploymentState() == automlpb.Model_DEPLOYED {
		deploymentState = "deployed"
	}

	// Display the model information.
	fmt.Fprintf(w, "Model name: %v\n", model.GetName())
	fmt.Fprintf(w, "Model display name: %v\n", model.GetDisplayName())
	fmt.Fprintf(w, "Model create time:\n")
	fmt.Fprintf(w, "\tseconds: %v\n", model.GetCreateTime().GetSeconds())
	fmt.Fprintf(w, "\tnanos: %v\n", model.GetCreateTime().GetNanos())
	fmt.Fprintf(w, "Model deployment state: %v\n", deploymentState)

	return nil
}

Java

AutoML Translation용 클라이언트 라이브러리를 설치하고 사용하는 방법은 AutoML Translation 클라이언트 라이브러리를 참조하세요. 자세한 내용은 AutoML Translation Java API 참조 문서를 확인하세요.

AutoML Translation에 인증하려면 애플리케이션 기본 사용자 인증 정보를 설정합니다. 자세한 내용은 로컬 개발 환경의 인증 설정을 참조하세요.

import com.google.cloud.automl.v1.AutoMlClient;
import com.google.cloud.automl.v1.Model;
import com.google.cloud.automl.v1.ModelName;
import java.io.IOException;

class GetModel {

  static void getModel() throws IOException {
    // TODO(developer): Replace these variables before running the sample.
    String projectId = "YOUR_PROJECT_ID";
    String modelId = "YOUR_MODEL_ID";
    getModel(projectId, modelId);
  }

  // Get a model
  static void getModel(String projectId, String modelId) throws IOException {
    // Initialize client that will be used to send requests. This client only needs to be created
    // once, and can be reused for multiple requests. After completing all of your requests, call
    // the "close" method on the client to safely clean up any remaining background resources.
    try (AutoMlClient client = AutoMlClient.create()) {
      // Get the full path of the model.
      ModelName modelFullId = ModelName.of(projectId, "us-central1", modelId);
      Model model = client.getModel(modelFullId);

      // Display the model information.
      System.out.format("Model name: %s\n", model.getName());
      // To get the model id, you have to parse it out of the `name` field. As models Ids are
      // required for other methods.
      // Name Format: `projects/{project_id}/locations/{location_id}/models/{model_id}`
      String[] names = model.getName().split("/");
      String retrievedModelId = names[names.length - 1];
      System.out.format("Model id: %s\n", retrievedModelId);
      System.out.format("Model display name: %s\n", model.getDisplayName());
      System.out.println("Model create time:");
      System.out.format("\tseconds: %s\n", model.getCreateTime().getSeconds());
      System.out.format("\tnanos: %s\n", model.getCreateTime().getNanos());
      System.out.format("Model deployment state: %s\n", model.getDeploymentState());
    }
  }
}

Node.js

AutoML Translation용 클라이언트 라이브러리를 설치하고 사용하는 방법은 AutoML Translation 클라이언트 라이브러리를 참조하세요. 자세한 내용은 AutoML Translation Node.js API 참조 문서를 확인하세요.

AutoML Translation에 인증하려면 애플리케이션 기본 사용자 인증 정보를 설정합니다. 자세한 내용은 로컬 개발 환경의 인증 설정을 참조하세요.

/**
 * TODO(developer): Uncomment these variables before running the sample.
 */
// const projectId = 'YOUR_PROJECT_ID';
// const location = 'us-central1';
// const modelId = 'YOUR_MODEL_ID';

// Imports the Google Cloud AutoML library
const {AutoMlClient} = require('@google-cloud/automl').v1;

// Instantiates a client
const client = new AutoMlClient();

async function getModel() {
  // Construct request
  const request = {
    name: client.modelPath(projectId, location, modelId),
  };

  const [response] = await client.getModel(request);

  console.log(`Model name: ${response.name}`);
  console.log(
    `Model id: ${
      response.name.split('/')[response.name.split('/').length - 1]
    }`
  );
  console.log(`Model display name: ${response.displayName}`);
  console.log('Model create time');
  console.log(`\tseconds ${response.createTime.seconds}`);
  console.log(`\tnanos ${response.createTime.nanos / 1e9}`);
  console.log(`Model deployment state: ${response.deploymentState}`);
}

getModel();

Python

AutoML Translation용 클라이언트 라이브러리를 설치하고 사용하는 방법은 AutoML Translation 클라이언트 라이브러리를 참조하세요. 자세한 내용은 AutoML Translation Python API 참조 문서를 확인하세요.

AutoML Translation에 인증하려면 애플리케이션 기본 사용자 인증 정보를 설정합니다. 자세한 내용은 로컬 개발 환경의 인증 설정을 참조하세요.

from google.cloud import automl

# TODO(developer): Uncomment and set the following variables
# project_id = "YOUR_PROJECT_ID"
# model_id = "YOUR_MODEL_ID"

client = automl.AutoMlClient()
# Get the full path of the model.
model_full_id = client.model_path(project_id, "us-central1", model_id)
model = client.get_model(name=model_full_id)

# Retrieve deployment state.
if model.deployment_state == automl.Model.DeploymentState.DEPLOYED:
    deployment_state = "deployed"
else:
    deployment_state = "undeployed"

# Display the model information.
print(f"Model name: {model.name}")
print("Model id: {}".format(model.name.split("/")[-1]))
print(f"Model display name: {model.display_name}")
print(f"Model create time: {model.create_time}")
print(f"Model deployment state: {deployment_state}")

추가 언어

C#: 클라이언트 라이브러리 페이지의 C# 설정 안내를 따른 후 .NET용 AutoML 번역 참조 문서를 참조하세요.

PHP: 클라이언트 라이브러리 페이지의 PHP 설정 안내를 따른 후 PHP용 AutoML 번역 참조 문서를 참조하세요.

Ruby: 클라이언트 라이브러리 페이지의 Ruby 설정 안내를 따른 다음 Ruby용 AutoML 번역 참조 문서를 참조하세요.

모델 나열

프로젝트는 수많은 모델을 포함할 수 있습니다. 이 섹션에서는 프로젝트에 사용할 수 있는 모델 목록을 검색하는 방법에 대해 설명합니다.

웹 UI

AutoML Translation UI에서 사용할 수 있는 모델 목록을 확인하려면 왼쪽 탐색 메뉴에 있는 전구 아이콘을 클릭하세요.

하나의 모델이 나열된 모델 탭

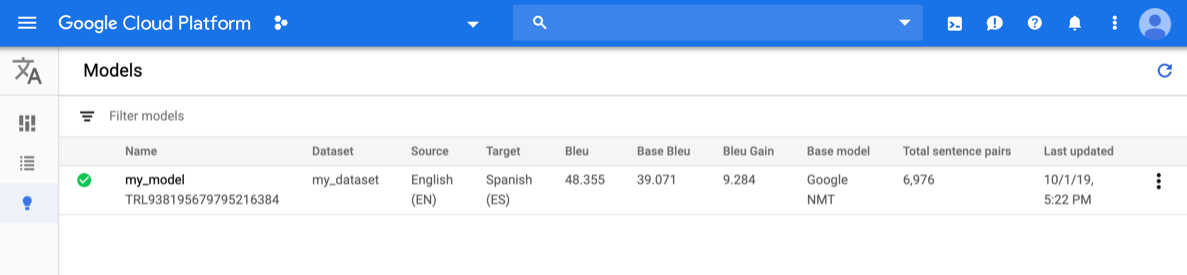
다른 프로젝트의 모델을 보려면 제목 표시줄 오른쪽 위에 있는 드롭다운 목록에서 프로젝트를 선택하세요.

REST

요청 데이터를 사용하기 전에 다음을 바꿉니다.

  • project-id: Google Cloud Platform 프로젝트 ID

HTTP 메서드 및 URL:

GET https://automl.googleapis.com/v1/projects/project-id/locations/us-central1/models

요청을 보내려면 다음 옵션 중 하나를 펼칩니다.

다음과 비슷한 JSON 응답이 표시됩니다.

{
  "model": [
    {
      "name": "projects/project-number/locations/us-central1/models/model-id",
      "displayName": "model-display-name",
      "datasetId": "dataset-id",
      "createTime": "2019-10-01T21:51:44.115634Z",
      "deploymentState": "DEPLOYED",
      "updateTime": "2019-10-02T00:22:36.330849Z",
      "translationModelMetadata": {
        "sourceLanguageCode": "source-language",
        "targetLanguageCode": "target-language"
      }
    }
  ]
}

Go

AutoML Translation용 클라이언트 라이브러리를 설치하고 사용하는 방법은 AutoML Translation 클라이언트 라이브러리를 참조하세요. 자세한 내용은 AutoML Translation Go API 참조 문서를 확인하세요.

AutoML Translation에 인증하려면 애플리케이션 기본 사용자 인증 정보를 설정합니다. 자세한 내용은 로컬 개발 환경의 인증 설정을 참조하세요.

import (
	"context"
	"fmt"
	"io"

	automl "cloud.google.com/go/automl/apiv1"
	"cloud.google.com/go/automl/apiv1/automlpb"
	"google.golang.org/api/iterator"
)

// listModels lists existing models.
func listModels(w io.Writer, projectID string, location string) error {
	// projectID := "my-project-id"
	// location := "us-central1"

	ctx := context.Background()
	client, err := automl.NewClient(ctx)
	if err != nil {
		return fmt.Errorf("NewClient: %w", err)
	}
	defer client.Close()

	req := &automlpb.ListModelsRequest{
		Parent: fmt.Sprintf("projects/%s/locations/%s", projectID, location),
	}

	it := client.ListModels(ctx, req)

	// Iterate over all results
	for {
		model, err := it.Next()
		if err == iterator.Done {
			break
		}
		if err != nil {
			return fmt.Errorf("ListModels.Next: %w", err)
		}

		// Retrieve deployment state.
		deploymentState := "undeployed"
		if model.GetDeploymentState() == automlpb.Model_DEPLOYED {
			deploymentState = "deployed"
		}

		// Display the model information.
		fmt.Fprintf(w, "Model name: %v\n", model.GetName())
		fmt.Fprintf(w, "Model display name: %v\n", model.GetDisplayName())
		fmt.Fprintf(w, "Model create time:\n")
		fmt.Fprintf(w, "\tseconds: %v\n", model.GetCreateTime().GetSeconds())
		fmt.Fprintf(w, "\tnanos: %v\n", model.GetCreateTime().GetNanos())
		fmt.Fprintf(w, "Model deployment state: %v\n", deploymentState)
	}

	return nil
}

Java

AutoML Translation용 클라이언트 라이브러리를 설치하고 사용하는 방법은 AutoML Translation 클라이언트 라이브러리를 참조하세요. 자세한 내용은 AutoML Translation Java API 참조 문서를 확인하세요.

AutoML Translation에 인증하려면 애플리케이션 기본 사용자 인증 정보를 설정합니다. 자세한 내용은 로컬 개발 환경의 인증 설정을 참조하세요.

import com.google.cloud.automl.v1.AutoMlClient;
import com.google.cloud.automl.v1.ListModelsRequest;
import com.google.cloud.automl.v1.LocationName;
import com.google.cloud.automl.v1.Model;
import java.io.IOException;

class ListModels {

  static void listModels() throws IOException {
    // TODO(developer): Replace these variables before running the sample.
    String projectId = "YOUR_PROJECT_ID";
    listModels(projectId);
  }

  // List the models available in the specified location
  static void listModels(String projectId) throws IOException {
    // Initialize client that will be used to send requests. This client only needs to be created
    // once, and can be reused for multiple requests. After completing all of your requests, call
    // the "close" method on the client to safely clean up any remaining background resources.
    try (AutoMlClient client = AutoMlClient.create()) {
      // A resource that represents Google Cloud Platform location.
      LocationName projectLocation = LocationName.of(projectId, "us-central1");

      // Create list models request.
      ListModelsRequest listModelsRequest =
          ListModelsRequest.newBuilder()
              .setParent(projectLocation.toString())
              .setFilter("")
              .build();

      // List all the models available in the region by applying filter.
      System.out.println("List of models:");
      for (Model model : client.listModels(listModelsRequest).iterateAll()) {
        // Display the model information.
        System.out.format("Model name: %s\n", model.getName());
        // To get the model id, you have to parse it out of the `name` field. As models Ids are
        // required for other methods.
        // Name Format: `projects/{project_id}/locations/{location_id}/models/{model_id}`
        String[] names = model.getName().split("/");
        String retrievedModelId = names[names.length - 1];
        System.out.format("Model id: %s\n", retrievedModelId);
        System.out.format("Model display name: %s\n", model.getDisplayName());
        System.out.println("Model create time:");
        System.out.format("\tseconds: %s\n", model.getCreateTime().getSeconds());
        System.out.format("\tnanos: %s\n", model.getCreateTime().getNanos());
        System.out.format("Model deployment state: %s\n", model.getDeploymentState());
      }
    }
  }
}

Node.js

AutoML Translation용 클라이언트 라이브러리를 설치하고 사용하는 방법은 AutoML Translation 클라이언트 라이브러리를 참조하세요. 자세한 내용은 AutoML Translation Node.js API 참조 문서를 확인하세요.

AutoML Translation에 인증하려면 애플리케이션 기본 사용자 인증 정보를 설정합니다. 자세한 내용은 로컬 개발 환경의 인증 설정을 참조하세요.

/**
 * TODO(developer): Uncomment these variables before running the sample.
 */
// const projectId = 'YOUR_PROJECT_ID';
// const location = 'us-central1';

// Imports the Google Cloud AutoML library
const {AutoMlClient} = require('@google-cloud/automl').v1;

// Instantiates a client
const client = new AutoMlClient();

async function listModels() {
  // Construct request
  const request = {
    parent: client.locationPath(projectId, location),
    filter: 'translation_model_metadata:*',
  };

  const [response] = await client.listModels(request);

  console.log('List of models:');
  for (const model of response) {
    console.log(`Model name: ${model.name}`);
    console.log(`
      Model id: ${model.name.split('/')[model.name.split('/').length - 1]}`);
    console.log(`Model display name: ${model.displayName}`);
    console.log('Model create time');
    console.log(`\tseconds ${model.createTime.seconds}`);
    console.log(`\tnanos ${model.createTime.nanos / 1e9}`);
    console.log(`Model deployment state: ${model.deploymentState}`);
  }
}

listModels();

Python

AutoML Translation용 클라이언트 라이브러리를 설치하고 사용하는 방법은 AutoML Translation 클라이언트 라이브러리를 참조하세요. 자세한 내용은 AutoML Translation Python API 참조 문서를 확인하세요.

AutoML Translation에 인증하려면 애플리케이션 기본 사용자 인증 정보를 설정합니다. 자세한 내용은 로컬 개발 환경의 인증 설정을 참조하세요.

from google.cloud import automl

# TODO(developer): Uncomment and set the following variables
# project_id = "YOUR_PROJECT_ID"

client = automl.AutoMlClient()
# A resource that represents Google Cloud Platform location.
project_location = f"projects/{project_id}/locations/us-central1"

request = automl.ListModelsRequest(parent=project_location, filter="")
response = client.list_models(request=request)

print("List of models:")
for model in response:
    # Display the model information.
    if model.deployment_state == automl.Model.DeploymentState.DEPLOYED:
        deployment_state = "deployed"
    else:
        deployment_state = "undeployed"

    print(f"Model name: {model.name}")
    print("Model id: {}".format(model.name.split("/")[-1]))
    print(f"Model display name: {model.display_name}")
    print(f"Model create time: {model.create_time}")
    print(f"Model deployment state: {deployment_state}")

추가 언어

C#: 클라이언트 라이브러리 페이지의 C# 설정 안내를 따른 후 .NET용 AutoML 번역 참조 문서를 참조하세요.

PHP: 클라이언트 라이브러리 페이지의 PHP 설정 안내를 따른 후 PHP용 AutoML 번역 참조 문서를 참조하세요.

Ruby: 클라이언트 라이브러리 페이지의 Ruby 설정 안내를 따른 다음 Ruby용 AutoML 번역 참조 문서를 참조하세요.

모델 삭제

다음 예시에서는 모델을 삭제합니다.

웹 UI

  1. AutoML Translation UI의 왼쪽 탐색 메뉴에서 전구 아이콘을 클릭하여 사용 가능한 모델 목록을 표시합니다.

    하나의 모델이 나열된 모델 탭

  2. 삭제하려는 행 맨 오른쪽에 있는 점 3개로 된 메뉴를 클릭하고 모델 삭제를 클릭합니다.

  3. 확인 대화상자에서 삭제를 클릭합니다.

REST

요청 데이터를 사용하기 전에 다음을 바꿉니다.

  • model-name: 모델의 전체 이름입니다. 프로젝트 이름과 위치가 포함됩니다. 모델 이름의 예를 들면 projects/project-id/locations/us-central1/models/model-id입니다.
  • project-id: Google Cloud Platform 프로젝트 ID

HTTP 메서드 및 URL:

DELETE https://automl.googleapis.com/v1/model-name

요청을 보내려면 다음 옵션 중 하나를 펼칩니다.

다음과 비슷한 JSON 응답이 표시됩니다.

{
  "name": "projects/project-number/locations/us-central1/operations/operation-id",
  "metadata": {
    "@type": "type.googleapis.com/google.cloud.automl.v1beta1.OperationMetadata",
    "progressPercentage": 100,
    "createTime": "2018-04-27T02:33:02.479200Z",
    "updateTime": "2018-04-27T02:35:17.309060Z"
  },
  "done": true,
  "response": {
    "@type": "type.googleapis.com/google.protobuf.Empty"
  }
}

Go

AutoML Translation용 클라이언트 라이브러리를 설치하고 사용하는 방법은 AutoML Translation 클라이언트 라이브러리를 참조하세요. 자세한 내용은 AutoML Translation Go API 참조 문서를 확인하세요.

AutoML Translation에 인증하려면 애플리케이션 기본 사용자 인증 정보를 설정합니다. 자세한 내용은 로컬 개발 환경의 인증 설정을 참조하세요.

import (
	"context"
	"fmt"
	"io"

	automl "cloud.google.com/go/automl/apiv1"
	"cloud.google.com/go/automl/apiv1/automlpb"
)

// deleteModel deletes a model.
func deleteModel(w io.Writer, projectID string, location string, modelID string) error {
	// projectID := "my-project-id"
	// location := "us-central1"
	// modelID := "TRL123456789..."

	ctx := context.Background()
	client, err := automl.NewClient(ctx)
	if err != nil {
		return fmt.Errorf("NewClient: %w", err)
	}
	defer client.Close()

	req := &automlpb.DeleteModelRequest{
		Name: fmt.Sprintf("projects/%s/locations/%s/models/%s", projectID, location, modelID),
	}

	op, err := client.DeleteModel(ctx, req)
	if err != nil {
		return fmt.Errorf("DeleteModel: %w", err)
	}
	fmt.Fprintf(w, "Processing operation name: %q\n", op.Name())

	if err := op.Wait(ctx); err != nil {
		return fmt.Errorf("Wait: %w", err)
	}

	fmt.Fprintf(w, "Model deleted.\n")

	return nil
}

Java

AutoML Translation용 클라이언트 라이브러리를 설치하고 사용하는 방법은 AutoML Translation 클라이언트 라이브러리를 참조하세요. 자세한 내용은 AutoML Translation Java API 참조 문서를 확인하세요.

AutoML Translation에 인증하려면 애플리케이션 기본 사용자 인증 정보를 설정합니다. 자세한 내용은 로컬 개발 환경의 인증 설정을 참조하세요.

import com.google.cloud.automl.v1.AutoMlClient;
import com.google.cloud.automl.v1.ModelName;
import com.google.protobuf.Empty;
import java.io.IOException;
import java.util.concurrent.ExecutionException;

class DeleteModel {

  public static void main(String[] args)
      throws IOException, ExecutionException, InterruptedException {
    // TODO(developer): Replace these variables before running the sample.
    String projectId = "YOUR_PROJECT_ID";
    String modelId = "YOUR_MODEL_ID";
    deleteModel(projectId, modelId);
  }

  // Delete a model
  static void deleteModel(String projectId, String modelId)
      throws IOException, ExecutionException, InterruptedException {
    // Initialize client that will be used to send requests. This client only needs to be created
    // once, and can be reused for multiple requests. After completing all of your requests, call
    // the "close" method on the client to safely clean up any remaining background resources.
    try (AutoMlClient client = AutoMlClient.create()) {
      // Get the full path of the model.
      ModelName modelFullId = ModelName.of(projectId, "us-central1", modelId);

      // Delete a model.
      Empty response = client.deleteModelAsync(modelFullId).get();

      System.out.println("Model deletion started...");
      System.out.println(String.format("Model deleted. %s", response));
    }
  }
}

Node.js

AutoML Translation용 클라이언트 라이브러리를 설치하고 사용하는 방법은 AutoML Translation 클라이언트 라이브러리를 참조하세요. 자세한 내용은 AutoML Translation Node.js API 참조 문서를 확인하세요.

AutoML Translation에 인증하려면 애플리케이션 기본 사용자 인증 정보를 설정합니다. 자세한 내용은 로컬 개발 환경의 인증 설정을 참조하세요.

/**
 * TODO(developer): Uncomment these variables before running the sample.
 */
// const projectId = 'YOUR_PROJECT_ID';
// const location = 'us-central1';
// const modelId = 'YOUR_MODEL_ID';

// Imports the Google Cloud AutoML library
const {AutoMlClient} = require('@google-cloud/automl').v1;

// Instantiates a client
const client = new AutoMlClient();

async function deleteModel() {
  // Construct request
  const request = {
    name: client.modelPath(projectId, location, modelId),
  };

  const [response] = await client.deleteModel(request);
  console.log(`Model deleted: ${response}`);
}

deleteModel();

Python

AutoML Translation용 클라이언트 라이브러리를 설치하고 사용하는 방법은 AutoML Translation 클라이언트 라이브러리를 참조하세요. 자세한 내용은 AutoML Translation Python API 참조 문서를 확인하세요.

AutoML Translation에 인증하려면 애플리케이션 기본 사용자 인증 정보를 설정합니다. 자세한 내용은 로컬 개발 환경의 인증 설정을 참조하세요.

from google.cloud import automl

# TODO(developer): Uncomment and set the following variables
# project_id = "YOUR_PROJECT_ID"
# model_id = "YOUR_MODEL_ID"

client = automl.AutoMlClient()
# Get the full path of the model.
model_full_id = client.model_path(project_id, "us-central1", model_id)
response = client.delete_model(name=model_full_id)

print(f"Model deleted. {response.result()}")

추가 언어

C#: 클라이언트 라이브러리 페이지의 C# 설정 안내를 따른 후 .NET용 AutoML 번역 참조 문서를 참조하세요.

PHP: 클라이언트 라이브러리 페이지의 PHP 설정 안내를 따른 후 PHP용 AutoML 번역 참조 문서를 참조하세요.

Ruby: 클라이언트 라이브러리 페이지의 Ruby 설정 안내를 따른 다음 Ruby용 AutoML 번역 참조 문서를 참조하세요.