After training a model, AutoML Translation uses items from the TEST set to evaluate the quality and accuracy of the new model. AutoML Translation expresses the model quality using its BLEU (Bilingual Evaluation Understudy) score, which indicates how similar the candidate text is to the reference texts, with values closer to one representing more similar texts.
The BLEU score provides an overall assessment of model quality. You can also evaluate the model output for specific data items by exporting the TEST set with the model predictions. The exported data includes both the reference text (from the original dataset) and the model's candidate text.
Use this data to evaluate your model's readiness. If you're not happy with the quality level, consider adding more (and more diverse) training sentence pairs. One option is to add more sentence pairs. Use the Add Files link in the title bar. Once you've added files, train a new model by clicking the Train New Model button on the Train page. Repeat this process until you reach a high enough quality level.
Getting the model evaluation
Web UI
Open the AutoML Translation console and click the lightbulb icon next to Models in the left navigation bar. The available models are displayed. For each model, the following information is included: Dataset (from which the model was trained), Source (language), Target (language), Base model (used to train the model).
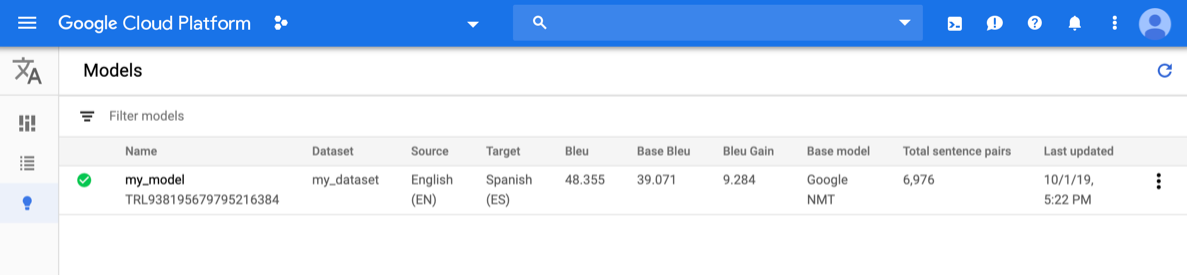
To view the models for a different project, select the project from the drop-down list in the upper right of the title bar.
Click the row for the model you want to evaluate.
The Predict tab operns.
Here, you can test your model and see the results for both custom model and the base model you used to train with.
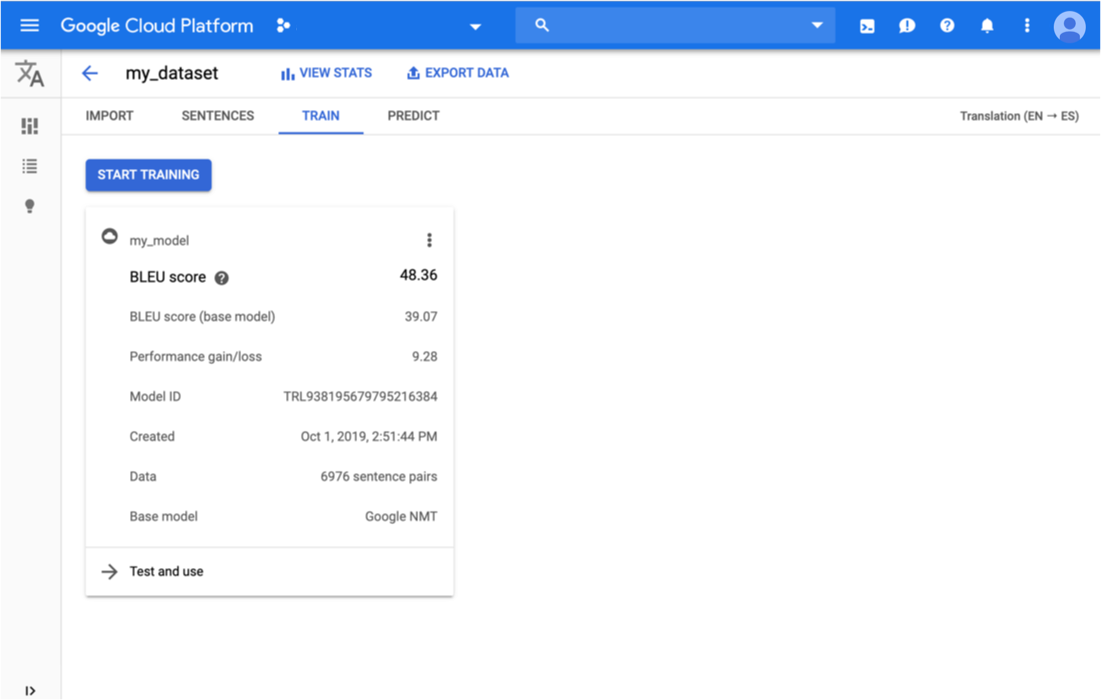
Click the Train tab just below the title bar.
When training has completed for the model, AutoML Translation shows its evaluation metrics.
Go
To learn how to install and use the client library for AutoML Translation, see AutoML Translation client libraries. For more information, see the AutoML Translation Go API reference documentation.
To authenticate to AutoML Translation, set up Application Default Credentials. For more information, see Set up authentication for a local development environment.
Java
To learn how to install and use the client library for AutoML Translation, see AutoML Translation client libraries. For more information, see the AutoML Translation Java API reference documentation.
To authenticate to AutoML Translation, set up Application Default Credentials. For more information, see Set up authentication for a local development environment.
Node.js
To learn how to install and use the client library for AutoML Translation, see AutoML Translation client libraries. For more information, see the AutoML Translation Node.js API reference documentation.
To authenticate to AutoML Translation, set up Application Default Credentials. For more information, see Set up authentication for a local development environment.
Python
To learn how to install and use the client library for AutoML Translation, see AutoML Translation client libraries. For more information, see the AutoML Translation Python API reference documentation.
To authenticate to AutoML Translation, set up Application Default Credentials. For more information, see Set up authentication for a local development environment.
Additional languages
C#: Please follow the C# setup instructions on the client libraries page and then visit the AutoML Translation reference documentation for .NET.
PHP: Please follow the PHP setup instructions on the client libraries page and then visit the AutoML Translation reference documentation for PHP.
Ruby: Please follow the Ruby setup instructions on the client libraries page and then visit the AutoML Translation reference documentation for Ruby.
Exporting test data with model predictions
After training a model, AutoML Translation uses items from the TEST set to evaluate the quality and accuracy of the new model. From the AutoML Translation console, you can export the TEST set to see how the model output compares to the reference text from the original dataset. AutoML Translation saves a TSV file to your Google Cloud Storage bucket, where each row has this format:
Source sentence tab Reference translation tab Model candidate translation
Web UI
Open the AutoML Translation console and click the lightbulb icon to the left of "Models" in the left navigation bar to display the available models.
To view the models for a different project, select the project from the drop-down list in the upper right of the title bar.
Select the model.
Click the Export Data button in the title bar.
Enter the full path to the Google Cloud Storage bucket where you want to save the exported .tsv file.
You must use a bucket associated with the current project.
Choose the model whose TEST data you want to export.
The Testing set with model predictions drop-down list lists the models trained using the same input dataset.
Click Export.
AutoML Translation writes a file named model-name
_evaluated.tsvin the specified Google Cloud Storage bucket.
Evaluate and compare models using a new test set
From the AutoML Translation console, you can reevaluate existing models by using a new set of test data. In a single evaluation, you can include up to 5 different models and then compare their results.
Upload your test data to Cloud Storage as a tab-separated
values (.tsv) file
or as a Translation Memory
eXchange
(.tmx) file.
AutoML Translation evaluates your models against the test set and then produces
evaluation scores. You can optionally save the results for each model as a
.tsv file in a Cloud Storage bucket, where each row has the following
format:
Source sentence tab Model candidate translation tab Reference translation
Web UI
Open the AutoML Translation console and click Models in the left navigation pane to display the available models.
To view the models for a different project, select the project from the drop-down list in the upper right of the title bar.
Select one of the models that you want to evaluate.
Click the Evaluate tab just below the title bar.
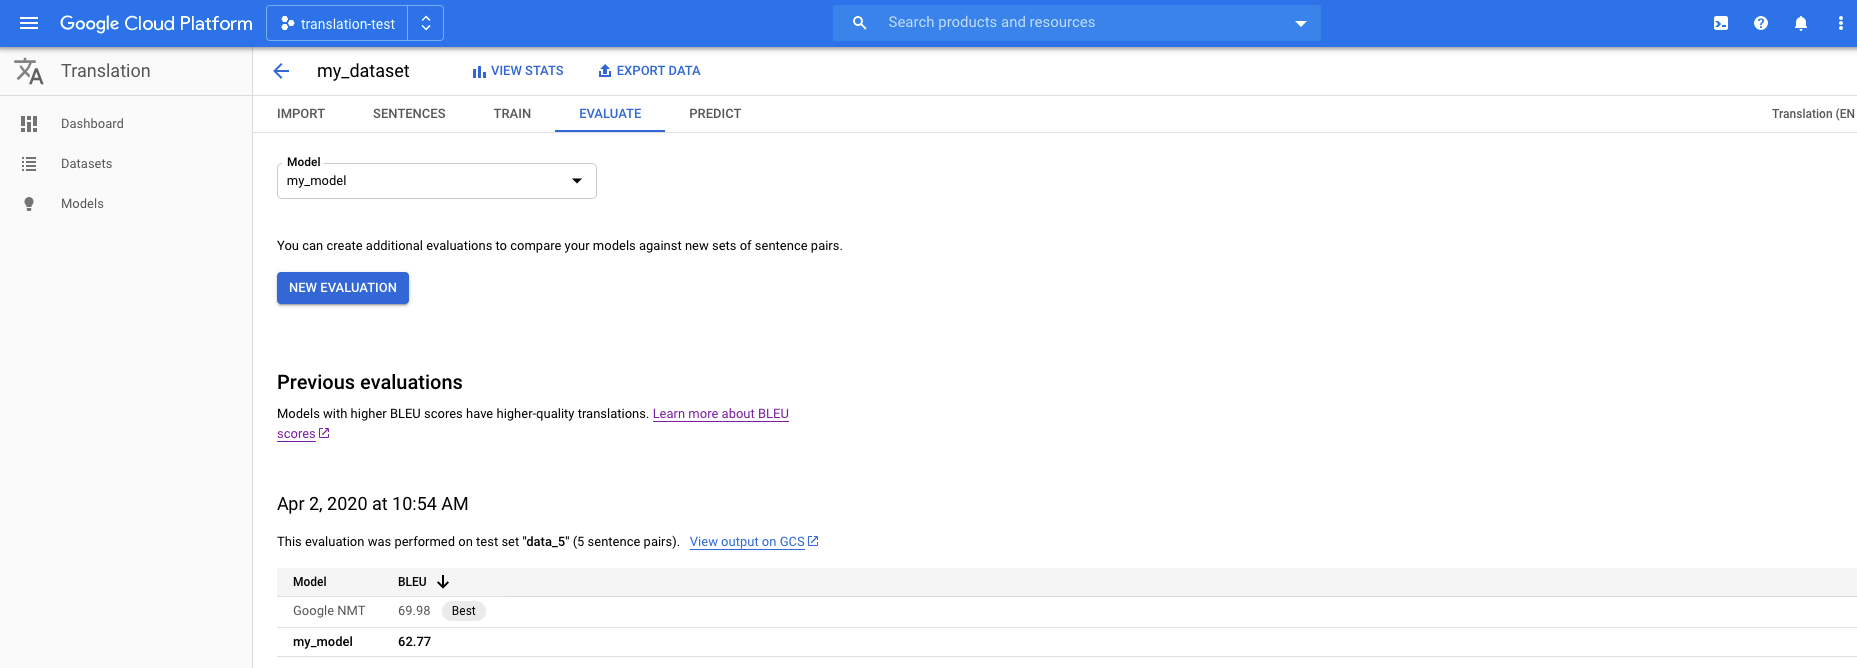
In the Evaluate tab, click New Evaluation.
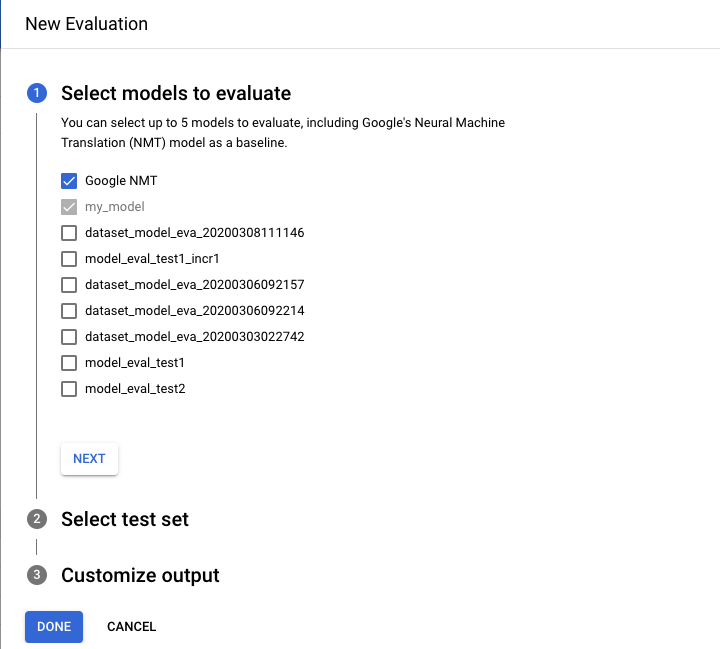
- Select the models that you want to evaluate and compare. The current model must be selected, and Google NMT is selected by default, which you can deselect.
- Specify a name for the Test set name to help you distinguish it from other evaluations, and then select your new test set from Cloud Storage.
- If you want to export the predictions that are based on your test set, specify a Cloud Storage bucket where the results will be stored (standard per character rate pricing applies).
Click Done.
AutoML Translation presents evaluation scores in a table format in the console after the evaluation is done. You can run only one evaluation at a time. If you specified a bucket to store prediction results, AutoML Translation writes files named model-name_test-set-name
.tsvto the bucket.
Understanding the BLEU Score
BLEU (BiLingual Evaluation Understudy) is a metric for automatically evaluating machine-translated text. The BLEU score is a number between zero and one that measures the similarity of the machine-translated text to a set of high quality reference translations. A value of 0 means that the machine-translated output has no overlap with the reference translation (low quality) while a value of 1 means there is perfect overlap with the reference translations (high quality).
It has been shown that BLEU scores correlate well with human judgment of translation quality. Note that even human translators do not achieve a perfect score of 1.0.
AutoML expresses BLEU scores as a percentage rather than a decimal between 0 and 1.
Interpretation
Trying to compare BLEU scores across different corpora and languages is strongly discouraged. Even comparing BLEU scores for the same corpus but with different numbers of reference translations can be highly misleading.
However, as a rough guideline, the following interpretation of BLEU scores (expressed as percentages rather than decimals) might be helpful.
| BLEU Score | Interpretation |
|---|---|
| < 10 | Almost useless |
| 10 - 19 | Hard to get the gist |
| 20 - 29 | The gist is clear, but has significant grammatical errors |
| 30 - 40 | Understandable to good translations |
| 40 - 50 | High quality translations |
| 50 - 60 | Very high quality, adequate, and fluent translations |
| > 60 | Quality often better than human |
The following color gradient can be used as a general scale interpretation of the BLEU score:

The mathematical details
Mathematically, the BLEU score is defined as:
with
\[ precision_i = \dfrac{\sum_{\text{snt}\in\text{Cand-Corpus}}\sum_{i\in\text{snt}}\min(m^i_{cand}, m^i_{ref})} {w_t^i = \sum_{\text{snt'}\in\text{Cand-Corpus}}\sum_{i'\in\text{snt'}} m^{i'}_{cand}} \]
where
- \(m_{cand}^i\hphantom{xi}\) is the count of i-gram in candidate matching the reference translation
- \(m_{ref}^i\hphantom{xxx}\) is the count of i-gram in the reference translation
- \(w_t^i\hphantom{m_{max}}\) is the total number of i-grams in candidate translation
The formula consists of two parts: the brevity penalty and the n-gram overlap.
Brevity Penalty
The brevity penalty penalizes generated translations that are too short compared to the closest reference length with an exponential decay. The brevity penalty compensates for the fact that the BLEU score has no recall term.N-Gram Overlap
The n-gram overlap counts how many unigrams, bigrams, trigrams, and four-grams (i=1,...,4) match their n-gram counterpart in the reference translations. This term acts as a precision metric. Unigrams account for adequacy while longer n-grams account for fluency of the translation. To avoid overcounting, the n-gram counts are clipped to the maximal n-gram count occurring in the reference (\(m_{ref}^n\)).
Examples
Calculating \(precision_1\)
Consider this reference sentence and candidate translation:
Reference: the cat is on the mat
Candidate: the the the cat mat
The first step is to count the occurrences of each unigram in the reference and the candidate. Note that the BLEU metric is case-sensitive.
| Unigram | \(m_{cand}^i\hphantom{xi}\) | \(m_{ref}^i\hphantom{xxx}\) | \(\min(m^i_{cand}, m^i_{ref})\) |
|---|---|---|---|
the |
3 | 2 | 2 |
cat |
1 | 1 | 1 |
is |
0 | 1 | 0 |
on |
0 | 1 | 0 |
mat |
1 | 1 | 1 |
The total number of unigrams in the candidate (\(w_t^1\)) is 5, so \(precision_1\) = (2 + 1 + 1)/5 = 0.8.
Calculating the BLEU score
Reference:
The NASA Opportunity rover is battling a massive dust storm on Mars .
Candidate 1:
The Opportunity rover is combating a big sandstorm on Mars .
Candidate 2:
A NASA rover is fighting a massive storm on Mars .
The above example consists of a single reference and two candidate translations. The sentences are tokenized prior to computing the BLEU score as depicted above; for example, the final period is counted as a separate token.
To compute the BLEU score for each translation, we compute the following statistics.
- N-Gram Precisions
The following table contains the n-gram precisions for both candidates. - Brevity-Penalty
The brevity-penalty is the same for candidate 1 and candidate 2 since both sentences consist of 11 tokens. - BLEU-Score
Note that at least one matching 4-gram is required to get a BLEU score > 0. Since candidate translation 1 has no matching 4-gram, it has a BLEU score of 0.
| Metric | Candidate 1 | Candidate 2 |
|---|---|---|
| \(precision_1\) (1gram) | 8/11 | 9/11 |
| \(precision_2\) (2gram) | 4/10 | 5/10 |
| \(precision_3\) (3gram) | 2/9 | 2/9 |
| \(precision_4\) (4gram) | 0/8 | 1/8 |
| Brevity-Penalty | 0.83 | 0.83 |
| BLEU-Score | 0.0 | 0.27 |
Properties
BLEU is a Corpus-based Metric
The BLEU metric performs badly when used to evaluate individual sentences. For example, both example sentences get very low BLEU scores even though they capture most of the meaning. Because n-gram statistics for individual sentences are less meaningful, BLEU is by design a corpus-based metric; that is, statistics are accumulated over an entire corpus when computing the score. Note that the BLEU metric defined above cannot be factorized for individual sentences.No distinction between content and function words
The BLEU metric does not distinguish between content and function words, that is, a dropped function word like "a" gets the same penalty as if the name "NASA" were erroneously replaced with "ESA".Not good at capturing meaning and grammaticality of a sentence
The drop of a single word like "not" can change the polarity of a sentence. Also, taking only n-grams into account with n≤4 ignores long-range dependencies and thus BLEU often imposes only a small penalty for ungrammatical sentences.Normalization and Tokenization
Prior to computing the BLEU score, both the reference and candidate translations are normalized and tokenized. The choice of normalization and tokenization steps significantly affect the final BLEU score.