このドキュメントでは、Visual Studio 公開ウィザードを設定して、 Google Cloudへの .NET アプリのデプロイを簡略化する方法を説明します。
はじめに
Cloud Tools for Visual Studio の最新リリースでは、.NET アプリを Google Cloud にデプロイするのが以前より簡単になりました。以下のサポートされているターゲットにアプリケーションをデプロイするデプロイ ウィザードが拡張機能に組み込まれています。
- Compute Engine(ASP.NET 4.x アプリの場合)
- App Engine フレキシブル環境と Google Kubernetes Engine(ASP.NET Core アプリの場合)
デプロイ ウィザードは、プロジェクトでサポートされているターゲットを自動的に検出し、デプロイ プロセスを案内します。
はじめに
デプロイ ウィザードを呼び出すには、[ツール] > [Google Cloud Tools] > [Publish [PROJECT-NAME] to Google Cloud] を選択するか、ソリューション エクスプローラーでプロジェクト ノードを右クリックして [Publish [PROJECT-NAME] to Google Cloud] をクリックします。
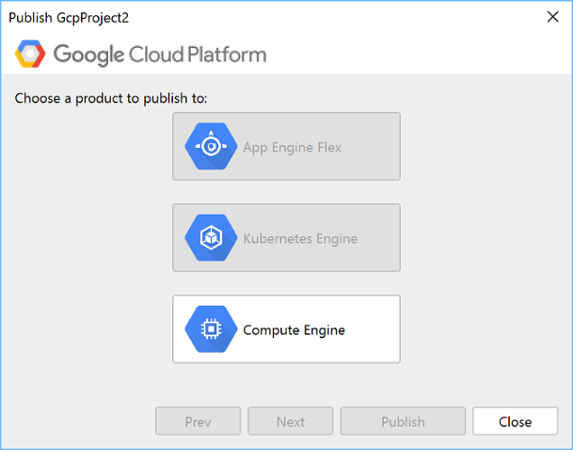
デプロイ ウィザードには、選択したプロジェクトと互換性のあるデプロイ ターゲットが表示されます。 Google Cloud
プロジェクトを変更する場合は、[ツール] > [Google Cloud Tools] > [Open Cloud Explorer] をクリックして Cloud Explorer を開き、デプロイするプロジェクトを選択します。
ASP.NET 4.x アプリのデプロイ
ASP.NET 4.x アプリを Compute Engine にデプロイするには:
[ツール] > [Google Cloud Tools] > [Publish [PROJECT-NAME] to Google Cloud] をクリックして、デプロイ ウィザードを開きます。
[Compute Engine] を選択します。
Windows VM インスタンスとデプロイの認証情報を選択します。
Windows VM は IIS を実行しており、Deployment Manager から作成された ASP.NET VM など、ASP.NET 4.x アプリを実行できる必要があります。
デプロイの認証情報を選択します。Windows 認証情報を作成するには、[資格情報の管理] をクリックします。
[Publish] をクリックしてアプリをビルドし、選択した VM にデプロイします。
デプロイの進行状況が Visual Studio の出力ウィンドウに表示され、進行状況インジケーターが Visual Studio のシェル ステータスバーに表示されます。
ASP.NET Core アプリのデプロイ
ASP.NET Core アプリは Docker コンテナ内で実行できるので、このアプリは App Engine フレキシブル環境と GKE にデプロイできます。
App Engine フレキシブル環境へのデプロイ
フレキシブル環境にデプロイするには:
[ツール] > [Google Cloud Tools] > [Publish [PROJECT-NAME] to Google Cloud] をクリックして、デプロイ ウィザードを開きます。
[App Engine Flex] を選択します。
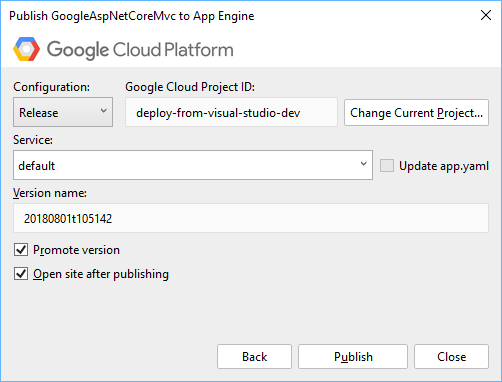
アプリのバージョン名とトラフィック管理の選択肢を入力します。
- デフォルトのバージョン名は、現在のシステム時刻に基づきます。別の名前を指定できます。
- プロモーション バージョンは、このアプリ バージョンがトラフィックの 100% を受信するかどうかを選択できます。このチェックボックスをオンにすると、デプロイ直後に新しいアプリがすべてのトラフィックを受信します。
[Publish] をクリックしてアプリをビルドし、App Engine フレキシブル環境にデプロイします。
これで作業は完了です。アプリがデプロイされ、進捗状況が Visual Studio の出力ウィンドウに表示されます。
カスタム App Engine の設定を行うには、プロジェクトのルートフォルダに app.yaml ファイルを作成します。
app.yaml を生成するには、デプロイするプロジェクトを右クリックして [Generate app.yaml and Dockerfile for [PROJECT-NAME]] をクリックします。デフォルトの Docker イメージを実行する場合、Docker ファイルを削除できます。
GKE へのデプロイ
GKE にデプロイするには:
[ツール] > [Google Cloud Tools] > [Publish [PROJECT-NAME] to Google Cloud] をクリックして、デプロイ ウィザードを開きます。
[Container Engine] を選択します。
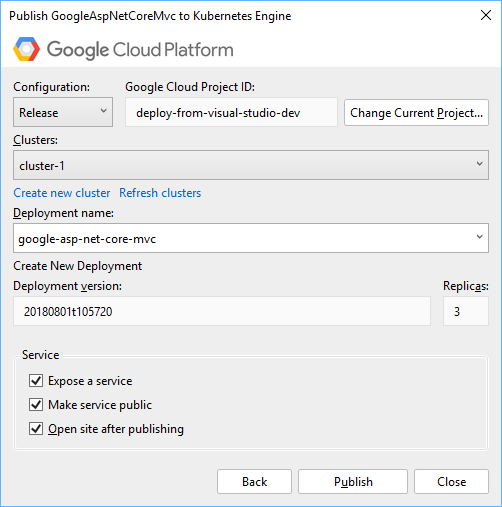
デプロイするクラスタを選択し、アプリのデプロイ名、バージョン、レプリカの数を入力します。
クラスタを作成するには、[Create new cluster] をクリックします。これにより、 Google Cloud コンソールのクラスタ作成ページに移動します。Visual Studio でクラスタを表示するには、[Refresh clusters] をクリックします。
デプロイ名は、Kubernetes デプロイを作成するときに使用されます。オプションで選択すると、クラスタでアプリを実行する kubernetes サービスも使用されます。名前をよりわかりやすい名前に変更できます。
- デフォルトのバージョン名は、現在のシステム時刻に基づきます。別の名前を指定できます。
レプリカの数は変更できます。デフォルトは 3 です。
インターネット上で Kubernetes サービスを公開することもできます。インターネット上で公共サービスを公開することにより、クラスタ外からサービスにアクセスするのに使用できるパブリック IP アドレスを取得します。
[Publish] をクリックします。
これで作業は完了です。アプリが Docker イメージにパッケージ化され、コンテナにデプロイされます。アプリが公開済みのサービスの場合、Visual Studio はサービスの IP アドレスが利用可能になるまで待機します。