Die F5 BIG-IP-Plattform bietet verschiedene Dienste, mit denen Sie die Sicherheit, Verfügbarkeit und Leistung Ihrer Anwendungen verbessern können. Dazu gehören L7-Load Balancing, Netzwerk-Firewalls, Web Application Firewalls (WAF) und DNS-Dienste. Für die verteilte Cloud von Google bietet BIG-IP externen Zugriff und L3/4-Load-Balancing-Dienste.
Zusätzliche Konfiguration
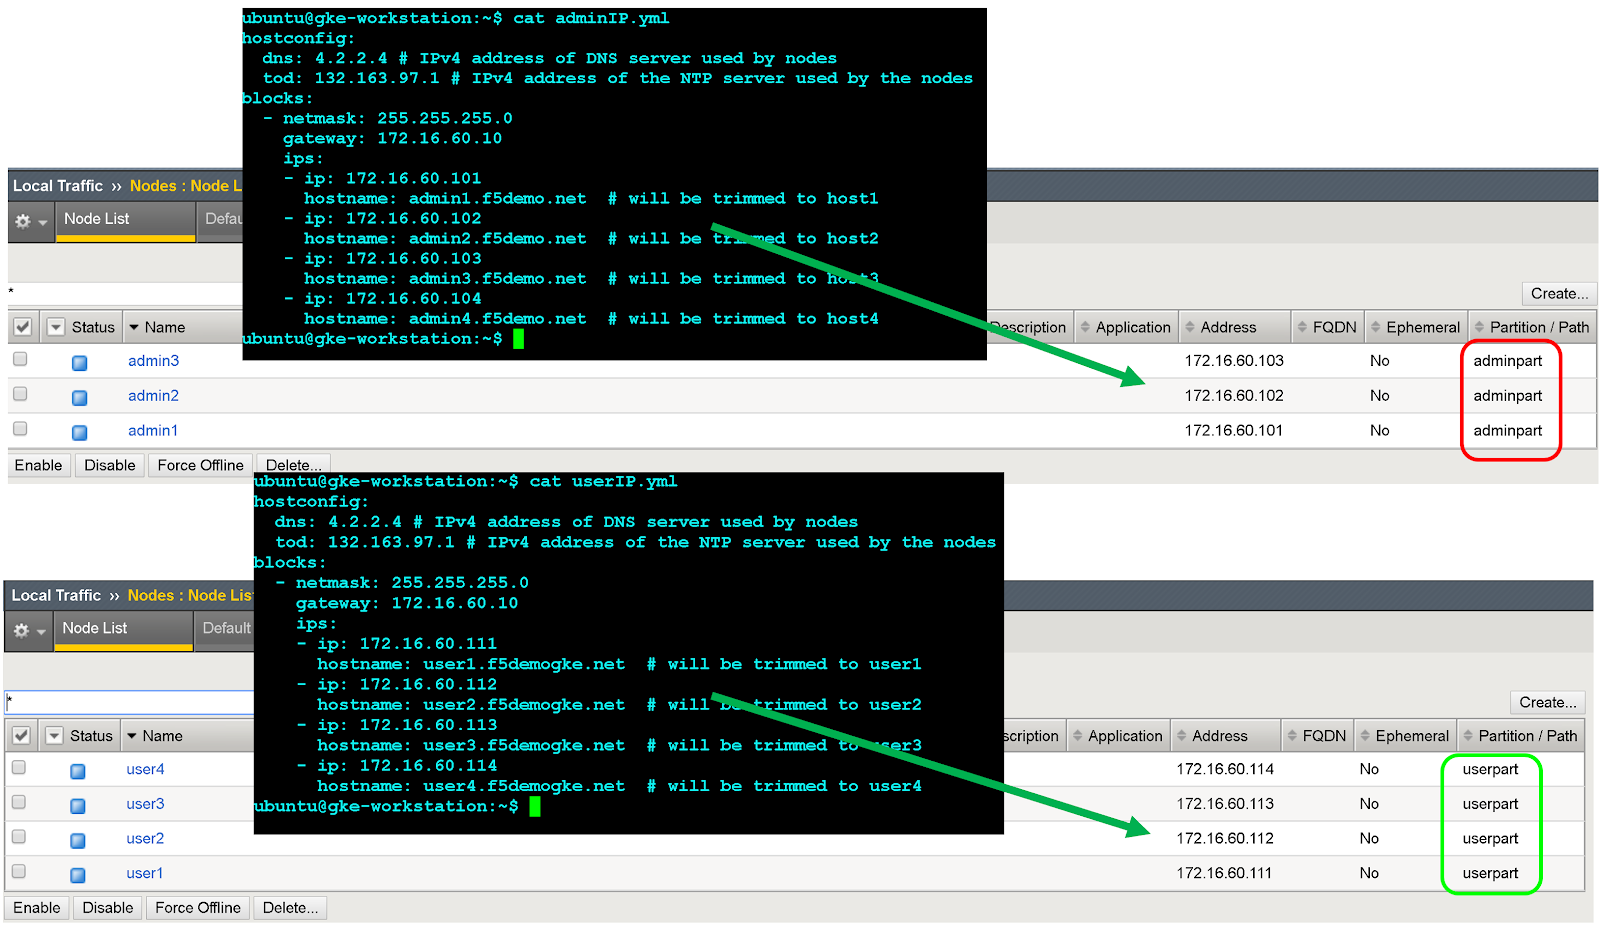
Nachdem das Einrichtungsprogramm abgeschlossen ist, müssen Sie für jeden Nutzercluster, den Sie freigeben und auf den Sie zugreifen möchten, eine Verwaltungspartition erstellen.
Zuerst definieren Sie eine Partition für den ersten Nutzercluster. Verwenden Sie Clusterpartitionen nicht für andere Zwecke.
Für jeden Cluster muss eine Partition vorhanden sein, die ausschließlich durch diesen Cluster verwendet wird.
BIG-IP für externe Endpunkte von Google Distributed Cloud konfigurieren
VIP für den Ingress-Controller des Nutzerclusters (freigegebener Port: 443)
VIP für den Ingress-Controller des Nutzerclusters (freigegebener Port: 80)
Knotenobjekt erstellen
Die externen IP-Adressen der Clusterknoten werden wiederum verwendet, um Knotenobjekte auf dem BIG-IP-System zu konfigurieren. Sie erstellen ein Knotenobjekt für jeden Google Distributed Cloud-Clusterknoten. Die Knoten werden Back-End-Pools hinzugefügt, die dann mit virtuellen Servern verknüpft werden.
Rufen Sie die IP-Adresse auf, um sich in der BIG-IP-Verwaltungskonsole anzumelden. Die Adresse wird während der Installation angegeben.
Klicken Sie auf die zuvor erstellte Nutzerpartition.
Gehen Sie zu Lokaler Traffic > Knoten > Knotenliste.
Klicken Sie auf Erstellen.
Geben Sie für jeden Clusterhost einen Namen und eine IP-Adresse ein und klicken Sie auf Fertig.
Backend-Pools erstellen
Sie erstellen einen Backend-Pool für jeden Knotenport.
Klicken Sie in der BIG-IP-Verwaltungskonsole auf Nutzerpartition für die zuvor erstellte Nutzerpartition.
Gehen Sie zu Lokaler Traffic > Pools > Poolliste.
Klicken Sie auf Erstellen.
Klicken Sie im Drop-down-Menü Konfiguration auf Erweitert.
Geben Sie im Feld NameIstio-80-pool ein.
Klicken Sie unter Systemdiagnose auf tcp, um die Erreichbarkeit des Poolmitglieds zu prüfen. Optional: Da es sich um eine manuelle Konfiguration handelt, können Sie auch erweiterte Monitore verwenden, die für Ihre Bereitstellung geeignet sind.
Klicken Sie bei Aktion bei Ausfall des Dienstes auf Ablehnen.
Klicken Sie für diese Anleitung in der Drop-down-Liste Load Balancing Method (Lastenausgleichsmethode) auf Round Robin.
Klicken Sie im Bereich Neue Mitglieder auf Knotenliste und wählen Sie dann den zuvor erstellten Knoten aus.
Geben Sie im Feld Dienstport die entsprechende nodePort aus der Konfigurationsdatei oder spec.ports[?].nodePort im Kubernetes-Dienst „istio ingress“ der Laufzeit (Name: istio-ingress, Namespace: gke-system) ein.
Klicken Sie auf Hinzufügen.
Wiederholen Sie die Schritte 8 und 9 und fügen Sie jede Clusterknoteninstanz hinzu.
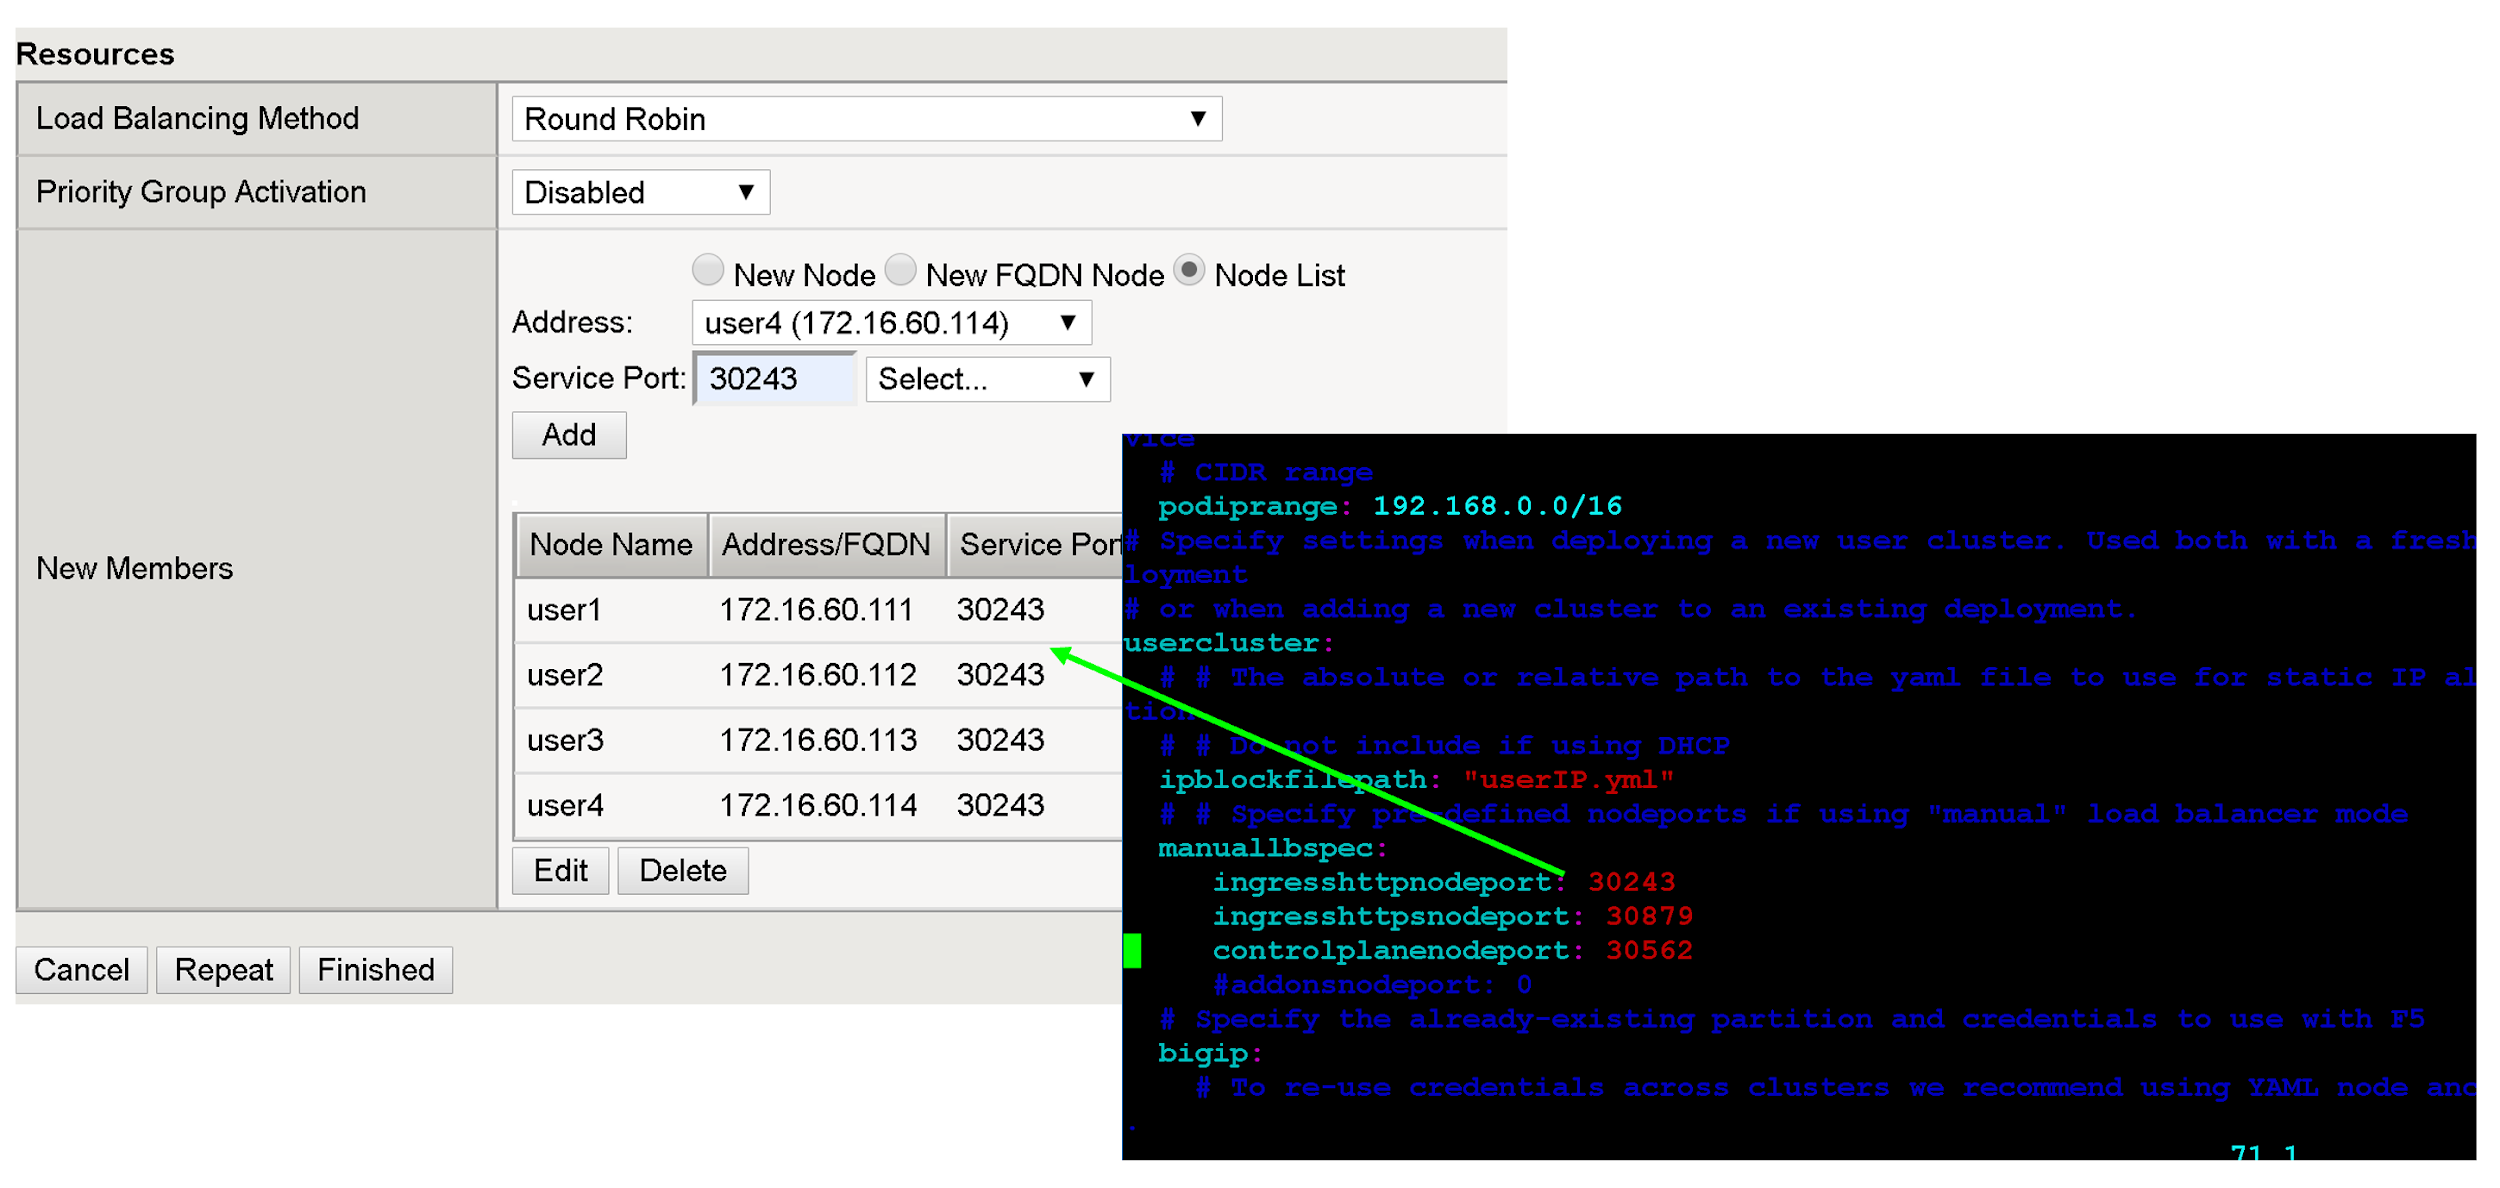
Klicken Sie auf Fertig.
Wiederholen Sie alle diese Schritte in diesem Abschnitt für die restlichen Nutzercluster-Knotenports.
Virtuelle Server erstellen
Sie erstellen insgesamt zwei virtuelle Server auf dem BIG-IP für den ersten Nutzercluster. Die virtuellen Server entsprechen den Kombinationen „VIP + Port“.
Klicken Sie in der BIG-IP-Verwaltungskonsole auf die zuvor erstellte Nutzerpartition.
Gehen Sie zu Lokaler Traffic > Virtuelle Server > Virtuelle Serverliste.
Klicken Sie auf Erstellen.
Geben Sie im Feld Nameistio-ingress-80 ein.
Geben Sie im Feld Zieladresse/‑maske die IP-Adresse für die VIP ein. Verwenden Sie für diese Anleitung das HTTP-Ingress-VIP in configuration file oder spec.loadBalancerIP im Kubernetes-Dienst „istio ingress“ der Laufzeit (Name: istio-ingress, Namespace: gke-system).
Geben Sie im Feld Service Port den entsprechenden Listener-Port für das VIP ein. Verwenden Sie für diese Anleitung den Port 80 oder spec.ports[?].port im Kubernetes-Dienst „istio ingress“ (Name: istio-ingress, Namespace: gke-system).
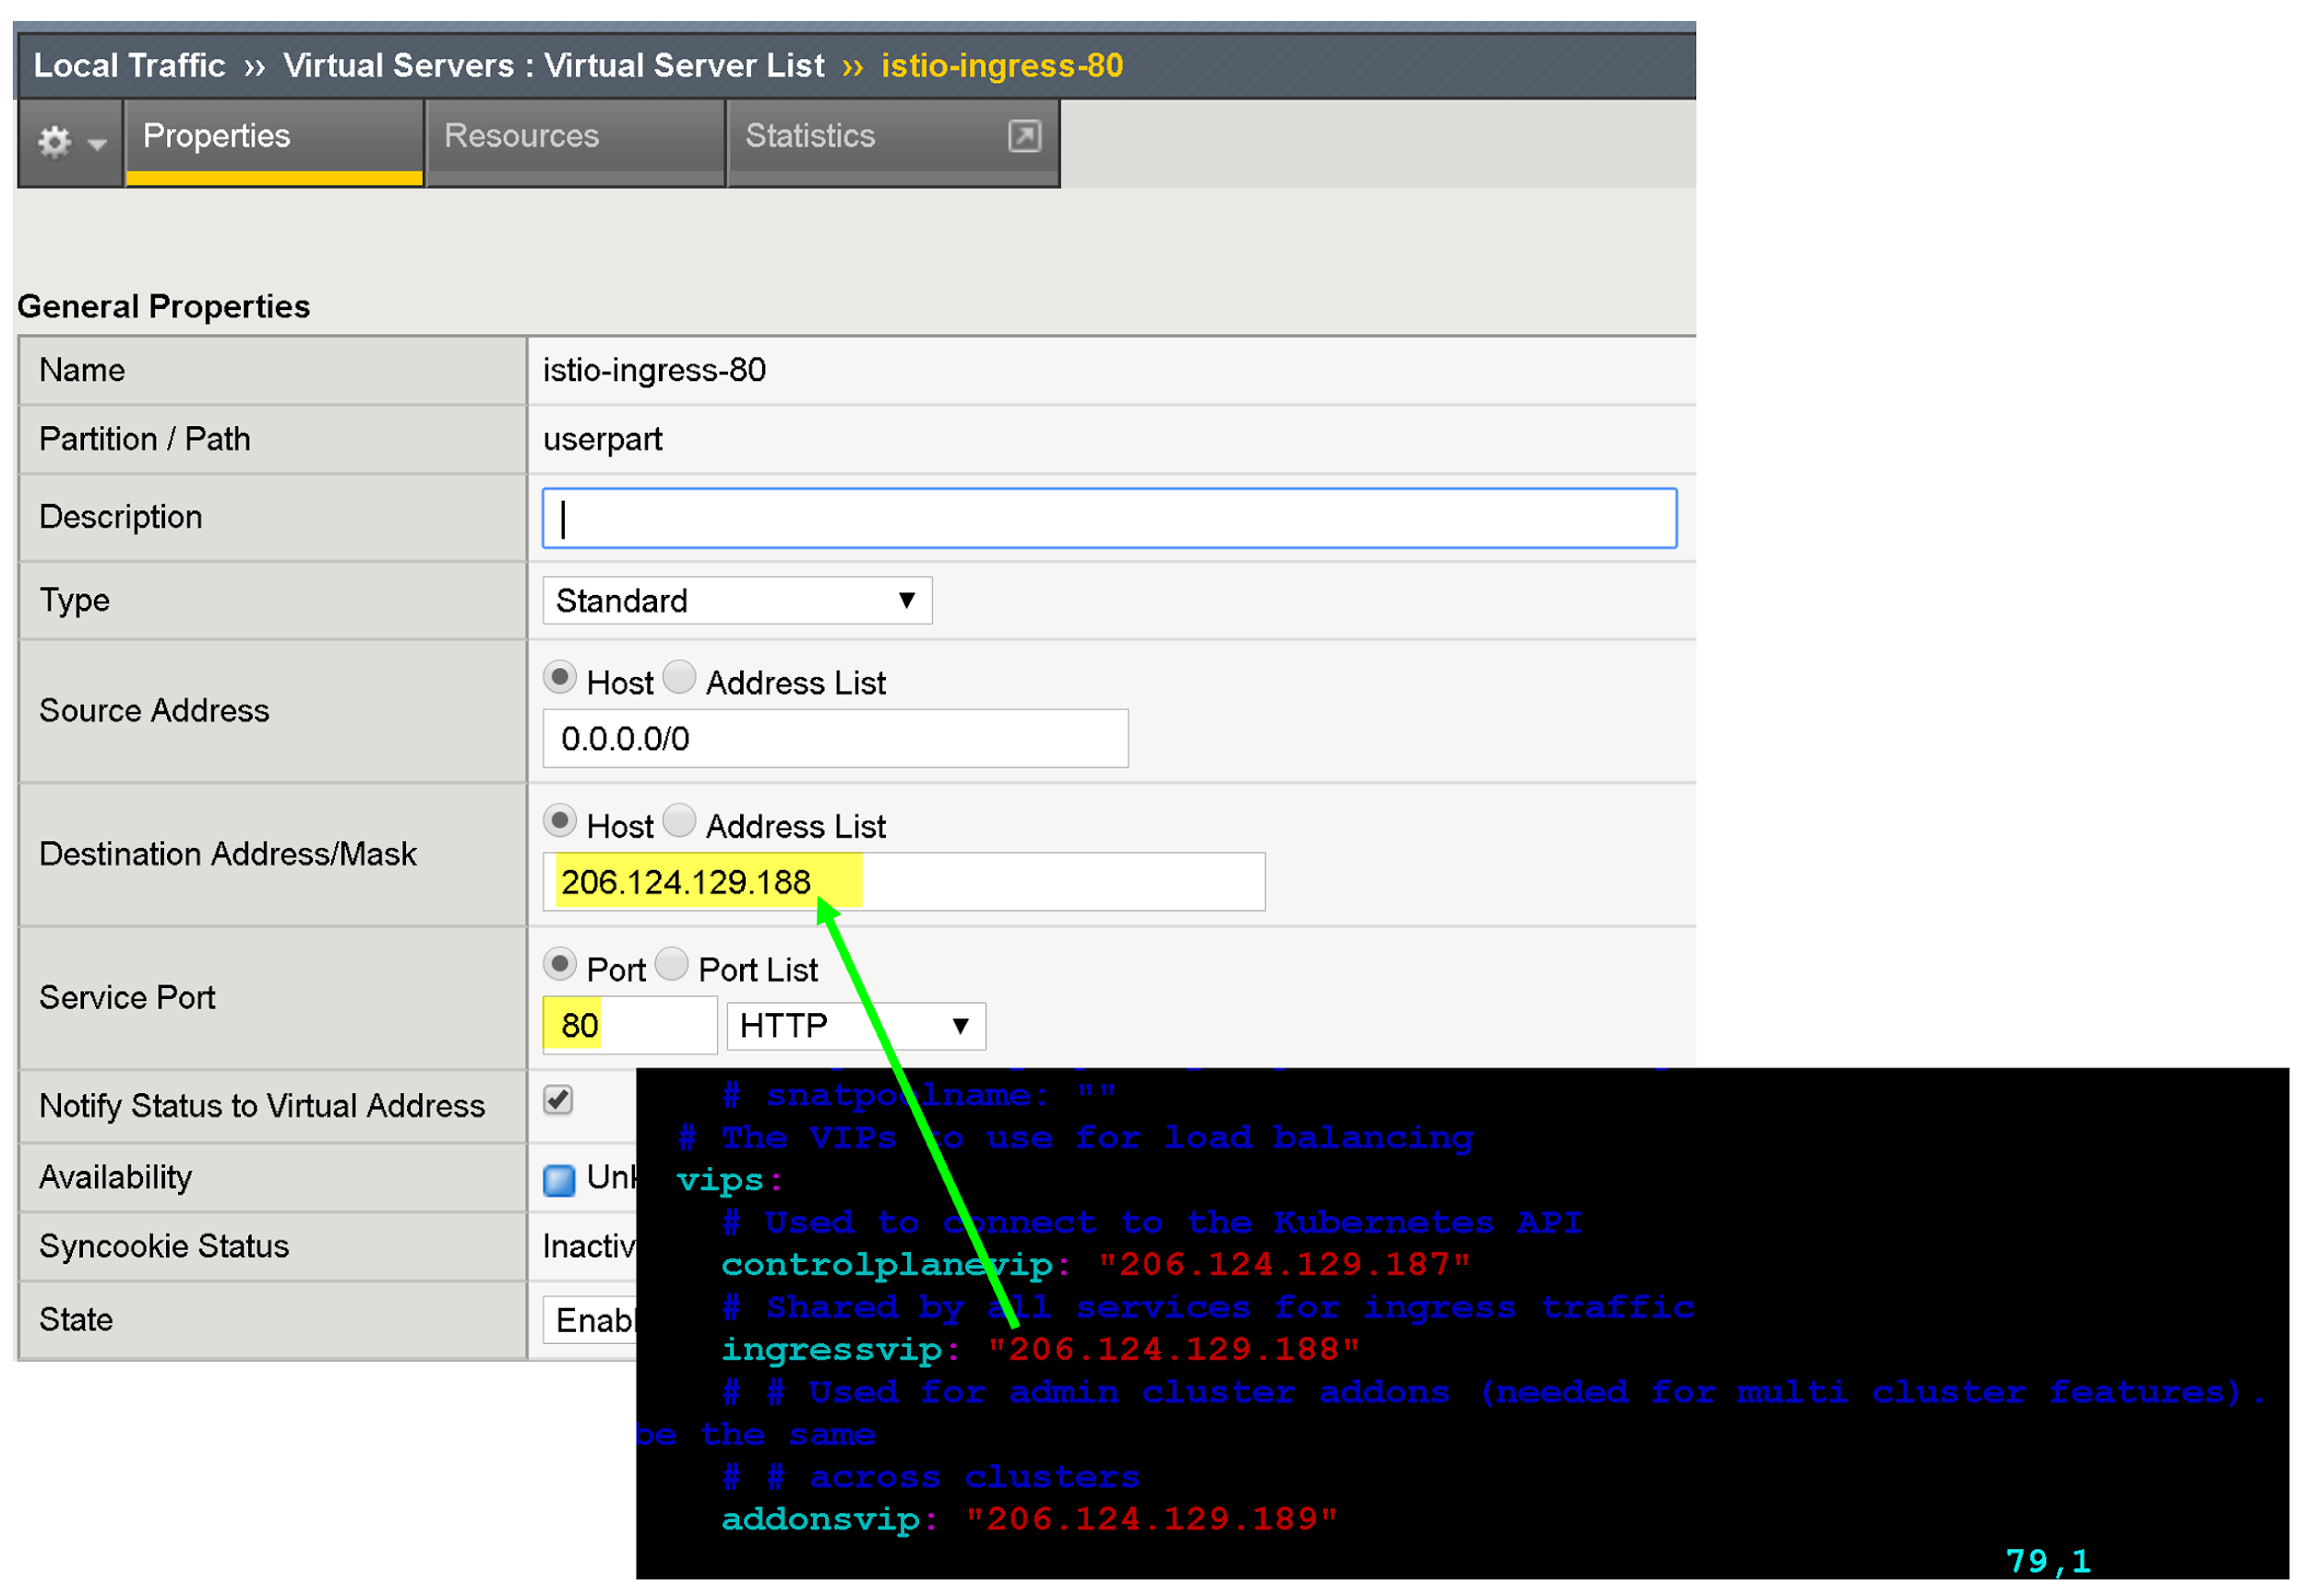
Es gibt mehrere Konfigurationsoptionen, um den Endpunkt Ihrer App zu optimieren, z. B. die Verknüpfung von protokollspezifischen Profilen, Zertifikatprofilen und WAF-Richtlinien.
Klicken Sie bei Source Address Translation (Übersetzung der Quelladresse) auf Auto Map.
Wählen Sie unter Default Pool (Standardpool) den entsprechenden Pool aus, den Sie zuvor erstellt haben.
[[["Leicht verständlich","easyToUnderstand","thumb-up"],["Mein Problem wurde gelöst","solvedMyProblem","thumb-up"],["Sonstiges","otherUp","thumb-up"]],[["Schwer verständlich","hardToUnderstand","thumb-down"],["Informationen oder Beispielcode falsch","incorrectInformationOrSampleCode","thumb-down"],["Benötigte Informationen/Beispiele nicht gefunden","missingTheInformationSamplesINeed","thumb-down"],["Problem mit der Übersetzung","translationIssue","thumb-down"],["Sonstiges","otherDown","thumb-down"]],["Zuletzt aktualisiert: 2025-07-22 (UTC)."],[],[],null,["This tutorial shows how to set up the\n[F5 BIG-IP](https://www.f5.com/products/big-ip-services) when\nyou [integrate with Google Distributed Cloud](/kubernetes-engine/distributed-cloud/vmware/docs)\nusing the\n[manual load-balancing mode on Google Distributed Cloud](/kubernetes-engine/distributed-cloud/vmware/docs/how-to/manual-load-balance).\n\nThe F5 BIG-IP platform provides\nvarious services to help you enhance the security, availability, and performance\nof your apps. These services include, L7 load balancing, network firewalling,\n[web application firewalling\n(WAF)](https://wikipedia.org/wiki/Web_application_firewall),\nDNS services, and more. For Google Distributed Cloud, BIG-IP provides\nexternal access and L3/4 load-balancing services.\n\nAdditional configuration\n\nAfter the Setup utility completes,\nyou need to [Create an administrative partition](https://techdocs.f5.com/kb/en-us/products/big-ip_ltm/manuals/product/bigip-user-account-administration-12-0-0/3.html)\nfor each user cluster you intend to expose and access.\n\nInitially, you define a partition\nfor the first user cluster. Don't use cluster partitions for anything else.\nEach of the clusters must have a partition that is for the sole use of that\ncluster.\n\nConfiguring the BIG-IP for Google Distributed Cloud external endpoints\n\nIf you didn't [disable bundled ingress](/kubernetes-engine/distributed-cloud/vmware/docs/how-to/disable-bundled-ingress), you must\n[configure the BIG-IP with the virtual servers](/kubernetes-engine/distributed-cloud/vmware/docs/how-to/manual-load-balance#cp-v2-user-cluster_4)\n(VIPs), corresponding to the following Google Distributed Cloud endpoints:\n\n- **User partition**\n\n - VIP for user cluster ingress controller (port exposed: `443`)\n - VIP for user cluster ingress controller (port exposed: `80`)\n\n| **Note:** Because Google Distributed Cloud blocks creating clusters with [legacy features](/kubernetes-engine/distributed-cloud/vmware/docs/concepts/migrate-recommended-features), this document doesn't cover the BIG-IP configuration for legacy features.\n\nCreate node object\n\nThe cluster node external IP addresses are in turn used to configure node objects on the BIG-IP\nsystem. You will create a node object for each Google Distributed Cloud\ncluster node. The nodes are added to backend pools that are then associated with\nvirtual servers.\n| **Important:** If you choose [DHCP IP Mode](/kubernetes-engine/distributed-cloud/vmware/docs/how-to/user-cluster-configuration-file-latest#network-ipmode-type-field), you need to update IP addresses for each node object on the BIG-IP system once the Google Distributed Cloud cluster node IP addresses changed.\n\n1. To sign in to the BIG-IP management console, go to the IP address. The address is provided during the installation.\n2. Click the **User partition** that you previously created.\n3. Go to **Local Traffic** \\\u003e **Nodes** \\\u003e **Node List**.\n4. Click **Create**.\n5. Enter a name and IP address for each cluster host and click **Finished**.\n\nCreate backend pools\n\nYou create a backend pool for each node Port.\n\n1. In the BIG-IP management console, click **User partition** for the user partition that you previously created.\n2. Go to **Local Traffic** \\\u003e **Pools** \\\u003e **Pool List**.\n3. Click **Create**.\n4. In the **Configuration** drop-down list, click **Advanced**.\n5. In the **Name** field, enter `Istio-80-pool`.\n6. To verify the pool member accessibility, under **Health Monitor** , click **tcp** . Optional: Because this is a manual configuration, you can also take advantage of more [advanced monitors](https://techdocs.f5.com/kb/en-us/products/big-ip_ltm/manuals/product/bigip-local-traffic-manager-monitors-reference-13-1-0.html) as appropriate for your deployment.\n7. For **Action on Service Down** , click **Reject**.\n\n8. For this tutorial, in the **Load Balancing Method** drop-down list,\n click **Round Robin**.\n\n9. In the **New Members** section, click **Node List** and then select the\n previously created node.\n\n10. In the **Service Port** field, enter the appropriate `nodePort` from the\n [configuration file](/kubernetes-engine/distributed-cloud/vmware/docs/how-to/manual-load-balance#cp-v2-user-cluster_2) or `spec.ports[?].nodePort` in the runtime\n istio ingress Kubernetes Service (name: `istio-ingress`, namespace: `gke-system`).\n\n11. Click **Add**.\n\n12. Repeat steps 8-9 and add each cluster node instance.\n\n13. Click **Finished**.\n\n14. Repeat all of these steps in this section for the remaining\n [user cluster nodePorts](/kubernetes-engine/distributed-cloud/vmware/docs/how-to/manual-load-balance#cp-v2-user-cluster_4).\n\nCreate virtual servers\n\nYou create a total of two virtual servers on the BIG-IP for the first user cluster. The virtual servers correspond to\nthe \"VIP + port\" combinations.\n\n1. In the BIG-IP management console, click the **User partition** that you previously created.\n2. Go to **Local Traffic** \\\u003e **Virtual Servers** \\\u003e **Virtual Server List**.\n3. Click **Create**.\n4. In the **Name** field, enter `istio-ingress-80`.\n5. In the **Destination Address/Mask** field, enter the IP address for the\n VIP. For this tutorial, use the HTTP ingress VIP in the\n [`configuration file`](/kubernetes-engine/distributed-cloud/vmware/docs/how-to/manual-load-balance#cp-v2-user-cluster_1) or `spec.loadBalancerIP` in the runtime\n istio ingress Kubernetes Service (name: `istio-ingress`, namespace: `gke-system`).\n\n | **Warning:** Don't setup a virtual server for `controlPlaneVIP`.\n6. In the **Service Port** field, enter the appropriate listener port for\n the VIP. For this tutorial, use port `80` or `spec.ports[?].port` in the runtime\n istio ingress Kubernetes Service (name: `istio-ingress`, namespace: `gke-system`).\n\n There are several configuration options for enhancing your app's endpoint,\n such as associating protocol-specific profiles,\n [certificate profiles](https://techdocs.f5.com/kb/en-us/products/big-ip_ltm/manuals/product/ltm-profiles-reference-13-1-0/6.html#guid-cc146765-9237-474b-9faf-0e18a208cb23),\n and\n [WAF policies](https://support.f5.com/csp/article/K85426947).\n7. For **Source Address Translation** click **Auto Map**.\n\n8. For **Default Pool** select the appropriate pool that you previously\n created.\n\n9. Click **Finished**.\n\n10. [Create and download an archive of the current configuration](https://support.f5.com/csp/article/K4423).\n\nWhat's next\n\n- To further enhance the security and performance of the external-facing\n VIPs, consider the following:\n\n - [F5 Advanced WAF](https://www.f5.com/products/security/advanced-waf)\n - [F5 Access Policy Manager (APM)](https://www.f5.com/products/security/access-policy-manager)\n - [Caching \\& Compression](https://www.f5.com/products/big-ip-services/local-traffic-manager)\n - [Health monitoring](https://techdocs.f5.com/en-us/bigip-15-0-0/big-ip-local-traffic-manager-implementations/implementing-health-and-performance-monitoring.html)\n - [Intelligent application traffic management](https://www.f5.com/products/big-ip-services/local-traffic-manager)\n- Learn more about F5\n [BIG-IP Application Services](https://www.f5.com/products/big-ip-services).\n\n- Learn more about BIG-IP configurations and capabilities:\n\n - [Certificate profiles](https://techdocs.f5.com/kb/en-us/products/big-ip_ltm/manuals/product/ltm-profiles-reference-13-1-0/6.html#guid-cc146765-9237-474b-9faf-0e18a208cb23)\n - [WAF policies](https://support.f5.com/csp/article/K85426947)"]]