您可以将 Enterprise Document OCR 用作 Document AI 的一部分,以检测和提取各种文档中的文本和布局信息。借助可配置的功能,您可以根据特定的文档处理要求定制系统。
概览
您可以使用 Enterprise Document OCR 来执行基于算法或机器学习的数据输入等任务,并提高和验证数据准确性。您还可以使用 Enterprise Document OCR 来处理以下任务:
- 文本数字化:从文档中提取文本和布局数据,以用于搜索、基于规则的文档处理流水线或自定义模型创建。
- 使用大语言模型应用:利用 LLM 的上下文理解能力和 OCR 的文本及布局提取能力,自动生成问题和答案。从数据中发掘数据洞见,并简化工作流程。
- 归档:将纸质文档数字化为机器可读的文本,以提高文档的可访问性。
为您的使用场景选择最佳 OCR
| 解决方案 | 产品 | 说明 | 用例 |
|---|---|---|---|
| Document AI | Enterprise Document OCR | 专门针对文档使用场景的模型。高级功能包括图片质量得分、语言提示和旋转校正。 | 建议在从文档中提取文本时使用。用例包括 PDF 文档、图片扫描文档或 Microsoft DocX 文件。 |
| Document AI | OCR 加购项 | 满足特定需求的高级功能。仅与 Enterprise Document OCR 版本 2.0 及更高版本兼容。 | 需要检测和识别数学公式、接收字体样式信息或启用复选框提取功能。 |
| Cloud Vision API | 文本检测 | 基于 Google Cloud 标准 OCR 模型的全球可用 REST API。默认配额为每分钟 1,800 个请求。 | 需要低延迟和高容量的常规文本提取使用场景。 |
| Cloud Vision | OCR Google Distributed Cloud(已弃用) | Google Cloud Marketplace 应用,可作为容器部署到任何 GKE 集群(使用 GKE Enterprise)。 | 满足数据驻留或合规性要求。 |
检测和提取
Enterprise Document OCR 可以检测 PDF 和图片中的文本块、段落、行、字词和符号,还可以对文档进行倾斜校正,以提高准确性。
支持的布局检测和提取属性:
| 印刷文字 | 手写 | 段落 | 屏蔽 | Line | 文字 | 符号级 | 页码 |
|---|---|---|---|---|---|---|---|
| 默认 | 默认 | 默认 | 默认 | 默认 | 默认 | 可配置 | 默认 |
可配置的 Enterprise Document OCR 功能包括:
从数字 PDF 中提取嵌入式文本或原生文本:此功能可提取文本和符号,即使是旋转的文本、极端的字体大小或样式以及部分隐藏的文本,也能准确提取。
旋转校正:使用 Enterprise Document OCR 预处理文档图片,以校正可能会影响提取质量或处理的旋转问题。
图片质量得分:接收有助于文档路由的质量指标。图片质量得分可为您提供 8 个维度的网页级质量指标,包括模糊度、是否存在比正常字体小的字体以及眩光。
指定网页范围:指定输入文档中要进行 OCR 的网页范围。这样可以节省不必要网页的支出和处理时间。
语言检测:检测提取的文本中使用的语言。
语言和手写提示:根据数据集的已知特征,为 OCR 模型提供语言或手写提示,从而提高准确性。
如需了解如何启用 OCR 配置,请参阅启用 OCR 配置。
OCR 加购项
Enterprise Document OCR 提供可选的分析功能,可根据需要在各个处理请求中启用。
以下附加功能适用于稳定版 pretrained-ocr-v2.0-2023-06-02 和 pretrained-ocr-v2.1-2024-08-07 以及候选版本 pretrained-ocr-v2.1.1-2025-01-31。
- 数学 OCR:以 LaTeX 格式识别并提取文档中的公式。
- 复选框提取:在 Enterprise Document OCR 响应中检测复选框并提取其状态(选中/未选中)。
- 字体样式检测:识别字词级字体属性,包括字体类型、字体样式、手写体、粗细和颜色。
如需了解如何启用所列的插件,请参阅启用 OCR 插件。
支持的文件格式
企业版文档 OCR 支持 PDF、GIF、TIFF、JPEG、PNG、BMP 和 WebP 文件格式。如需了解详情,请参阅支持的文件。
Enterprise Document OCR 还支持最多 15 页的同步 DocX 文件。如需发出配额增加请求 (QIR),请按照申请配额调整中的步骤操作。DocX 支持目前为非公开预览版。如要申请访问权限,请与您的 Google 客户支持团队联系。
高级版本控制
高级版本控制目前为预览版。对底层 AI/机器学习 OCR 模型的升级可能会导致 OCR 行为发生变化。如果需要严格的一致性,请使用冻结的模型版本将行为固定到旧版 OCR 模型,最长可达 18 个月。这可确保获得相同的图片转文字功能结果。请参阅有关处理器版本的表格。
处理器版本
以下处理器版本与此功能兼容。如需了解详情,请参阅管理处理器版本。
| 版本 ID | 发布渠道 | 说明 |
|---|---|---|
pretrained-ocr-v1.2-2022-11-10 |
稳定版 | 冻结模型版本(v1.0):在容器映像中冻结版本快照的模型文件、配置和二进制文件,最长可冻结 18 个月。 |
pretrained-ocr-v2.0-2023-06-02 |
稳定版 | 专门针对文档使用场景而打造的生产环境就绪型模型。包括对所有 OCR 加购项的访问权限。 |
pretrained-ocr-v2.1-2024-08-07 |
稳定版 | v2.1 的主要改进方面包括:更好地识别印刷文字、更精确地检测复选框和更准确的阅读顺序。 |
pretrained-ocr-v2.1.1-2025-01-31 |
候选版本 | v2.1.1 与 v2.1 类似,可在除以下地区以外的所有地区使用:US、EU 和 asia-southeast1。 |
使用 Enterprise Document OCR 处理文档
本快速入门为您介绍 Enterprise Document OCR。本文档将介绍如何通过启用或停用任何可用的 OCR 配置来优化工作流的文档 OCR 结果。
- Sign in to your Google Cloud account. If you're new to Google Cloud, create an account to evaluate how our products perform in real-world scenarios. New customers also get $300 in free credits to run, test, and deploy workloads.
-
In the Google Cloud console, on the project selector page, select or create a Google Cloud project.
Roles required to select or create a project
- Select a project: Selecting a project doesn't require a specific IAM role—you can select any project that you've been granted a role on.
-
Create a project: To create a project, you need the Project Creator
(
roles/resourcemanager.projectCreator), which contains theresourcemanager.projects.createpermission. Learn how to grant roles.
-
Verify that billing is enabled for your Google Cloud project.
-
Enable the Document AI API.
Roles required to enable APIs
To enable APIs, you need the Service Usage Admin IAM role (
roles/serviceusage.serviceUsageAdmin), which contains theserviceusage.services.enablepermission. Learn how to grant roles. -
In the Google Cloud console, on the project selector page, select or create a Google Cloud project.
Roles required to select or create a project
- Select a project: Selecting a project doesn't require a specific IAM role—you can select any project that you've been granted a role on.
-
Create a project: To create a project, you need the Project Creator
(
roles/resourcemanager.projectCreator), which contains theresourcemanager.projects.createpermission. Learn how to grant roles.
-
Verify that billing is enabled for your Google Cloud project.
-
Enable the Document AI API.
Roles required to enable APIs
To enable APIs, you need the Service Usage Admin IAM role (
roles/serviceusage.serviceUsageAdmin), which contains theserviceusage.services.enablepermission. Learn how to grant roles. quality/defect_blurryquality/defect_noisyquality/defect_darkquality/defect_faintquality/defect_text_too_smallquality/defect_document_cutoffquality/defect_text_cutoffquality/defect_glare- 对于没有缺陷的数字文档,该模型可能会返回假阳性检测结果。此功能最适合用于扫描或拍摄的文档。
眩光缺陷是局部的。它们的存在可能不会影响文档的总体可读性。
- 仅处理第二页和第五页:
- 仅处理前三个页面:
- 仅处理最后四页:
检测到图片
转换为 LaTeX

- 对于图片请求,Vision AI API 响应仅填充
vertices;对于 PDF 请求,Vision AI API 响应仅填充normalized_vertices。Document AI 响应和转换器会填充vertices和normalized_vertices。 - Vision AI API 响应会在字词的最后一个符号中填充
detected_break。Document AI API 响应和转换器会在字词和字词的最后一个符号中填充detected_break。 - Vision AI API 响应始终会填充符号字段。默认情况下,Document AI 响应不会填充符号字段。为确保 Document AI 响应和转换器填充符号字段,请按详细说明设置
enable_symbol功能。 - LOCATION:处理器的位置,例如:
us- 美国eu- 欧盟
- PROJECT_ID:您的 Google Cloud 项目 ID。
- PROCESSOR_ID:自定义处理器的 ID。
- PROCESSOR_VERSION:处理器版本标识符。如需了解详情,请参阅选择处理器版本。例如:
pretrained-TYPE-vX.X-YYYY-MM-DDstablerc
- skipHumanReview:一个用于停用人工审核的布尔值(仅受人机协同处理器支持)。
true- 跳过人工审核false- 启用人工审核(默认)
- MIME_TYPE†:有效的 MIME 类型选项之一。
- IMAGE_CONTENT†:有效的内嵌文档内容之一,表示为字节流。对于 JSON 表示形式,二进制图片数据的 base64 编码(ASCII 字符串)。此字符串应类似于以下字符串:
/9j/4QAYRXhpZgAA...9tAVx/zDQDlGxn//2Q==
- FIELD_MASK:指定要在
Document输出中包含哪些字段。这是完全限定字段名称的逗号分隔列表,格式为FieldMask。- 示例:
text,entities,pages.pageNumber
- 示例:
- OCR 配置
- ENABLE_NATIVE_PDF_PARSING:(布尔值)提取 PDF 中的嵌入文本(如有)。
- ENABLE_IMAGE_QUALITY_SCORES:(布尔值)启用智能文档质量评分。
- ENABLE_SYMBOL:(布尔值)是否包含符号(字母)OCR 信息。
- DISABLE_CHARACTER_BOXES_DETECTION:(Boolean) 关闭 OCR 引擎中的字符框检测器。
- LANGUAGE_HINTS:用于 OCR 的 BCP-47 语言代码列表。
- ADVANCED_OCR_OPTIONS:用于进一步微调 OCR 行为的高级 OCR 选项列表。当前有效值包括:
legacy_layout:一种启发式布局检测算法,可替代当前基于机器学习的布局检测算法。
- 高级版 OCR 加购项
- ENABLE_SELECTION_MARK_DETECTION:(布尔值)开启 OCR 引擎中的选择标记检测器。
- COMPUTE_STYLE_INFO(布尔值)开启字体识别模型并返回字体样式信息。
- ENABLE_MATH_OCR:(布尔值)开启可以提取 LaTeX 数学公式的模型。
- INDIVIDUAL_PAGES:要处理的各个网页的列表。
创建 Enterprise Document OCR 处理器
首先,创建 Enterprise Document OCR 处理器。如需了解详情,请参阅创建和管理处理器。
OCR 配置
您可以在 ProcessDocumentRequest 或 BatchProcessDocumentsRequest 中设置 ProcessOptions.ocrConfig 中的相应字段,以启用所有 OCR 配置。
如需了解详情,请参阅发送处理请求。
图片质量分析
智能文档质量分析使用机器学习技术,根据文档内容的可读性来评估文档质量。
此质量评估结果以质量得分 [0, 1] 的形式返回,其中 1 表示质量完美。
如果检测到的质量得分低于 0.5,系统还会返回负面质量原因列表(按可能性排序)。
如果似然大于 0.5,则视为检测到正例。
如果文档被视为有缺陷,API 会返回以下 8 种文档缺陷类型:
当前文档质量分析存在一些限制:
输入
在处理请求中将 ProcessOptions.ocrConfig.enableImageQualityScores 设置为 true 即可启用。
此附加功能会增加与 OCR 处理相当的流程调用延迟时间。
  {
    "rawDocument": {
      "mimeType": "MIME_TYPE",
      "content": "IMAGE_CONTENT"
    },
    "processOptions": {
      "ocrConfig": {
        "enableImageQualityScores": true
      }
    }
  }
输出
缺陷检测结果会显示在 Document.pages[].imageQualityScores[] 中。
  {
    "pages": [
      {
        "imageQualityScores": {
          "qualityScore": 0.7811847,
          "detectedDefects": [
            {
              "type": "quality/defect_document_cutoff",
              "confidence": 1.0
            },
            {
              "type": "quality/defect_glare",
              "confidence": 0.97849524
            },
            {
              "type": "quality/defect_text_cutoff",
              "confidence": 0.5
            }
          ]
        }
      }
    ]
  }
如需查看完整的输出示例,请参阅处理器输出示例。
语言提示
OCR 处理器支持您定义的语言提示,以提高 OCR 引擎性能。应用语言提示可让 OCR 针对所选语言(而非推断出的语言)进行优化。
输入
通过设置 ProcessOptions.ocrConfig.hints[].languageHints[] 并提供 BCP-47 语言代码列表来启用。
  {
    "rawDocument": {
      "mimeType": "MIME_TYPE",
      "content": "IMAGE_CONTENT"
    },
    "processOptions": {
      "ocrConfig": {
        "hints": {
          "languageHints": ["en", "es"]
        }
      }
    }
  }
如需查看完整的输出示例,请参阅处理器输出示例。
符号检测
在文档响应中填充符号(或单个字母)级数据。
输入
在处理请求中将 ProcessOptions.ocrConfig.enableSymbol 设置为 true 即可启用。
  {
    "rawDocument": {
      "mimeType": "MIME_TYPE",
      "content": "IMAGE_CONTENT"
    },
    "processOptions": {
      "ocrConfig": {
        "enableSymbol": true
      }
    }
  }
输出
如果此功能已启用,则会填充 Document.pages[].symbols[] 字段。
如需查看完整的输出示例,请参阅处理器输出示例。
内置 PDF 解析
从数字 PDF 文件中提取嵌入的文本。启用后,如果有数字文本,系统会自动使用内置的数字 PDF 模型。如果存在非数字文本,系统会自动使用光学 OCR 模型。用户会收到合并后的文本结果。
输入
在处理请求中将 ProcessOptions.ocrConfig.enableNativePdfParsing 设置为 true 即可启用。
  {
    "rawDocument": {
      "mimeType": "MIME_TYPE",
      "content": "IMAGE_CONTENT"
    },
    "processOptions": {
      "ocrConfig": {
        "enableNativePdfParsing": true
      }
    }
  }
盒子中的角色检测
默认情况下,Enterprise Document OCR 会启用检测器,以提高方框内字符的文本提取质量。示例如下:
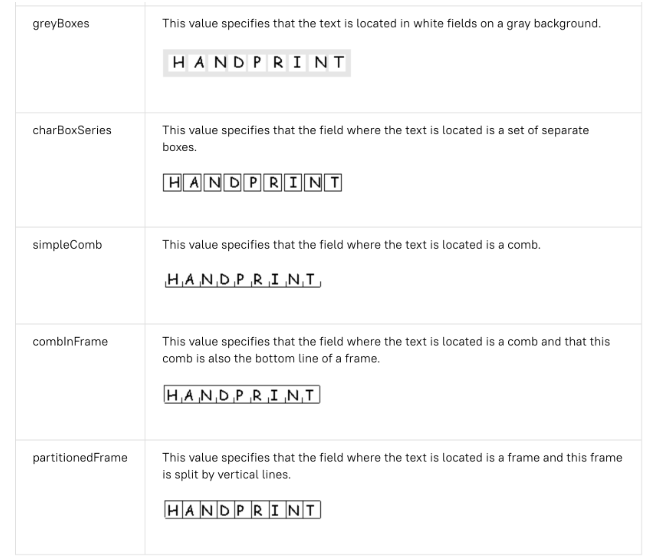
如果您在识别方框内的字符时遇到 OCR 质量问题,可以停用此功能。
输入
在处理请求中将 ProcessOptions.ocrConfig.disableCharacterBoxesDetection 设置为 true 即可停用。
  {
    "rawDocument": {
      "mimeType": "MIME_TYPE",
      "content": "IMAGE_CONTENT"
    },
    "processOptions": {
      "ocrConfig": {
        "disableCharacterBoxesDetection": true
      }
    }
  }
旧版布局
如果您需要启发式布局检测算法,可以启用旧版布局,作为当前基于机器学习的布局检测算法的替代方案。这不是推荐的配置。客户可以根据自己的文档工作流程选择最合适的布局算法。
输入
在处理请求中将 ProcessOptions.ocrConfig.advancedOcrOptions 设置为 ["legacy_layout"] 即可启用。
  {
    "rawDocument": {
      "mimeType": "MIME_TYPE",
      "content": "IMAGE_CONTENT"
    },
    "processOptions": {
      "ocrConfig": {
          "advancedOcrOptions": ["legacy_layout"]
      }
    }
  }
指定页码范围
默认情况下,OCR 会从文档中的所有页面提取文本和布局信息。您可以选择特定页码或页码范围,并仅从这些页面中提取文本。
您可以在 ProcessOptions 中通过以下三种方式配置此功能:
  {
    "individualPageSelector": {"pages": [2, 5]}
  }
  {
    "fromStart": 3
  }
  {
    "fromEnd": 4
  }
在响应中,每个 Document.pages[].pageNumber 都对应于请求中指定的相同网页。
OCR 插件的用途
您可以根据需要针对个别处理请求启用这些 Enterprise Document OCR 可选分析功能。
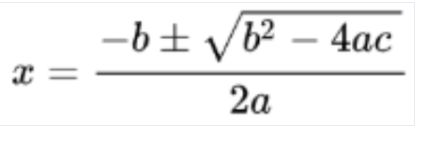
数学 OCR
数学 OCR 可检测、识别和提取公式,例如以 LaTeX 表示的数学方程式,以及边界框坐标。
以下是 LaTeX 表示法的示例:
输入
在处理请求中将 ProcessOptions.ocrConfig.premiumFeatures.enableMathOcr 设置为 true 即可启用。
  {
    "rawDocument": {
      "mimeType": "MIME_TYPE",
      "content": "IMAGE_CONTENT"
    },
    "processOptions": {
      "ocrConfig": {
          "premiumFeatures": {
            "enableMathOcr": true
          }
      }
    }
  }
输出
数学 OCR 输出会显示在 Document.pages[].visualElements[] 中,并带有 "type": "math_formula"。

"visualElements": [
  {
    "layout": {
      "textAnchor": {
        "textSegments": [
          {
            "endIndex": "46"
          }
        ]
      },
      "confidence": 1,
      "boundingPoly": {
        "normalizedVertices": [
          {
            "x": 0.14662756,
            "y": 0.27891156
          },
          {
            "x": 0.9032258,
            "y": 0.27891156
          },
          {
            "x": 0.9032258,
            "y": 0.8027211
          },
          {
            "x": 0.14662756,
            "y": 0.8027211
          }
        ]
      },
      "orientation": "PAGE_UP"
    },
    "type": "math_formula"
  }
]
选择标记提取
如果启用,模型会尝试提取文档中的所有复选框和单选按钮,以及边界框坐标。
输入
在处理请求中将 ProcessOptions.ocrConfig.premiumFeatures.enableSelectionMarkDetection 设置为 true 即可启用。
  {
    "rawDocument": {
      "mimeType": "MIME_TYPE",
      "content": "IMAGE_CONTENT"
    },
    "processOptions": {
      "ocrConfig": {
          "premiumFeatures": {
            "enableSelectionMarkDetection": true
          }
      }
    }
  }
输出
复选框输出会显示在 Document.pages[].visualElements[] 中,值为 "type": "unfilled_checkbox" 或 "type": "filled_checkbox"。

"visualElements": [
  {
    "layout": {
      "confidence": 0.89363575,
      "boundingPoly": {
        "vertices": [
          {
            "x": 11,
            "y": 24
          },
          {
            "x": 37,
            "y": 24
          },
          {
            "x": 37,
            "y": 56
          },
          {
            "x": 11,
            "y": 56
          }
        ],
        "normalizedVertices": [
          {
            "x": 0.017488075,
            "y": 0.38709676
          },
          {
            "x": 0.05882353,
            "y": 0.38709676
          },
          {
            "x": 0.05882353,
            "y": 0.9032258
          },
          {
            "x": 0.017488075,
            "y": 0.9032258
          }
        ]
      }
    },
    "type": "unfilled_checkbox"
  },
  {
    "layout": {
      "confidence": 0.9148201,
      "boundingPoly": ...
    },
    "type": "filled_checkbox"
  }
],
字体样式检测
启用字体样式检测后,Enterprise Document OCR 会提取字体属性,以便更好地进行后处理。
在令牌(字词)级别,系统会检测以下属性:
输入
在处理请求中将 ProcessOptions.ocrConfig.premiumFeatures.computeStyleInfo 设置为 true 即可启用。
  {
    "rawDocument": {
      "mimeType": "MIME_TYPE",
      "content": "IMAGE_CONTENT"
    },
    "processOptions": {
      "ocrConfig": {
          "premiumFeatures": {
            "computeStyleInfo": true
          }
      }
    }
  }
输出
字体样式输出以 Document.pages[].tokens[].styleInfo 形式显示,类型为 StyleInfo。

"tokens": [
  {
    "styleInfo": {
      "fontSize": 3,
      "pixelFontSize": 13,
      "fontType": "SANS_SERIF",
      "bold": true,
      "fontWeight": 564,
      "textColor": {
        "red": 0.16862746,
        "green": 0.16862746,
        "blue": 0.16862746
      },
      "backgroundColor": {
        "red": 0.98039216,
        "green": 0.9882353,
        "blue": 0.99215686
      }
    }
  },
  ...
]
将文档对象转换为 Vision AI API 格式
Document AI 工具箱包含一个工具,可将 Document AI API Document 格式转换为 Vision AI AnnotateFileResponse 格式,从而让用户能够比较文档 OCR 处理器和 Vision AI API 之间的响应。以下是一些示例代码。
Vision AI API 响应与 Document AI API 响应和转换器之间的已知差异:
代码示例
以下代码示例演示了如何发送启用 OCR 配置和插件的处理请求,然后读取字段并将其打印到终端:
REST
在使用任何请求数据之前,请先进行以下替换:
† 也可以使用 inlineDocument 对象中的 base64 编码内容指定此内容。
HTTP 方法和网址:
POST https://LOCATION-documentai.googleapis.com/v1/projects/PROJECT_ID/locations/LOCATION/processors/PROCESSOR_ID/processorVersions/PROCESSOR_VERSION:process
请求 JSON 正文:
{
  "skipHumanReview": skipHumanReview,
  "rawDocument": {
    "mimeType": "MIME_TYPE",
    "content": "IMAGE_CONTENT"
  },
  "fieldMask": "FIELD_MASK",
  "processOptions": {
    "ocrConfig": {
      "enableNativePdfParsing": ENABLE_NATIVE_PDF_PARSING,
      "enableImageQualityScores": ENABLE_IMAGE_QUALITY_SCORES,
      "enableSymbol": ENABLE_SYMBOL,
      "disableCharacterBoxesDetection": DISABLE_CHARACTER_BOXES_DETECTION,
      "hints": {
        "languageHints": [
          "LANGUAGE_HINTS"
        ]
      },
      "advancedOcrOptions": ["ADVANCED_OCR_OPTIONS"],
      "premiumFeatures": {
        "enableSelectionMarkDetection": ENABLE_SELECTION_MARK_DETECTION,
        "computeStyleInfo": COMPUTE_STYLE_INFO,
        "enableMathOcr": ENABLE_MATH_OCR,
      }
    },
    "individualPageSelector" {
      "pages": [INDIVIDUAL_PAGES]
    }
  }
}
如需发送请求,请选择以下方式之一:
curl
将请求正文保存在名为 request.json 的文件中,然后执行以下命令:
curl -X POST \
     -H "Authorization: Bearer $(gcloud auth print-access-token)" \
     -H "Content-Type: application/json; charset=utf-8" \
     -d @request.json \
     "https://LOCATION-documentai.googleapis.com/v1/projects/PROJECT_ID/locations/LOCATION/processors/PROCESSOR_ID/processorVersions/PROCESSOR_VERSION:process"
PowerShell
将请求正文保存在名为 request.json 的文件中,然后执行以下命令:
$cred = gcloud auth print-access-token
$headers = @{ "Authorization" = "Bearer $cred" }

Invoke-WebRequest `
    -Method POST `
    -Headers $headers `
    -ContentType: "application/json; charset=utf-8" `
    -InFile request.json `
    -Uri "https://LOCATION-documentai.googleapis.com/v1/projects/PROJECT_ID/locations/LOCATION/processors/PROCESSOR_ID/processorVersions/PROCESSOR_VERSION:process" | Select-Object -Expand Content
如果请求成功,服务器将返回一个 200 OK HTTP 状态代码以及 JSON 格式的响应。响应正文包含一个 Document 实例。
Python
如需了解详情,请参阅 Document AI Python API 参考文档。
如需向 Document AI 进行身份验证,请设置应用默认凭据。 如需了解详情,请参阅为本地开发环境设置身份验证。