민감한 정보 보호는 이미지에서 민감한 텍스트를 수정할 수 있습니다. 민감한 정보 보호는 infoType 감지기 및 Cloud Vision을 사용하여 이미지에서 텍스트를 검사하고 텍스트 내의 민감한 정보를 감지한 후 일치하는 민감한 정보가 불투명한 직사각형으로 가려진 이미지를 반환합니다.
예를 들어 다음의 '이전' 이미지와 '이후' 이미지를 살펴보세요. 원본 이미지는 종이 문서를 스캔한 후 생성된 일반적인 이미지 파일의 예시입니다. 이 예시에서 민감한 정보 보호는 콘텐츠에 따라 다양한 색상의 직사각형을 사용하여 미국 사회보장번호, 이메일 주소, 전화번호를 수정하도록 구성되었습니다.
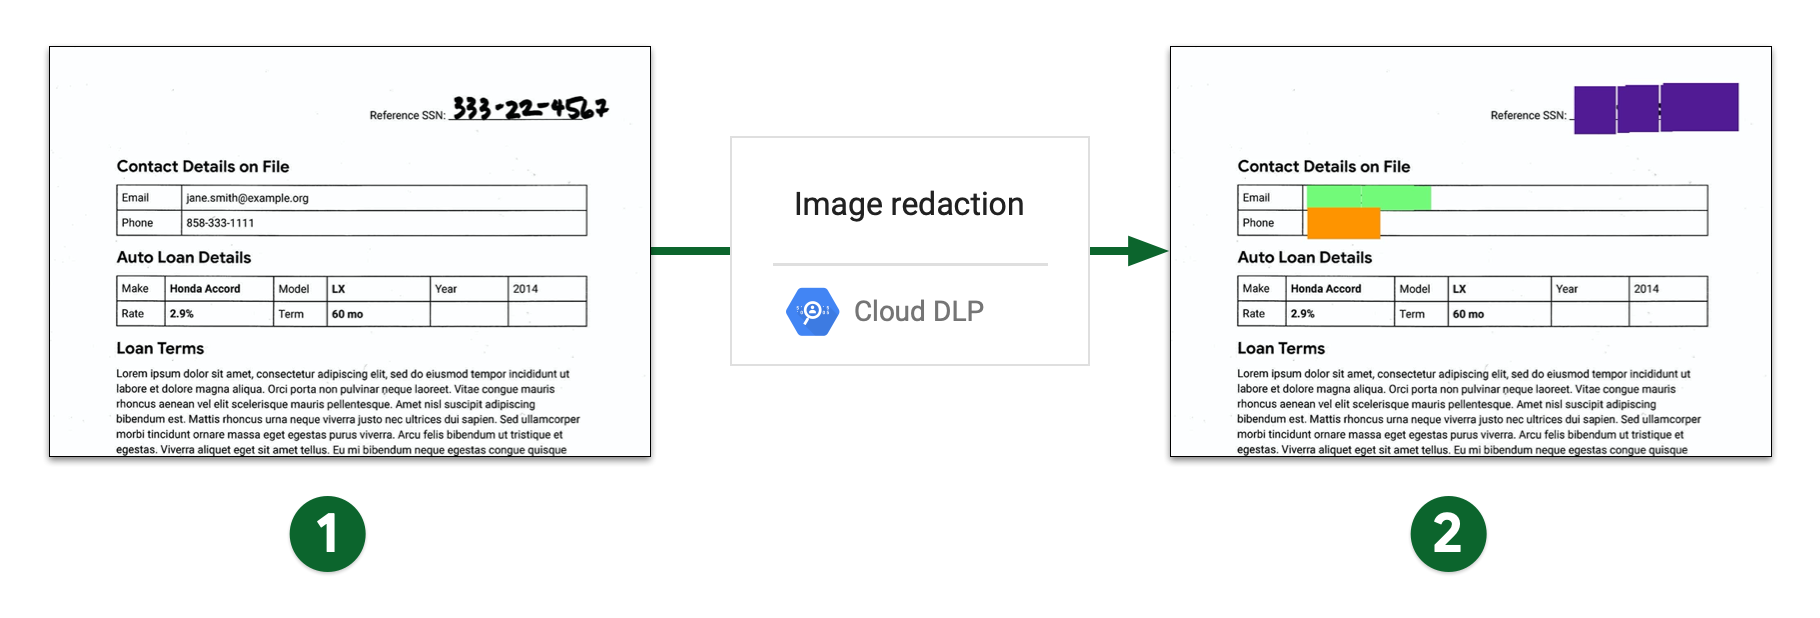
- 이미지 수정 전 스캔한 이미지
- 이미지 수정 후 스캔한 이미지
제한사항 및 고려사항
이미지에서 콘텐츠를 수정할 때는 다음 사항을 고려하세요.
지원되는 파일 형식
민감한 정보 보호는 JPEG, BMP, PNG를 비롯한 다양한 이미지 유형에서 민감한 정보를 수정할 수 있습니다. 자세한 내용은 지원되는 파일 형식을 참조하세요.
SVG, PDF, XLSX, PPTX 또는 DOCX 파일에 대해서는 콘텐츠 수정이 지원되지 않습니다.
발견 항목 한도
이미지에서 데이터를 수정할 때는 발견 항목 한도가 적용되지 않습니다. 일부 데이터만 수정되는 예기치 않거나 일관되지 않는 결과가 발생할 수 있습니다. 요청에 FindingLimits를 포함하면 민감한 정보 보호에서 오류를 생성합니다.
시작하기 전에
-
In the Google Cloud console, on the project selector page, select or create a Google Cloud project.
-
Enable the DLP API.
-
Create a service account:
-
In the Google Cloud console, go to the Create service account page.
Go to Create service account - Select your project.
-
In the Service account name field, enter a name. The Google Cloud console fills in the Service account ID field based on this name.
In the Service account description field, enter a description. For example,
Service account for quickstart. - Click Create and continue.
-
Grant the Project > Owner role to the service account.
To grant the role, find the Select a role list, then select Project > Owner.
- Click Continue.
-
Click Done to finish creating the service account.
Do not close your browser window. You will use it in the next step.
-
-
Create a service account key:
- In the Google Cloud console, click the email address for the service account that you created.
- Click Keys.
- Click Add key, and then click Create new key.
- Click Create. A JSON key file is downloaded to your computer.
- Click Close.
-
Set the environment variable
GOOGLE_APPLICATION_CREDENTIALSto the path of the JSON file that contains your credentials. This variable applies only to your current shell session, so if you open a new session, set the variable again. - Install the Google Cloud CLI.
-
Configure the gcloud CLI to use your federated identity.
For more information, see Browser-based sign-in with the gcloud CLI.
-
To initialize the gcloud CLI, run the following command:
gcloud init
이미지에서 모든 기본 infoType 수정
이미지에서 민감한 정보를 수정하려면 이미지를 DLP API의 image.redact 메서드에 제출합니다.
검색할 특정 정보 유형(infoType)을 지정하지 않으면 민감한 정보 보호는 가장 일반적인 infoType을 검색합니다.
이미지에서 기본 infoType을 수정하려면 다음을 수행합니다.
이미지를 base64 문자열로 인코딩합니다.
민감한 정보 보호 클라이언트 라이브러리 중 하나를 사용하여 이 태스크를 수행하려면 이 단계를 건너뜁니다.
image.redact메서드에 요청을 제출합니다.기본 infoType을 수정하려는 경우 요청에는 base64로 인코딩된 이미지만 있으면 됩니다.
예를 들어 다음 이미지를 살펴보겠습니다. 이는 종이 문서를 스캔한 후 생성된 일반적인 이미지 파일의 예시입니다.
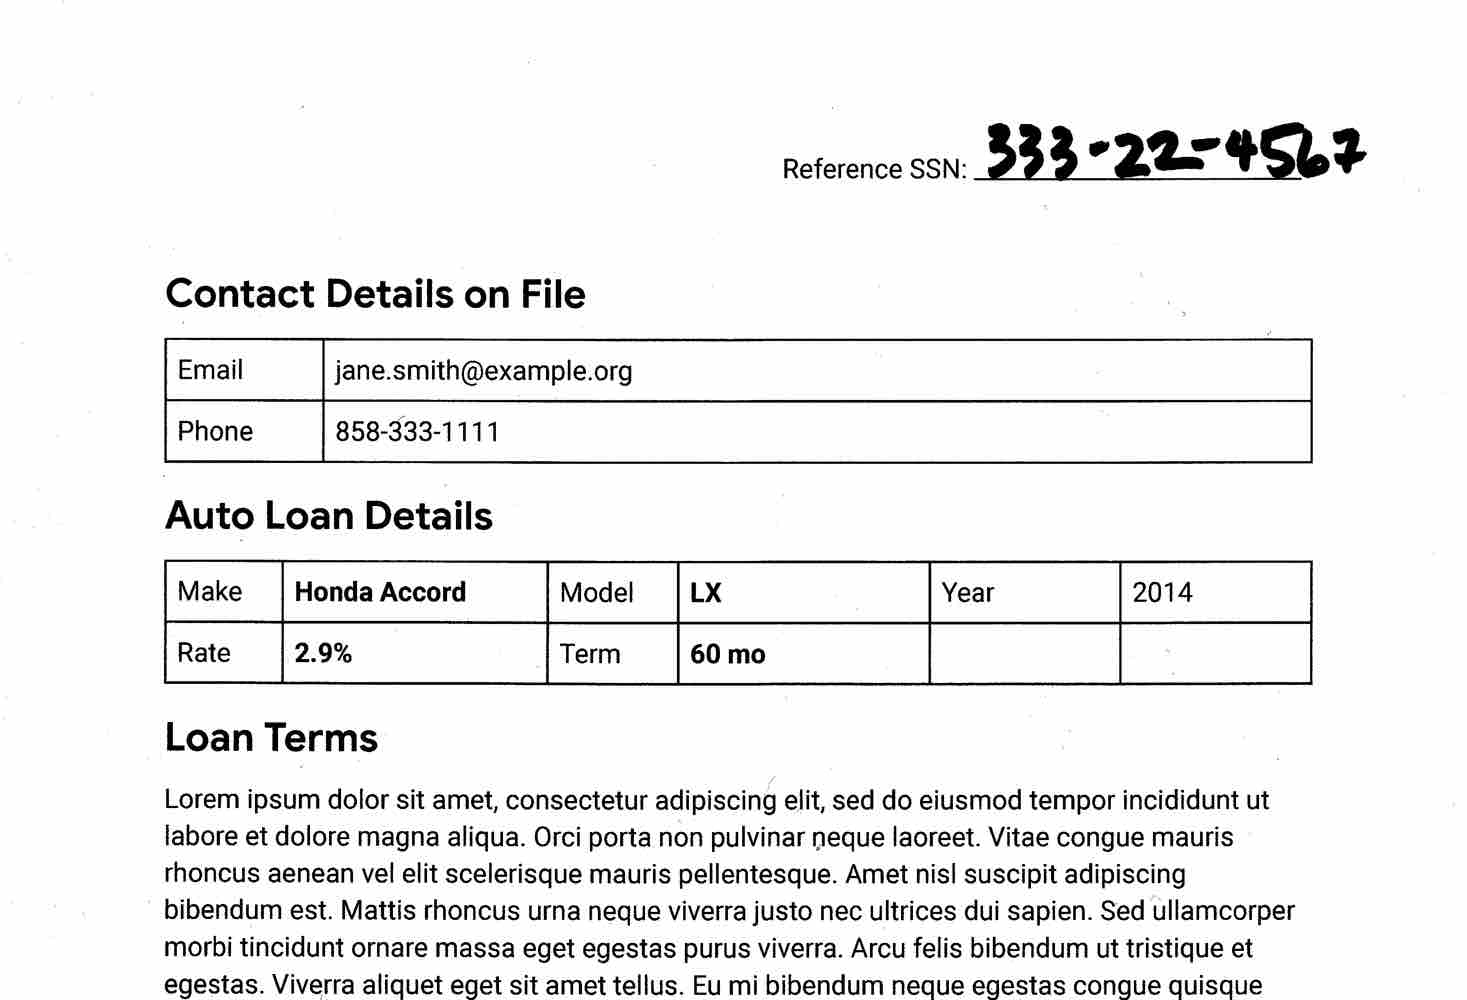
이 이미지에서 기본 infoType을 수정하려면 다음 요청을 DLP API의 image.redact 메서드에 제출합니다.
C#
Sensitive Data Protection의 클라이언트 라이브러리를 설치하고 사용하는 방법은 Sensitive Data Protection 클라이언트 라이브러리를 참조하세요.
Sensitive Data Protection에 인증하려면 애플리케이션 기본 사용자 인증 정보를 설정합니다. 자세한 내용은 로컬 개발 환경의 인증 설정을 참조하세요.
Go
Sensitive Data Protection의 클라이언트 라이브러리를 설치하고 사용하는 방법은 Sensitive Data Protection 클라이언트 라이브러리를 참조하세요.
Sensitive Data Protection에 인증하려면 애플리케이션 기본 사용자 인증 정보를 설정합니다. 자세한 내용은 로컬 개발 환경의 인증 설정을 참조하세요.
Java
Sensitive Data Protection의 클라이언트 라이브러리를 설치하고 사용하는 방법은 Sensitive Data Protection 클라이언트 라이브러리를 참조하세요.
Sensitive Data Protection에 인증하려면 애플리케이션 기본 사용자 인증 정보를 설정합니다. 자세한 내용은 로컬 개발 환경의 인증 설정을 참조하세요.
Node.js
Sensitive Data Protection의 클라이언트 라이브러리를 설치하고 사용하는 방법은 Sensitive Data Protection 클라이언트 라이브러리를 참조하세요.
Sensitive Data Protection에 인증하려면 애플리케이션 기본 사용자 인증 정보를 설정합니다. 자세한 내용은 로컬 개발 환경의 인증 설정을 참조하세요.
PHP
Sensitive Data Protection의 클라이언트 라이브러리를 설치하고 사용하는 방법은 Sensitive Data Protection 클라이언트 라이브러리를 참조하세요.
Sensitive Data Protection에 인증하려면 애플리케이션 기본 사용자 인증 정보를 설정합니다. 자세한 내용은 로컬 개발 환경의 인증 설정을 참조하세요.
Python
Sensitive Data Protection의 클라이언트 라이브러리를 설치하고 사용하는 방법은 Sensitive Data Protection 클라이언트 라이브러리를 참조하세요.
Sensitive Data Protection에 인증하려면 애플리케이션 기본 사용자 인증 정보를 설정합니다. 자세한 내용은 로컬 개발 환경의 인증 설정을 참조하세요.
REST
{
  "byteItem": {
    "data": "[BASE64-ENCODED-IMAGE]",
    "type": "IMAGE_JPEG"
  }
}
민감한 정보 보호는 다음을 반환합니다.
    {
      "redactedImage": "[BASE64-ENCODED-IMAGE]"
    }
base64로 인코딩된 이미지를 디코딩합니다.
결과 이미지가 다음과 같이 표시됩니다.
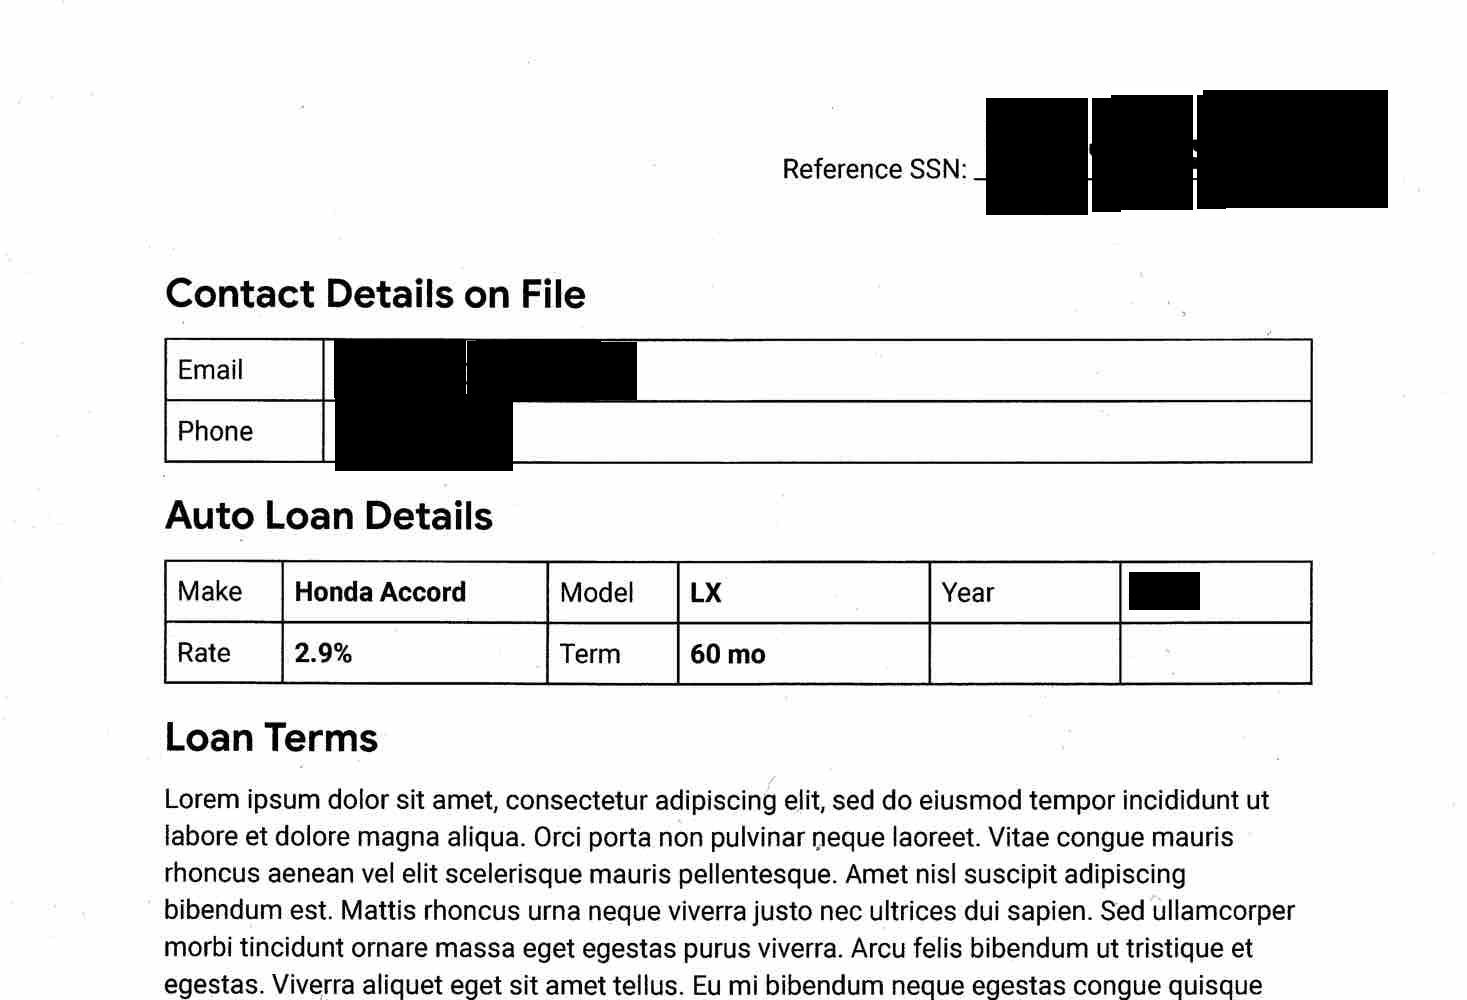
민감한 정보 보호는 필기 입력된 사회보장번호, 이메일 주소, 전화번호 마스킹 외에 연도도 수정했습니다. 다음 섹션에서는 특정 infoType만 수정하는 방법을 보여줍니다.
이미지에서 특정 infoType 수정
이미지에서 특정 민감한 정보만 수정하려면 해당하는 기본 제공 infoType을 지정하세요.
이미지에서 특정 infoType을 수정하려면 DLP API의 image.redact 메서드에 요청을 제출합니다. 요청에는 다음이 포함되어야 합니다.
- 이미지
- 1개 이상의 infoType 감지기
이전 섹션의 원본 이미지를 다시 살펴보겠습니다. 주민등록번호, 이메일 주소, 전화번호를 수정하려면 다음 JSON을 DLP API의 image.redact 메서드에 제출합니다.
C#
Sensitive Data Protection의 클라이언트 라이브러리를 설치하고 사용하는 방법은 Sensitive Data Protection 클라이언트 라이브러리를 참조하세요.
Sensitive Data Protection에 인증하려면 애플리케이션 기본 사용자 인증 정보를 설정합니다. 자세한 내용은 로컬 개발 환경의 인증 설정을 참조하세요.
Go
Sensitive Data Protection의 클라이언트 라이브러리를 설치하고 사용하는 방법은 Sensitive Data Protection 클라이언트 라이브러리를 참조하세요.
Sensitive Data Protection에 인증하려면 애플리케이션 기본 사용자 인증 정보를 설정합니다. 자세한 내용은 로컬 개발 환경의 인증 설정을 참조하세요.
Java
Sensitive Data Protection의 클라이언트 라이브러리를 설치하고 사용하는 방법은 Sensitive Data Protection 클라이언트 라이브러리를 참조하세요.
Sensitive Data Protection에 인증하려면 애플리케이션 기본 사용자 인증 정보를 설정합니다. 자세한 내용은 로컬 개발 환경의 인증 설정을 참조하세요.
Node.js
Sensitive Data Protection의 클라이언트 라이브러리를 설치하고 사용하는 방법은 Sensitive Data Protection 클라이언트 라이브러리를 참조하세요.
Sensitive Data Protection에 인증하려면 애플리케이션 기본 사용자 인증 정보를 설정합니다. 자세한 내용은 로컬 개발 환경의 인증 설정을 참조하세요.
PHP
Sensitive Data Protection의 클라이언트 라이브러리를 설치하고 사용하는 방법은 Sensitive Data Protection 클라이언트 라이브러리를 참조하세요.
Sensitive Data Protection에 인증하려면 애플리케이션 기본 사용자 인증 정보를 설정합니다. 자세한 내용은 로컬 개발 환경의 인증 설정을 참조하세요.
Python
Sensitive Data Protection의 클라이언트 라이브러리를 설치하고 사용하는 방법은 Sensitive Data Protection 클라이언트 라이브러리를 참조하세요.
Sensitive Data Protection에 인증하려면 애플리케이션 기본 사용자 인증 정보를 설정합니다. 자세한 내용은 로컬 개발 환경의 인증 설정을 참조하세요.
REST
    {
      "byteItem": {
        "data": "[BASE64-ENCODED-IMAGE]",
        "type": "IMAGE_JPEG"
      },
      "imageRedactionConfigs": [
        {
          "infoType": {
            "name": "US_SOCIAL_SECURITY_NUMBER"
          }
        },
        {
          "infoType": {
            "name": "EMAIL_ADDRESS"
          }
        },
        {
          "infoType": {
            "name": "PHONE_NUMBER"
          }
        }
      ]
    }
민감한 정보 보호는 다음을 반환합니다.
    {
      "redactedImage": "[BASE64-ENCODED-IMAGE]"
    }
base64로 인코딩된 이미지를 디코딩합니다.
결과 이미지가 다음과 같이 표시됩니다.

수정된 정보를 infoType별로 색상으로 분류하면 수정된 정보를 한 눈에 파악할 수 있습니다. 자세한 내용은 다음 섹션을 참조하세요.
색상 코딩을 사용하여 이미지에서 infoType 수정
수정된 정보를 infoType별로 색상으로 분류하려면 infoType 감지기를 RGB 색상 공간 값과 연결합니다.
이미지에서 수정된 infoType의 색상을 지정하려면 DLP API의 image.redact 메서드에 요청을 제출합니다. 요청에는 다음이 포함되어야 합니다.
- 이미지
- 1개 이상의 infoType 감지기(각각에 RGB 색상 공간 값을 사용하여 색상을 할당)
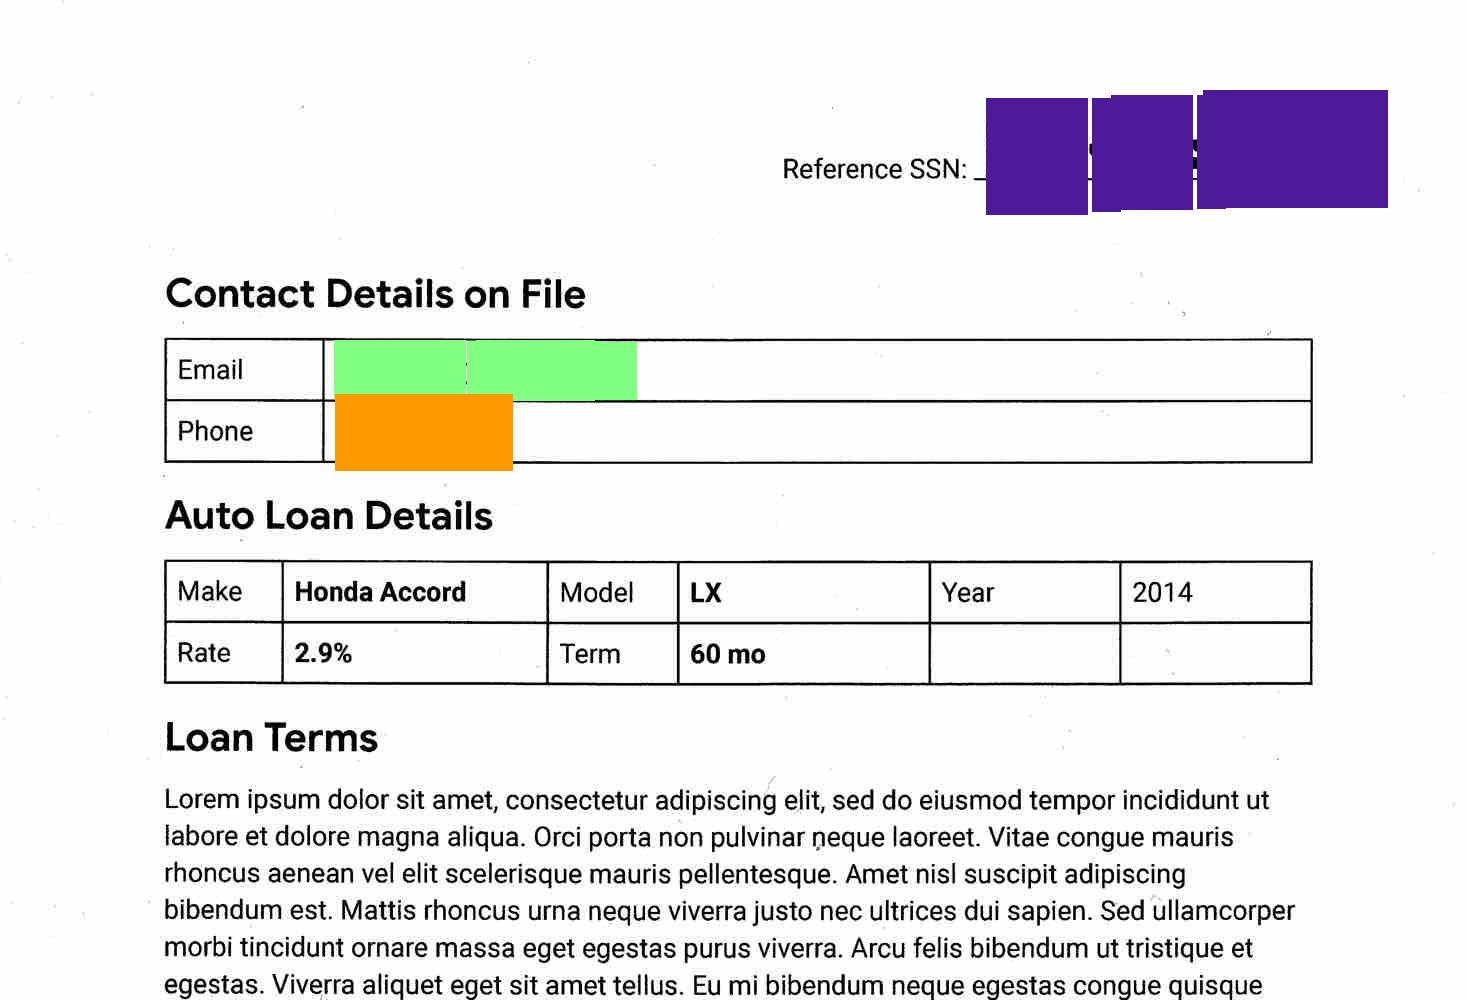
첫 번째 섹션의 원본 이미지를 다시 살펴보겠습니다. 주민등록번호는 자주색 상자, 이메일 주소는 녹색 상자, 전화번호는 주황색 상자로 수정하려면 다음 JSON을 DLP API의 image.redact 메서드에 제출합니다.
C#
Sensitive Data Protection의 클라이언트 라이브러리를 설치하고 사용하는 방법은 Sensitive Data Protection 클라이언트 라이브러리를 참조하세요.
Sensitive Data Protection에 인증하려면 애플리케이션 기본 사용자 인증 정보를 설정합니다. 자세한 내용은 로컬 개발 환경의 인증 설정을 참조하세요.
Go
Sensitive Data Protection의 클라이언트 라이브러리를 설치하고 사용하는 방법은 Sensitive Data Protection 클라이언트 라이브러리를 참조하세요.
Sensitive Data Protection에 인증하려면 애플리케이션 기본 사용자 인증 정보를 설정합니다. 자세한 내용은 로컬 개발 환경의 인증 설정을 참조하세요.
Java
Sensitive Data Protection의 클라이언트 라이브러리를 설치하고 사용하는 방법은 Sensitive Data Protection 클라이언트 라이브러리를 참조하세요.
Sensitive Data Protection에 인증하려면 애플리케이션 기본 사용자 인증 정보를 설정합니다. 자세한 내용은 로컬 개발 환경의 인증 설정을 참조하세요.
Node.js
Sensitive Data Protection의 클라이언트 라이브러리를 설치하고 사용하는 방법은 Sensitive Data Protection 클라이언트 라이브러리를 참조하세요.
Sensitive Data Protection에 인증하려면 애플리케이션 기본 사용자 인증 정보를 설정합니다. 자세한 내용은 로컬 개발 환경의 인증 설정을 참조하세요.
PHP
Sensitive Data Protection의 클라이언트 라이브러리를 설치하고 사용하는 방법은 Sensitive Data Protection 클라이언트 라이브러리를 참조하세요.
Sensitive Data Protection에 인증하려면 애플리케이션 기본 사용자 인증 정보를 설정합니다. 자세한 내용은 로컬 개발 환경의 인증 설정을 참조하세요.
Python
Sensitive Data Protection의 클라이언트 라이브러리를 설치하고 사용하는 방법은 Sensitive Data Protection 클라이언트 라이브러리를 참조하세요.
Sensitive Data Protection에 인증하려면 애플리케이션 기본 사용자 인증 정보를 설정합니다. 자세한 내용은 로컬 개발 환경의 인증 설정을 참조하세요.
REST
    {
      "byteItem": {
        "data": "[BASE64-ENCODED-IMAGE]",
        "type": "IMAGE_JPEG"
      },
      "imageRedactionConfigs": [
        {
          "infoType": {
            "name": "US_SOCIAL_SECURITY_NUMBER"
          },
          "redactionColor": {
            "red": 0.3,
            "green": 0.1,
            "blue": 0.6
          }
        },
        {
          "infoType": {
            "name": "EMAIL_ADDRESS"
          },
          "redactionColor": {
            "red": 0.5,
            "blue": 0.5,
            "green": 1
          }
        },
        {
          "infoType": {
            "name": "PHONE_NUMBER"
          },
          "redactionColor": {
            "red": 1,
            "blue": 0,
            "green": 0.6
          }
        }
      ]
    }
민감한 정보 보호는 다음을 반환합니다.
    {
      "redactedImage": "[BASE64-ENCODED-IMAGE]"
    }
base64로 인코딩된 이미지를 디코딩합니다.
결과 이미지가 다음과 같이 표시됩니다.
이미지에서 모든 텍스트 수정
민감한 정보 보호에는 이미지에서 감지된 모든 텍스트를 수정할 수 있는 옵션도 포함됩니다.
이미지에서 모든 텍스트를 수정하려면 DLP API의 image.redact 메서드에 요청을 제출합니다. 요청에는 다음이 포함되어야 합니다.
- 이미지
true로 설정된redactAllText옵션
첫 번째 섹션의 원본 이미지를 다시 살펴보겠습니다. 모든 텍스트를 수정하려면 다음 JSON을 DLP API의 image.redact 메서드로 보냅니다.
C#
Sensitive Data Protection의 클라이언트 라이브러리를 설치하고 사용하는 방법은 Sensitive Data Protection 클라이언트 라이브러리를 참조하세요.
Sensitive Data Protection에 인증하려면 애플리케이션 기본 사용자 인증 정보를 설정합니다. 자세한 내용은 로컬 개발 환경의 인증 설정을 참조하세요.
Go
Sensitive Data Protection의 클라이언트 라이브러리를 설치하고 사용하는 방법은 Sensitive Data Protection 클라이언트 라이브러리를 참조하세요.
Sensitive Data Protection에 인증하려면 애플리케이션 기본 사용자 인증 정보를 설정합니다. 자세한 내용은 로컬 개발 환경의 인증 설정을 참조하세요.
Java
Sensitive Data Protection의 클라이언트 라이브러리를 설치하고 사용하는 방법은 Sensitive Data Protection 클라이언트 라이브러리를 참조하세요.
Sensitive Data Protection에 인증하려면 애플리케이션 기본 사용자 인증 정보를 설정합니다. 자세한 내용은 로컬 개발 환경의 인증 설정을 참조하세요.
Node.js
Sensitive Data Protection의 클라이언트 라이브러리를 설치하고 사용하는 방법은 Sensitive Data Protection 클라이언트 라이브러리를 참조하세요.
Sensitive Data Protection에 인증하려면 애플리케이션 기본 사용자 인증 정보를 설정합니다. 자세한 내용은 로컬 개발 환경의 인증 설정을 참조하세요.
PHP
Sensitive Data Protection의 클라이언트 라이브러리를 설치하고 사용하는 방법은 Sensitive Data Protection 클라이언트 라이브러리를 참조하세요.
Sensitive Data Protection에 인증하려면 애플리케이션 기본 사용자 인증 정보를 설정합니다. 자세한 내용은 로컬 개발 환경의 인증 설정을 참조하세요.
Python
Sensitive Data Protection의 클라이언트 라이브러리를 설치하고 사용하는 방법은 Sensitive Data Protection 클라이언트 라이브러리를 참조하세요.
Sensitive Data Protection에 인증하려면 애플리케이션 기본 사용자 인증 정보를 설정합니다. 자세한 내용은 로컬 개발 환경의 인증 설정을 참조하세요.
REST
    {
      "byteItem": {
        "data": "[BASE64-ENCODED-IMAGE]",
        "type": "IMAGE_JPEG"
      },
      "imageRedactionConfigs": [
        {
          "redactAllText": true
        }
      ]
    }
민감한 정보 보호는 다음을 반환합니다.
    {
      "redactedImage": "[BASE64-ENCODED-IMAGE]"
    }
base64로 인코딩된 이미지를 디코딩합니다.
API는 제공된 것과 동일한 이미지를 반환하지만 기준에 따라 민감한 정보가 포함된 것으로 식별된 모든 텍스트는 수정됩니다.
결과 이미지가 다음과 같이 표시됩니다.
가능성 설정이 포함된 코드 예시
이 예시는 이미지에서 특정 infoType 수정과 비슷합니다. 또한 최소 가능성을 지정하는 방법을 보여줍니다.
C#
Sensitive Data Protection의 클라이언트 라이브러리를 설치하고 사용하는 방법은 Sensitive Data Protection 클라이언트 라이브러리를 참조하세요.
Sensitive Data Protection에 인증하려면 애플리케이션 기본 사용자 인증 정보를 설정합니다. 자세한 내용은 로컬 개발 환경의 인증 설정을 참조하세요.
Go
Sensitive Data Protection의 클라이언트 라이브러리를 설치하고 사용하는 방법은 Sensitive Data Protection 클라이언트 라이브러리를 참조하세요.
Sensitive Data Protection에 인증하려면 애플리케이션 기본 사용자 인증 정보를 설정합니다. 자세한 내용은 로컬 개발 환경의 인증 설정을 참조하세요.
Java
Sensitive Data Protection의 클라이언트 라이브러리를 설치하고 사용하는 방법은 Sensitive Data Protection 클라이언트 라이브러리를 참조하세요.
Sensitive Data Protection에 인증하려면 애플리케이션 기본 사용자 인증 정보를 설정합니다. 자세한 내용은 로컬 개발 환경의 인증 설정을 참조하세요.
Node.js
Sensitive Data Protection의 클라이언트 라이브러리를 설치하고 사용하는 방법은 Sensitive Data Protection 클라이언트 라이브러리를 참조하세요.
Sensitive Data Protection에 인증하려면 애플리케이션 기본 사용자 인증 정보를 설정합니다. 자세한 내용은 로컬 개발 환경의 인증 설정을 참조하세요.
PHP
Sensitive Data Protection의 클라이언트 라이브러리를 설치하고 사용하는 방법은 Sensitive Data Protection 클라이언트 라이브러리를 참조하세요.
Sensitive Data Protection에 인증하려면 애플리케이션 기본 사용자 인증 정보를 설정합니다. 자세한 내용은 로컬 개발 환경의 인증 설정을 참조하세요.
Python
Sensitive Data Protection의 클라이언트 라이브러리를 설치하고 사용하는 방법은 Sensitive Data Protection 클라이언트 라이브러리를 참조하세요.
Sensitive Data Protection에 인증하려면 애플리케이션 기본 사용자 인증 정보를 설정합니다. 자세한 내용은 로컬 개발 환경의 인증 설정을 참조하세요.
사용해 보기
image.redact의 참조 페이지에서 API 탐색기로 이 페이지의 각 예시를 직접 사용해 보거나 자체 이미지로 실험해 볼 수 있습니다.
다음 단계
- 이미지 검사 및 수정 자세히 알아보기
- 민감한 정보 보호로 민감한 정보 수정 Codelab 진행하기
- 이미지에서 민감한 정보를 검사하는 방법 알아보기
- 스토리지에서 익명화된 데이터 사본 만들기 자세히 알아보기