The Cloud Code for VS Code extension adds support for Google Cloud development to VS Code.
Before you begin
Before you install Cloud Code, confirm that the following tools are installed and set up on your system:
- Install and set up Visual Studio Code on your machine.
Install and configure language support.
The Cloud Code extension works best with the following languages:
Install Git. Git is required for copying samples to your machine.
Install the Docker client and add it to the
PATHenvironment variable:- If you're building exclusively using Cloud Build or Jib, you can skip installing Docker.
- If you're using WSL but can't install Docker for Desktop, use minikube instead for local development with Cloud Code.
If you're using Google Cloud, create a Google Cloud project and then enable billing.
Projects allow you to collect the related resources for a single application in one place, manage APIs, enable Google Cloud services, add and remove collaborators, and manage permissions for Google Cloud resources.
Install Cloud Code
Install the Google Cloud Code extension from the Visual Studio Code Marketplace.
Alternatively, open the Extensions view in VS Code:
Click
 Extensions or press
 Ctrl/Cmd+Shift+X.Search for
Google Cloud Code.
Click Install.
If prompted, restart VS Code.
After the extension has successfully installed, the Cloud Code icon is added to the activity bar and ready for use. You can further configure your Cloud Code installation by specifying your preferences using the top-level application taskbar: navigate to Code > Settings > Settings > Extensions and search for
Gemini Code Assist + Google Cloud Code.
Custom versions of dependencies
By default, Cloud Code has Auto dependencies turned on and installs some command-line dependencies for you automatically. If you turn off auto dependencies, you can use custom versions of the dependencies but you must install the dependencies yourself for Cloud Code to work.
To use custom versions of Cloud Code dependencies:
Click settings Manage > Settings and then set Auto Dependencies (
cloudcode.autoDependencies) tooff.Install the following dependencies on your
PATH:
Install the Google Cloud CLI
The first time you use a feature that requires the gcloud CLI, you're given the option to learn how to install the CLI from your IDE, use an existing installation, or continue with managed dependencies. If you prefer to install the gcloud CLI manually, see Install the gcloud CLI.
Optional: Verify Cloud Code vsix using VsixSignTool
To verify the Cloud Code vsix with the VsixSignTool, perform the following steps:
Ensure you're using the following:
- Nuget package manager
- Windows OS
- A production release of Cloud Code
Install the Microsoft VsixSignTool and take note of the installation path.
Open VS Code and navigate to
Extensions > Cloud Code.In the Details tab, under Extension Resources, click Marketplace.
On the Marketplace page in your browser, under Resources, click Download Extension to download the packaged version of Cloud Code. This downloads the packaged version of Cloud Code, which has a
.vsixfile extension, to your default download directory.If you'd prefer to verify a different version than the latest, click the Version History tab and select a different version to download.
When the download is complete, open a terminal window and run the following:
PATH_TO_VSIXSIGNTOOL verify PATH_TO_DOWNLOADED_VSIXConfirm that the output matches the following:
VsixSignTool Success: Package PATH_TO_DOWNLOADED_VSIX is valid.
Authenticate credentials for Google Cloud
To help with application development with Google Cloud APIs, when you sign in to the gcloud CLI, your Application Default Credentials are updated.
Sign in to Google Cloud
If you aren't signed in to Google Cloud, follow these steps to sign in:
- In the Cloud Code status bar, click Cloud Code - Sign in.
If this is your first time connecting to Google Cloud in your IDE, you're prompted to add
https://accounts.google.comto Trusted Domain. Click Configure Trusted Domains in the dialog that appears: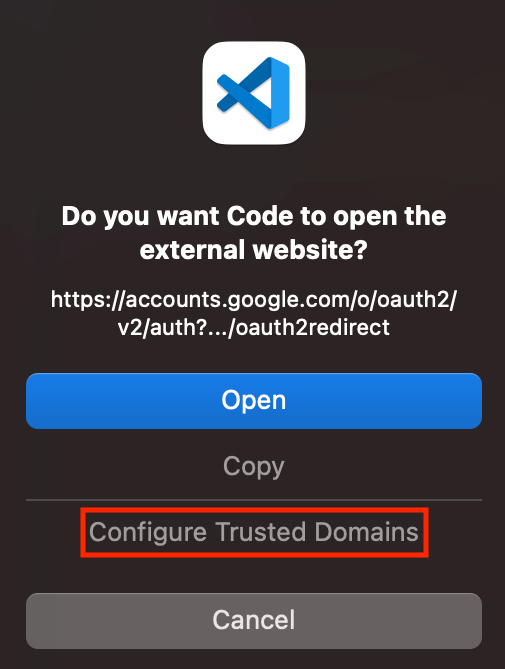
Follow the prompts to sign in using your web browser.
When prompted to allow Cloud Code to access your Google Account, click Allow.
Known issue: Edge browser redirects to HTTPS on authentication callback
When using the Microsoft Edge browser to authenticate your credentials, you may
notice that the Edge browser redirects the URL http://localhost:3000 to
https://localhost:3000. This leads to the following failure message:
The connection for this site is not secure. localhost sent an invalid response.
Try running Windows Network Diagnostics. ERR_SSL_PROTOCOL_ERROR.
To solve this problem, you can exclude localhost from the redirection:
In the address bar of your Edge browser, enter
edge://net-internals/#hsts.Go to the Delete domain security policies section.
Enter
localhost, then click Delete.
Log out of Google Cloud
- Click
 Cloud Code and then expand
Help and Feedback.
Cloud Code and then expand
Help and Feedback. - Click Sign Out of Google Cloud and when prompted, select Sign-out.
- Alternatively, you can log out using the Command Palette. Press
Ctrl/Cmd+Shift+Por click View > Command Palette, and then click Sign out of all accounts in Google Cloud SDK.
Change the active Google Cloud project
In the Cloud Code status bar, click the active project name.

In the Quick Pick menu that appears, select sync_alt Switch Project.
Select a project or enter keywords in the search bar to filter projects.
Authenticate credentials for debugging applications locally
In addition to the authentication steps in the Sign in to Google Cloud section, you'll need to authenticate your credentials to debug an application locally in your IDE that makes Google API calls.
If you don't authenticate your credentials for debugging applications, an error message appears in your IDE when you attempt to run/debug a local application that tries to make a call to a Google API.
To authenticate your credentials for debugging applications locally, perform the following steps:
Install gcloud to your machine if you haven't already done so.
Run the following command:
gcloud auth application-default loginWhen you've finished debugging locally, you can sign out by running the following command:
gcloud auth application-default revoke
To learn more about Application Default Credentials and Google APIs, see Authenticate to Cloud services using client libraries.