IntelliJ용 Cloud Code를 사용하여 Kubernetes 앱 배포
이 페이지에서는 Cloud Code를 시작하는 방법을 보여줍니다.
이 빠른 시작에서는 시작 Hello World 템플릿을 사용하여 새 Kubernetes 애플리케이션 설정, 선택한 클러스터에서 앱 실행, 앱을 반복적으로 개발할 수 있도록 꾸준히 재빌드 촉진, 실행 중인 코드 디버깅 수행, 라이브 애플리케이션에서 로그 스트리밍을 쉽게 확인할 수 있습니다.
시작하기 전에
Google Cloud를 사용하려면 Google Cloud 프로젝트를 만들거나 선택하고 프로젝트에 결제를 사용 설정해야 합니다.
또는 다른 Cloud Platform에서 호스팅되는 클러스터 또는 로컬 Kubernetes 클러스터를 minikube 및 Docker Desktop과 같은 도구와 함께 사용할 수 있습니다.
Cloud Code가 샘플 클론과 같은 Git 작업을 수행할 수 있도록 Git을 설치합니다.
아직 설치하지 않은 경우 Cloud Code 플러그인을 설치합니다.
애플리케이션 만들기
Cloud Code에는 빠른 시작을 위한 코드 샘플 템플릿 모음이 포함되어 있습니다. 기존 샘플을 사용하여 새 애플리케이션을 만들려면 다음 단계를 따르세요.
IDE에서 File(파일) > New Project(새 프로젝트)를 열고 Cloud Code: Kubernetes를 선택합니다.
시작 애플리케이션 목록에서 Hello World 템플릿을 선택합니다.
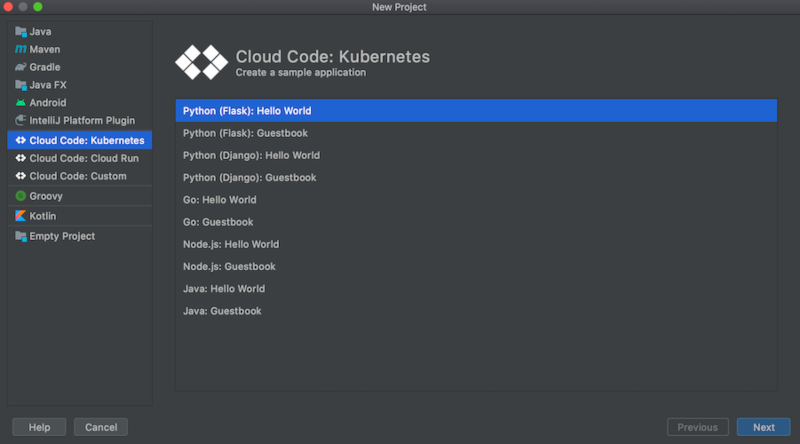
프로젝트 이름을 선택합니다.
마침을 클릭하면 Cloud Code에서 선택한 템플릿을 클론하여 사용할 새로 만든 프로젝트를 엽니다.
자바 템플릿의 경우 필요한 Maven 프로젝트를 가져와서 pom.xml을 동기화하라는 메시지가 표시됩니다. Add as Maven project(Maven 프로젝트로 추가)를 클릭한 다음 Import Changes(변경사항 가져오기)를 클릭합니다.
클러스터 선택
애플리케이션을 개발하려면 Minikube에서 로컬로 호스팅되거나 Google Kubernetes Engine 클러스터와 같은 클라우드 플랫폼을 사용하는 연결된 Kubernetes 클러스터가 필요합니다.
로컬 클러스터
이 빠른 시작에서 사용할 클러스터가 없는 경우 Cloud Code 관리형 로컬 Minikube 클러스터로 애플리케이션을 실행할 수 있습니다. Cloud Code는 애플리케이션 실행을 위해 Minikube 클러스터를 시작하고, 배포가 중지되면 클러스터를 중지합니다. Minikube 클러스터가 이미 실행 중인 경우, Cloud Code는 배포를 위해 기존 Minikube 클러스터를 재사용합니다.
다음 단계인 애플리케이션 개발에서 배포 환경설정으로 설정하여 이 Cloud Code 관리형 Minikube 클러스터를 사용할 수 있습니다.
클라우드 플랫폼 기반 클러스터
kubectl과 같이 이 빠른 시작에 사용할 수 있는 Kubernetes 도구를 사용하도록 구성된 클러스터가 이미 있으면 Cloud Code가 이를 자동으로 배포합니다. 애플리케이션 개발로 이동하여 원하는 클러스터가 현재 컨텍스트로 설정되었는지 확인할 수 있습니다.
그렇지 않으면 해당 클라우드 플랫폼의 특정 안내에 따라 만들 수 있습니다. GKE의 경우 클러스터 만들기 가이드를 따를 수 있습니다.
애플리케이션 개발
Kubernetes에서 애플리케이션 개발을 시작하려면 다음 안내를 따릅니다.
Cloud Platform에서 호스팅된 클러스터에서 실행 중인 경우 Kubernetes에서 개발에 대한 컨테이너 이미지가 저장되는 위치를 정의했는지 확인합니다.
IDE에서 Google Cloud 에 로그인하고 기본 프로젝트가 정의된 경우 Cloud Code는 자동으로 기본 컨테이너 이미지 저장소({project_id}가 기본 프로젝트를 참조하는 경우 gcr.io/{project_id})를 사용합니다.
원하는 Kubernetes 컨텍스트가 설정되었는지 확인합니다. 이는 실행 탭 및 배포 환경설정 섹션에 있는 Develop on Kubernetes 구성에서 지정할 수 있습니다(실행 > 구성 수정 > Develop on Kubernetes를 통해 액세스 가능).
현재 컨텍스트(기본값), Minikube 클러스터에 로컬로, 또는 사용 가능한 다른 컨텍스트에 배포하도록 선택할 수 있습니다.
기본적으로 Kubernetes 애플리케이션은 주문형으로 선택된 주문형 모드에서 실행됩니다. 원하는 경우 파일 저장 시 옵션을 대신 선택할 수 있습니다.
탐색 메뉴의 실행/디버그 구성 선택기에서 Kubernetes에서 개발 실행 대상을 선택합니다.

이렇게 하면 모든 코드 변경사항이 자동으로 새 버전의 애플리케이션에 빌드, 푸시, 배포됩니다.
Kubernetes 클러스터에서 개발 주기를 시작하려면 Kubernetes에서 개발
출력 창의 로그 탭에서 수신되는 애플리케이션 로그를 확인합니다.
배포가 시작되면 배포된 애플리케이션에 전달된 포트 목록이 표시됩니다.
배포가 성공하면 새로운 서비스 URL을 사용할 수 있다는 알림이 표시됩니다. 서비스 URL 탭을 클릭하여 URL을 확인한 후 URL 링크를 클릭하여 실행 중인 애플리케이션으로 브라우저를 엽니다.
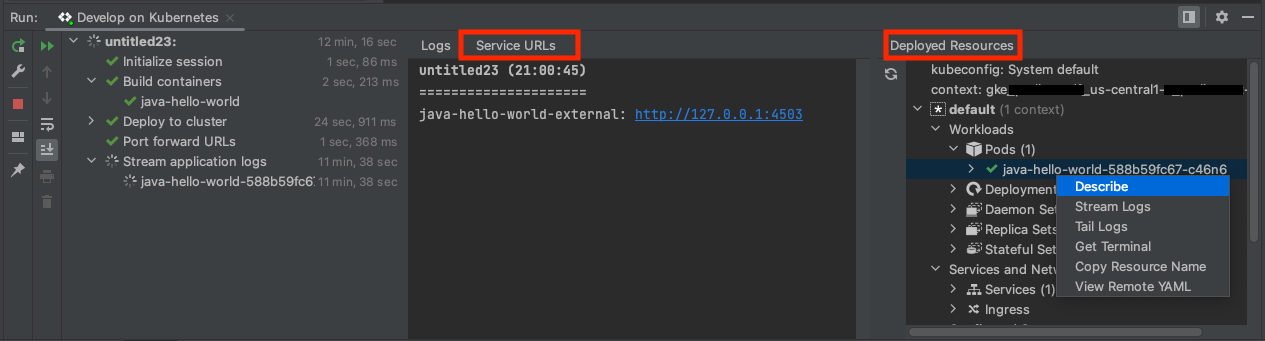
또는 이벤트 로그를 연 후 링크를 클릭하여 실행 중인 애플리케이션으로 브라우저를 열 수 있습니다.
배포된 리소스 창에는 개발 세션 중에 배포한 항목이 표시됩니다.
애플리케이션 디버깅
Cloud Code는 디버깅 중 변경사항 적용을 지원합니다.
애플리케이션을 디버깅하는 방법은 다음과 같습니다.
Develop on Kubernetes를 위한 디버그 작업
 을 클릭하여 Kubernetes 클러스터의 디버그 모드에서 개발 주기를 시작합니다.
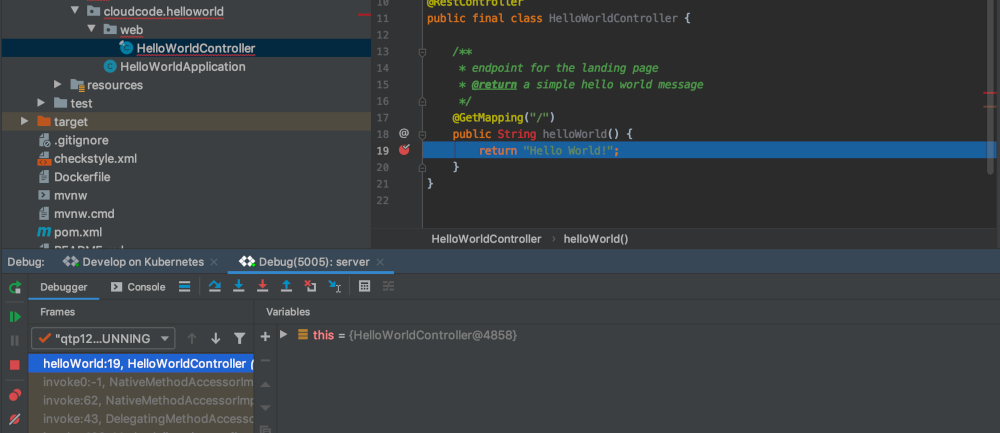
Cloud Code에서 디버그 세션을 연결합니다. 성공하면 디버그 도구 창이 열리고 콘솔 탭에서 연결을 확인합니다.
이제 라이브 Kubernetes 클러스터를 디버깅할 수 있습니다.
중단점을 추가하려는 코드의 실행줄에서 여백을 클릭합니다.
붉은색으로 채워진 원은 활성 중단점을 나타내며 윤곽선이 붉고 가운데가 빈 원은 사용하지 않는 중단점을 나타냅니다.
애플리케이션에 새 요청을 보내면 원하는 행에서 일시중지됩니다.
디버깅 세션을 종료하려면
Develop on Kubernetes실행 구성의 중지 아이콘을 클릭합니다.
로그 보기
애플리케이션을 개발하고 실행하는 동안 터미널 출력에서 실행 중인 pod의 실시간 로그 스트림을 보는 것 외에 Kubernetes 탐색기로 이동하여 특정 pod의 로그를 볼 수 있습니다.
특정 포드의 로그를 보려면 다음 단계를 따릅니다.
Kubernetes 탐색기로 이동합니다. 오른쪽 측면 패널에서 또는 Tools(도구) > Cloud Code > Kubernetes > View Cluster Explorer(클러스터 탐색기 보기)를 사용해 액세스할 수 있습니다.
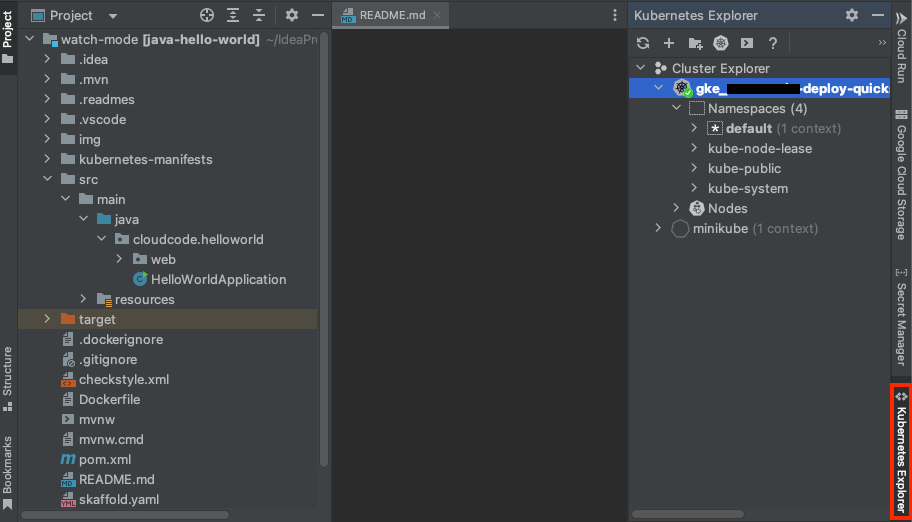
로그를 보려는 포드를 선택합니다.
포드를 마우스 오른쪽 버튼으로 클릭한 다음 스트림 로그를 선택합니다. 또는 포드에서 실행되는 개별 컨테이너의 로그를 스트리밍할 수 있습니다.
그러면 Kubernetes 탐색기 콘솔에 로그가 출력됩니다.

삭제
이 페이지에서 사용한 리소스 비용이 Google Cloud 계정에 청구되지 않도록 하려면 다음 단계를 수행합니다.
콘솔의 프로젝트 페이지로 이동합니다. Google Cloud
이 빠른 시작에서 만든 프로젝트를 선택하고 옆의 휴지통 아이콘을 클릭하여 삭제합니다.
그러면 프로젝트가 종료되고 삭제 일정이 예약됩니다.
다음 단계
- 기존 애플리케이션(Kubernetes 또는 App Engine 앱)을 IDE로 가져와서 Cloud Code 설정하기
- Kubernetes 애플리케이션 개발에 대해 자세히 살펴보기
- Cloud Code의 YAML 수정 지원을 통해 고급 Google Cloud 및 Kubernetes 구성을 처리하기
- Kubernetes 리소스를 더 잘 파악하고 관리하려면 Kubernetes 탐색기를 사용하세요.
- ARM64, AMD64 또는 혼합 아키텍처 GKE 클러스터에 애플리케이션 배포하기
- Cloud Code로 App Engine 앱을 생성, 실행, 디버그, 배포하기
- IDE에서 편리하게 Cloud API 및 클라이언트 라이브러리를 관리하기
- IDE 내에서 Cloud Storage 콘텐츠를 탐색하기
- Cloud Code를 사용하는 Cloud Source Repositories에서 새 프로젝트를 추가하고 기존 프로젝트 확인하기